
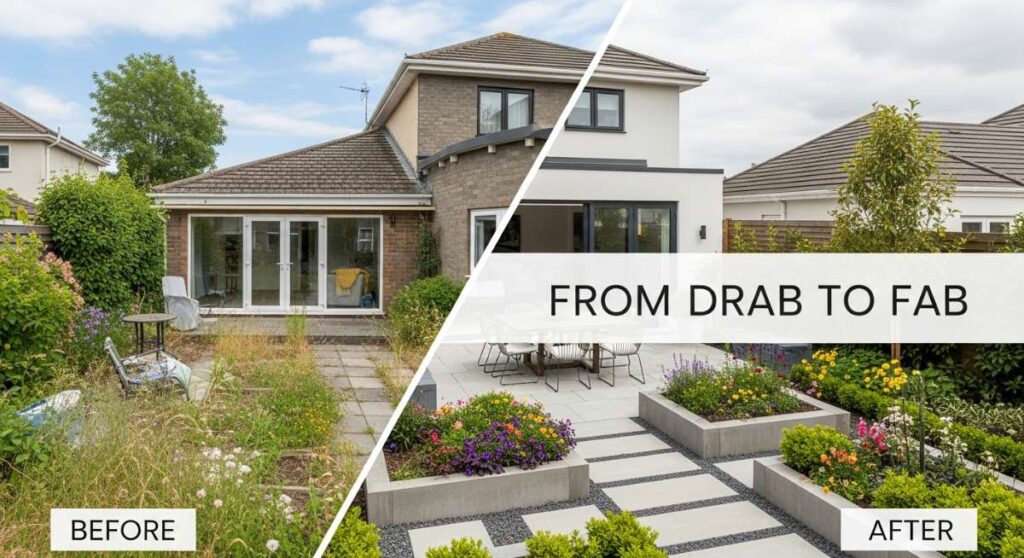
Have you ever looked out your back window at a patch of brown grass and felt a pang of disappointment, or pulled into your driveway only to wish your front yard felt more like a sanctuary and less like a chore? We’ve all been there. The dream of a lush, vibrant outdoor space often feels miles away from the reality of our busy schedules and limited budgets. But lately, I’ve been scrolling through some of the most breathtaking viral transformations that prove you don’t need a professional landscaping crew or a hidden chest of gold to turn ‘drab’ into ‘fab.’
There is something deeply soulful about getting your hands in the dirt and watching a vision come to life. Whether it’s the way the morning light hits a perfectly styled patio table or the scent of blooming jasmine as you walk up your front path, these changes do more than just add value to your home—they add joy to your everyday life. Today, I’m sharing some of the most inspiring DIYs that have taken the internet by storm, ranging from low-maintenance garden hacks to creative indoor studio spaces that fuel the imagination.
Grab a glass of iced tea, find a cozy spot, and let’s dive into these transformations. From the tactile satisfaction of building your own furniture to the visual poetry of a well-planted flower bed, these projects are designed to be approachable, affordable, and absolutely stunning. Let’s get growing!
How to Design Low Maintenance Flower Beds for Effortless Curb Appeal
Why we love this
We love this because it honors the desire for beauty without demanding every single weekend for upkeep. Imagine stepping onto your porch and being greeted by the soft, silvery foliage of lamb’s ear and the structural elegance of perennial grasses, all swaying gently in the breeze. There’s a deep, earthy aroma of fresh cedar mulch that keeps the weeds at bay, allowing you to simply enjoy the sight of purple coneflowers nodding their heads in the sun. It feels like a permanent vacation spot right in your front yard, where the textures are varied and the stress is non-existent.
Essential Elements:
- Woven landscape fabric or cardboard for weed suppression.
- Hardy perennial plants (like Lavender, Hostas, or Sedum).
- High-quality cedar or hemlock mulch.
- Natural stone or metal edging for clean borders.
- Slow-release organic fertilizer granules.
How to make it
- Begin by marking out the shape of your bed using a garden hose or spray paint to create fluid, organic curves that lead the eye naturally.
- Remove the existing grass using a sharp spade, or use the ‘no-dig’ method by laying down thick layers of corrugated cardboard to smother weeds.
- Amend your soil with 2-3 inches of organic compost, tilling it in slightly to ensure your perennials have a nutrient-rich foundation.
- Position your plants while they are still in their pots to check the spacing; place taller structural plants in the back and shorter groundcovers at the front.
- Dig holes twice as wide as the root ball, gently tease the roots, and plant them at the same depth they were in the nursery container.
- Install your edging material—stone or metal—to create a crisp line between the lawn and the bed, preventing grass from creeping in.
- Spread a 3-inch layer of mulch across the entire bed, being careful not to pile it directly against the stems of the plants, which can cause rot.
- Water deeply immediately after planting to settle the soil around the roots and eliminate air pockets.
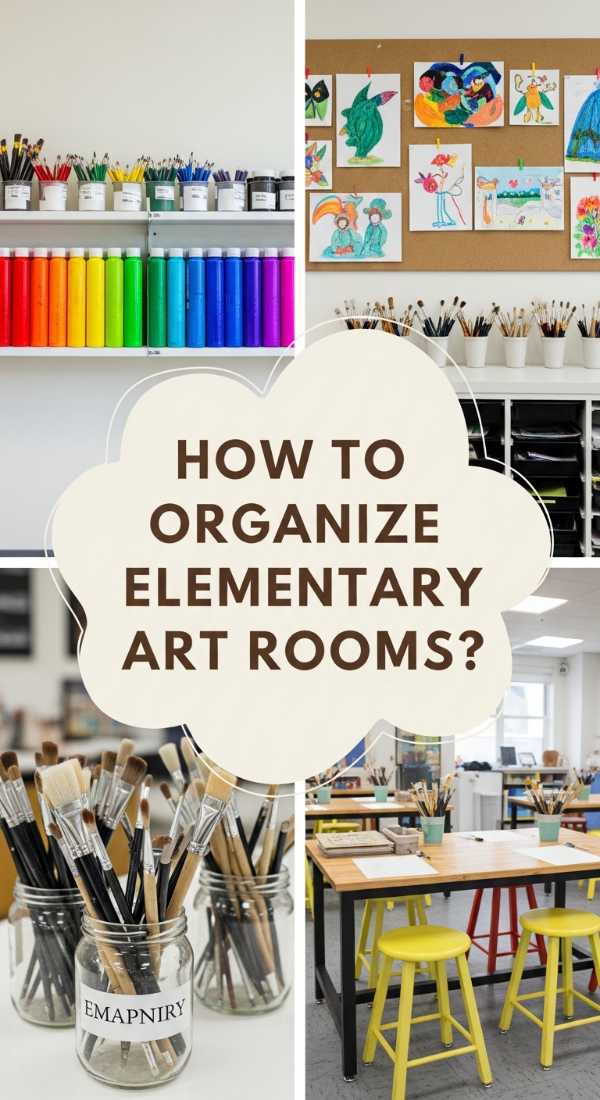
How to Organize Elementary Art Rooms for Maximum Creative Spark

Why we love this
This transformation is all about the electricity of inspiration that comes from a perfectly curated creative space. Imagine a room where the air smells faintly of beeswax crayons and fresh paper, and every color of the rainbow is displayed in clear, gleaming canisters. The tactile joy of running your hands over smooth wooden brushes and seeing jars of vibrant tempera paint lined up like soldiers makes even the smallest artist feel like a master. It’s a sensory playground where the organization isn’t just about neatness—it’s about removing the barriers to imagination.
Essential Elements:
- Clear, stackable acrylic bins for visibility.
- Color-coded rolling carts for mobile supplies.
- Pegboards with hooks for hanging scissors and palettes.
- Label maker with bold, easy-to-read fonts.
- Wall-mounted drying racks for wet masterpieces.
How to make it
- Sort every single supply by category (dry media, wet media, paper, etc.) and discard any dried-up markers or broken tools to clear the mental clutter.
- Utilize vertical space by installing pegboards at a height accessible to children, ensuring that frequently used items like aprons and scissors are within easy reach.
- Group supplies by color; placing all red pencils, markers, and crayons together creates a visually soothing environment that helps kids find what they need instantly.
- Label every bin with both words and a small icon or picture, which empowers younger students who are still learning to read to take ownership of the cleanup.
- Set up a ‘rotation station’ on a rolling cart where you keep the specific materials for the current week’s project, allowing you to wheel it to the center of the room.
- Create a dedicated ‘Inspiration Zone’ with a corkboard or magnetic strip to display student work and professional art prints at eye level.
How to Build Budget Friendly Grill Stations for Summer Entertaining

Why we love this
There is nothing quite like the sizzle of a steak hitting a hot grate, and having a dedicated station makes that experience feel like a five-star outdoor kitchen. We love this because it combines the rustic charm of stained wood with the industrial cool of a concrete or granite-topped prep surface. The aroma of smoky charcoal and grilled vegetables hangs in the air as you effortlessly reach for your tongs from a sleek hook. It turns the act of cooking into a social event, where friends can lean against the counter with a cold drink while the chef works their magic.
Essential Elements:
- Heat-treated wooden pallets or 4×4 pressure-treated posts.
- Exterior-grade screws and heavy-duty brackets.
- Concrete paver stones for a fire-safe countertop.
- Stainless steel hooks for utensils.
- Weather-resistant wood stain or sealant.
How to make it
- Measure your grill’s dimensions and design a U-shaped or L-shaped frame that allows for at least 18 inches of clearance on either side for prep space.
- Construct the frame using pressure-treated 4×4 posts for the legs and 2x4s for the horizontal supports, ensuring everything is perfectly level using a 4-foot spirit level.
- Apply a generous coat of exterior-grade stain or ‘spar urethane’ to protect the wood from UV rays and moisture, allowing it to dry for 24 hours.
- For the countertop, lay down a piece of cement board over your wooden frame and then adhere large, flat concrete pavers using exterior construction adhesive.
- Install a heavy-duty bottle opener on the side and a series of S-hooks along a metal rail to keep your spatulas and grill brushes organized.
- If you have a charcoal grill, build a small ‘cubby’ in the lower section of the frame to keep your bag of briquettes dry and off the ground.
How to Create Front House Flower Beds for a Welcoming Entrance
Why we love this
This is the ultimate ‘welcome home’ hug for your house. We love how a well-designed front bed uses a palette of textures—the velvety leaves of Dusty Miller, the glossy sheen of Boxwoods, and the delicate, papery petals of Hydrangeas—to create a multi-dimensional masterpiece. When you walk up the path, the soft scent of blooming Gardenias or Roses catches the breeze, instantly lowering your heart rate. It transforms a house from just a building into a home with personality and soul, making every arrival feel like a special occasion.
Essential Elements:
- A mix of ‘Thriller, Filler, and Spiller’ plants for height and depth.
- High-contrast mulch (like dark chocolate brown or black).
- Solar-powered path lights for evening ambiance.
- Evergreen shrubs for year-round structure.
- Decorative boulders or garden gnomes for focal points.
How to make it
- Analyze the sunlight of your front yard for a full day; choose ‘Full Sun’ plants for south-facing beds and ‘Shade’ plants for those tucked under eaves or trees.
- Layer your planting: start with evergreen shrubs (like Boxwood or Yew) against the foundation to provide a green backdrop during winter months.
- Add middle-height perennials like Peonies or Salvia that will bloom at different times of the year, ensuring there is always a pop of color.
- Incorporate ‘spillers’ like Creeping Jenny or Lobelia along the edges of the bed to soften the transition between the dirt and the walkway.
- Use a garden edger to cut a sharp, 4-inch deep trench between the grass and the bed to prevent roots from migrating and to give a professional finish.
- Add a layer of high-quality topsoil mixed with peat moss to improve drainage, especially near the foundation where soil can be compacted.
- Finish by tucking in a few solar lights to highlight the textures of the plants at night, creating a glowing, magical entrance.
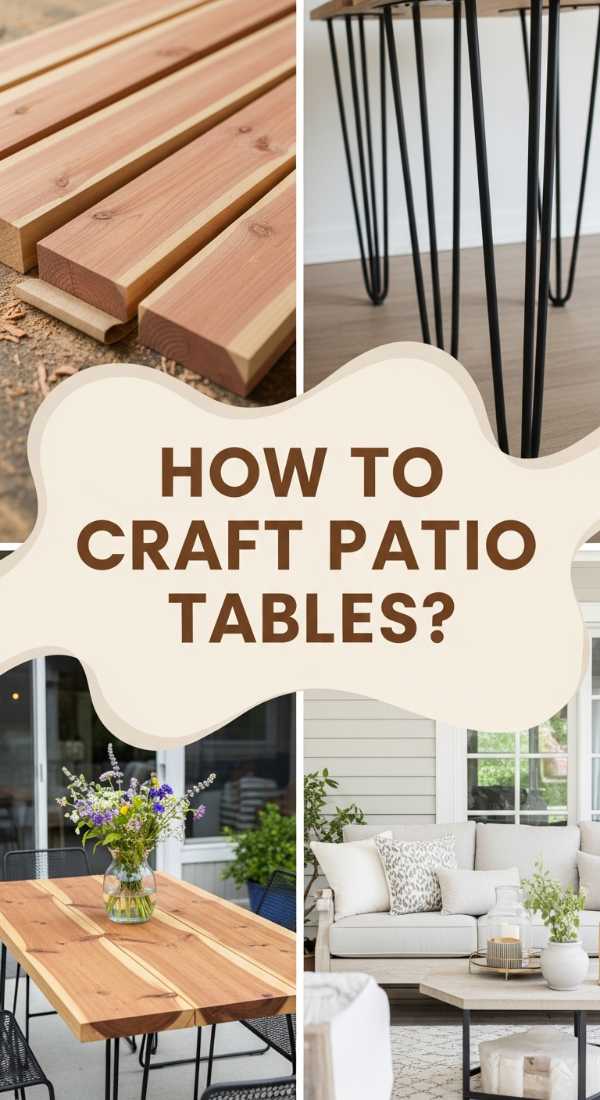
How to Craft Handmade Patio Tables for Cozy Outdoor Dining
Why we love this
There’s a unique pride in resting your elbows on a table you built with your own two hands. We love the warmth of real wood—the way it feels smooth and solid under your fingers and the beautiful, unique grain patterns that tell a story. Imagine a long, farmhouse-style table set with linen napkins and a ceramic pitcher of lemonade, the wood glowing in the golden hour light. It’s the heart of the backyard, a place where stories are told and laughter lingers long after the sun goes down.
Essential Elements:
- Cedar or Redwood planks (naturally rot-resistant).
- Kreg Jig for hidden pocket-hole joinery.
- Exterior-grade wood glue.
- Orbital sander with 80, 120, and 220 grit sandpaper.
- Heavy-duty metal X-frame legs or wooden 4×4 legs.
How to make it
- Select your lumber carefully, choosing boards that are straight and free of large cracks or ‘cups’ that will make the tabletop uneven.
- Cut your planks to length, typically 6 to 8 feet for a standard dining table, and use a Kreg Jig to drill pocket holes on the underside of the boards.
- Apply a thin bead of waterproof wood glue along the edges of the planks, then clamp them tightly together and drive in your pocket-hole screws.
- Sand the surface starting with 80-grit to level out any bumps, then move to 120 and finally 220 for a buttery-smooth finish that won’t snag clothing.
- Build or attach your legs; if using wood, create a sturdy ‘apron’ (a frame under the tabletop) to prevent the table from wobbling over time.
- Seal the wood with a high-quality outdoor oil or sealer (like Tung oil or a deck sealer) to protect it from rain and spills while highlighting the natural grain.
- Add felt pads or adjustable feet to the bottom of the legs to ensure the table sits level on your patio surface.
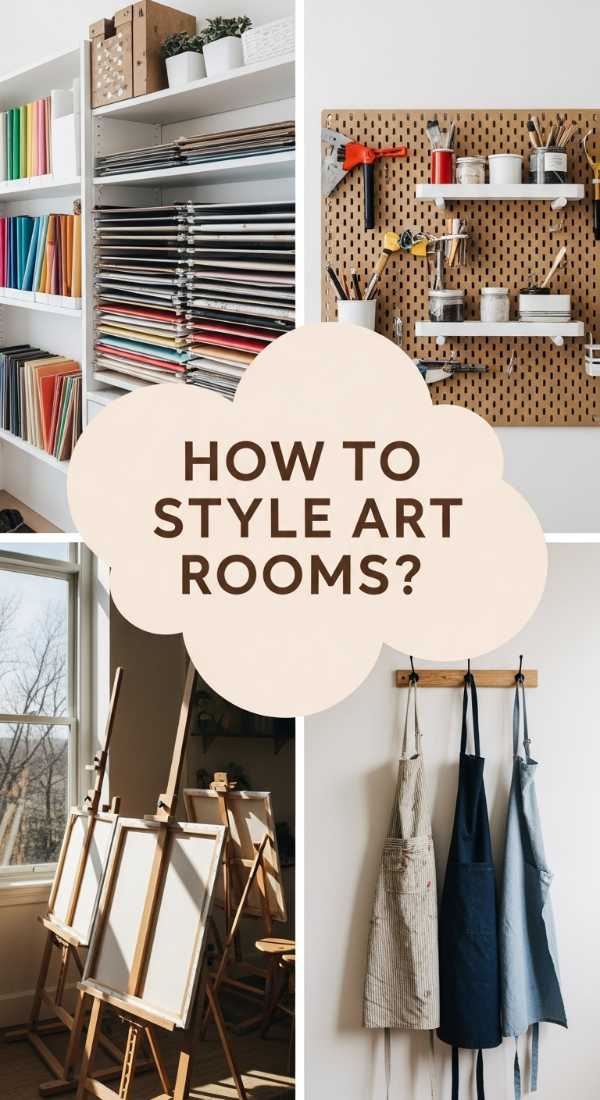
How to Style Inspiring School Studio Spaces for Young Artists

Why we love this
A school studio should feel like a sanctuary where ‘mistakes’ are just happy accidents. We love this because it uses light and layout to spark curiosity. Imagine a corner flooded with natural light, where a tall easel waits with a fresh canvas and the floor is protected by a paint-splattered drop cloth that carries the history of a hundred projects. The atmosphere is quiet but charged with potential, smelling of linseed oil and graphite, making every student feel like their voice and their vision truly matter.
Essential Elements:
- Adjustable easels or drafting tables.
- Natural spectrum LED lighting to mimic daylight.
- A ‘gallery wall’ with wire and clips to display work.
- Comfortable, ergonomic stools for long creative sessions.
- Mobile storage towers for personal art portfolios.
How to make it
- Maximize natural light by placing worktables near windows, or install ‘daylight’ bulbs (5000K-6000K) to ensure colors are seen accurately during the dark winter months.
- Create ‘zones’ within the studio: a messy zone for painting and clay, a dry zone for drawing and digital work, and a quiet zone for brainstorming and sketching.
- Install a wire hanging system across one wall; this allows students to quickly clip up their work to dry and creates an ever-changing mural of their progress.
- Provide a dedicated ‘still life’ station with a spotlight and a collection of interesting objects (vases, skulls, fruit) to encourage observational drawing.
- Use industrial-style metal shelving to store heavy clay or stone supplies, keeping the space looking organized but professional.
- Ensure there is a large, deep sink available for cleaning brushes, equipped with a sediment trap to prevent paint and clay from clogging the pipes.
How to Plant Easy Care Gardens for Year Round Beauty

Why we love this
The magic of an easy-care garden is that it works for you, rather than you working for it. We love the ‘set it and forget it’ nature of using native plants and evergreens that provide a lush, green backdrop even in the depths of winter. Picture the deep emerald of Holly bushes dusted with snow, followed by the explosion of yellow Forsythia in the spring—all without you needing to lift a finger. It’s about creating a living tapestry that matures and gets more beautiful with each passing year, providing a consistent sense of peace.
Essential Elements:
- Native plants adapted to your specific climate zone.
- Slow-growing evergreens (like Dwarf Alberta Spruce).
- Automatic drip irrigation system with a timer.
- Self-seeding annuals for effortless color.
- A thick layer of organic compost applied annually.
How to make it
- Research your USDA Hardiness Zone and select plants that are indigenous to your area; these will naturally resist local pests and require less water.
- Group plants with similar water and light needs together (hydro-zoning) so you don’t overwater the succulents or underwater the ferns.
- Install a simple drip irrigation kit connected to an outdoor faucet timer; this delivers water directly to the roots, reducing evaporation and preventing leaf diseases.
- Incorporate ‘hardscaping’ elements like large river rocks or gravel paths, which reduce the amount of plantable space you need to maintain while adding visual interest.
- Plant in ‘drifts’ or large groups of the same species; this looks more intentional and makes it much easier to prune or deadhead everything at once.
- Use a slow-release fertilizer in early spring to give the garden a single ‘boost’ that lasts throughout the entire growing season.
How to Construct Affordable Outdoor Cooking Zones for Family Barbecues
Why we love this
This is the ultimate gathering spot, the place where memories are marinated and grilled to perfection. We love the rugged, functional beauty of a DIY cooking zone that uses simple materials like cinder blocks or reclaimed brick. There is a primal joy in cooking over fire, surrounded by the laughter of family and the cool evening air. The station provides a dedicated space for the ‘Grill Master’ to spread out, with plenty of room for platters of corn on the cob and bowls of pasta salad, making the whole process feel seamless and celebratory.
Essential Elements:
- Concrete blocks (Cinder blocks) for a sturdy base.
- Stone veneer or exterior paint to finish the blocks.
- A large, food-safe wooden or stone prep surface.
- A heavy-duty outdoor umbrella or pergola for shade.
- Integrated bins for charcoal and wood storage.
How to make it
- Level the ground where you plan to build, using a layer of crushed gravel or sand to create a stable foundation that won’t shift with the frost.
- Dry-stack your cinder blocks to test the layout, ensuring the height is comfortable for cooking (usually 36 inches, similar to indoor counters).
- Bond the blocks together using ‘bead’ masonry adhesive, which is much easier for beginners than traditional mortar and just as strong for this application.
- Cover the raw blocks with a stone veneer peel-and-stick product or a thick coat of exterior stucco for a high-end, finished look.
- Secure a countertop of your choice; a piece of polished granite from a local ‘remnant’ yard is often very affordable and completely heat-proof.
- Leave an open ‘bay’ in the block structure to slide your existing rolling grill into, creating a built-in look without the cost of a custom drop-in unit.
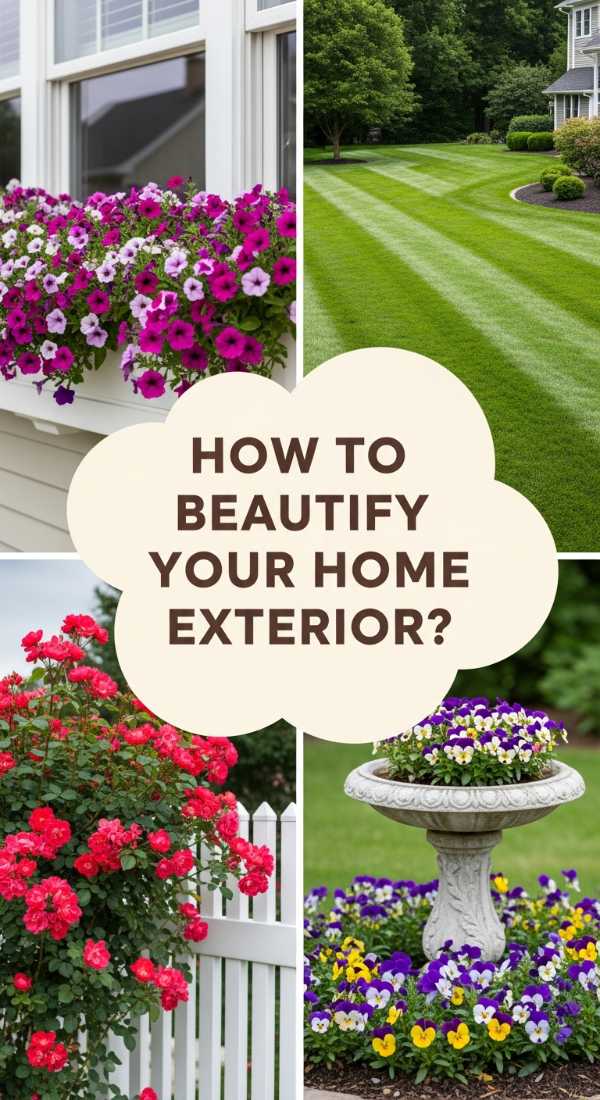
How to Beautify Your Home Exterior with Simple Floral Landscaping
Why we love this
Sometimes the most impactful changes are the simplest ones. We love how a few strategically placed window boxes and colorful pots can completely change the ‘vibe’ of a house. Imagine walking up to a front door framed by oversized terracotta pots overflowing with vibrant pink Petunias and lime-green Sweet Potato Vine. The colors pop against the siding, and the air is filled with the sweet, honey-like scent of Alyssum. It’s a quick-win project that provides instant gratification and a huge boost in curb appeal.
Essential Elements:
- Coordinating planters in various sizes.
- High-quality potting mix with moisture-retaining crystals.
- Liquid seaweed fertilizer for quick blooms.
- Window boxes with sturdy mounting brackets.
- A mix of ‘upright’ and ‘trailing’ flowers.
How to make it
- Choose a color palette that complements your house; for example, white flowers look crisp against dark blue siding, while purple and orange pop against beige or brick.
- When planting in pots, ensure there are plenty of drainage holes at the bottom to prevent the roots from sitting in stagnant water.
- Fill the bottom third of large pots with empty plastic water bottles or packing peanuts to save on soil weight and cost.
- Mix a handful of slow-release fertilizer into the top layer of soil before planting to keep the flowers blooming vigorously for months.
- Mount window boxes securely into the studs of your house, ensuring they are level and can support the significant weight of wet soil.
- Water your pots every morning; containers dry out much faster than garden beds, and consistent moisture is the secret to those lush, viral-worthy displays.
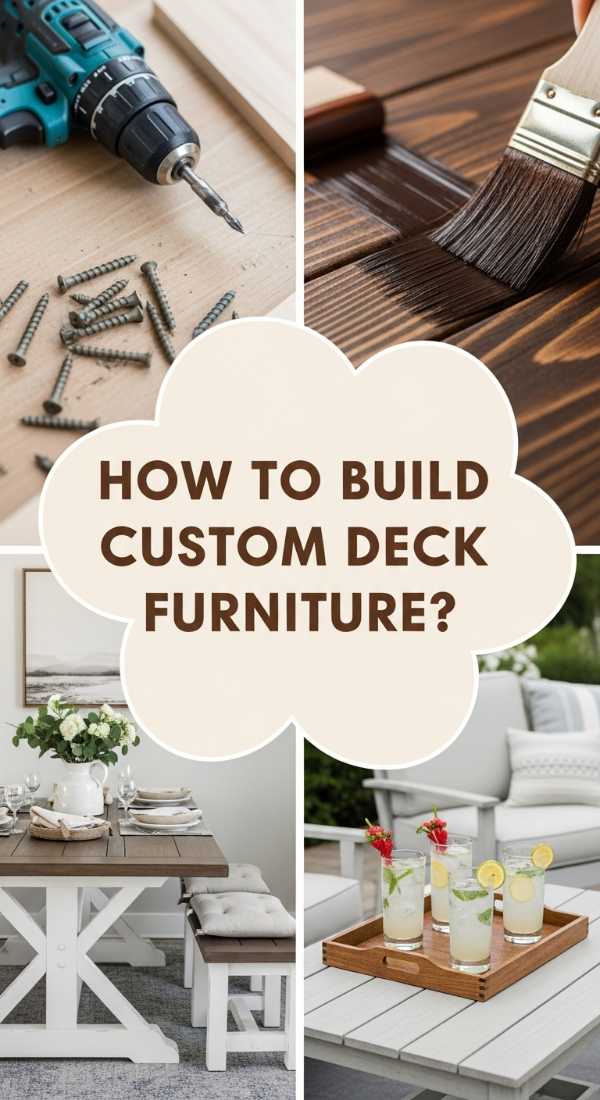
How to Build Custom Deck Furniture for Your Relaxing Backyard Retreat
[IMAGE_10]
Why we love this
Custom furniture allows you to maximize every square inch of your deck, creating a tailored retreat that fits your lifestyle perfectly. We love the feeling of sinking into a deep-seated sectional that was built specifically for your space. The wood is cool to the touch, and the oversized cushions feel like a cloud. It transforms a flat wooden platform into an outdoor living room where you can curl up with a book, enjoy a morning coffee, or watch the fire pit glow. It’s the ultimate expression of ‘living large’ in your own backyard.
Essential Elements:
- Pressure-treated 2x4s and 2x6s for the frame.
- Outdoor-rated foam and UV-resistant fabric for cushions.
- Deck screws with a specialized coating to prevent rust.
- A miter saw for precise angle cuts.
- Sanding block and tack cloth for a clean finish.
How to make it
- Design your furniture with ‘standard’ cushion sizes in mind (like 24×24 inches) so you can buy pre-made outdoor cushions instead of having them custom-sewn.
- Build a sturdy box frame using 2x4s, adding cross-braces every 12 inches to prevent the seat from sagging over time.
- Angle the backrest slightly—about 15 degrees—for maximum comfort; a perfectly vertical backrest is rarely comfortable for long periods of lounging.
- Use a miter saw to cut your pieces to the exact length, and always pre-drill your screw holes to prevent the wood from splitting near the ends.
- Sand every surface thoroughly, paying extra attention to the armrests and any edges where legs might brush against the wood.
- Apply two coats of a high-quality deck stain or outdoor paint that matches your deck’s aesthetic, letting it cure completely before adding the cushions.
- For a sectional, use metal ‘sofa connectors’ or simple mending plates to keep the different pieces from sliding apart on the deck.
Conclusion
Transforming your home and garden from drab to fab isn’t about having a limitless budget; it’s about having a vision and the willingness to take that first step. Whether you’re planting a low-maintenance flower bed that will greet you every spring or building a custom table for your family dinners, these projects are about reclaiming your space and making it a true reflection of what you love. Each of these viral-inspired DIYs offers a path to a more beautiful, functional, and joyful home. So, pick one project, gather your supplies, and start creating your own ‘fab’ reality today!