
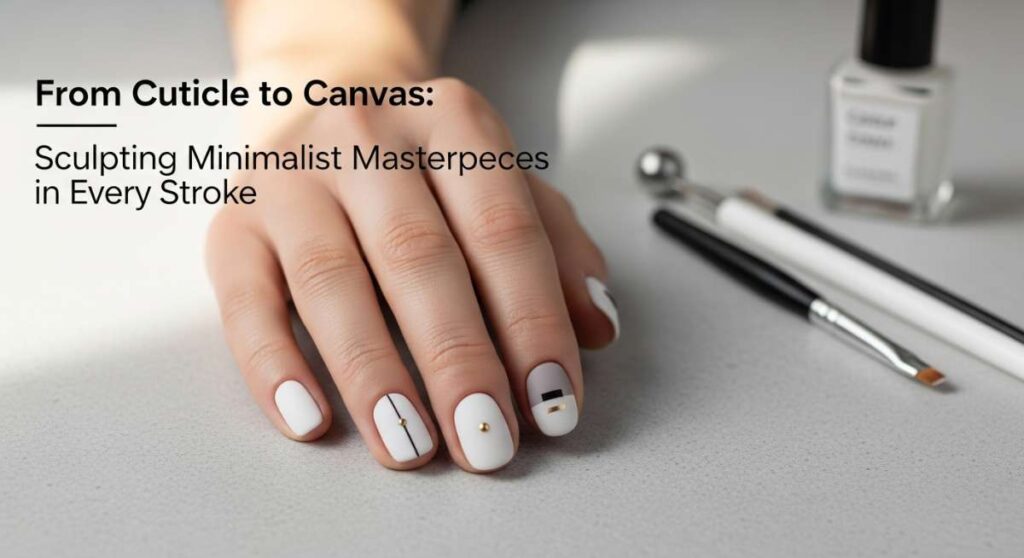
From Cuticle to Canvas: Sculpting Minimalist Masterpieces in Every Stroke
Hello loves, welcome back to my little sanctuary. You know how sometimes the world feels just a bit too loud, and all you want is a moment of quiet, creative stillness? I’ve found that my weekly nail ritual has become that soft place for me to land. It is more than just polish; it is a whispered conversation between my soul and my hands, a way to reclaim ten tiny canvases for pure, unadulterated self-love.
Lately, I’ve been obsessed with the idea of ‘minimalist masterpieces’—designs that don’t scream for attention but instead invite a closer look. There is such a profound beauty in a clean line or a perfectly placed dot of color. It reminds me that even in our busiest days, we can carry a piece of art with us. Today, I’m opening up my heart and my vanity drawer to share my favorite ways to sculpt these little moments of joy.
Whether you’re a seasoned pro with a steady hand or you’re just starting to explore the magic of a fresh manicure, I hope these guides feel like a warm hug. Let’s slow down, pour a cup of tea, and turn our fingertips into something truly divine. Here is my ultimate masterclass in aesthetic nail art, curated just for you.
The Ethereal Glow: 5 Steps for Perfect Pink Chrome Nails
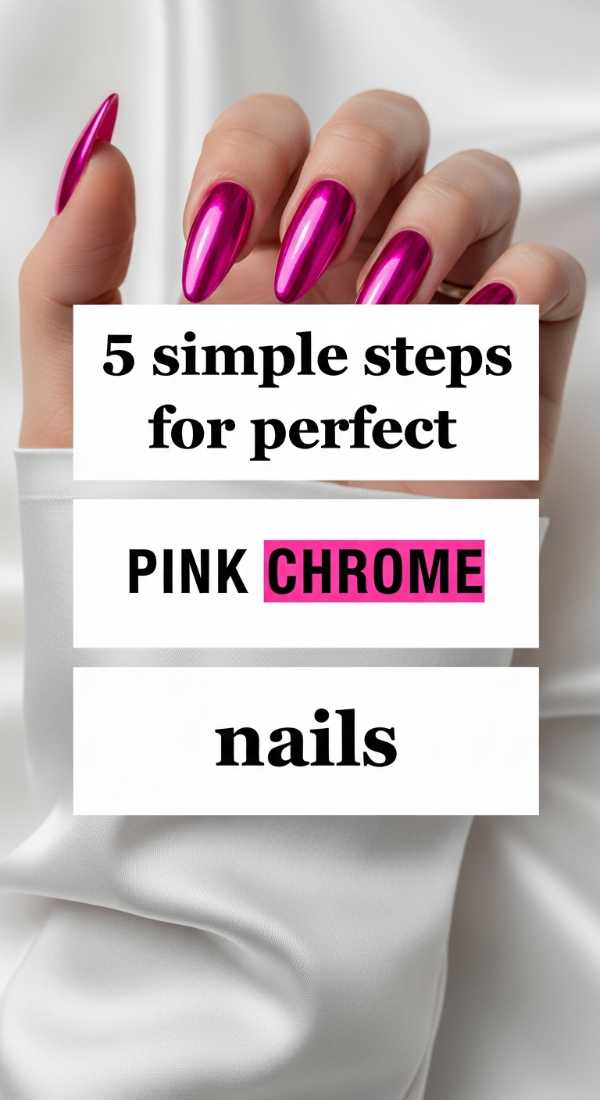
Why to love these Nails:
Imagine the softest sunset caught in a mirror. Pink chrome nails are the ultimate blend of futuristic chic and feminine grace, offering a high-shine finish that makes your hands look like they belong in a fairytale.
Essential Items:
- Soft pink gel polish
- No-wipe top coat
- Pink chrome powder
- Sponge applicator
- LED/UV lamp
How to Prepare:
- Apply and cure two thin layers of your favorite soft pink gel polish.
- Apply a no-wipe top coat and cure for only 30 seconds (it should be slightly tacky).
- Dip your sponge into the chrome powder and rub it firmly onto the nail surface until a mirror finish appears.
- Use a soft brush to dust off any excess powder from the cuticles.
- Seal the look with a final layer of top coat and cure completely.
Budget Range
- Beetles Gel Polish in ‘Sweet Pea’ – $7.99
- Artdone Chrome Powder Set – $9.50
- SunUV LED Lamp – $24.00
The Coquette Touch: 3 Ways to Paint Cute Bow French Tips
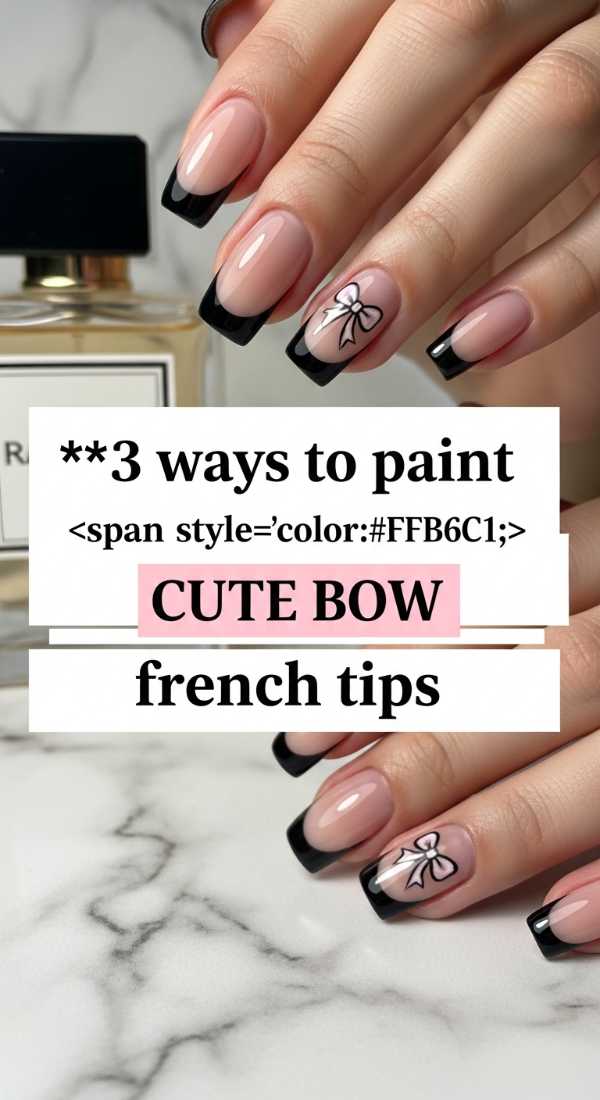
Why to love these Nails:
There is something so whisper-soft and darling about a tiny bow. It’s the ‘coquette’ aesthetic brought to life, adding a playful yet sophisticated ribbon of joy to a classic French manicure.
Essential Items:
- Sheer nude base coat
- Fine detail liner brush
- White or black acrylic paint/gel
- Dotting tool
How to Prepare:
- Method 1: Paint two small triangles meeting at a center dot to create a classic butterfly-style bow at the smile line.
- Method 2: Use a liner brush to draw two loops and two trailing ‘ribbons’ for a more fluid, hand-drawn look.
- Method 3: Place two dots side-by-side and pull the paint inward to a center point for a minimalist, rounded bow.
Budget Range
- Zeva Nail Liner Brushes – $6.50
- Essie ‘Mademoiselle’ Base – $10.00
- Modelones White Gel Liner – $5.99
The Bold Silhouette: 4 Tricks to Shape Your Acrylic Coffin Nails
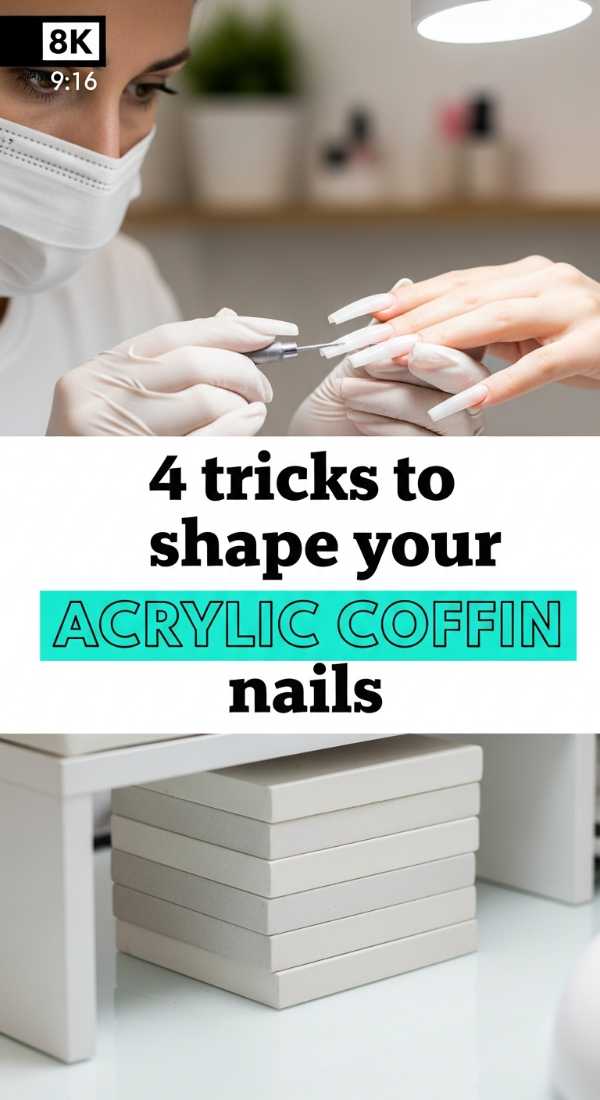
Why to love these Nails:
The coffin shape—or ballerina, as I love to call it—is for the girl who isn’t afraid to take up space. It’s architectural, lengthening, and provides a stunning flat canvas for any minimalist art you desire.
Essential Items:
- 100/180 grit nail file
- Acrylic nail clipper
- Buffing block
- Straight edge guide
How to Prepare:
- Clip the sides of the nail at a diagonal angle, narrowing toward the tip but leaving plenty of room.
- File the sides in long, straight strokes, ensuring both sides are symmetrical and tapered evenly.
- Place your file perpendicular to the tip and file straight across to create that signature flat, ‘coffin’ end.
- Finish by buffing the edges to remove sharpness while maintaining the crisp, geometric silhouette.
Budget Range
- Makartt Professional Nail Files – $8.99
- Kiara Sky Professional Nail Clipper – $12.00
- Flowery Blue Buffer Block – $4.50
Sweet Intentions: 6 Easy Dots for a Minimalist Heart Manicure
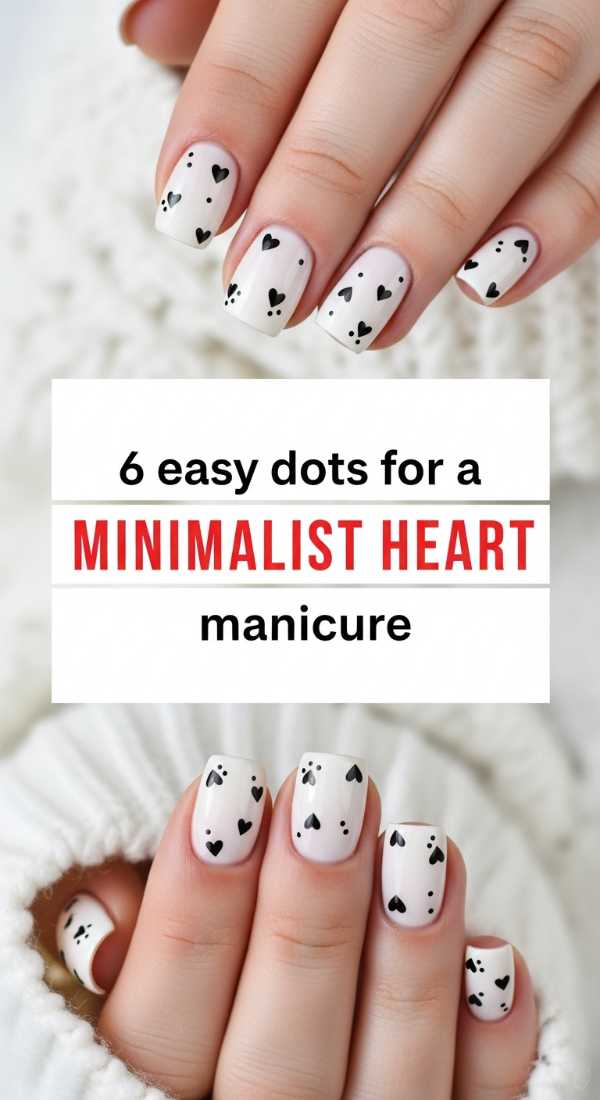
Why to love these Nails:
These tiny pulses of love are the epitome of ‘less is more.’ They are perfect for when you want a subtle nod to romance without the clutter of a full-themed set.
Essential Items:
- Wooden toothpick or dotting tool
- Red or deep plum polish
- Matte top coat
- Base color of choice
How to Prepare:
- Apply your base color and let it dry completely.
- Dip your dotting tool into the red polish.
- Place two dots side-by-side at a slight angle.
- Place a third dot slightly below and centered between the first two.
- Use the tip of your tool to drag the paint from the top dots down to the center bottom dot.
- Connect the lines to form a perfect, tiny heart and seal with a matte coat.
Budget Range
- OPI ‘Big Apple Red’ – $11.50
- Dotting Tool Set (5 sizes) – $5.00
- Sally Hansen Miracle Gel Matte Top Coat – $9.99
The Timeless Curve: 7 Secrets to Achieve the Classy Almond Look
Why to love these Nails:
The almond shape is the most flattering silhouette for any hand. It elongates the fingers and provides a soft, natural grace that feels incredibly expensive and polished.
Essential Items:
- Glass nail file
- Cuticle pusher
- Nourishing nail oil
- Precision nippers
How to Prepare:
- Find the exact center point of your free edge to act as your ‘peak.’
- File from the corner toward the center at a 45-degree angle.
- Repeat on the other side, ensuring the ‘shoulders’ of the nail are rounded, not pointed.
- Avoid filing too deep into the side walls to maintain nail strength.
- Use a glass file for the final shaping to prevent peeling or splitting.
- Keep the curve mimic the natural shape of your cuticle for the most ‘quiet luxury’ look.
- Hydrate the surrounding skin immediately to highlight the clean lines.
Budget Range
- Mont Bleu Crystal Nail File – $10.00
- SolarOil Cuticle Care – $12.50
- Tweezerman Stainless Steel Pusher – $15.00
The Cozy Brew: 5 Steps to Create Trendy Coffee Bean Art
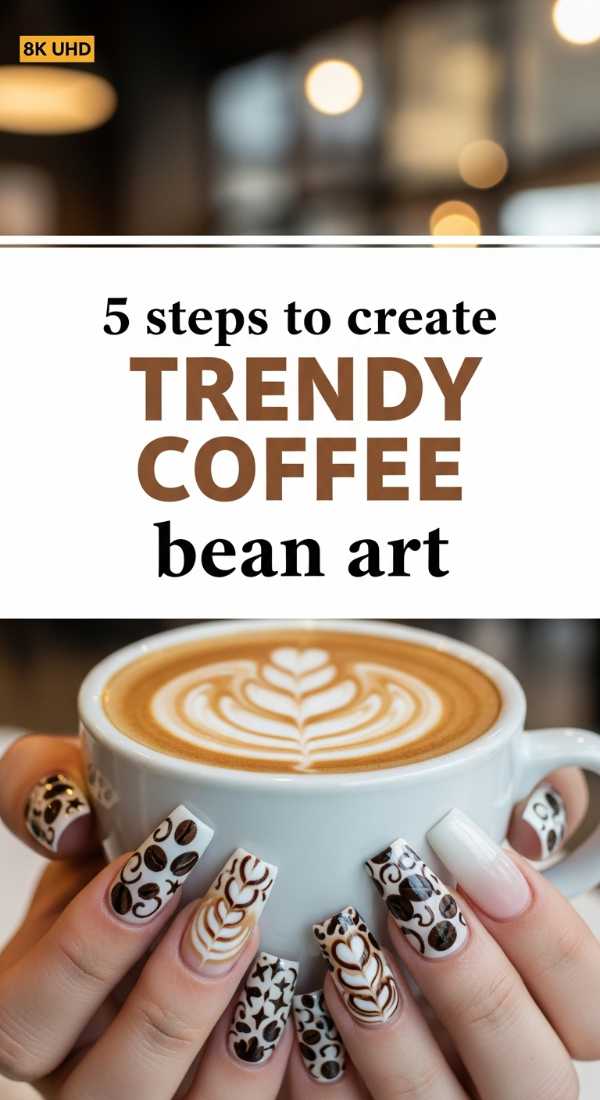
Why to love these Nails:
For the lovers of slow mornings and the scent of roasted beans. This design is warm, earthy, and perfectly captures that ‘clean girl’ aesthetic with a caffeine-inspired twist.
Essential Items:
- Cream-colored base polish
- Dark espresso brown polish
- Fine detail brush
- Glossy top coat
How to Prepare:
- Paint your nails with a creamy, latte-colored base.
- Using the brown polish, paint a small, rounded oval in the center or corner of the nail.
- Once the oval is slightly dry, use a clean liner brush to draw a tiny, wavy ‘S’ line down the center.
- Add a second, smaller bean nearby for a balanced cluster.
- Top with a thick, glossy top coat to give the ‘beans’ a realistic, shiny look.
Budget Range
- Cirque Colors ‘Coffee Talk’ Set – $25.00
- Holo Taco ‘Espresso’ Polish – $11.00
- Glisten & Glow Top Coat – $8.50
Structured Serenity: 4 Quick Lines for a Flawless Plaid Design
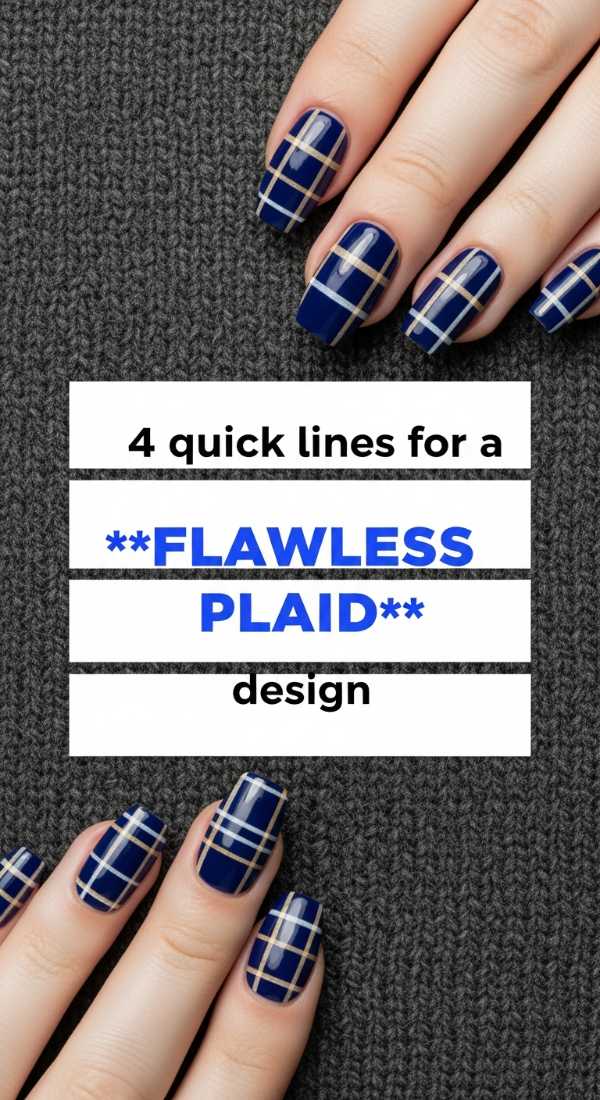
Why to love these Nails:
Plaid is like a cozy sweater for your nails. It brings a sense of order and tradition, but when done in muted tones, it becomes a sophisticated minimalist statement.
Essential Items:
- Striping tape or a long-hair liner brush
- Two contrasting muted colors
- Steady surface for your hand
- Clear top coat
How to Prepare:
- Paint one vertical line slightly off-center using your primary accent color.
- Paint one horizontal line near the base of the nail, intersecting the first line.
- Use your second color to paint thinner, parallel lines right next to the originals.
- Ensure your brush has very little paint to keep the lines crisp and prevent bleeding.
Budget Range
- Winstonia Striping Brushes – $7.95
- Zoya ‘Naked’ Manicure Set – $18.00
- Nail Art Striping Tape – $4.00
Pastel Dreams: 8 Ways to Style Your Summer Pastel Nails
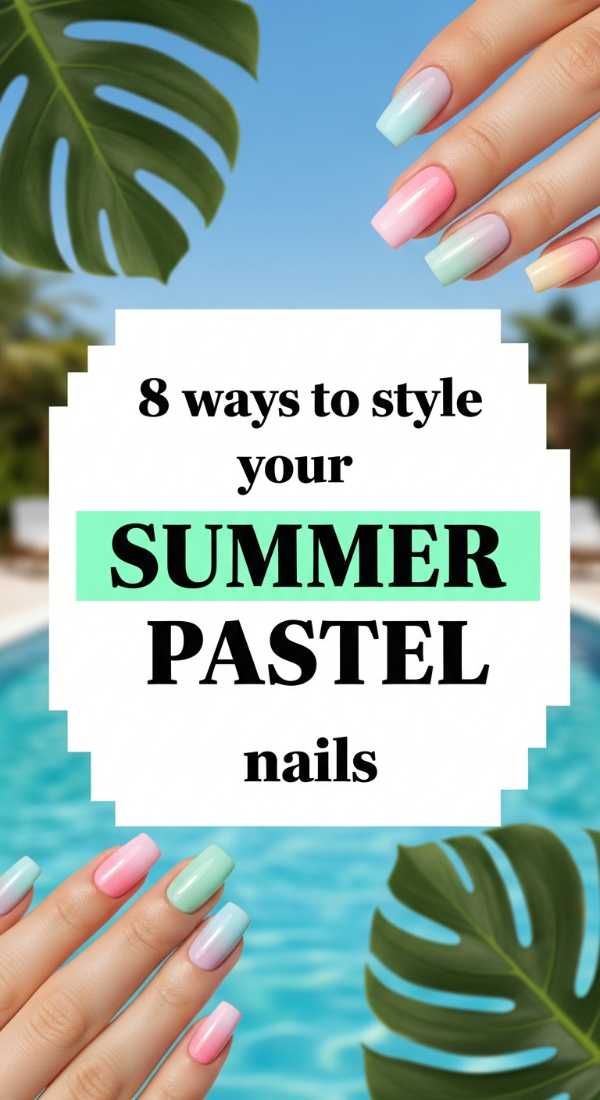
Why to love these Nails:
Summer is for light and air. Pastel nails are like a bowl of sweet macarons under the June sun—refreshing, soft, and eternally youthful.
Essential Items:
- Set of 5 pastel colors (mint, lavender, peach, lemon, sky blue)
- Matte and Glossy top coats
- Sponge for gradients
How to Prepare:
- The Skittle: Paint each nail a different pastel shade for a playful rainbow.
- The Gradient: Sponge two pastels together for a soft ‘aura’ effect.
- The Half-Moon: Leave the base of the nail bare and paint the rest pastel.
- Pastel French: Swap white for a soft lavender on the tips.
- Matte Finish: Turn bright pastels into ‘chalky’ chic with a matte coat.
- Double Tip: Use two pastels to create a layered French look.
- Sideways Gradient: Transition from thumb to pinky in a pastel spectrum.
- Minimalist Dots: A single pastel dot at the base of a clear nail.
Budget Range
- Olive & June ‘Pastel’ Set – $40.00
- Orly ‘Sweet Retreat’ Collection – $15.00/bottle
- Beauty Secrets Acetone – $5.00
Celestial Shimmer: 3 Techniques for a Sparkly Glitter Nail Ombré
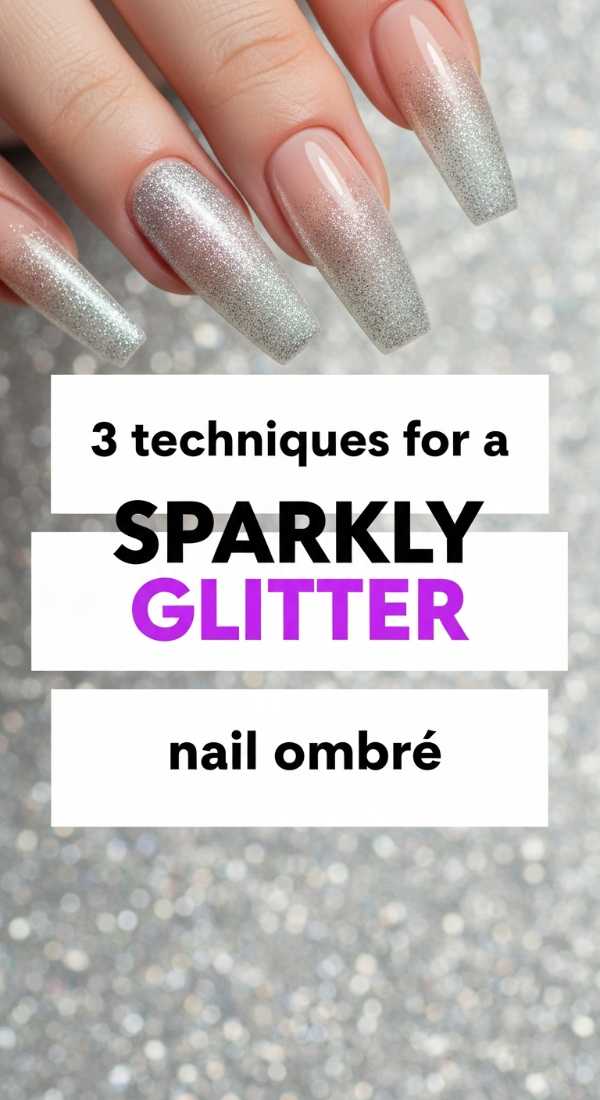
Why to love these Nails:
Like falling stars captured in a bottle. A glitter ombré is the perfect way to add a bit of magic to your day without the commitment of a full glitter nail.
Essential Items:
- Loose fine glitter or glitter polish
- Makeup wedge sponge
- Liquid latex (for easy cleanup)
How to Prepare:
- The Sponge Method: Dab glitter polish onto a sponge and tap it from the tip toward the middle for a dense-to-light fade.
- The Dry Brush: Use a brush with very little glitter and ‘flick’ it from the cuticle downward for a ‘reverse’ ombré.
- The Dip: While the base coat is wet, gently dip the tip of the nail into loose glitter and shake off the excess.
Budget Range
- ILNP Glitter Polishes – $10.00
- Latex Barrier – $8.00
- Wedge Sponges (50 pack) – $4.00
The Forever Vow: 6 Steps to Design Your Dream Bridal Nails

Why to love these Nails:
Whether it’s for your big day or just a day where you want to feel ethereal, bridal nails represent purity, elegance, and timeless beauty. They are the ultimate ‘I do’ to yourself.
Essential Items:
- Milky white polish
- Pearlescent top coat
- Tiny 1mm rhinestones
- Nail glue
How to Prepare:
- Apply a sheer, milky white base that allows a hint of the natural nail to show.
- Add a single layer of pearlescent shimmer for a ‘glazed donut’ glow.
- Place one tiny rhinestone at the center of the cuticle on your ring finger.
- Ensure the edges are perfectly filed into a soft oval or almond.
- Use a high-shine top coat to lock in the brilliance.
- Finish with a luxurious hand cream to ensure your hands are photo-ready.
Budget Range
- DND ‘White Rabbit’ Gel – $9.00
- Swarovski Nail Crystals – $14.00
- L’Occitane Hand Cream – $12.00
Closing Thoughts
Creating these designs is such a beautiful way to practice mindfulness, isn’t it? As you paint, I hope you feel the tension leaving your shoulders. There is no such thing as a ‘mistake’ in nail art—only a new direction for your masterpiece. Carry these colors and shapes with you as a reminder that you are a work of art in progress. Until next time, stay soft, stay creative, and keep shining, my loves.