

From Commencement to Coastal: Top 2026 Summer Nail Looks to Try
Hello, my loves! Can you feel it? There is a certain magic in the air as we approach the summer of 2026. It’s that bittersweet, beautiful transition where the structure of the school year melts into the infinite, salt-crusted days of coastal living. Whether you are walking across a stage to collect a diploma or simply walking toward the shoreline with a cold drink in hand, your hands are the storytellers of your season.
I’ve spent the last few weeks dreaming up a palette that feels like a soft embrace—one that carries you from the dignity of commencement to the wild, free energy of a sunset bonfire. This guide is my heart on a plate for you, a collection of textures and tones designed to make you feel as radiant as the mid-July sun. Let’s dive into these looks together, shall we?
The Graduation Classic: 5 Simple Steps to DIY College Graduation Nails

Why to love this Design:
There is something so deeply poetic about a clean, sophisticated nail as you turn your tassel. This design is about quiet confidence; it doesn’t scream for attention, but it hums with the grace of someone who has worked incredibly hard and is ready for what comes next.
Essential Elements:
- Sheer milky white or soft nude base
- Ultra-fine silver or gold micro-glitter
- High-gloss top coat
- Precision cleanup brush
How to Prepare:
- Gently push back cuticles and shape nails into a soft almond or square-oval.
- Apply one thin layer of a sheer, milky base color to create a ‘your nails but better’ foundation.
- Take a toothpick or fine brush and apply a tiny ‘halo’ of micro-glitter at the base of the cuticle.
- Seal everything with a thick, gel-like top coat for a professional finish.
- Hydrate with a rose-scented cuticle oil to ensure your hands look camera-ready for those diploma close-ups.
Budget Range
- Essie Marshmallow ($10)
- Holo Taco Gold Flake ($13)
- Sally Hansen Miracle Gel Top Coat ($8)
Golden Hour Glow: 4 Quick Ways to Get Sunset Chrome Nails
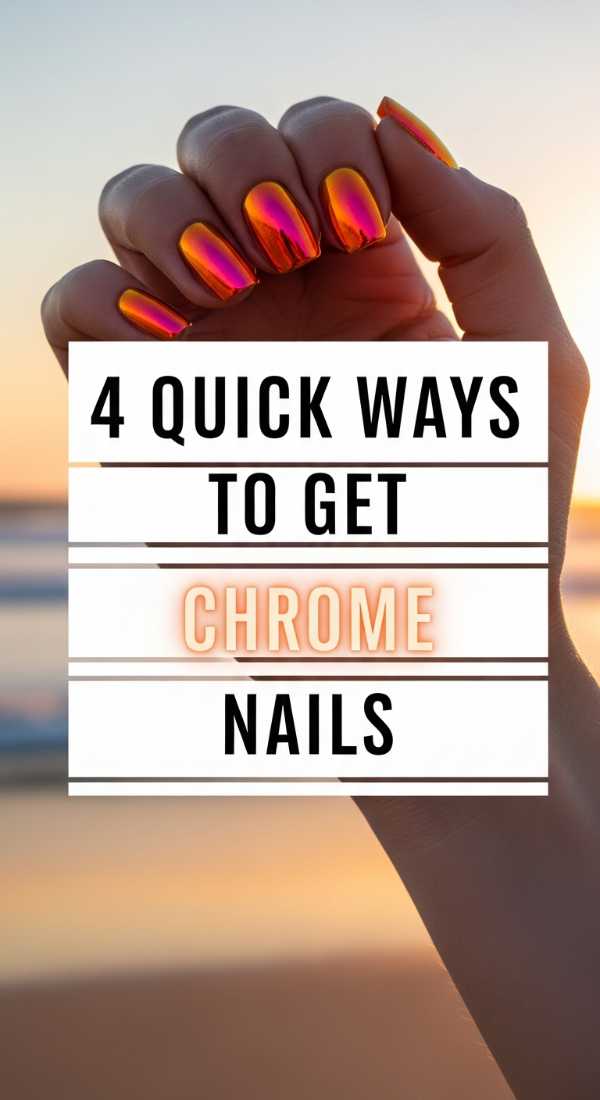
Why to love this Design:
Imagine the exact moment the sun touches the horizon and the sky turns into a liquid masterpiece. Sunset chrome captures that fleeting warmth. It’s reflective, soulful, and makes every movement of your hands look like a dance.
Essential Elements:
- Peach or apricot base polish
- Iridescent orange-to-pink chrome powder
- Sponge applicator
- Non-wipe top coat
How to Prepare:
- Apply two coats of your favorite peach base and let dry completely (or cure if using gel).
- Apply a non-wipe top coat and cure for only 30 seconds so it remains slightly ‘tacky’.
- Using a sponge, buff the chrome powder from the tip upward for a gradient effect.
- Finish with a final top coat to lock in that celestial shimmer.
Budget Range
- Artdone Chrome Powder Set ($12)
- OPI ‘Data Peach’ ($11)
- Beetles No Wipe Top Coat ($7)
Zesty Soul: 6 Easy Stages to Master Lemon Nails Designs
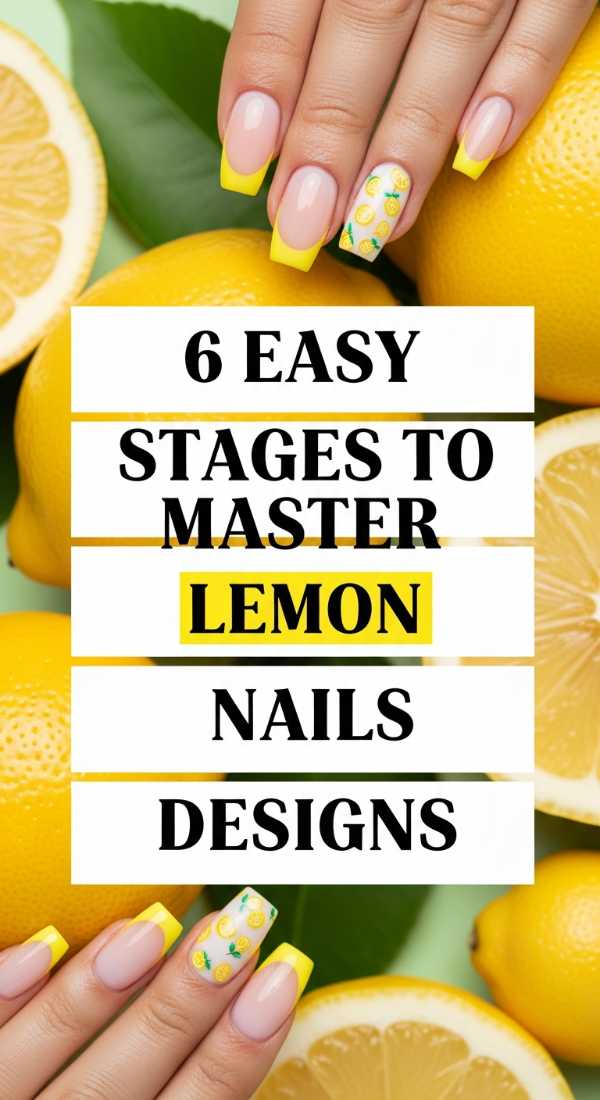
Why to love this Design:
If summer had a flavor, it would be a cold glass of lemonade under a sprawling oak tree. These lemon designs are the epitome of ‘cottagecore’ joy—bright, refreshing, and just a little bit whimsical for those weekend farmers’ market trips.
Essential Elements:
- Pale yellow polish
- Leaf green striper pen
- White detail paint
- Matte top coat (optional for a realistic rind look)
How to Prepare:
- Start with a clean, clear base or a soft ‘linen’ white.
- Paint two small yellow ovals side-by-side near the tip of the nail.
- Use a fine brush to add a tiny white ‘Y’ shape inside the yellow to represent fruit segments.
- Add two small green leaves at the top of the lemon.
- Outline slightly with a darker yellow for dimension.
- Seal with a matte top coat to give the fruit a soft, organic texture.
Budget Range
- Olive & June ‘Lemonade’ ($9)
- Nail Art Striper Pens ($15 set)
- Zoya ‘Darcy’ ($12)
Tropical Depth: 3 Ways to Prepare Teal and Coral Nails
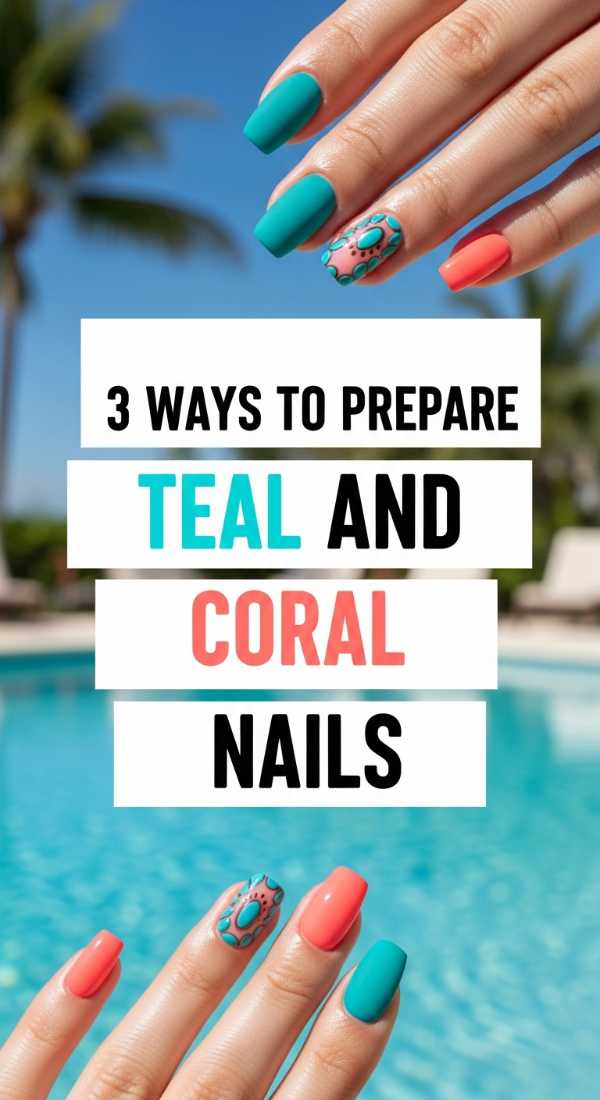
Why to love this Design:
This is the ultimate ‘vacation mode’ pairing. Teal represents the depth of the ocean, while coral brings the vibrance of the reef. Together, they create a high-contrast look that feels energetic and deeply adventurous.
Essential Elements:
- Deep teal lacquer
- Vibrant coral cream polish
- Dotting tool
How to Prepare:
- The Alternating Method: Paint your thumb, middle, and pinky teal, and your index and ring fingers coral.
- The Half-Moon Method: Paint the base teal and use a guide to paint a coral ‘smile line’ at the cuticle.
- The Dotting Method: Paint a solid teal base and use a dotting tool to create a vertical line of coral bubbles down the center.
Budget Range
- Orly ‘Far Out’ Teal ($15)
- Revlon ‘Candid’ Coral ($6)
- Professional Dotting Tool Set ($5)
Ethereal Edge: 7 Steps to Achieve Summer Goth Nails

Why to love this Design:
Who says dark colors are only for winter? Summer goth is about sheer blacks, lace textures, and a moody mystery that contrasts beautifully with a white sundress. it’s for my loves who find peace in the shadows even on the brightest days.
Essential Elements:
- Sheer ‘jelly’ black polish
- Solid black detailer
- Silver star decals
- Ultra-glossy finish
How to Prepare:
- Apply one coat of sheer black jelly to create a smoky window effect.
- Use a stamping kit or hand-paint thin black ‘french’ tips.
- Apply a second layer of jelly polish over the tips to soften the edge.
- Place one silver star decal on the ring finger.
- Add tiny black dots around the star like a dark galaxy.
- Clean any spills with a brush dipped in acetone.
- Apply a high-shine top coat to make the ‘smoke’ pop.
Budget Range
- Cirque Colors ‘RRR’ Black Jelly ($13)
- Maniology Stamping Plate ($8)
- Seche Vite Dry Fast Top Coat ($10)
Earthy Luxury: 5 Techniques for Perfect Taurus Birthday Nails
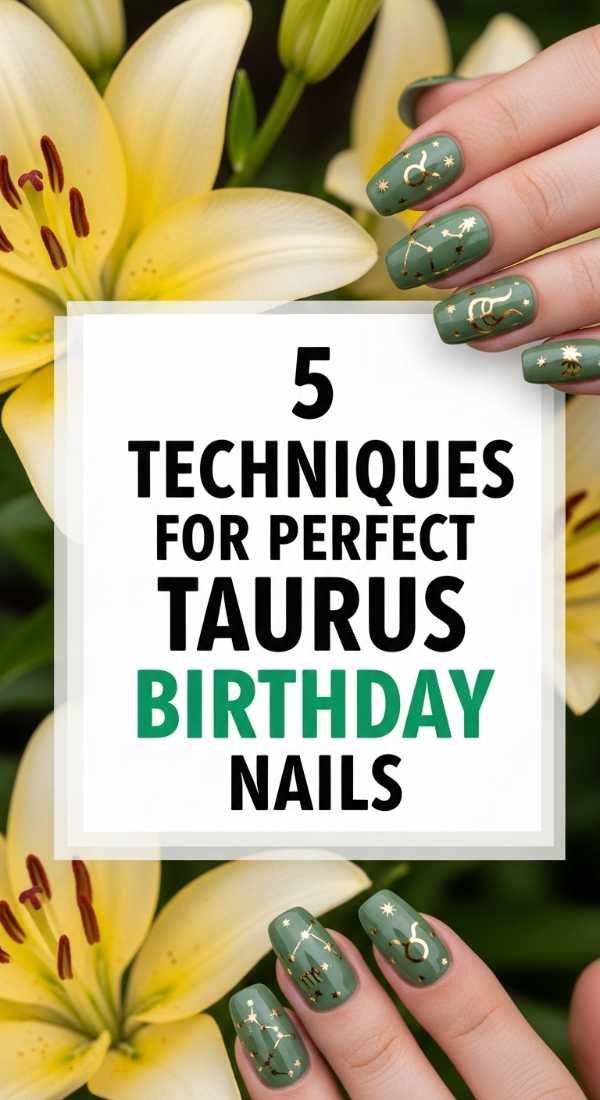
Why to love this Design:
Taurus season is all about grounded luxury. Think forest greens, rich golds, and textures that feel like a walk through a lush, private garden. It’s a birthday look that says ‘I am worthy of all things beautiful.’
Essential Elements:
- Emerald green polish
- Gold leaf flakes
- Nude accent polish
- Tweezers
How to Prepare:
- The Marble Technique: Swirl emerald and white together on a palette before transferring to the nail.
- The Foil Technique: Apply gold leaf flakes onto a tacky green base using tweezers.
- The Negative Space: Leave a ‘V’ shape at the base of the nail unpainted for a modern twist.
- The Velvet Finish: Use a magnetic green polish for a soft, shimmering depth.
- The Floral Touch: Add a tiny white daisy on the emerald base to represent the Taurus flower.
Budget Range
- ILNP ‘Venom’ Magnetic ($12.50)
- Gold Leaf Nail Art Kit ($6)
- Lights Lacquer ‘Emerald’ ($13)
- Essie ‘Gilded’ ($10)
Wild Vibrance: 8 Steps to Design Neon Cheetah Print Nails
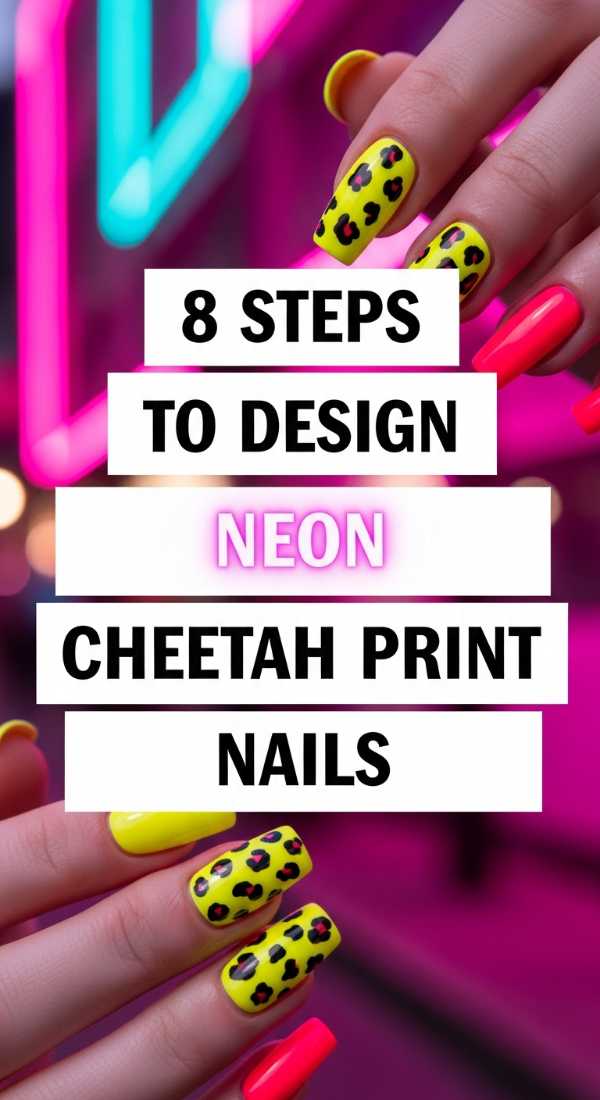
Why to love this Design:
For the soul that refuses to blend in! Neon cheetah print is a nostalgic nod to the early 2000s, reimagined for 2026. It’s loud, proud, and absolutely perfect for a summer music festival.
Essential Elements:
- Neon pink or lime base
- Black acrylic paint or polish
- Metallic center color (gold or silver)
- Fine liner brush
How to Prepare:
- Apply two coats of neon pink base and let dry.
- Use a dotting tool to place ‘blobs’ of metallic gold randomly across the nail.
- Take a fine liner brush and black polish.
- Draw two ‘C’ shapes or brackets around each gold blob.
- Do not make them perfect—jagged lines look more natural!
- Add tiny black ‘seeds’ or dots in the empty spaces.
- Wait 10 minutes to ensure the black is dry.
- Seal with a thick top coat to prevent smearing the art.
Budget Range
- China Glaze ‘Flip Flop Fantasy’ ($8)
- Nail Art Detail Brushes ($7)
- OPI Black Onyx ($11)
Celestial Aura: 4 Simple Ways to Style Sunset Aura Nails
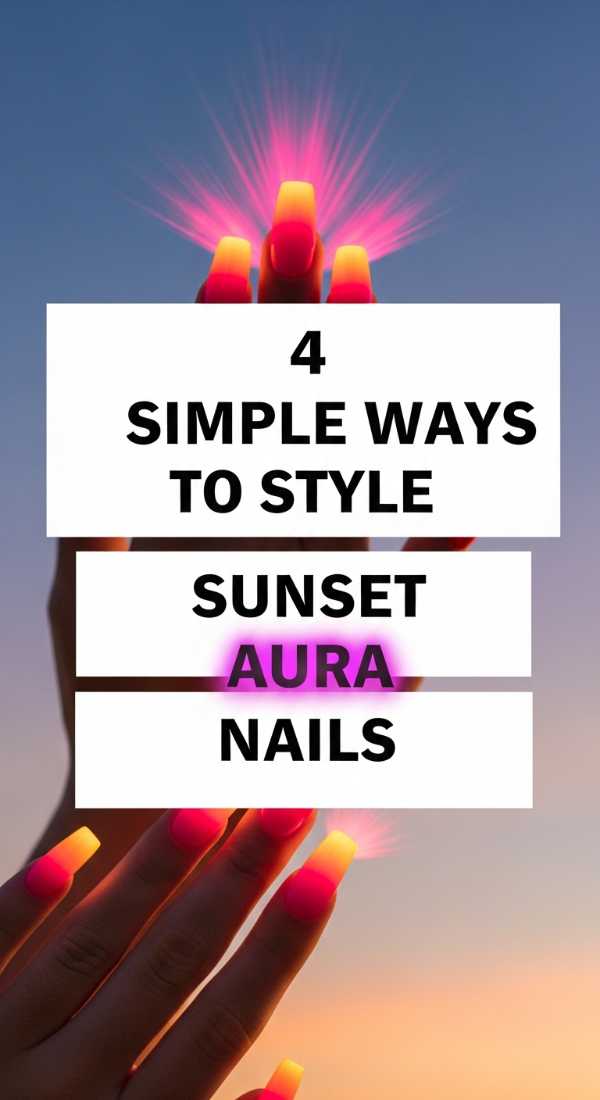
Why to love this Design:
Aura nails are like a visual representation of your energy. By using sunset colors, you’re wearing the vibration of joy and creativity. It’s a soft, diffused look that feels almost spiritual.
Essential Elements:
- Makeup sponge
- Orange, pink, and purple polishes
- White base coat
How to Prepare:
- The Sponge Method: Dab a circle of orange into the center of a pink base using a small sponge.
- The Eyeshadow Method: Buff actual sunset-colored eyeshadow onto a tacky base for a seamless blend.
- The Airbrush Method: Use a handheld mini-airbrush for the most professional gradient.
- The Layering Method: Apply very thin, diluted layers of color, building intensity only in the center.
Budget Range
- Mini Airbrush Kit ($35)
- Color Club ‘Neon’ Pastel Set ($15)
- Disposable Makeup Sponges ($4)
The Perfect Pair: 3 Steps to Match Your Hands and Toes Nails

Why to love this Design:
There is a quiet harmony in a matching set. While ‘mismatched’ is trendy, a coordinated mani-pedi feels intentional and polished—perfect for those days when you’re switching from sandals to graduation heels.
Essential Elements:
- One primary color (like a soft lavender)
- One accent glitter or metallic
How to Prepare:
- Identify your ‘hero’ color and apply it to all toes and eight fingers.
- Choose a ‘sister’ shade (one shade lighter or darker) for the ring finger and the big toe.
- Add a tiny swipe of the same glitter to the tips of both your hands and toes to tie the look together.
Budget Range
- Zoya ‘Lavender’ Set ($20)
- Essie ‘Gel Couture’ Duo ($18)
Classic Energy: 5 Quick Steps for Bright Red Summer Nails
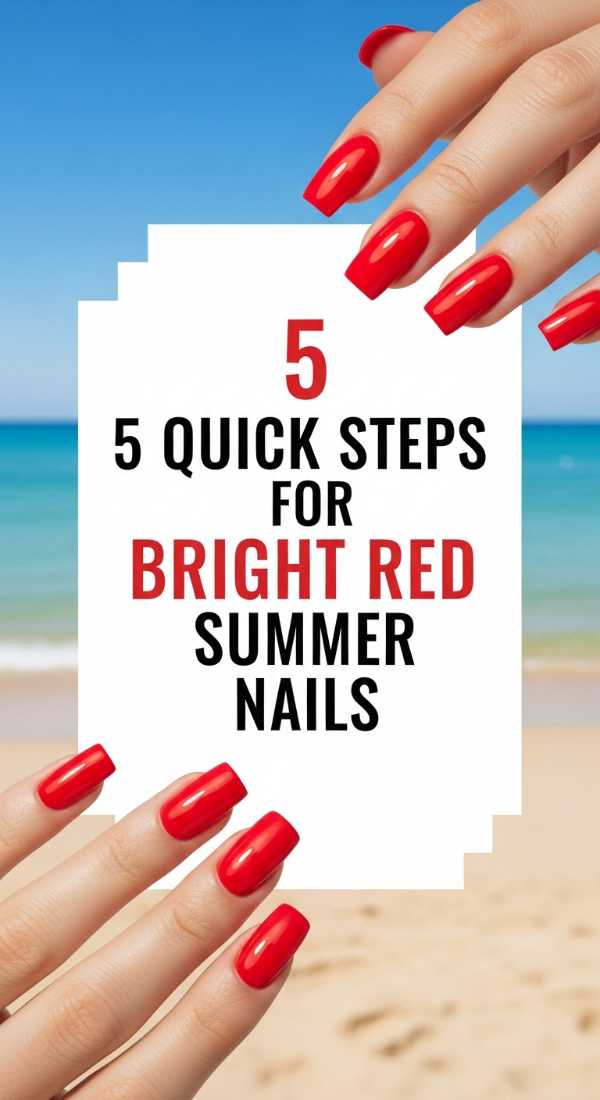
Why to love this Design:
You can never go wrong with a ‘Tomato Girl’ summer red. It’s timeless, fierce, and looks incredible against tanned skin. It’s the ultimate power move for a graduation ceremony or a first summer internship.
Essential Elements:
- True orange-red cream polish
- Long-wear base coat
- Conditioning top coat
How to Prepare:
- Prep with a ridge-filling base coat to ensure a smooth canvas for the pigment.
- Apply the first coat using the ‘three-swipe’ method (middle, side, side).
- Apply a second coat to achieve full opacity and depth of color.
- Run the brush along the very edge of the nail (capping the tip) to prevent chipping.
- Finish with a quick-dry drop to set the color instantly.
Budget Range
- Dior ‘999’ Rouge ($30 – Splurge!)
- Essie ‘Geranium’ ($10)
- Sally Hansen ‘Red-y Get Set’ ($7)
A Summer to Remember
As you transition into this beautiful new chapter, I hope these designs remind you to take a moment for yourself. Painting our nails is such a small ritual, but it’s a way of saying, ‘I value myself, and I am ready for this moment.’ Whether you choose the quiet elegance of graduation milky-whites or the roar of neon cheetah, wear it with your head held high, my loves. The world is waiting for your sparkle. Until next time, stay sun-drenched and soulful.