
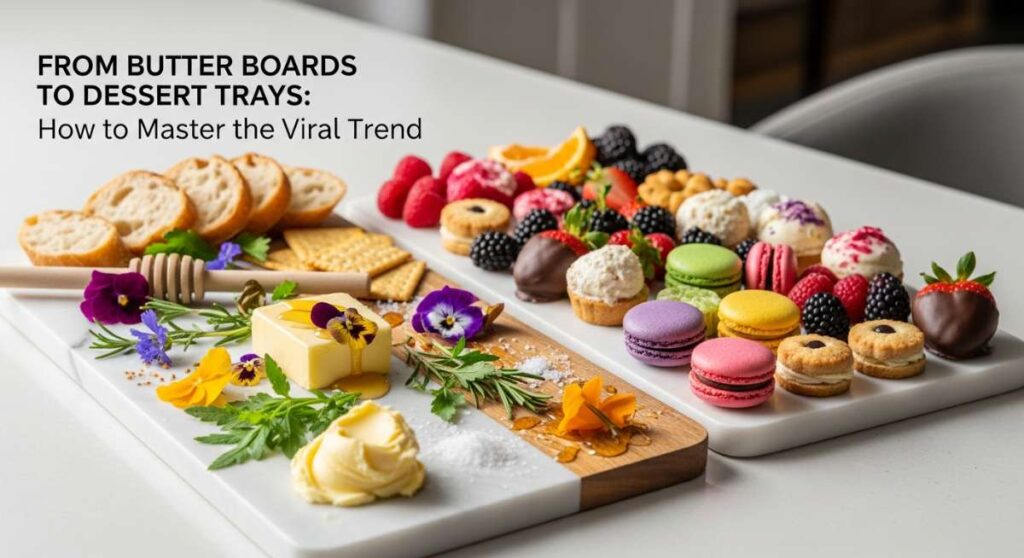
From Butter Boards to Dessert Trays: How to Master the Viral Trend
There is something undeniably magical about the way a simple board of food can bring people together. Whether it is the soft smear of salted butter on a rustic plank or a curated selection of sweets, these trends are more than just social media fodder; they are an invitation to slow down and savor the moment. I remember the first time I set out a DIY dessert tray for my friends—the gasps of delight and the immediate reach for a phone to capture the aesthetic beauty of it all made me realize that we eat with our eyes long before the first bite.
The secret to mastering the viral simple food board isn’t just about the ingredients themselves, but the story you tell through textures, colors, and the love put into every component. From the flaky crust of a pie to the tangy crumb of a sourdough loaf, every element on your board serves as a piece of edible art. In this guide, we are diving deep into the essentials of the baking lifestyle, covering everything from the perfect peach cobbler to the business of sharing your treats with the world.
How to bake peach cobbler
Why we love this
Peach cobbler is the ultimate comfort food, evoking memories of golden summer afternoons and the sweet, heavy scent of ripening fruit. We love the way the jammy, caramelized peaches bubble up through a cake-like topping, creating a contrast of soft fruit and slightly crisp, buttery edges that melt in your mouth. The aroma alone, a heavenly mix of cinnamon, sugar, and stone fruit, is enough to make any house feel like a home, especially when served warm with a scoop of vanilla bean ice cream.
Ingredients
- 6-8 large fresh peaches, sliced
- 1 cup granulated sugar
- 1/2 cup brown sugar
- 1 teaspoon ground cinnamon
- 1/4 teaspoon ground nutmeg
- 1 tablespoon lemon juice
- 1 cup all-purpose flour
- 1 tablespoon baking powder
- 1/2 cup salted butter, melted
- 1 cup whole milk
How to make it
- Preheat your oven to 375°F (190°C). While the oven warms, place the sliced peaches in a large saucepan over medium heat. Stir in the granulated sugar, lemon juice, cinnamon, and nutmeg. Cook for about 5-8 minutes until the peaches have released their juices and the mixture is slightly thickened. Do not overcook; the peaches should remain tender but not mushy.
- While the peaches simmer, prepare the batter. In a medium mixing bowl, whisk together the flour, baking powder, and brown sugar. Gradually pour in the milk and whisk until the mixture is smooth and free of large lumps. The consistency should be similar to a thick pancake batter.
- Pour the melted butter into a 9×13 inch baking dish, ensuring it covers the bottom evenly. Pour the flour and milk batter directly over the butter. Do not stir the mixture; let the batter sit on top of the butter.
- Gently spoon the warm peach mixture and its juices over the batter. Again, resist the urge to stir. As the cobbler bakes, the batter will rise through the peaches to create a beautiful, craggy crust.
- Bake for 40-45 minutes. Watch for the top to turn a deep, golden brown and for the juices to bubble vigorously at the edges. Remove from the oven and let it stand for 10 minutes before serving to allow the sauce to thicken properly.
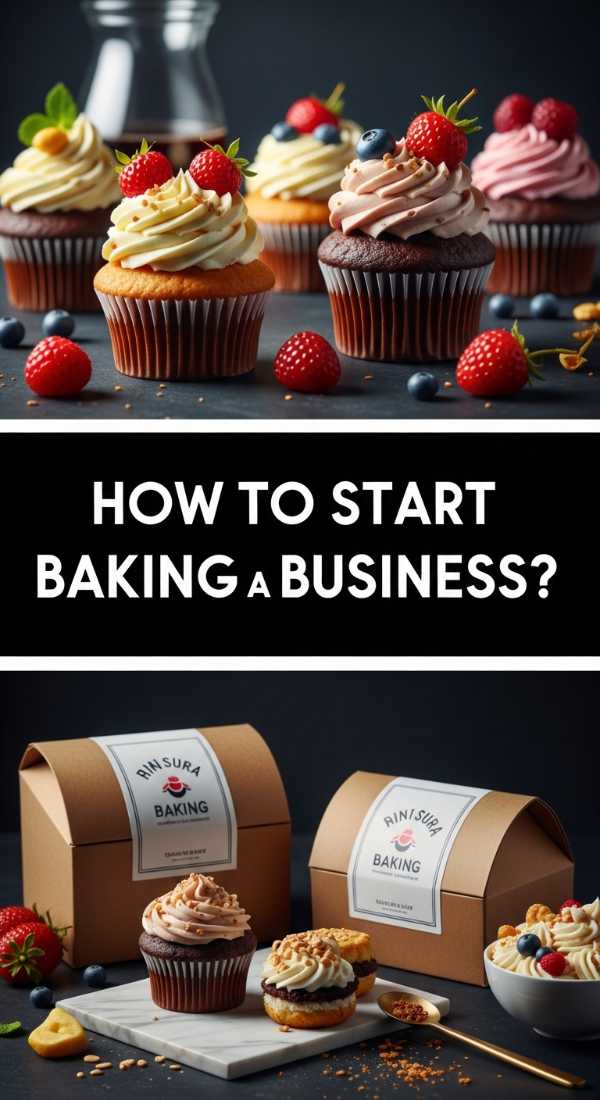
How to start baking business

Why we love this
Starting a baking business is the ultimate dream for those of us who find peace in the rhythm of a whisk and the dusting of flour. It represents the transition from a hobbyist to a professional creator, allowing you to share your passion with a wider community while building a brand that is uniquely yours. There is a profound sense of pride in seeing someone purchase a treat you’ve poured your heart into, knowing that your kitchen has become a source of joy and celebration for others.
Ingredients
- A clear business plan
- Local food handling permits
- A dedicated kitchen space
- Professional branding and logo
- Social media marketing strategy
- High-quality bulk ingredients
- Packaging materials
How to make it
- Begin by researching your local cottage food laws. These regulations vary by state and determine what types of baked goods you can sell from home and how much you can earn before needing a commercial space. Obtain necessary permits and a food handler’s license to ensure legal compliance.
- Develop a signature menu. Rather than trying to bake everything, pick 3-5 items you excel at—perhaps a specific sourdough or a unique cookie art style. This helps in branding and keeps your ingredient inventory manageable.
- Calculate your costs meticulously. Include the price of ingredients, packaging, labels, and even your electricity and water usage. Set a price point that covers these expenses while providing a fair wage for your labor time.
- Create a visual identity. Choose a business name that resonates with your style and design a logo. Set up a professional Instagram or TikTok account to showcase high-quality photos of your products, as visual appeal is the primary driver for food sales online.
- Establish a workflow for orders. Determine your pickup or delivery schedule and set up an easy payment system, such as a website or a dedicated business app. Start small by selling to friends and family to gather testimonials before launching to the general public.
How to design pie crusts

Why we love this
Designing pie crusts transforms a humble dessert into a breathtaking centerpiece that looks almost too good to eat. We love the tactile satisfaction of braiding chilled dough and the endless possibilities for creativity, from intricate floral cutouts to classic herringbone lattices. A beautifully designed crust suggests a level of craftsmanship and care that makes the act of sharing a pie feel like a true occasion, highlighting the buttery, flaky texture that defines a perfect bake.
Ingredients
- Double batch of chilled pie dough
- Egg wash (1 egg beaten with 1 tbsp water)
- Decorative cookie cutters (leaves, stars, flowers)
- Pastry wheel or sharp knife
- Coarse sanding sugar
How to make it
- Start with very cold dough. Roll your bottom crust and fit it into the pie plate, then chill it in the fridge while you work on the decorations. Keeping the fat in the dough cold is essential for maintaining the shape of your designs during baking.
- For a lattice top, roll out your second disk of dough into a rectangle. Use a pastry wheel to cut strips of varying widths. Lay half the strips vertically across the pie, then fold every other strip back to weave the remaining strips horizontally. Aim for tight, consistent spacing for a professional look.
- Use small cutters to create decorative shapes from the dough scraps. You can layer these leaves or flowers around the edge of the pie to hide the seam where the lattice meets the base. Use a tiny bit of water or egg wash as “glue” to stick the shapes in place.
- To add texture, use the tines of a fork to crimp the edges or use a sharp knife to score “veins” into leaf cutouts. For a braided edge, cut three thin strips of dough, braid them loosely, and wrap them around the circumference of the crust.
- Apply a thin, even layer of egg wash over all the decorative elements using a pastry brush. This ensures a deep golden shine. Sprinkle with sanding sugar for a sparkling finish before baking at the temperature specified in your recipe, usually around 400°F (200°C) for the first 15 minutes to set the design.
How to make strawberry tarts
Why we love this
Strawberry tarts are a celebration of freshness and elegance, combining a crisp, shortbread-like shell with velvety pastry cream and vibrant, glistening fruit. We love the way the bright acidity of the strawberries cuts through the richness of the vanilla custard, creating a balanced bite that feels light yet indulgent. The visual contrast of the deep red berries against the pale cream, finished with a glossy apricot glaze, makes these tarts a favorite for garden parties and upscale dessert boards.
Ingredients
- 1 pre-baked tart shell (pâte sablée)
- 2 cups whole milk
- 1/2 cup sugar
- 4 egg yolks
- 1/4 cup cornstarch
- 1 tablespoon butter
- 2 teaspoons vanilla bean paste
- 1 pound fresh strawberries, hulled and halved
- 1/4 cup apricot preserves (for glaze)
How to make it
- Prepare the pastry cream first. In a medium saucepan, heat the milk over medium heat until it just begins to simmer. In a separate bowl, whisk the egg yolks, sugar, and cornstarch together until pale and thick.
- Temper the eggs by slowly pouring a small amount of the hot milk into the egg mixture while whisking constantly. Once the egg mixture is warm, pour it back into the saucepan with the rest of the milk. Whisk vigorously over medium heat until the mixture thickens into a heavy custard.
- Remove from heat and stir in the butter and vanilla bean paste until smooth. Transfer the cream to a bowl, cover with plastic wrap (pressing it directly onto the surface to prevent a skin), and refrigerate for at least 2 hours until completely cold.
- Once the cream is chilled, spread it evenly into your pre-baked and cooled tart shell using an offset spatula. Smooth the top so it provides a level base for the fruit.
- Arrange the strawberry halves in concentric circles starting from the outer edge, pointing the tips toward the center. Warm the apricot preserves with a teaspoon of water, strain out any lumps, and brush the glaze gently over the strawberries for a professional, high-shine finish.
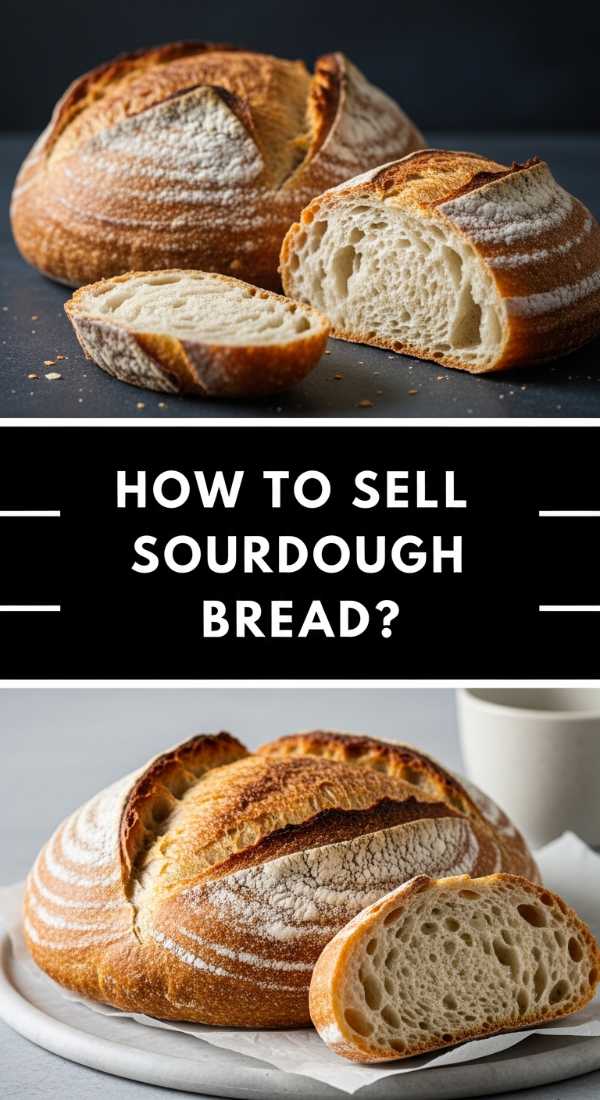
How to sell sourdough bread

Why we love this
Selling sourdough bread is about more than commerce; it is about sharing a living tradition and the deep, complex flavors that only time and fermentation can produce. We love the tactile experience of the “ear” on a loaf—that crunchy, caramelized ridge—and the airy, open crumb that tells the story of a healthy starter. It is a slow food movement staple that resonates with people looking for authenticity, gut health, and the rustic charm of an artisan loaf baked with only flour, water, and salt.
Ingredients
- Mature sourdough starter
- High-protein bread flour
- Filtered water
- Sea salt
- Rice flour (for dusting)
- Bread bags or kraft paper
How to make it
- Master your signature recipe first. Consistency is key when selling. Ensure you can replicate the same crust color, crumb structure, and tanginess every single time. Document your proofing times and temperatures to account for seasonal changes in your kitchen.
- Invest in a high-quality Dutch oven or a steam-injected oven if possible. To sell bread, the crust must be exceptional—thin, crisp, and blistered. Professional-looking scores (the cuts on top) help the bread expand and act as your “signature” on each loaf.
- Scale your production by using a large proofing container and multiple bannetons (proofing baskets). You will need to time your bakes so that you can produce several loaves in a single morning while they are at peak freshness for your customers.
- Choose your marketplace. Local farmers’ markets are excellent for face-to-face interaction, but many sourdough bakers find success through “porch pickups” or subscription-based bread clubs. Use a simple online form for pre-orders to ensure you only bake what you have already sold.
- Packaging is vital for the artisan feel. Wrap your loaves in breathable kraft paper or linen bags to maintain the crust’s integrity. Attach a small card with the bake date, ingredient list, and tips on how to store and reheat the bread to ensure the customer has the best possible experience at home.
How to choose baking tattoos

Why we love this
Baking tattoos are the ultimate badge of honor for the dedicated creator, a way to wear your passion on your sleeve—literally. We love how these designs can range from delicate, fine-line sprigs of wheat to bold, traditional-style stand mixers, serving as a permanent reminder of the joy found in the kitchen. For many, these tattoos are a form of self-expression that connects their professional identity with their personal aesthetic, celebrating the tools and ingredients that define their craft.
Ingredients
- Inspiration mood board (Pinterest or Instagram)
- List of meaningful baking tools (whisk, rolling pin, etc.)
- Reputable tattoo artist portfolio
- Aftercare balm
- Designated tattoo placement area
How to make it
- Start by identifying the symbols that mean the most to you. Are you a bread specialist? A sprig of wheat or a sourdough scoring pattern might be perfect. Love pastry? Consider a delicate croissant or a vintage sifter. Avoid overly trendy designs; instead, look for items that have been staples in your baking journey.
- Research tattoo styles. Do you prefer “minimalist” (clean black lines), “watercolor” (splashes of color), or “traditional” (bold lines and primary colors)? Look at artists on Instagram who specialize in the style you want and check their “healed” photos to ensure the work lasts.
- Consider placement carefully. As a baker, your forearms and hands are often visible, but they are also high-movement areas. If you choose a hand or wrist tattoo, be prepared for more frequent touch-ups due to constant washing and heat exposure in the kitchen.
- Schedule a consultation with your chosen artist. Bring your inspiration photos but be open to their professional input on sizing and detail. A good artist will help you simplify a design so it doesn’t blur over time, ensuring the whisk or rolling pin remains recognizable.
- Follow a strict aftercare routine. Fresh tattoos are open wounds. Keep the area clean and hydrated with a fragrance-free ointment. Avoid submerging the tattoo in water or exposing it to heavy flour dust for the first few days to prevent infection and ensure the ink settles perfectly.
How to bake lemon loaf

Why we love this
A perfect lemon loaf is like sunshine in a slice, offering a bright, citrusy punch that wakes up the palate. We love the dense, pound-cake-like crumb that remains incredibly moist thanks to a generous soaking of lemon syrup while the cake is still warm. The contrast between the tart, zesty cake and the sweet, opaque white glaze on top creates a sophisticated flavor profile that is equally suited for a morning coffee break or a centerpiece on a brunch board.
Ingredients
- 1 1/2 cups all-purpose flour
- 1/2 teaspoon baking powder
- 1/2 teaspoon baking soda
- 1/2 teaspoon salt
- 1 cup granulated sugar
- 2 tablespoons lemon zest (about 2 lemons)
- 1/2 cup unsalted butter, softened
- 2 large eggs
- 1/3 cup fresh lemon juice
- 1/2 cup sour cream
- 1 cup powdered sugar (for glaze)
How to make it
- Preheat your oven to 350°F (175°C) and grease a standard 9×5 inch loaf pan. In a small bowl, rub the lemon zest into the granulated sugar with your fingertips until the sugar is fragrant and moist; this releases the essential oils for a deeper flavor.
- In a large bowl, cream the lemon-sugar and softened butter together until light and fluffy, about 3-5 minutes using a hand mixer. Add the eggs one at a time, beating well after each addition to ensure proper aeration of the batter.
- In a separate bowl, whisk together the flour, baking powder, baking soda, and salt. In another small jug, mix the sour cream and lemon juice. Alternately add the dry ingredients and the sour cream mixture to the butter, beginning and ending with the dry ingredients. Stir just until combined; overmixing leads to a tough loaf.
- Pour the batter into the prepared pan and smooth the top. Bake for 50-60 minutes, or until a toothpick inserted into the center comes out clean. If the top is browning too quickly, tent it loosely with aluminum foil for the last 15 minutes.
- While the loaf cools slightly, whisk together the powdered sugar and 2 tablespoons of lemon juice to create a thick, pourable glaze. Once the loaf is on a wire rack but still slightly warm, pour the glaze over the top, letting it drip down the sides. Allow the glaze to set completely before slicing.
How to price baked goods

Why we love this
Pricing your baked goods correctly is an act of self-respect and the foundation of a sustainable creative life. We love the clarity that comes from understanding the value of your skill, transforming “just a hobby” into a viable source of income. When you price with confidence, you move away from the stress of undercutting yourself and toward a professional mindset where you can afford the highest quality ingredients and the time needed to perfect every detail of your viral boards.
Ingredients
- Detailed ingredient cost spreadsheet
- Labor time log
- Market research on local competitors
- Overhead cost list (packaging, utilities, marketing)
- Target profit margin (usually 20-30%)
How to make it
- Create a Master Ingredient List. Open a spreadsheet and list every item you buy, from flour to the salt on your butter boards. Break down the cost per gram or per ounce. For example, if a 5lb bag of flour costs $5, calculate the cost of the exact 500g you use in a loaf.
- Track your labor hours. Do not just count the time the cake is in the oven. Record the time spent shopping, prepping, baking, decorating, cleaning up, and communicating with the customer. Decide on a fair hourly wage for yourself and multiply it by these hours.
- Account for “invisible” costs. This includes parchment paper, cupcake liners, ribbons, stickers, boxes, and even a portion of your monthly internet and electricity bills. These small expenses add up quickly and can eat away at your profit if ignored.
- Analyze the market. Look at what high-end bakeries in your area are charging for similar artisanal items. You don’t need to be the cheapest; in fact, being too cheap can often signal lower quality to customers. Position yourself based on the unique value and aesthetic you provide.
- Apply a profit margin. Total your COGS (Cost of Goods Sold) and labor, then add a percentage for profit. This profit is what allows the business to grow, buy new equipment, or handle unexpected costs. A common formula is (Total Costs / 0.70) to achieve a 30% profit margin.
How to master berry muffins
Why we love this
Mastering berry muffins is about achieving that elusive bakery-style “muffin top” and a crumb that is tender, not tough. We love the burst of jammy juice from a roasted blueberry or raspberry, nestled within a crumb that is scented with vanilla and a hint of nutmeg. There is something deeply satisfying about a muffin that stands tall with a craggy, sugar-dusted crust, providing a rustic yet refined addition to any breakfast tray or simple food board.
Ingredients
- 3 cups all-purpose flour
- 1 tablespoon baking powder
- 1/2 teaspoon baking soda
- 1/2 teaspoon salt
- 10 tablespoons unsalted butter, melted and cooled
- 1 cup granulated sugar
- 2 large eggs
- 1 cup plain yogurt or sour cream
- 1 1/2 cups fresh mixed berries (blueberries, raspberries, blackberries)
- Turbinado sugar (for topping)
How to make it
- Preheat your oven to 425°F (220°C). High initial heat is the secret to getting high-domed muffin tops. Line a standard 12-cup muffin tin with paper liners. In a large bowl, whisk together the flour, baking powder, baking soda, and salt.
- In a separate bowl, whisk the melted butter and granulated sugar until combined. Add the eggs and yogurt, whisking until smooth. The thick yogurt provides moisture without making the batter too thin, which helps support the weight of the berries.
- Gently fold the wet ingredients into the dry ingredients using a spatula. Stop when there are still a few streaks of flour visible. Add the berries and fold them in carefully with just two or three turns. Overmixing at this stage will result in blue-tinted batter and tough muffins.
- Divide the batter evenly among the muffin cups, filling them all the way to the top. This is contrary to most cake recipes but is essential for that overhanging muffin top. Sprinkle the tops generously with turbinado sugar for a crunchy texture.
- Place the muffins in the oven and immediately turn the heat down to 375°F (190°C). Bake for 18-22 minutes until the tops are golden and spring back when touched. Let them cool in the pan for 5 minutes before transferring to a wire rack.
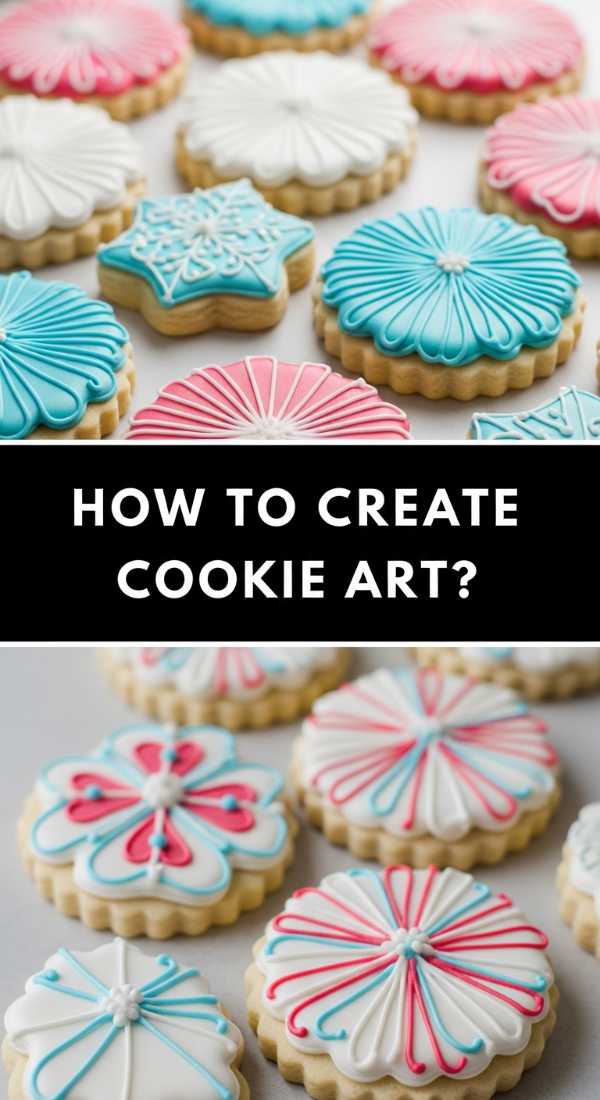
How to create cookie art
[IMAGE_10]
Why we love this
Cookie art is where baking meets illustration, turning a simple sugar cookie into a canvas for incredible detail and storytelling. We love the meditative process of piping royal icing, from the satisfying “flood” that creates a smooth, matte base to the fine-line details that add character and depth. It is a viral trend for a reason: the sheer variety of designs—from marbled patterns to hand-painted florals—makes every cookie a tiny, edible masterpiece that delights the soul.
Ingredients
- Chilled sugar cookie dough (shaped and baked)
- Royal icing (stiff and flood consistencies)
- Gel food coloring
- Piping bags and small round tips (#1 or #2)
- Scribe tool or toothpick
- Edible gold luster dust (optional)
How to make it
- Start with a completely flat, cooled sugar cookie. Any bumps in the surface will cause the icing to pool unevenly. Prepare your royal icing and divide it into bowls to color with gel dyes. You will need two consistencies for each color: “outline” (thick like toothpaste) and “flood” (thin like honey).
- Using the outline icing, pipe a border around the edge of the cookie. This acts as a dam to hold the thinner icing in place. Let this dry for about 2-3 minutes.
- Fill the center of the bordered area with the flood icing. Use a scribe tool or toothpick to pop any tiny air bubbles and to gently nudge the icing into the corners. If you want a “wet-on-wet” design (like marble or polka dots), drop different colored flood icing onto the surface immediately while it is still wet.
- For layered details (like flower petals or text), let the base flood layer dry completely for at least 4-6 hours or overnight. Once dry, use the stiff outline icing to pipe your 3D details on top. This ensures the colors don’t bleed into each other and the details stay sharp.
- For a final touch of luxury, mix a tiny amount of edible gold luster dust with a drop of vodka or lemon extract. Use a fine-tipped paintbrush to flick gold splatters across the cookies or to paint the edges of your designs for a shimmering, viral-ready look.
Conclusion
Mastering the viral food board trend is a journey that begins with a single ingredient and ends with a shared experience. Whether you are perfecting the rise of a sourdough loaf, pricing your goods for a new business venture, or simply decorating a cookie with care, remember that the heart of this trend is connection. These boards aren’t just about the food; they are about the stories we tell and the warmth we bring to the table. So, grab your rolling pin, dust off your flour, and start creating something beautiful today!