

Fresh Tips: Your All-Access Guide to 2024 Spring Nail Trends
Welcome back to my cozy corner of the internet, my loves! As the frost finally begins to melt away and those first brave tulips start peeking through the soil, I find myself craving a fresh start. There is something so deeply therapeutic about sitting down with a warm cup of herbal tea, putting on a soft playlist, and giving our hands the love they deserve. Our nails are like tiny canvases for our souls, don’t you think?
This season, it’s all about embracing the light, the texture, and a little bit of unexpected edge. I’ve spent weeks playing with colors and patterns to bring you this 2024 Spring Nail Art Masterclass. Whether you’re a minimalist seeking a soft glow or a maximalist ready for a burst of fruit-inspired joy, I’ve curated these looks just for you. Let’s dive into this cloud-soft embrace of color together.
3 Simple Steps for Chic Black Spring Nails

Why to love this Design:
Who says black is only for the moody winter months? This look is all about ‘Spring Noir’—using sheer blacks and delicate lines to create a sophisticated, airy vibe that feels high-fashion yet grounded. It’s the perfect anchor for those flowery sundresses.
Essential Elements:
- Sheer black jelly polish
- Fine detailing brush
- High-shine top coat
How to Prepare:
- Apply one thin layer of sheer black jelly polish to create a ‘smoke’ base.
- Use a detailing brush to paint a delicate black micro-french tip.
- Seal the look with a glass-like top coat for maximum reflection.
Budget Range
- Zoya Jelly Polish in ‘Paloma’ – $12
- Essie Gel Setter Top Coat – $11
- Nail Art Brush Set – $8
Get Bright Spring Nails in 5 Minutes

Why to love this Design:
Sometimes our busy lives don’t leave room for hours of pampering, but we still deserve that pop of happiness! These bright spring nails are like a shot of espresso for your mood. They are vibrant, energetic, and take less time than brewing a fresh pot of coffee.
Essential Elements:
- Electric pastel neon polish
- Quick-dry drops
- Base coat
How to Prepare:
- Apply a white base coat to make the neon pop.
- Swipe on two quick layers of your brightest electric peach or lime.
- Apply quick-dry drops and wait 60 seconds.
- Massage cuticle oil for a salon finish.
- Step out into the sun!
Budget Range
- Orly Neon Earth Collection – $15
- OPI Drip Dry Drops – $14
- Sally Hansen Insta-Dri – $7
Paint Spring Checkered Nails in 4 Steps
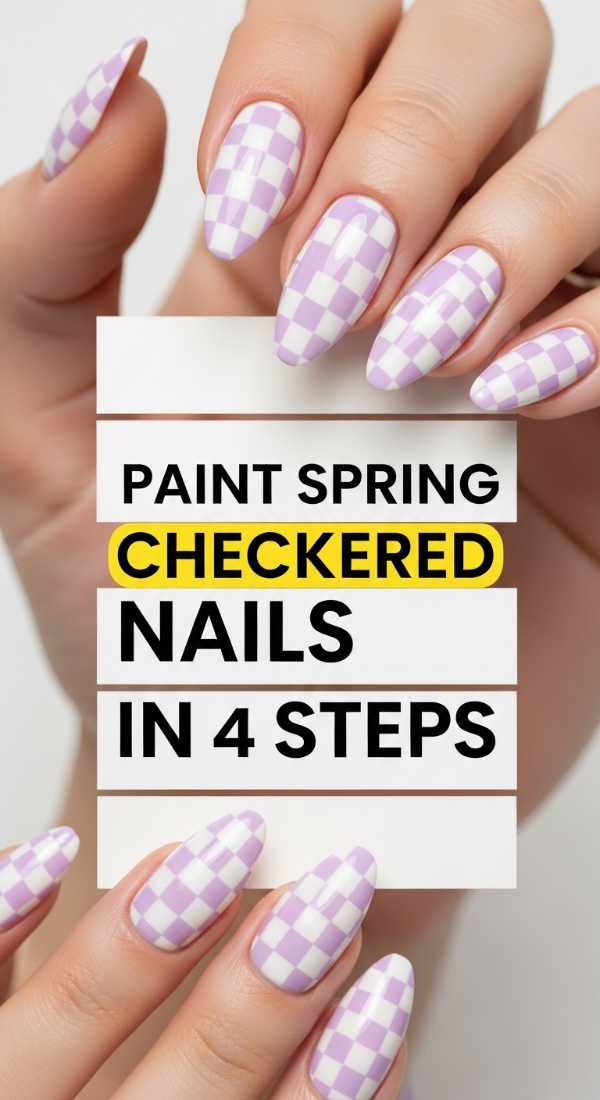
Why to love this Design:
The picnic-blanket aesthetic is making a massive comeback this year, loves! There is a whimsical, nostalgic charm to checkered nails that reminds me of afternoon tea and vintage ribbons. It’s playful without being overwhelming.
Essential Elements:
- Soft lavender polish
- Opaque white polish
- Striper brush
How to Prepare:
- Paint your nails with two coats of soft lavender.
- Using a striper brush, draw two horizontal white lines.
- Cross them with two vertical white lines to create a grid.
- Fill in alternating squares with white polish.
Budget Range
- Holt Lavender Polish – $10
- Beetles Nail Art Liner Gel – $9
- Base and Top Coat Set – $15
Create Stunning April Nails in 6 Quick Steps

Why to love this Design:
April is the month of showers and growth, and this design reflects that beautiful transition. We are going for a ‘raindrop’ effect using 3D gel texture. It’s a sensory experience right at your fingertips!
Essential Elements:
- Pale sky blue polish
- Clear 3D builder gel
- Dotting tool
How to Prepare:
- Apply two coats of sky blue polish.
- Matte out the surface with a matte top coat.
- Dip a dotting tool into clear builder gel.
- Place random ‘droplets’ of gel onto the nail.
- Cure under a lamp (or use thick clear air-dry polish).
- Leave the droplets glossy against the matte base.
Budget Range
- Essie ‘Soothe Move’ Blue – $9
- Modelones Builder Gel – $10
- Matte Top Coat – $8
Apply Spring Chrome Nails in 3 Stages
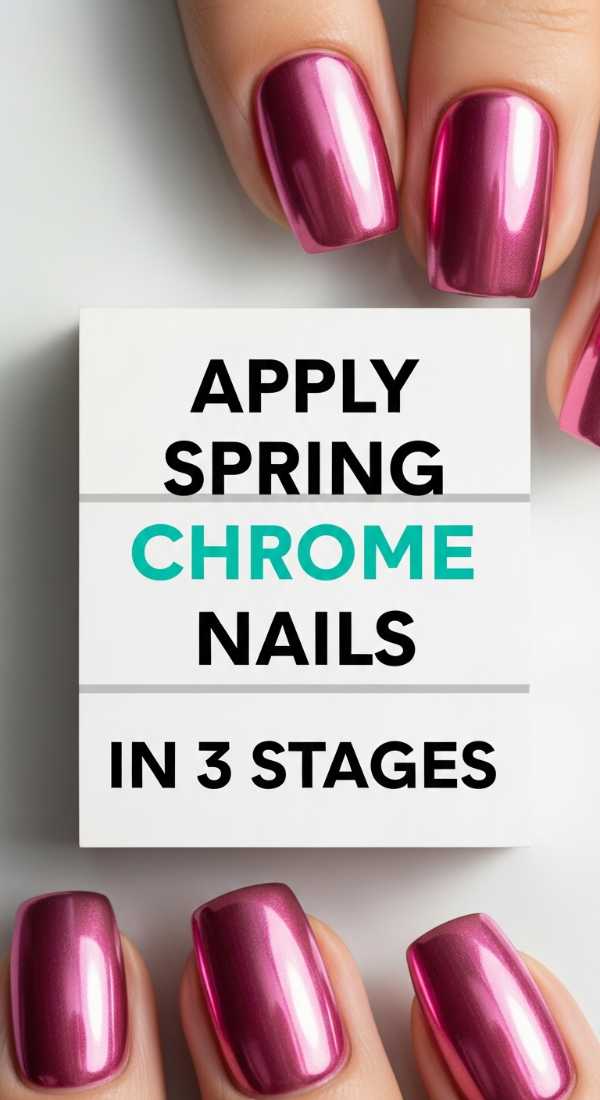
Why to love this Design:
Chrome isn’t going anywhere, but for spring, we are softening it up. Think ‘Pearl Core.’ This design gives your nails a celestial, ethereal glow that catches the light beautifully when you’re gardening or holding a mimosa.
Essential Elements:
- Pearl chrome powder
- No-wipe top coat
- Sponge applicator
How to Prepare:
- Apply a soft pink base and a no-wipe top coat; cure/dry until ‘tacky’.
- Rub the pearl chrome powder firmly onto the nail using a sponge.
- Seal with a final high-gloss top coat to lock in the shimmer.
Budget Range
- Artdone Chrome Powder – $11
- Kiara Sky Non-Wipe Top Coat – $15
- Sponge Applicator Pack – $5
Design Spring Nails Fruit in 5 Steps
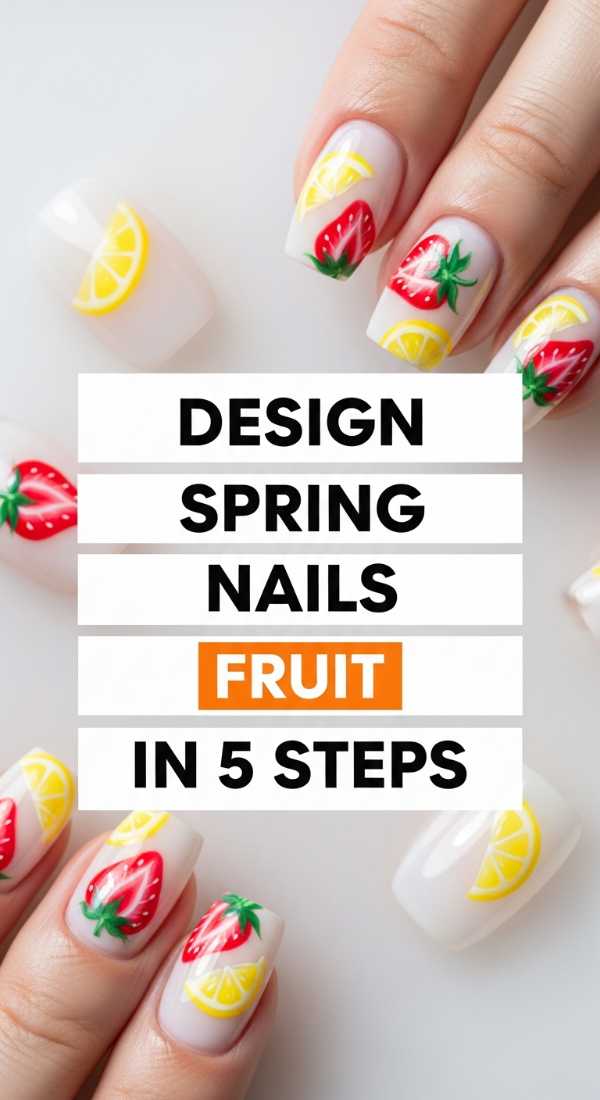
Why to love this Design:
Is there anything cuter than tiny strawberries? This fruit-themed art is for the whimsical heart. It’s sweet, vibrant, and adds a touch of cottage-core magic to your daily routine.
Essential Elements:
- Red, green, and yellow polishes
- Small dotting tool
- Steady hand
How to Prepare:
- Paint a red strawberry ‘heart’ shape in the center of the nail.
- Add two tiny green leaves at the top.
- Use yellow to place tiny ‘seed’ dots on the red area.
- Add a tiny white ‘highlight’ for a 3D effect.
- Top with a glossy finish.
Budget Range
- Color Club Fruit Tones Set – $18
- Detailing Tool Kit – $7
- Seche Vite Fast Dry Top Coat – $10
Master Black Spring Nails in 4 Pro Steps
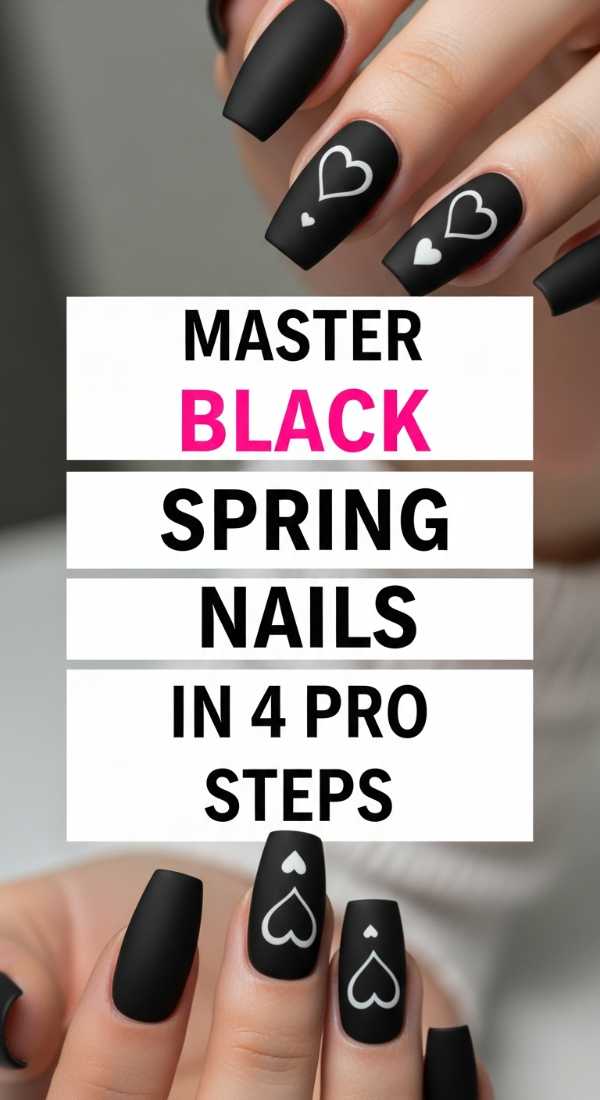
Why to love this Design:
This is for my pros who want that ‘expensive’ look. By mixing matte and gloss textures within a black palette, we create a look that is architectural and stunning. It’s a total power move for spring galas.
Essential Elements:
- Opaque black polish
- Matte top coat
- Glossy top coat
How to Prepare:
- Paint the entire nail a deep, opaque black.
- Apply a matte top coat over the whole nail.
- Use a glossy top coat to paint a wide french tip.
- Add a single glossy vertical stripe down the center.
Budget Range
- OPI ‘Black Onyx’ – $11
- Matte Finish Polish – $9
- Professional Liner Brush – $12
Style Bright Spring Nails in 5 Easy Steps

Why to love this Design:
Can’t pick a color? Don’t! The ‘Skittles’ mani is perfect for spring. It’s a joyful celebration of the entire rainbow, keeping things light and playful. Each finger tells a different story of color.
Essential Elements:
- 5 different pastel-bright polishes
- Unified top coat
- Cuticle cream
How to Prepare:
- Select five colors that share the same ‘brightness’ level.
- Apply two coats of a different color to each finger.
- Ensure the shapes are consistent across all nails.
- Apply a thick top coat to unify the texture.
- Hydrate with lemon-scented cuticle cream.
Budget Range
- Lights Lacquer Spring Bundle – $50
- Burt’s Bees Lemon Butter Cuticle Cream – $6
- Glass Nail File – $10
Make Spring Checkered Nails in 7 Steps
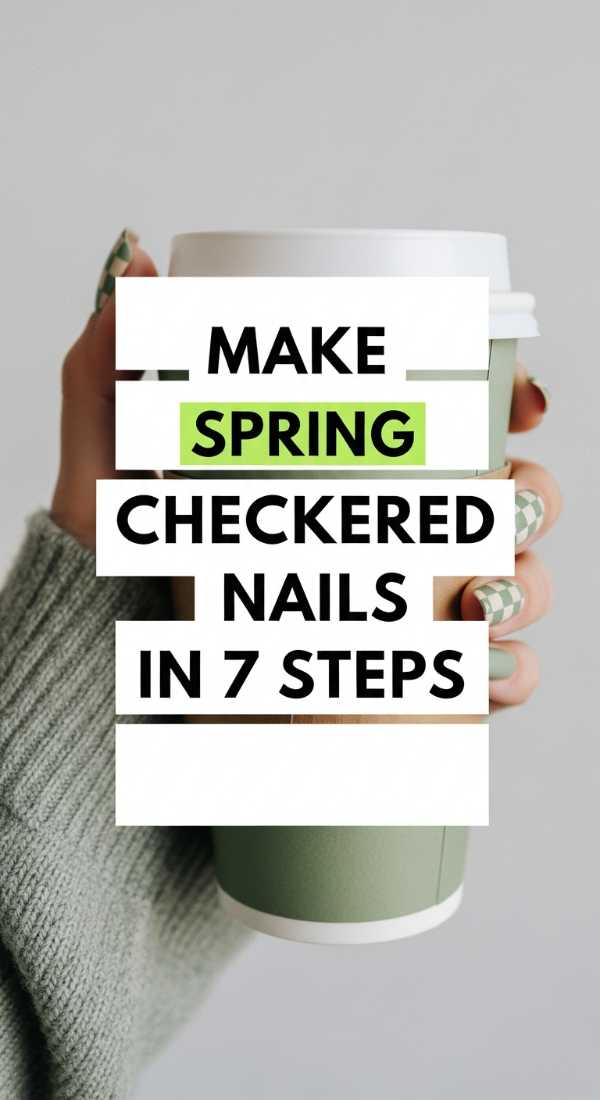
Why to love this Design:
This is the high-detail version for those who love a challenge! We’re doing a ‘clashing’ check pattern with pink and green. It’s bold, it’s preppy, and it looks incredible in photos.
Essential Elements:
- Bubblegum pink polish
- Mint green polish
- Thin nail tape
How to Prepare:
- Apply the pink base and let it dry completely.
- Apply thin nail tape in a grid pattern.
- Carefully paint mint green over the open squares.
- Remove the tape while the green is still slightly wet.
- Touch up any edges with a clean-up brush.
- Wait 10 minutes for the layers to settle.
- Finish with a long-wear top coat.
Budget Range
- Essie ‘Mint Candy Apple’ – $9
- Line Tape Roll – $4
- Clean-up Brush with Acetone – $12
Finish Spring Chrome Nails in 4 Easy Steps

Why to love this Design:
This is the ‘Glazed Donut’ 2.0. We are using a holographic chrome to give that prismatic spring morning feel. It’s incredibly flattering on all skin tones and makes your hands look radiant.
Essential Elements:
- Holographic chrome powder
- Sheer nude base
- LED lamp (optional for gel)
How to Prepare:
- Apply one coat of sheer nude polish.
- Buff a tiny amount of holo-chrome onto the surface.
- Use a soft brush to dust off the excess powder.
- Seal with a thin layer of top coat for a smooth finish.
Budget Range
- Born Pretty Holo Powder – $8
- Zoya ‘Naked Nails’ Base – $12
- Soft Dusting Brush – $5
Bloom Where You Are Planted
I hope these designs inspire you to take a little moment for yourself this week, my loves. Spring is a season of rebirth, and sometimes that starts with something as small as a fresh manicure. Remember, there are no rules in art—if you want black nails in April, wear them with pride! You are beautiful, you are growing, and your hands do so much work for the world. Treat them kindly. Until next time, stay fresh and keep blooming!