
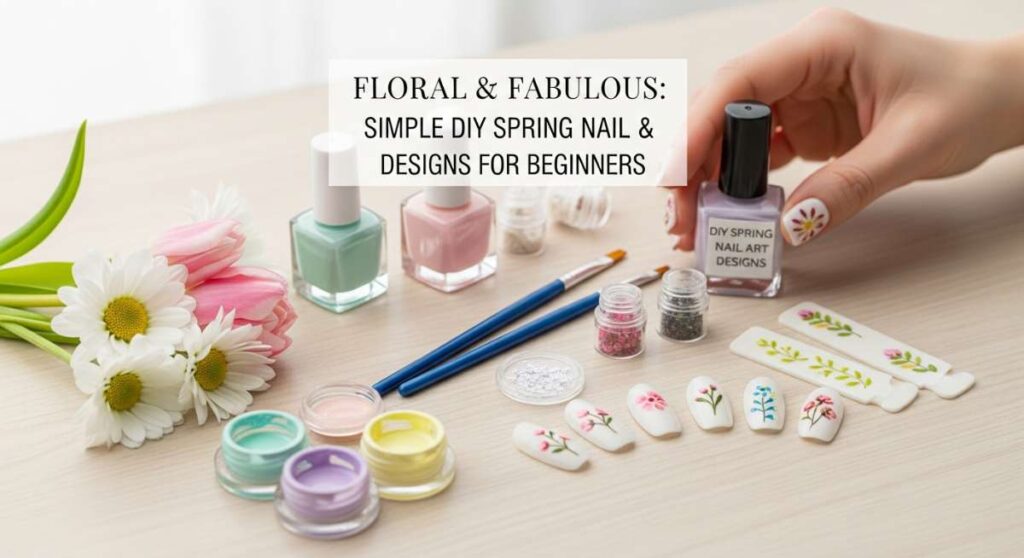
Floral & Fabulous: Simple DIY Spring Nail Designs for Beginners
Hello, my loves! Can you feel that gentle shift in the air? The way the sunlight lingers just a little longer on the windowsill and the first brave buds are starting to peek through the frost? Spring is finally whispering to us, and there is something so incredibly soul-soothing about matching our energy to the blooming world outside. For me, self-care has always been found in the quiet moments—the soft click of a polish bottle opening and the rhythmic brushstrokes that turn my fingertips into tiny canvases of joy.
I know how intimidating nail art can feel when you’re just starting out, but I want you to take a deep breath and let that worry drift away like a dandelion seed. This season is all about grace, not perfection. Whether you’re sipping tea on a rainy Tuesday or prepping for a sun-drenched brunch, these designs are meant to be a cloud-soft embrace for your creative spirit. Let’s dive into these easy, beautiful ways to celebrate the season of renewal together.
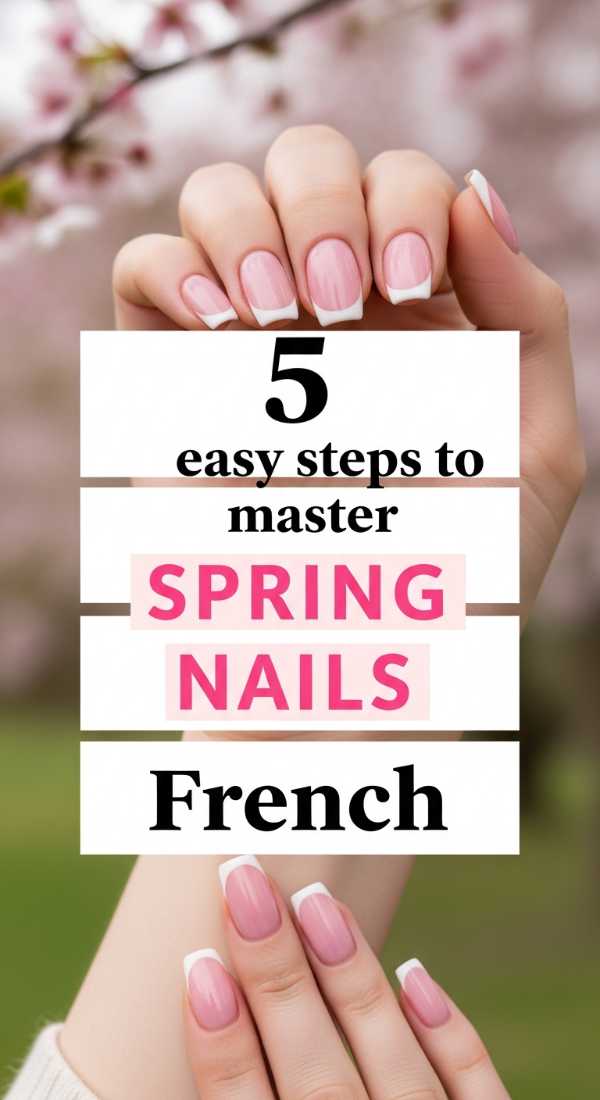
5 Easy Steps to Master Spring Nails French
Why to love this Design:
There is a timeless elegance to a French manicure, but giving it a spring twist feels like a fresh breath of air. Instead of the classic white, we’re using soft pastels to mimic the petals of a cherry blossom. It’s sophisticated yet playful, making your hands look elongated and effortlessly chic.
Essential Elements:
- Sheer pink base coat
- Pastel lavender or mint polish
- French tip guides or a thin liner brush
- Glossy top coat
How to Prepare:
- Apply a thin layer of sheer pink base and let it dry completely.
- Place your tip guide just below the free edge of your nail.
- Swipe your pastel color across the tip in one smooth motion.
- Carefully peel the guide away while the polish is still slightly tacky.
- Seal the look with a high-shine top coat for that salon-quality finish.
Budget Range
- Essie ‘Sugar Daddy’ ($10)
- Sally Hansen Pastel Collection ($7)
- Nail Guide Stickers ($4)
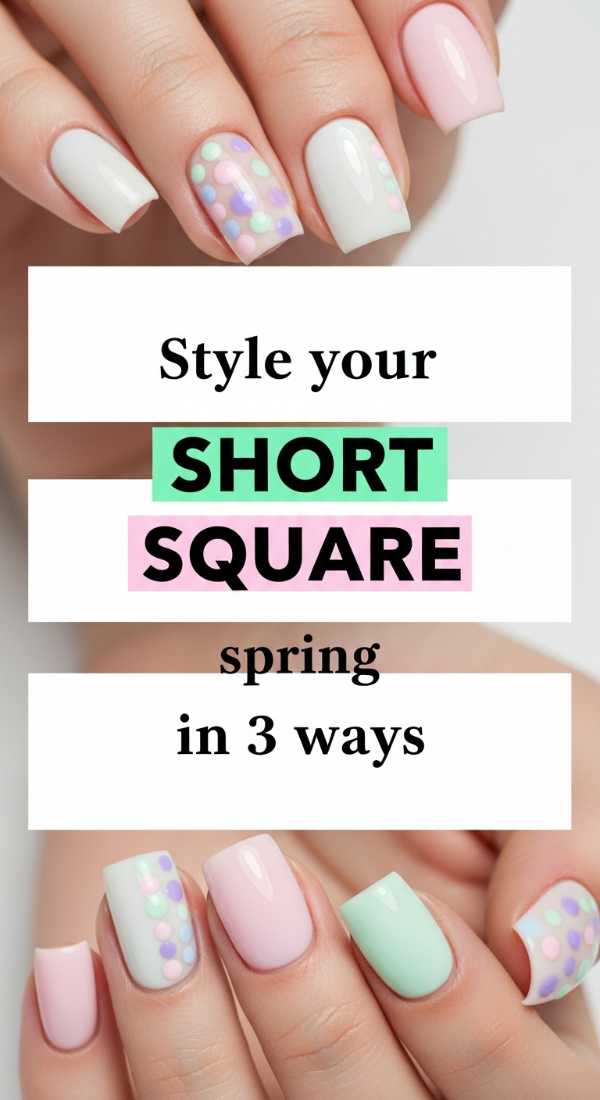
Style Your Short Square Nails Spring in 3 Ways
Why to love this Design:
Short square nails are my absolute favorite for everyday life—they are practical, modern, and so incredibly cute when dressed up for spring. This approach celebrates the natural beauty of your hands while adding just a hint of artistic flair that doesn’t require hours of steady-hand practice.
Essential Elements:
- Matte top coat
- Floral water decals
- Dotting tool
- Soft sage green polish
How to Prepare:
- Accent Nail: Paint your ring finger sage green and keep the others a soft nude.
- Floral Bliss: Apply a tiny daisy water decal to the center of your square tip.
- Minimalist Dots: Use a dotting tool to place three tiny white dots near the cuticle for a ‘micro-floral’ vibe.
Budget Range
- Zoya Sage Green Polish ($12)
- Spring Floral Water Decals ($5)
- Dotting Tool Set ($6)
Try These 7 Cute Spring Nail Ideas Today

Why to love this Design:
Sometimes we just want a little bit of everything! This collection of ideas is like a wildflower bouquet for your hands. It’s perfect for the person who can’t choose just one color and wants to embrace the full spectrum of spring joy through whimsical shapes and soft hues.
Essential Elements:
- A palette of 5 pastel colors
- White striping polish
- Clear glitter topper
- Gold stud accents
How to Prepare:
- Skittles Mani: Paint each finger a different pastel shade for an instant mood boost.
- Cloud Art: Use a brush to dab white ‘clouds’ onto a light blue base.
- Glitter Gradient: Sweep glitter from the base of the nail upward for a dew-drop effect.
Budget Range
- Holo Taco Scattered Holo ($14)
- Wet n Wild Pastel Bundle ($12)
- Nail Art Gold Studs ($5)
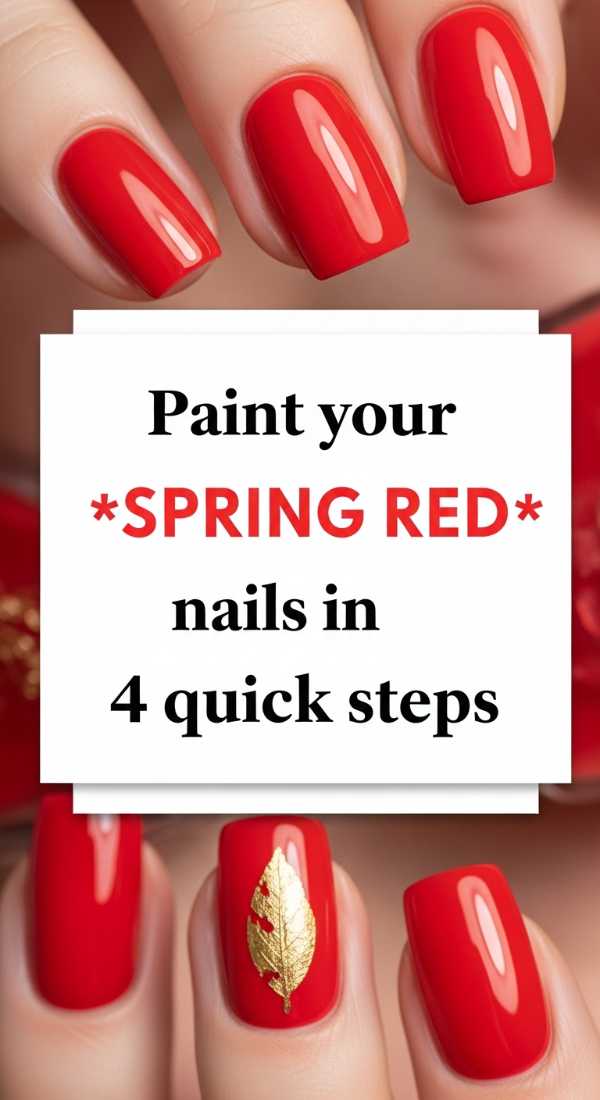
Paint Your Spring Red Nails in 4 Quick Steps
Why to love this Design:
Who says red is only for winter? A bright, poppy-toned red is the ultimate spring power move. It’s bold, romantic, and looks stunning against the greening landscape. It’s the color of confidence and blooming tulips, distilled into a perfect manicure.
Essential Elements:
- Bright Poppy Red polish
- Nourishing cuticle oil
- Fast-drying base coat
- Conditioning remover
How to Prepare:
- Apply a protective base coat to prevent staining.
- Paint two thin, even layers of your poppy red, leaving a tiny gap at the cuticle.
- Clean up any edges with a brush dipped in remover for a crisp look.
- Apply cuticle oil once dry to make the red ‘pop’ against healthy skin.
Budget Range
- OPI ‘Cajun Shrimp’ ($11)
- Olive & June Top Coat ($9)
- Cuccio Cuticle Oil ($8)
Recreate Viral Pucci Nails with 6 Simple Strokes
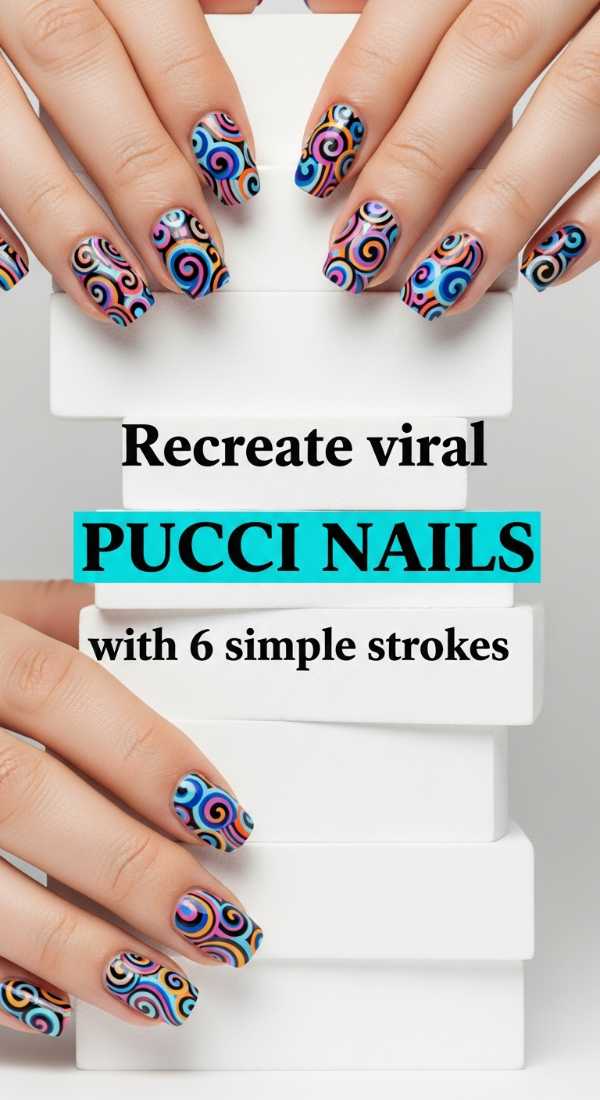
Why to love this Design:
If you’ve been scrolling through social media, you’ve definitely seen these retro, psychedelic swirls! Pucci-inspired nails are the ultimate ‘cool girl’ spring trend. They look incredibly complex but are actually just a series of soft, flowing lines that celebrate movement and color.
Essential Elements:
- Long liner brush
- Cream, peach, and turquoise polishes
- Steady surface for your arm
- Acetone for brush cleaning
How to Prepare:
- Start with a cream-colored base.
- Dip your liner brush into peach and draw a long ‘S’ curve across the nail.
- Repeat with turquoise, following the parallel line of the first curve.
- Fill in small gaps with a third contrasting color.
- Refine the edges with the cream base if needed.
- Finish with a thick layer of top coat to level the design.
Budget Range
- Orly Liner Brush ($12)
- Modelones Pastel Gel Set ($15)
- Pure Acetone ($4)
Mix 8 DND Spring Nail Colors for a Gradient
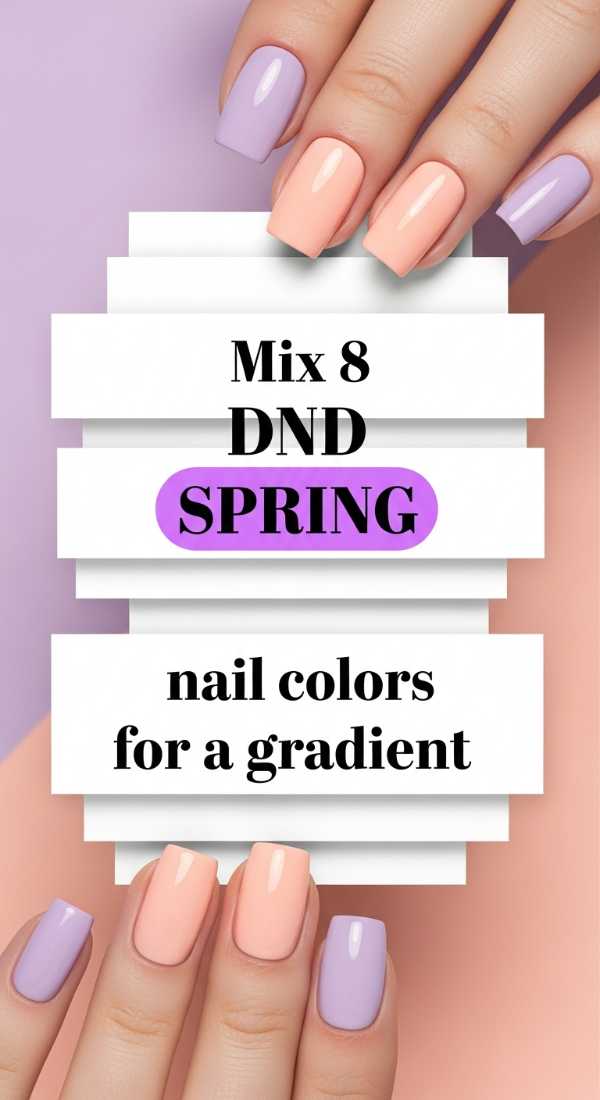
Why to love this Design:
DND colors are famous for their pigment and shine, and mixing them into a gradient is like watching a sunset over a field of lavender. It’s a seamless transition of color that feels high-end and professional, yet is surprisingly therapeutic to create at home.
Essential Elements:
- 8 DND Pastel shades (pinks, blues, purples)
- Makeup sponges
- Liquid latex (for easy cleanup)
- Patience and a light touch
How to Prepare:
- Apply liquid latex around your cuticles.
- Paint your lightest DND shade as a base.
- Strip your chosen colors onto a makeup sponge in horizontal lines.
- Gently dab the sponge onto the nail, moving it slightly up and down to blend.
- Repeat until the opacity is reached and peel off the latex.
Budget Range
- DND Gel Polish Duo ($13 per set)
- Wedge Makeup Sponges ($3)
- Pueen Liquid Latex ($9)
Achieve Chic Spring Simple Nails in 10 Minutes

Why to love this Design:
For my busy loves who are juggling a million things, this is for you. You don’t need an hour to feel put together. This ‘clean girl’ aesthetic for spring focuses on health, subtle shimmer, and a polished look that goes with every single outfit in your closet.
Essential Elements:
- Sheer milky white polish
- Buffing block
- Glass nail file
- Quick-dry drops
How to Prepare:
- File your nails into a soft oval shape to mimic natural growth.
- Buff the surface for a smooth, ridge-free canvas.
- Apply two coats of sheer milky polish.
- Add quick-dry drops so you can get back to your day instantly.
Budget Range
- Londontown Illuminating Nail Veil ($20)
- Mont Bleu Glass File ($10)
- Dashing Diva Gloss Strips ($8)
Craft Edgy Spring Nails with 5 Metallic Details
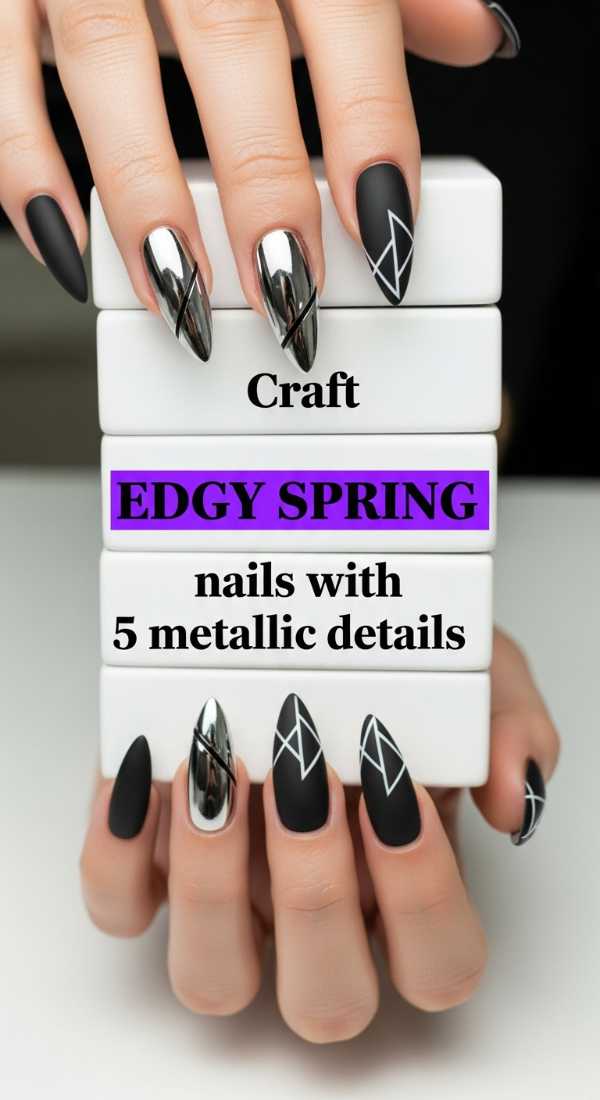
Why to love this Design:
Spring doesn’t always have to be soft and sweet! Adding metallic details brings a bit of edge and modern architecture to your look. It’s like wearing tiny pieces of jewelry on your fingertips—a little bit of silver or gold to catch the light as you move.
Essential Elements:
- Silver or gold metallic lacquer
- Fine-tip detailing brush
- Muted grey or lilac base polish
- Tweezers
How to Prepare:
- Paint your nails a muted lilac.
- Use the detail brush to draw a single vertical metallic line down the center.
- Add a tiny metallic dot at the base of each nail.
- Place a small metallic foil flake on the ring finger for extra texture.
- Seal with a smudge-proof top coat.
Budget Range
- ILNP Metallic Collection ($10)
- Nail Art Foil Leaves ($6)
- Berry Wine Liner Brushes ($7)
Apply 3 Layers for Perfect Spring Nails Chrome

Why to love this Design:
The ‘Glazed Donut’ trend is evolving for spring with iridescent pearls and soft holographic finishes. It’s magical, ethereal, and makes your nails look like they’ve been dipped in moonlight. It’s the perfect way to add a touch of fantasy to your daily routine.
Essential Elements:
- Iridescent chrome powder
- No-wipe top coat
- Sponge applicator
- Soft base color (light blue or pink)
How to Prepare:
- Apply your base color and a no-wipe top coat, then cure/dry.
- Use the sponge to rub the chrome powder onto the nail until it shines.
- Apply a final layer of top coat to lock in that mirror-like glow.
Budget Range
- Artdone Chrome Powder Set ($12)
- Kiara Sky No Wipe Top Coat ($15)
- Beetles Gel Base ($8)
Design Dark Goth Spring Nails in 4 Edgy Steps
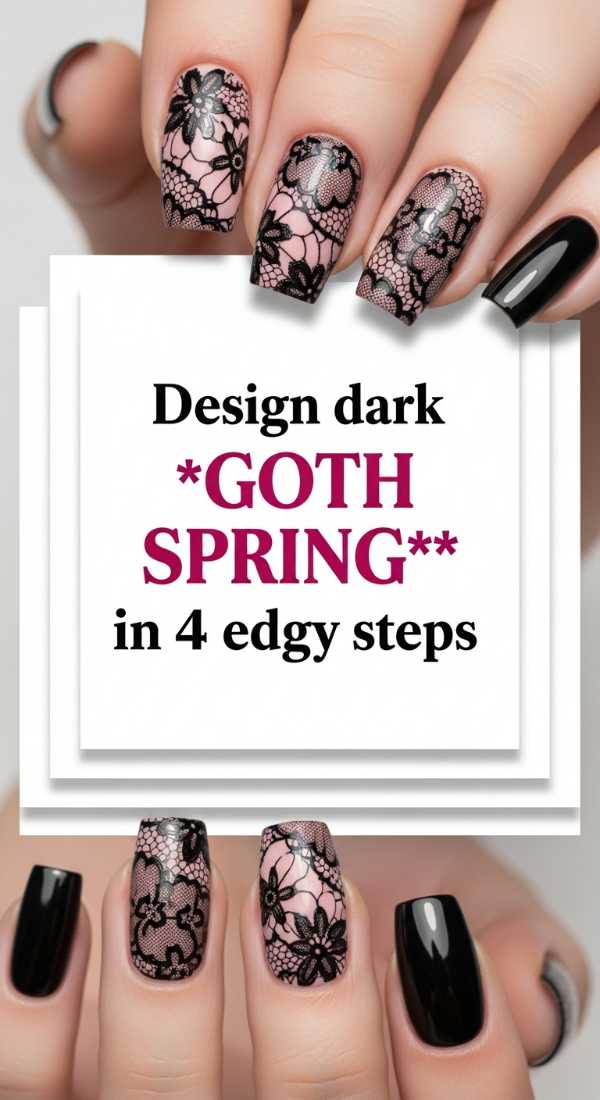
Why to love this Design:
For those of us whose hearts belong to the shadows, ‘Spring Goth’ is a beautiful paradox. Think deep plums and blacks accented with delicate, spindly floral patterns. It’s moody, sophisticated, and a gorgeous way to stay true to your aesthetic while acknowledging the season.
Essential Elements:
- Deep plum or black polish
- Matte top coat
- White acrylic paint (for detailing)
- Micro-brush
How to Prepare:
- Paint nails a deep, dark plum.
- Apply a matte top coat for a velvety texture.
- Using white paint, draw ‘ghostly’ branches or tiny skeletal flowers.
- Leave the design matte or add a single glossy drop to the center of the flowers.
Budget Range
- Revlon ‘Vixen’ ($6)
- NYX Matte Finish ($7)
- Fine Detail Paint Brushes ($5)
Bloom Where You Are Planted
As we wrap up our little nail journey, I hope you feel inspired to take a moment for yourself this week. Whether you chose a bold red or a subtle chrome, remember that these nails are a reflection of your own unique beauty and the fresh start that spring promises us all. You don’t need to be a professional to have hands that make you smile every time you pick up your coffee cup. Treat yourself with kindness, keep practicing, and let your creativity bloom just like the flowers outside. I’m so proud of you for trying something new, my loves!