

Everything You Need to Know About the Strawberry Dessert Taking Over Social Media
Hello, my loves! There is something truly magical about this time of year when the air turns sweet and the farmer’s markets are overflowing with the most vibrant, ruby-red strawberries you’ve ever seen. I’ve been spending my afternoons in my sun-drenched kitchen, experimenting with these little gems to find the perfect recipes that feel like a warm, cloud-soft embrace for your soul. You know I believe that food is a love language, and nothing says ‘I care for you’ quite like a handmade strawberry treat shared over a slow afternoon tea.
Lately, my social media feeds have been absolutely flooded with these aesthetic strawberry creations that look almost too beautiful to eat, but I promise they are as delicious as they are photogenic. I’ve gathered all the secrets, the whispered tips from professional pastry chefs, and my own personal kitchen trials to bring you this ultimate guide. We’re going to dive deep into the world of pink hues and sugary bliss, making sure your kitchen smells like a summer dream and your heart feels just as full as your plate. Let’s create some magic together, shall we?
The Secret To Irresistible Strawberry Desserts

Why we love this
The true secret to an irresistible strawberry dessert lies in the delicate balance between the fruit’s natural acidity and a gentle, supportive sweetness. By macerating your berries with a touch of sugar and a splash of lemon juice, you draw out the vibrant juices that create a natural syrup, intensifying every single bite. It’s a technique that honors the fruit rather than masking it, resulting in a flavor profile that feels sophisticated, bright, and deeply nostalgic. This little extra step transforms a simple snack into a gourmet experience that lingers on the palate like a sweet summer memory.
Ingredients
- 2 lbs fresh organic strawberries, hulled and sliced
- 1/4 cup granulated sugar
- 1 tablespoon fresh lemon juice
- 1 teaspoon pure vanilla bean paste
- A tiny pinch of sea salt to enhance the flavors
How to make it
- Begin by washing your strawberries in cool water and patting them completely dry with a soft lint-free towel to ensure the flavors stay concentrated.
- Slice the berries into uniform pieces, either halves or quarters depending on their size, and place them into a large glass mixing bowl.
- Sprinkle the granulated sugar and the tiny pinch of sea salt over the fruit, then drizzle with the fresh lemon juice and the vanilla bean paste.
- Gently toss the mixture with a silicone spatula, being careful not to bruise the delicate fruit, until every piece is evenly coated in the mixture.
- Cover the bowl with plastic wrap and let it sit at room temperature for at least 30 minutes, or in the fridge for 2 hours, before serving.
Better Homemade Strawberry Cake Mix Cookies

Why we love this
These cookies are the ultimate kitchen hack for when you want something that looks and tastes artisanal but requires very little effort from your busy heart. Using a high-quality cake mix as a base provides a soft, pillowy texture that mimics a cloud, while the addition of fresh strawberry reductions or chips adds a burst of authenticity. They are perfectly chewy on the edges and melt-in-your-mouth soft in the center, making them a favorite for bake sales or cozy movie nights. The beautiful pink hue makes them look like they’ve come straight from a high-end boutique bakery, but they are secretly so easy.
Ingredients
- 1 box (15.25 oz) strawberry cake mix
- 1/2 cup vegetable oil or melted coconut oil
- 2 large room-temperature eggs
- 1/2 cup white chocolate chips
- 1/4 cup finely chopped dried strawberries
How to make it
- Preheat your oven to 350°F (175°C) and line two large baking sheets with parchment paper or silicone baking mats to prevent any sticking.
- In a large mixing bowl, combine the strawberry cake mix, oil, and eggs, stirring until a thick, vibrant pink dough forms and no dry streaks remain.
- Gently fold in the white chocolate chips and the finely chopped dried strawberries until they are evenly distributed throughout the cookie dough.
- Scoop rounded tablespoons of dough onto the prepared baking sheets, spacing them about 2 inches apart to allow for a little bit of spreading.
- Bake for 9 to 11 minutes; the edges should be just set but the centers should still look slightly soft and underbaked for the best texture.
- Allow the cookies to cool on the baking sheet for at least 5 minutes before transferring them to a wire rack to cool completely.
Fresh Strawberry Desserts For Summer

Why we love this
Summer is all about lightness and celebrating the harvest, and these fresh strawberry parfaits capture that airy, sun-kissed essence perfectly in a glass. By layering light whipped cream with macerated berries and a touch of crunch, you create a dessert that satisfies the sweet tooth without ever feeling heavy or overwhelming. It’s the perfect end to an outdoor dinner party under the stars, feeling elegant yet completely approachable for any home cook. Every spoonful offers a refreshing burst of fruit and cream that cools you down on even the warmest, most humid July afternoons.
Ingredients
- 3 cups fresh strawberries, diced and lightly sugared
- 2 cups heavy whipping cream, chilled
- 1/2 cup powdered sugar
- 1 cup crushed shortbread cookies or graham crackers
- Fresh mint leaves for a beautiful, aromatic garnish
How to make it
- In a large chilled glass bowl, beat the heavy whipping cream and powdered sugar together until stiff, fluffy peaks form and hold their shape.
- Prepare your serving glasses by placing a generous spoonful of the crushed shortbread cookies at the very bottom of each individual container.
- Add a layer of the prepared strawberries, ensuring some of the sweet juice soaks into the cookie crumbs for extra flavor and texture.
- Top the fruit with a thick, velvety layer of the whipped cream, smoothing it out or piping it in swirls for a more decorative, professional look.
- Repeat the layers until the glasses are full, finishing with a final dollop of cream, a whole strawberry, and a sprig of fresh mint.
- Chill the parfaits in the refrigerator for at least one hour before serving to allow the layers to meld together into a cohesive dessert.
Professional Secrets For Chocolate Covered Strawberries

Why we love this
There is a specific kind of luxury found in a perfectly dipped chocolate strawberry, one where the chocolate snaps between your teeth to reveal the juicy fruit inside. Achieving that professional finish is all about the quality of the chocolate and the preparation of the berry, ensuring a smooth, glossy coat that doesn’t slip off. It’s an act of patience and love, requiring a steady hand and a bit of kitchen science to get that iconic, high-end look. Once you master the technique, you’ll be able to create stunning gift boxes that rival the most expensive chocolatiers in the city.
Ingredients
- 1 lb long-stemmed fresh strawberries
- 12 oz high-quality semi-sweet or dark chocolate melting wafers
- 1 teaspoon coconut oil for extra gloss and smooth flow
- Optional: Crushed nuts, sprinkles, or edible glitter for decorating
How to make it
- The most critical step is to ensure your strawberries are at room temperature and bone-dry; even one drop of water will cause the chocolate to seize.
- Melt your chocolate wafers and coconut oil in a microwave-safe bowl in 30-second intervals, stirring thoroughly between each session until completely smooth and glossy.
- Hold a strawberry by the green leafy stem and dip it into the melted chocolate, swirling it slightly to ensure an even, beautiful coating up to the shoulders.
- Lift the berry out and shake it very gently to let the excess chocolate drip off, then scrape the bottom against the edge of the bowl.
- Place the dipped berry onto a parchment-lined tray and immediately add your decorations like crushed nuts or sprinkles while the chocolate is still wet.
- Let the strawberries sit at room temperature until the chocolate has fully set and hardened, avoiding the fridge if possible to prevent condensation.
The Easiest No Bake Strawberry Cheesecake

Why we love this
When the heat of summer makes turning on the oven feel like a chore, this no-bake strawberry cheesecake arrives like a cool, creamy savior for your kitchen. It has all the tang and richness of a traditional cheesecake but with a much lighter, mousse-like consistency that feels incredibly refreshing on a hot day. The crust provides a salty-sweet crunch that anchors the silky filling, while a fresh strawberry glaze on top adds a vibrant pop of color. It is the ultimate ‘set it and forget it’ dessert that looks like it took hours of careful labor but actually comes together in minutes.
Ingredients
- 2 blocks (16 oz total) cream cheese, softened to room temperature
- 1 can (14 oz) sweetened condensed milk
- 1/4 cup fresh lemon juice
- 1 teaspoon vanilla extract
- 1 pre-made graham cracker crust or homemade crust
- 1 cup strawberry puree for the swirl or topping
How to make it
- In a large mixing bowl, beat the softened cream cheese with a hand mixer or stand mixer until it is completely smooth and free of any lumps.
- Gradually pour in the sweetened condensed milk while continuing to beat the mixture, ensuring it becomes thick, creamy, and thoroughly combined.
- Stir in the fresh lemon juice and the vanilla extract, which will help the cheesecake set up firmly while adding a bright, citrusy depth to the flavor.
- Pour the creamy filling into your graham cracker crust, using an offset spatula to smooth the top into a perfectly even, beautiful surface.
- Drop spoonfuls of strawberry puree onto the top and use a toothpick or a knife to swirl it gently into the cheesecake for a marbled effect.
- Cover the pie with plastic wrap and refrigerate for at least 6 to 8 hours, or ideally overnight, to ensure it is fully set before slicing.
Gourmet White Chocolate Covered Strawberries

Why we love this
White chocolate offers a buttery, vanilla-forward sweetness that complements the tartness of a strawberry in a way that feels exceptionally elegant and high-end. These gourmet treats are often seen at weddings and high-profile events because their ivory coating provides the perfect canvas for intricate designs and beautiful toppings. The contrast between the milky white exterior and the bright red interior is visually stunning and tastes like a sophisticated version of strawberries and cream. They are a little more delicate to work with, but the result is a dessert that feels like a true indulgence for the senses.
Ingredients
- 1 lb large, ripe strawberries with pretty green tops
- 12 oz premium white chocolate baking bars or wafers
- 1/2 cup freeze-dried strawberry dust (blended freeze-dried berries)
- Gold leaf or white sanding sugar for a touch of luxury
How to make it
- Carefully wash your berries and ensure they are 100% dry; use a hairdryer on the cool setting if you want to be absolutely certain no moisture remains.
- Chop your white chocolate into small, uniform pieces and melt them using a double boiler over low heat, stirring constantly to prevent burning the delicate milk solids.
- Once the chocolate is smooth and fluid, remove it from the heat and let it cool for just a minute so it thickens slightly for a better coating.
- Dip each strawberry into the white chocolate, rotating it to cover the sides, and then immediately roll the tip in the freeze-dried strawberry dust.
- Place the berries on a sheet of wax paper and sprinkle lightly with gold leaf or sanding sugar while the chocolate is still tacky and receptive.
- Allow them to firm up in a cool, dry place for about 30 minutes, then arrange them on a silver platter for a truly royal presentation.
Healthy Fresh Strawberry Yogurt Bites

Why we love this
For those days when you want a treat that nourishes your body as much as it delights your taste buds, these strawberry yogurt bites are the perfect solution. They are essentially frozen little clouds of probiotic goodness, offering a satisfying crunch and a creamy center that satisfies sugar cravings in a wholesome way. Kids absolutely adore them because they look like candy, and parents love them because they are made with simple, clean ingredients that provide energy. It’s a guilt-free snack that you can keep in the freezer for whenever the need for something sweet and refreshing strikes you.
Ingredients
- 1 cup thick Greek yogurt (plain or vanilla)
- 1 tablespoon honey or maple syrup for natural sweetness
- 1 cup finely chopped fresh strawberries
- 1/2 teaspoon ground cinnamon (optional)
- Silicon mini-muffin molds or a parchment-lined baking sheet
How to make it
- In a medium-sized bowl, whisk together the Greek yogurt and your sweetener of choice until the mixture is perfectly smooth and well-incorporated.
- Gently fold the finely chopped strawberries into the yogurt mixture, ensuring they are distributed evenly so every bite has a piece of fruit.
- Using a small spoon or a piping bag, drop small mounds of the mixture onto your parchment-lined sheet or into the mini-muffin molds.
- If you like, sprinkle a tiny bit more cinnamon or a small strawberry slice on top of each mound for a decorative and flavorful finishing touch.
- Place the tray in the freezer and let the bites freeze for at least 2 to 3 hours, until they are completely solid and easy to handle.
- Once frozen, pop them off the parchment and store them in a freezer-safe zip-top bag for a quick, healthy snack anytime you need a boost.
The Best Way To Layer Chocolate Strawberry Cake
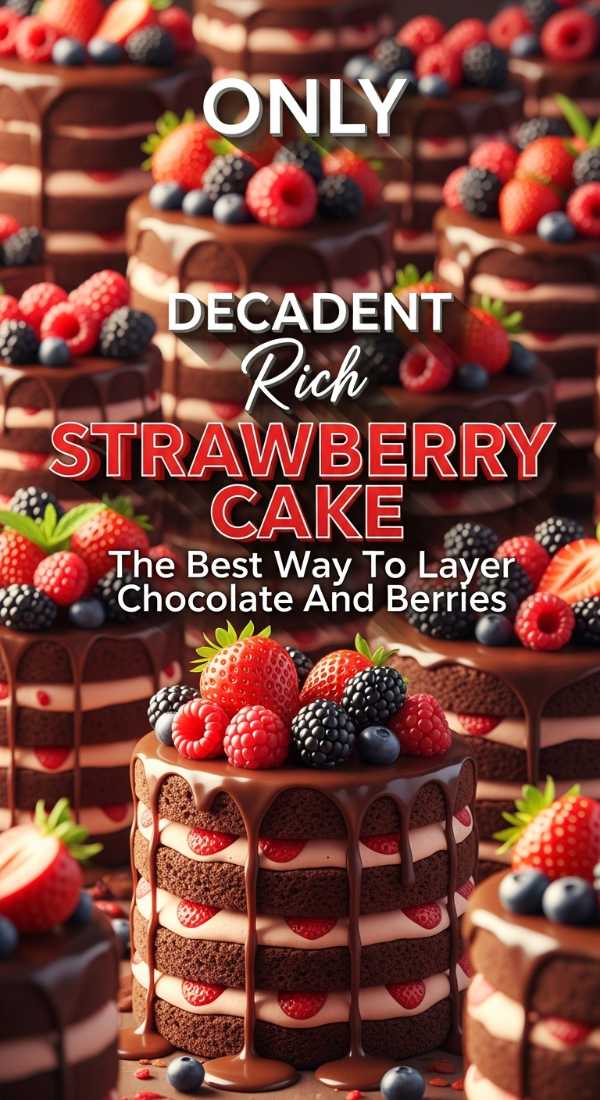
Why we love this
Layering a cake is an art form that transforms a simple bake into a centerpiece, and the combination of rich chocolate and fresh strawberries is a timeless classic. The key to a successful chocolate strawberry cake is ensuring structural integrity while keeping the fruit layers moist and bursting with flavor. When you cut into the cake, the sight of deep cocoa sponge alternating with bright red berries and pale pink frosting is enough to make anyone’s heart skip a beat. It’s a decadent, multi-sensory experience that balances the intensity of dark chocolate with the ethereal lightness of summer fruit.
Ingredients
- Two 8-inch chocolate sponge cakes, cooled and leveled
- 2 cups chocolate ganache or stiff chocolate buttercream
- 1.5 cups sliced fresh strawberries
- 1/2 cup strawberry jam or preserves
- Simple syrup (sugar and water) for brushing the cake layers
How to make it
- Place your first leveled cake layer on a revolving cake stand and brush the top lightly with simple syrup to ensure it stays incredibly moist.
- Pipe a thick ring of chocolate buttercream around the outer edge of the cake layer to act as a dam, preventing the fruit from sliding out.
- Spread a thin, even layer of strawberry preserves inside the ring, then top with a single, dense layer of sliced fresh strawberries.
- Carefully place the second cake layer on top, pressing down very gently to secure it to the buttercream dam and the fruit filling below.
- Cover the entire cake in a thin ‘crumb coat’ of frosting, then refrigerate for 20 minutes to set the structure before applying the final layer of frosting.
- Finish with a smooth coat of chocolate ganache and decorate the top with whole chocolate-dipped strawberries for a professional, show-stopping look.
Instant Strawberry Delights In Minutes

Why we love this
Sometimes the craving for something sweet hits when you have the least amount of time, and that is where these ‘instant’ strawberry delights truly shine for the busy soul. Using a few clever pantry staples and the magic of a microwave or a quick stir, you can create a dessert that tastes like it took all afternoon in under five minutes. It’s the perfect solution for late-night cravings or unexpected guests who drop by for a chat and a cup of coffee. These recipes prove that you don’t need a lot of time to create something that feels special and full of love.
Ingredients
- 1 cup sliced strawberries
- 2 tablespoons brown sugar
- 1/4 cup heavy cream or whipped topping
- 3-4 vanilla wafer cookies, crushed
- A dusting of cocoa powder
How to make it
- Place your sliced strawberries into a small microwave-safe bowl and sprinkle the brown sugar over the top, tossing them together briefly.
- Microwave the berries on high for only 30 to 45 seconds, just until the sugar melts and the berries release a little bit of their warm, aromatic juice.
- Let the warm berries sit for one minute to thicken slightly, then pour them into a pretty glass or a small ceramic ramekin for serving.
- Top the warm fruit with a generous dollop of heavy cream or whipped topping, which will begin to melt slightly into the warm strawberry syrup.
- Sprinkle the crushed vanilla wafer cookies over the top for a necessary bit of crunch that mimics a traditional fruit crumble or cobbler.
- Finish with a very light dusting of cocoa powder for color contrast and serve immediately while the fruit is still warm and the cream is cold.
The Famous Secret Ingredient Strawberry Fluff
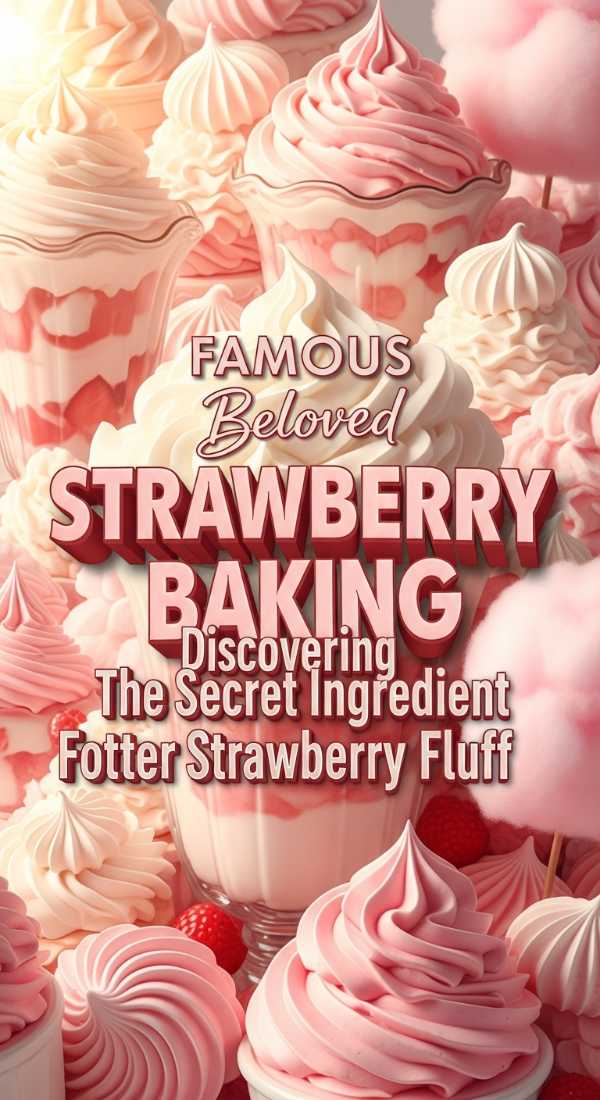
Why we love this
Strawberry Fluff is a nostalgic masterpiece that brings back memories of family reunions and sun-drenched picnics, but the ‘secret ingredient’ takes it to a whole new level of deliciousness. This version uses a hint of cream cheese and a specific brand of pudding mix to create a texture that is significantly more stable and rich than the standard versions. It’s a whimsical, pink, and airy side dish or dessert that children and adults alike can’t seem to get enough of. It’s light as a feather, sweet as a dream, and stays perfectly fluffy even after a few hours on a serving table.
Ingredients
- 1 package (3 oz) strawberry gelatin mix
- 1 package (3.4 oz) instant vanilla pudding mix (The Secret Ingredient!)
- 1 container (8 oz) whipped topping, thawed
- 2 cups mini marshmallows
- 2 cups fresh chopped strawberries
How to make it
- In a large mixing bowl, combine the dry strawberry gelatin and the dry instant vanilla pudding mix, whisking them together to ensure they are evenly mixed.
- Add one cup of boiling water to the dry powders and stir constantly for at least two minutes until every single crystal has completely dissolved.
- Stir in one cup of ice-cold water to the mixture and place the bowl in the refrigerator for about 15 to 20 minutes, until it is slightly thickened but not set.
- Once thickened, gently fold in the entire container of whipped topping using a large rubber spatula until the mixture is a uniform, beautiful pastel pink.
- Fold in the mini marshmallows and the fresh chopped strawberries, making sure they are distributed throughout the fluffy base for a variety of textures.
- Cover the bowl and refrigerate for at least 4 hours, allowing the marshmallows to soften slightly and the flavors to deepen before serving in a large glass bowl.
Final Thoughts on Your Strawberry Journey
I hope these recipes bring a little extra sunshine into your kitchen and a lot of sweetness to your heart, my loves. There is something so healing about working with your hands, smelling the fresh scent of berries, and creating something beautiful from scratch. Whether you’re making a quick instant treat or a tiered chocolate cake, remember that the most important ingredient is always the love you pour into it. Go forth and bake something wonderful, and don’t forget to share a bite with someone who needs a reason to smile today!