

There is something inherently magical about a home filled with the low hum of laughter, the clinking of glasses, and the irresistible aroma of a meal made with love. We’ve all been there—that frantic rush to finish the cooking just as the doorbell rings, leaving us feeling more like a harried line cook than the relaxed, welcoming host we envisioned. But what if I told you that the secret to viral-worthy hosting isn’t about spending hours over a complex stove? It’s about the art of the presentation, transforming simple, soulful meals into stunning ‘food boards’ that invite everyone to dig in together.
The beauty of a themed food board is that it breaks down the formal barriers of dining. Instead of stiff plated courses, you’re offering a visual feast that encourages grazing, sharing, and conversation. It’s tactile, it’s vibrant, and quite honestly, it’s exactly what our social feeds—and our souls—are craving right now. Whether you are hosting a breezy backyard brunch or a cozy weeknight catch-up, these ideas are designed to make you the star of the show without the stress.
How to make spring pasta?

Why we love this
This spring pasta board is like a love letter to the garden, bursting with the bright, zesty fragrance of lemon peel and the earthy sweetness of tender snap peas. As you twirl the al dente noodles, you’ll notice the delicate silkiness of a light butter sauce that clings to every strand, punctuated by the crunch of toasted pine nuts. It feels incredibly sophisticated yet remains light enough that you won’t feel weighed down, making it the perfect centerpiece for a sun-drenched patio lunch where the air is fresh and the company is even better.
Ingredients
- 1 lb Linguine or Tagliatelle
- 1 bunch Asparagus, trimmed and cut into 2-inch pieces
- 1 cup Frozen or fresh sweet peas
- 3 cloves Garlic, thinly sliced
- Zest and juice of 2 organic lemons
- 1/2 cup Freshly grated Parmesan cheese
- 1/4 cup Fresh mint and parsley, chopped
- Extra virgin olive oil and 2 tbsp butter
How to make it
- Bring a large pot of heavily salted water to a rolling boil—it should taste like the sea to properly season the pasta from the inside out.
- Drop your pasta and cook until it is about 2 minutes away from being al dente; this ensures it finishes cooking in the sauce for maximum flavor absorption.
- In a wide skillet, heat olive oil and butter over medium-low heat until the butter foams. Add the sliced garlic and sauté gently for 2-3 minutes; you are looking for a soft, translucent look rather than a deep brown color, which can turn bitter.
- Add the asparagus and peas to the skillet, increasing the heat to medium. Toss for 3-4 minutes until the asparagus is bright green and just tender-crisp to the bite.
- Using tongs, transfer the pasta directly from the water into the skillet, bringing some of that starchy pasta water with it. This is the secret to a glossy, emulsified sauce.
- Stir in the lemon juice, zest, and Parmesan cheese. Toss vigorously over medium heat for 60-90 seconds until a creamy sauce coats the noodles perfectly.
- Finish by folding in the fresh mint and parsley. Arrange the pasta on a large wooden board, garnishing with extra zest and a drizzle of premium olive oil before serving.
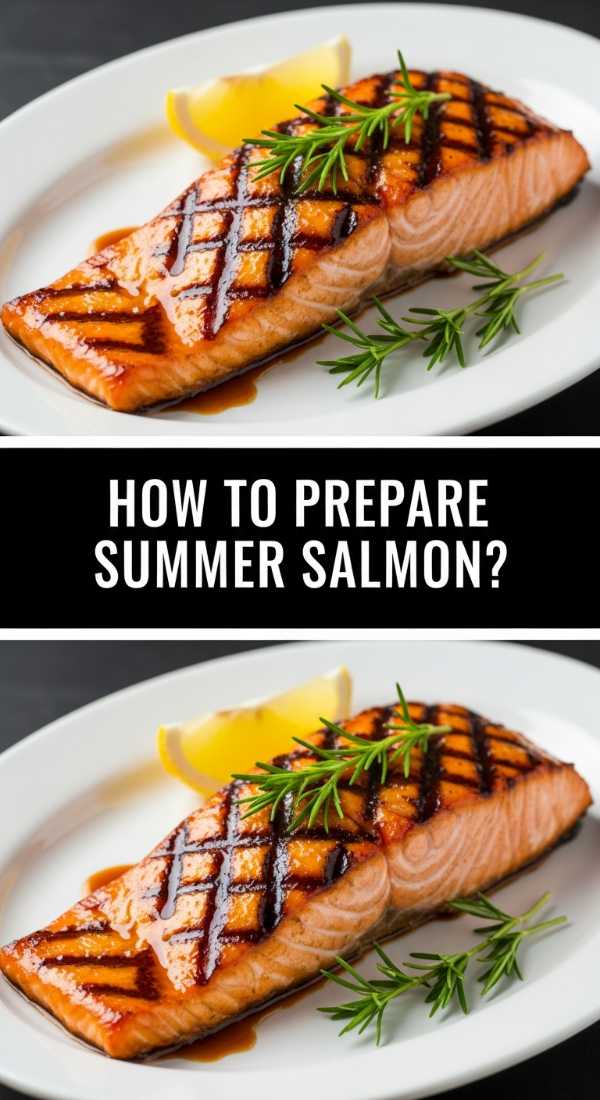
How to prepare summer salmon?
Why we love this
Summer salmon is all about that incredible contrast between a caramelized, honey-kissed exterior and a tender, flaky center that practically melts on your tongue. The aroma of charred citrus and fresh dill wafts through the air, instantly transporting your guests to a seaside escape. It’s a dish that looks effortlessly chic on a board, surrounded by vibrant slices of lime and cucumber, offering a cool, refreshing bite that balances the rich, healthy fats of the fish beautifully.
Ingredients
- 1 large Side of salmon (approx. 2 lbs)
- 3 tbsp Honey or maple syrup
- 2 tbsp Soy sauce or coconut aminos
- 1 tbsp Sriracha (optional for heat)
- 2 Limes, sliced into rounds
- 1 bunch Fresh dill
- Flaky sea salt and cracked black pepper
How to make it
- Preheat your oven to 400°F (200°C) and line a large baking sheet with parchment paper to prevent sticking and ensure an easy cleanup.
- Pat the salmon completely dry with paper towels; removing surface moisture is the most important step for achieving a beautiful sear rather than steaming the fish.
- In a small bowl, whisk together the honey, soy sauce, and sriracha until the glaze is smooth and well-incorporated.
- Place the salmon on the sheet and season generously with salt and pepper. Brush about two-thirds of the glaze over the top, ensuring it gets into all the crevices.
- Arrange lime slices both under the edges of the salmon and on top of it. Bake for 12-15 minutes. Check for doneness by pressing a fork gently into the thickest part; the fish should flake easily and look opaque.
- Switch the oven to ‘Broil’ for the final 2 minutes. Watch closely as the sugars in the honey bubble and turn a deep, golden brown—this creates that viral ‘crust’ guests love.
- Remove from the oven, brush with the remaining glaze, and shower with fresh dill. Transfer the whole side to a serving board for a dramatic, family-style presentation.
How to cook spam dinner?

Why we love this
There is a nostalgic, salty-sweet comfort in a spam board that is hard to beat, especially when the meat is fried to a perfect, shattered-glass crispiness on the edges. When glazed with a sticky soy-ginger reduction, the spam takes on a sophisticated depth that surprises even the skeptics. It’s a fun, playful meal that feels like a hug in food form, especially when paired with fluffy white rice and tangy pickled radishes that cut through the richness with a sharp, vinegar snap.
Ingredients
- 2 cans Spam (original or low sodium), sliced into 1/4 inch rectangles
- 1/4 cup Brown sugar
- 2 tbsp Soy sauce
- 1 tsp Grated fresh ginger
- Cooked jasmine rice
- Furikake seasoning and sliced scallions
How to make it
- Heat a large non-stick skillet over medium-high heat. Do not add oil; the spam has enough natural fat to crisp itself up perfectly.
- Lay the spam slices in a single layer, ensuring they aren’t crowded. Sear for 3-4 minutes per side until they develop a deep, mahogany-brown crust and the edges feel firm.
- While the spam is crisping, whisk together the brown sugar, soy sauce, and ginger in a small bowl until the sugar is mostly dissolved.
- Once the spam is crispy, turn the heat down to low. Pour the sauce over the slices. It will bubble rapidly and thicken almost instantly.
- Use tongs to flip the spam slices repeatedly for about 60 seconds, ensuring every millimeter is coated in the sticky, dark glaze.
- Remove the pan from the heat immediately to prevent the sugar from burning.
- Arrange the glazed spam on a board next to a large bowl of steamed rice. Sprinkle everything with furikake and scallions for a pop of color and umami.
How to eat paleo chicken?

Why we love this
Paleo chicken doesn’t have to be boring; when done right, it’s a rustic, golden masterpiece that celebrates the purity of high-quality ingredients. Imagine skin so crispy it crackles when you cut into it, revealing meat that has been infused with the woody fragrance of rosemary and the pungent warmth of roasted garlic. It feels like a high-end bistro meal served in the comfort of your home, grounding your guests with hearty, wholesome flavors that are as nourishing as they are delicious.
Ingredients
- 2 lbs Bone-in, skin-on chicken thighs
- 2 tbsp Avocado oil (high smoke point)
- 1 tbsp Dried oregano
- 1 tbsp Smoked paprika
- 6 cloves Garlic, smashed but skin left on
- Fresh rosemary and thyme sprigs
- Lemon wedges for serving
How to make it
- Preheat your oven to 425°F (220°C). A high temperature is essential for rendering the chicken fat and achieving that signature paleo crunch without breading.
- Pat the chicken thighs dry. In a bowl, toss the chicken with avocado oil, oregano, paprika, salt, and pepper until evenly coated.
- Place a cast-iron skillet or heavy baking dish in the oven for 5 minutes to get it screaming hot before adding the chicken.
- Carefully place the chicken skin-side down in the hot skillet. You should hear a loud sizzle. Roast in the oven for 15 minutes skin-side down.
- Flip the chicken over. Scatter the smashed garlic cloves and fresh herb sprigs around the pan. The herbs will fry in the chicken fat, infusing the meat with incredible aroma.
- Continue roasting for another 15-20 minutes until the internal temperature reaches 165°F and the skin is golden and taut.
- Let the meat rest for 5 minutes before serving on a board. This allows the juices to redistribute, ensuring the first bite is incredibly succulent.
How to fry southern catfish?

Why we love this
A southern catfish board brings a sense of soulful celebration to the table, featuring golden-fried fillets that offer a satisfying, gritty crunch from the cornmeal. The catfish itself is mild and sweet, providing the perfect canvas for a dusting of cayenne and black pepper. When served with a cold, creamy remoulade and some spicy hushpuppies, it’s a sensory experience that combines heat, salt, and cooling textures, making it a viral favorite for summer evenings.
Ingredients
- 4-6 Catfish fillets
- 1 cup Yellow cornmeal
- 1/2 cup All-purpose flour
- 1 tbsp Cajun seasoning
- 1 cup Buttermilk
- Peanut oil for frying
- Lemon wedges and hot sauce
How to make it
- Soak the catfish fillets in buttermilk for at least 20 minutes in the refrigerator. This removes any ‘muddy’ flavor and helps the breading adhere.
- In a shallow dish, whisk together the cornmeal, flour, and Cajun seasoning. Ensure the spices are distributed evenly so every bite has a kick.
- Fill a heavy-bottomed pot or deep skillet with about 2 inches of peanut oil. Heat the oil to exactly 350°F (175°C). Use a thermometer; too cold and the fish will be greasy, too hot and it will burn.
- Remove a fillet from the buttermilk, let the excess drip off, and dredge it thoroughly in the cornmeal mixture, pressing firmly to coat.
- Gently lower the fish into the oil. Fry for 3-5 minutes per side. You are looking for a deep golden-tan color and an internal texture that is firm.
- Drain the fillets on a wire rack rather than paper towels to keep the bottom from getting soggy.
- Serve on a large platter or board with small bowls of tartar sauce and lemon slices for a classic southern spread.
How to craft asian noodles?

Why we love this
There is nothing quite as satisfying as the slurp of silky, hand-crafted Asian noodles coated in a rich, umami-heavy sauce. This board is a visual explosion of colors—vibrant orange carrots, bright green scallions, and the deep mahogany of the sauce. The scent of toasted sesame oil and sizzling ginger fills the room, creating an atmosphere of warmth and excitement. It’s a customizable feast where guests can add their own toppings, making the meal interactive and endlessly fun.
Ingredients
- 1 lb Wheat noodles or Lo Mein noodles
- 3 tbsp Oyster sauce
- 2 tbsp Dark soy sauce
- 1 tbsp Toasted sesame oil
- 2 cups Shredded cabbage and carrots
- 4 cloves Garlic, minced
- 1 tbsp Fresh ginger, grated
How to make it
- Cook your noodles in boiling water according to the package directions, but stop 1 minute early. Rinse them under cold water to stop the cooking and remove excess starch.
- In a small bowl, whisk the oyster sauce, dark soy sauce, and sesame oil to create your flavor base.
- Heat a wok or very large skillet over high heat until it begins to smoke slightly. Add a tablespoon of neutral oil.
- Toss in the garlic and ginger, stirring constantly for only 30 seconds to release the aromatics without burning them.
- Add the cabbage and carrots, stir-frying for 2 minutes until they begin to wilt but still retain a bit of structural integrity.
- Add the noodles to the wok and pour the sauce over the top. Use long tongs or a pasta fork to toss everything together over high heat.
- Continue tossing for 2-3 minutes until the noodles have absorbed the sauce and everything is steaming hot. Transfer to a board and top with sesame seeds.
How to glaze crispy tofu?

Why we love this
This dish is a game-changer for plant-based hosting, offering tofu that has been transformed into crispy, golden nuggets of joy. Each piece is enrobed in a sticky, sweet-and-spicy glaze that shimmers under the light, providing a satisfying ‘snap’ followed by a soft, pillowy interior. It’s a textural masterpiece that pairs beautifully with crunchy cucumber ribbons and toasted peanuts, proving that simple ingredients can produce extraordinary, viral-worthy results.
Ingredients
- 2 blocks Extra-firm tofu, pressed and cubed
- 3 tbsp Cornstarch
- 1/4 cup Sweet chili sauce
- 2 tbsp Rice vinegar
- 1 tbsp Sriracha
- 2 tbsp Neutral oil
How to make it
- Press your tofu for at least 30 minutes using a tofu press or heavy books. Removing the water is the only way to ensure the tofu actually gets crispy.
- Toss the cubes in a bowl with cornstarch and a pinch of salt until they are completely and evenly dusted.
- Heat oil in a large non-stick skillet over medium-high heat. Add the tofu cubes, ensuring they aren’t touching.
- Fry for 2-3 minutes on each side. Do not rush this; you want a distinct, hard golden shell on all six sides of the cube.
- In a small jar, shake together the sweet chili sauce, rice vinegar, and sriracha.
- Once the tofu is crispy, pour the sauce into the pan. It will glaze the tofu almost immediately as the sugar caramelizes.
- Toss for 30-60 seconds until the sauce is thick and sticky, then move to a board lined with lettuce leaves for a fresh presentation.
How to make fast tacos?

Why we love this
The taco board is the ultimate crowd-pleaser because it’s a vibrant, choose-your-own-adventure meal. The air fills with the earthy scent of cumin and chili, while the board overflows with charred tortillas, zesty lime wedges, and bright, fresh salsas. It feels celebratory and relaxed, allowing everyone to build their perfect bite. The contrast of warm, seasoned protein against cold, crisp onions and cilantro is a timeless combination that never fails to impress on social media.
Ingredients
- 1 lb Ground beef or thinly sliced steak
- 1 tbsp Cumin and 1 tbsp Chili powder
- Small corn or flour tortillas
- 1 White onion, finely diced
- 1 bunch Cilantro, chopped
- Radishes, sliced thin
- Sour cream and your favorite salsa
How to make it
- Heat a skillet over medium-high heat and brown your protein. If using beef, drain the excess fat once cooked through.
- Add the cumin, chili powder, and a splash of water. Simmer for 5 minutes until the water has evaporated and the meat is deeply seasoned and moist.
- While the meat simmers, char your tortillas. You can do this directly over a low gas flame for 10 seconds per side or in a dry pan until they puff slightly and show dark spots.
- Keep the tortillas warm by wrapping them in a clean kitchen towel; this steams them slightly so they stay pliable.
- Prepare your ‘toppings’ section of the board by grouping the diced onions, cilantro, and radishes in neat piles.
- Place the hot meat in a central bowl on the board.
- Surround with the warm tortillas and small ramekins of salsa. Encourage guests to squeeze fresh lime over everything to brighten the flavors.
How to grill summer veggies?

Why we love this
There is nothing quite like the smoky, charred sweetness of vegetables kissed by an open flame. A grilled veggie board is a kaleidoscope of colors—deep purple eggplants, bright yellow squashes, and charred green peppers—all drizzled with a tangy balsamic reduction. The texture is a perfect balance of soft, caramelized interiors and slightly bitter, smoky edges. It’s a light yet incredibly flavorful option that celebrates the peak of the season’s harvest in the most beautiful way possible.
Ingredients
- 2 Zucchini, sliced into planks
- 1 Bell pepper, cut into wide strips
- 1 Red onion, cut into thick wedges
- 1 bunch Asparagus
- 1/4 cup Olive oil
- 2 tbsp Balsamic glaze
- Dried thyme and flaky salt
How to make it
- Preheat your grill to medium-high heat (about 400°F). Ensure the grates are clean and lightly oiled to prevent sticking.
- Toss all the prepared vegetables in a large bowl with olive oil, salt, pepper, and dried thyme. Use your hands to ensure every surface is lightly coated.
- Place the vegetables on the grill. Start with the onions and peppers, as they take the longest (about 5-6 minutes per side).
- Add the zucchini and asparagus for the last 3-4 minutes per side. You are looking for distinct, dark grill marks and a slight softening of the texture.
- Avoid moving the vegetables too much; let them sit undisturbed to develop that deep, smoky char that characterizes good grilling.
- Remove the vegetables and arrange them artistically on a large slate or wooden board.
- Drizzle generously with the balsamic glaze while the vegetables are still warm so they absorb the sweetness.
How to bake weeknight chicken?

Why we love this
Weeknight chicken doesn’t have to feel like a chore; when baked with garlic butter and lemon, it becomes a fragrant, succulent centerpiece that anchors a beautiful dinner board. The skin turns a gorgeous translucent gold, and the juices mingle with the herbs to create a natural sauce that begs to be mopped up with a piece of crusty bread. It’s the ultimate ‘low effort, high reward’ dish that brings a sense of grounded, home-cooked elegance to even the busiest Tuesday night.
Ingredients
- 4 Chicken breasts or drumsticks
- 4 tbsp Melted butter
- 3 cloves Garlic, minced
- 1 tsp Dried parsley
- 1 Lemon, half sliced and half juiced
- Paprika for color
How to make it
- Preheat your oven to 400°F (200°C). If using breasts, pound them to an even thickness to ensure they cook at the same rate and stay juicy.
- In a small bowl, combine the melted butter, minced garlic, parsley, and lemon juice.
- Place the chicken in a baking dish and pour the butter mixture over it, using a brush to ensure even coverage. Sprinkle with paprika and salt.
- Tuck the lemon slices between the chicken pieces; as they bake, the oils from the lemon rind will infuse the butter sauce.
- Bake for 20-25 minutes. The best way to check for doneness without drying the meat out is using a meat thermometer—aim for 165°F (74°C).
- Once out of the oven, spoon the pan juices back over the chicken (this is called basting) and let it rest for 10 minutes.
- Transfer the chicken to your board, surrounding it with roasted potatoes or a simple salad for a complete viral-ready meal.
The Art of the Finished Board
As you can see, elevating your hosting game isn’t about professional culinary training; it’s about the intention you put into the presentation. By taking these simple, flavorful dishes and arranging them with a bit of flair, you transform a meal into an event. Remember to play with heights, colors, and textures on your boards—add a sprig of fresh herbs here, a bowl of bright dipping sauce there. Your guests will feel the warmth and effort you’ve put in, and your dining table will become a place of genuine connection and viral-worthy beauty.
Frequently Asked Questions
Got questions about building the perfect food board? We’ve got answers to help you host like a pro.