

Effortless Entertaining: Viral Food Board Ideas for Your Next Party
There is something inherently magical about the moment your guests walk through the door and are immediately greeted by the intoxicating aroma of a home-cooked feast. Lately, I have been moving away from the stiff formality of plated dinners and embracing the ‘Big Board’ lifestyle—a way of eating that focuses on abundance, community, and the sheer joy of sharing. It is about creating a centerpiece that invites everyone to lean in, reach across the table, and discover their new favorite flavor combination together.
Hosting shouldn’t feel like a chore; it should be a celebration. By arranging these hearty, viral-inspired dishes on oversized wooden boards or stone platters, you transform a simple meal into an interactive experience. Whether it is a cozy winter gathering or a breezy summer evening on the patio, these recipes are designed to be the stars of your spread, looking like a professional editorial while tasting like pure, unadulterated comfort.
How to cook juicy meatloaf

Why we love this
There is nothing quite like a thick slice of glazed meatloaf to anchor a rustic dinner board, offering a nostalgic warmth that instantly puts guests at ease. This version is incredibly tender, bursting with a savory depth that comes from caramelized onions and a tangy-sweet glaze that clings to every bite. The aroma of baked herbs and beef filling the house is the ultimate welcome, providing a rich, velvety texture that contrasts beautifully with a slightly charred crust. It is the ultimate comfort food elevated for a modern gathering.
Ingredients
- 2 lbs ground beef (80/20 blend)
- 1 cup panko breadcrumbs
- 1/2 cup whole milk
- 2 large eggs, beaten
- 1 small onion, finely minced
- 3 cloves garlic, minced
- 2 tbsp Worcestershire sauce
- 1/2 cup ketchup (for the glaze)
- 2 tbsp brown sugar
- 1 tsp dried thyme
- Salt and cracked black pepper
How to make it
- Preheat your oven to 375°F (190°C) and line a baking sheet with parchment paper to ensure easy cleanup and prevent sticking.
- In a small bowl, soak the panko breadcrumbs in milk for 5 to 10 minutes; this ‘panade’ is the secret to a moist loaf that never dries out.
- Sauté the minced onions in a touch of olive oil over medium heat until translucent and fragrant (about 5 minutes), then add the garlic for the final 60 seconds to prevent burning.
- In a large mixing bowl, gently combine the ground beef, the soaked breadcrumbs, the cooled onion mixture, eggs, Worcestershire sauce, thyme, salt, and pepper. Use your hands and mix only until just combined—overworking the meat will lead to a dense, tough loaf.
- Shape the mixture into a 9×5 inch rectangle on the baking sheet, ensuring it is even in height for uniform cooking.
- Whisk together the ketchup and brown sugar in a small ramekin and brush half of it generously over the top of the meatloaf.
- Bake for 45 minutes, then apply the remaining glaze and continue baking for another 10-15 minutes until the internal temperature reaches 160°F (71°C) on a meat thermometer.
- Crucially, let the meatloaf rest for at least 10 minutes before slicing; this allows the juices to redistribute so every piece stays succulent and firm.
How to make greek chicken

Why we love this
Greek chicken is a vibrant explosion of Mediterranean flavors that brings a bright, sun-kissed energy to any food board. The combination of zesty lemon, aromatic oregano, and pungent garlic creates a marinade that tenderizes the meat while adding layers of complexity. When grilled or pan-seared, the skin takes on a beautiful golden hue with charred edges that offer a satisfying crunch followed by a burst of juicy, herb-infused chicken. It feels light and healthy, yet deeply satisfying and sophisticated.
Ingredients
- 1.5 lbs chicken thighs, bone-in and skin-on
- 1/4 cup extra virgin olive oil
- 3 tbsp fresh lemon juice
- 4 cloves garlic, smashed
- 2 tsp dried oregano
- 1 tsp dried thyme
- 1/2 tsp red pepper flakes
- Fresh parsley for garnish
- Lemon wedges
How to make it
- Whisk together the olive oil, lemon juice, garlic, oregano, thyme, and red pepper flakes in a large bowl or a resealable plastic bag.
- Add the chicken thighs and ensure they are fully coated; marinate in the refrigerator for at least 2 hours, though overnight is best for maximum flavor penetration.
- Remove the chicken from the fridge 20 minutes before cooking to bring it to room temperature, which ensures even cooking throughout the piece.
- Heat a heavy cast-iron skillet over medium-high heat with a splash of oil until it begins to shimmer.
- Place the chicken skin-side down in the pan and sear for 7-8 minutes without moving it, allowing the skin to render its fat and become incredibly crispy and golden brown.
- Flip the chicken over and reduce the heat to medium; cook for another 8-10 minutes until the internal temperature hits 165°F (74°C).
- During the last 2 minutes of cooking, toss a few lemon wedges into the pan to char them; they provide a smoky, acidic juice to squeeze over the meat before serving.
- Transfer to your board and garnish with freshly chopped parsley for a pop of color and freshness.
How to roast garlic cauliflower
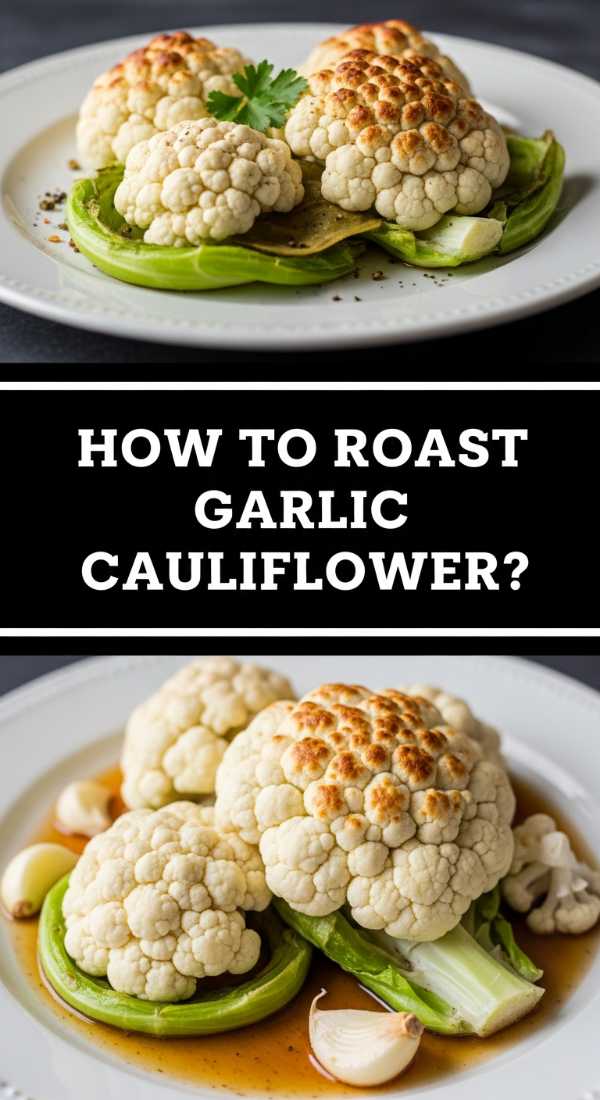
Why we love this
When cauliflower is roasted at high heat with plenty of garlic, it undergoes a total transformation into something nutty, sweet, and incredibly addictive. The edges become crispy and caramelized, while the interior remains tender and buttery, making it a perfect vegetarian anchor for a viral food board. The aroma of roasting garlic creates a savory cloud in your kitchen that is impossible to resist, and the final dish provides a wonderful textural contrast to softer elements like pasta or salad. It is a humble vegetable turned into a gourmet treat.
Ingredients
- 1 large head of cauliflower, cut into bite-sized florets
- 4 tbsp olive oil
- 5 cloves garlic, minced
- 1/2 cup grated Parmesan cheese
- 1/2 tsp paprika
- Salt and pepper to taste
- Fresh chives, chopped
How to make it
- Preheat your oven to 425°F (220°C). High heat is essential here to achieve the desired caramelization without turning the cauliflower into mush.
- In a large bowl, toss the cauliflower florets with the olive oil until every nook and cranny is coated.
- Add the minced garlic, paprika, salt, and pepper, and toss again to distribute the seasonings evenly.
- Spread the florets in a single layer on a large baking sheet; do not crowd the pan, or the cauliflower will steam instead of roast.
- Roast for 20 minutes, then remove the tray and use a spatula to toss the florets, ensuring they brown on all sides.
- Sprinkle the grated Parmesan cheese over the top and return to the oven for another 10-15 minutes until the cheese is melted and the cauliflower is fork-tender with dark, crispy edges.
- Remove from the oven and immediately sprinkle with fresh chives, then transfer to the board while still hot and sizzling.
How to bake classic lasagna

Why we love this
A classic lasagna is the ultimate showstopper for a dinner board, representing the pinnacle of Italian comfort with its architectural layers of pasta, rich ragu, and molten cheese. There is a primal satisfaction in cutting through the crispy, cheese-encrusted top layer to reveal the creamy ricotta and savory meat sauce hidden beneath. The scent of bubbling tomato sauce and melted mozzarella is legendary, creating a sense of home and heritage that connects everyone at the table. It is hearty, soul-warming, and visually stunning.
Ingredients
- 1 box lasagna noodles (no-boil or traditional)
- 1 lb ground sausage or beef
- 24 oz marinara sauce
- 15 oz ricotta cheese
- 1 large egg
- 3 cups shredded mozzarella
- 1/2 cup grated Parmesan
- 1 tsp dried basil
- Fresh basil for garnish
How to make it
- Preheat your oven to 375°F (190°C). Grease a 9×13 inch baking dish lightly with oil or butter.
- In a large skillet, brown the meat over medium-high heat until fully cooked; drain any excess grease and stir in the marinara sauce. Simmer for 10 minutes to let flavors meld.
- In a medium bowl, mix the ricotta cheese with one egg, the dried basil, and half of the Parmesan cheese; the egg acts as a binder to keep the cheese layer from running.
- To assemble, spread a thin layer of the meat sauce on the bottom of the dish to prevent the noodles from sticking.
- Place a layer of noodles over the sauce, followed by a layer of the ricotta mixture, and then a generous sprinkle of mozzarella.
- Repeat the layers (sauce, noodles, ricotta, mozzarella) until all ingredients are used, finishing with a thick layer of mozzarella and the remaining Parmesan on top.
- Cover the dish tightly with aluminum foil—ensure the foil isn’t touching the cheese to prevent sticking—and bake for 25 minutes.
- Remove the foil and bake for another 15-20 minutes until the cheese is bubbling and golden brown. Let it stand for 15 minutes before placing it on the board to ensure the layers set perfectly.
How to sear perfect steak
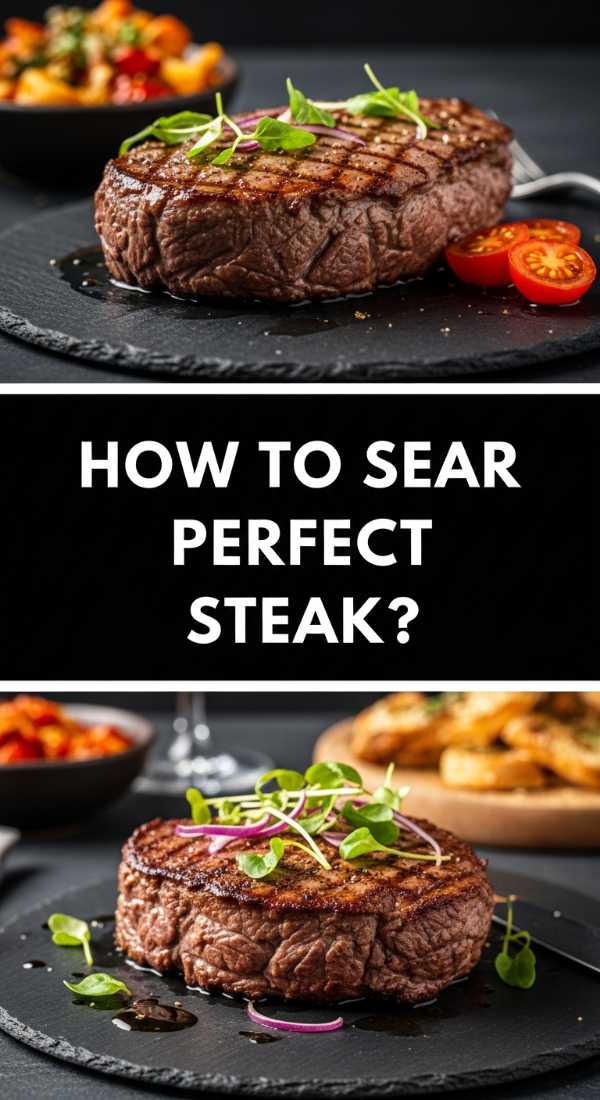
Why we love this
A perfectly seared steak is a masterclass in texture and flavor, offering a deep, savory crust known as the Maillard reaction that gives way to a tender, melt-in-your-mouth interior. We love this for its simplicity and the sheer drama it adds to a food board, especially when sliced against the grain to reveal a beautiful pink center. The addition of butter, garlic, and herbs during the basting process creates a rich, glossy sauce that coats the meat, making every bite feel like a high-end steakhouse experience in the comfort of your home.
Ingredients
- 2 thick-cut ribeye or New York strip steaks (at least 1.5 inches thick)
- 2 tbsp high-smoke point oil (like grapeseed or avocado oil)
- 3 tbsp unsalted butter
- 4 cloves garlic, crushed
- 3 sprigs fresh thyme or rosemary
- Kosher salt and coarse black pepper
How to make it
- Remove the steaks from the refrigerator 45 minutes before cooking to allow them to reach room temperature; this is vital for an even cook.
- Pat the steaks extremely dry with paper towels; moisture on the surface will cause the meat to steam rather than sear. Season aggressively with salt and pepper on all sides.
- Heat a cast-iron skillet over high heat until it is screaming hot and the oil begins to smoke slightly.
- Carefully place the steaks in the pan. Press down slightly to ensure maximum contact. Sear for 3-4 minutes without moving them until a deep brown crust forms.
- Flip the steaks and cook for another 2 minutes, then reduce the heat to medium and add the butter, garlic, and herbs to the pan.
- As the butter melts and foams, tilt the pan and use a large spoon to continuously pour the flavored butter over the steaks for the final 2-3 minutes of cooking.
- Use a meat thermometer to pull the steaks at 130°F (54°C) for medium-rare.
- Transfer the steaks to a cutting board and let them rest for at least 10 minutes; this allows the fibers to relax and retain their juices. Slice thin and place on the board.
How to prepare mediterranean salad
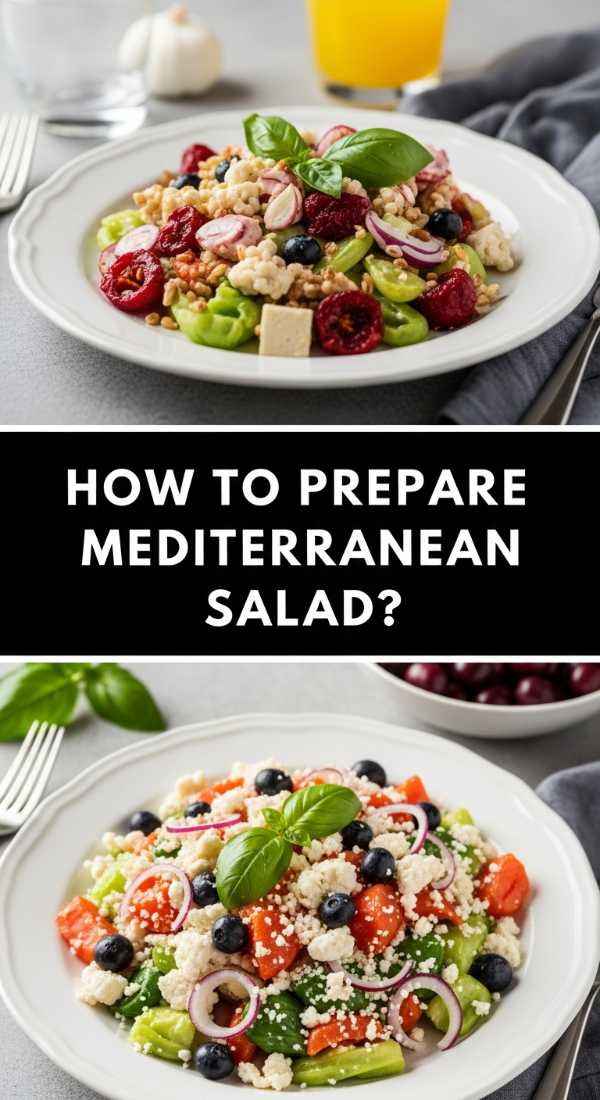
Why we love this
The Mediterranean salad is the refreshing, crunchy counterpoint that every rich food board needs to feel balanced. We love the vibrant palette of emerald cucumbers, ruby tomatoes, and chalky white feta, all tossed in a sharp, herbaceous vinaigrette. It provides a crispness that cleanses the palate between bites of heavier meats and cheeses, while the briny olives and sharp onions add pops of intense flavor. It is a celebration of fresh produce that looks just as beautiful as it tastes, bringing a light, airy feel to the spread.
Ingredients
- 2 large English cucumbers, diced
- 1 pint cherry tomatoes, halved
- 1/2 red onion, thinly sliced
- 1/2 cup Kalamata olives, pitted
- 1/2 cup crumbled feta cheese
- 1/4 cup extra virgin olive oil
- 2 tbsp red wine vinegar
- 1 tsp dried oregano
- Salt and pepper
How to make it
- In a small jar or bowl, whisk together the olive oil, red wine vinegar, dried oregano, salt, and pepper to create the dressing; let it sit for 10 minutes so the flavors can infuse.
- Place the diced cucumbers, halved tomatoes, and thinly sliced red onions in a large mixing bowl.
- Pro tip: soak the sliced red onions in cold water for 10 minutes before adding to the salad to remove their harsh ‘bite’ while keeping the crunch.
- Add the Kalamata olives to the bowl and drizzle the dressing over the vegetables.
- Toss gently to ensure everything is coated but the vegetables remain crisp and intact.
- Just before serving, gently fold in the crumbled feta cheese—adding it too early can cause the cheese to break down and make the dressing cloudy.
- Arrange the salad in a shallow bowl or directly on the board, garnished with a few sprigs of fresh oregano or parsley for an extra touch of greenery.
How to make creamy pasta
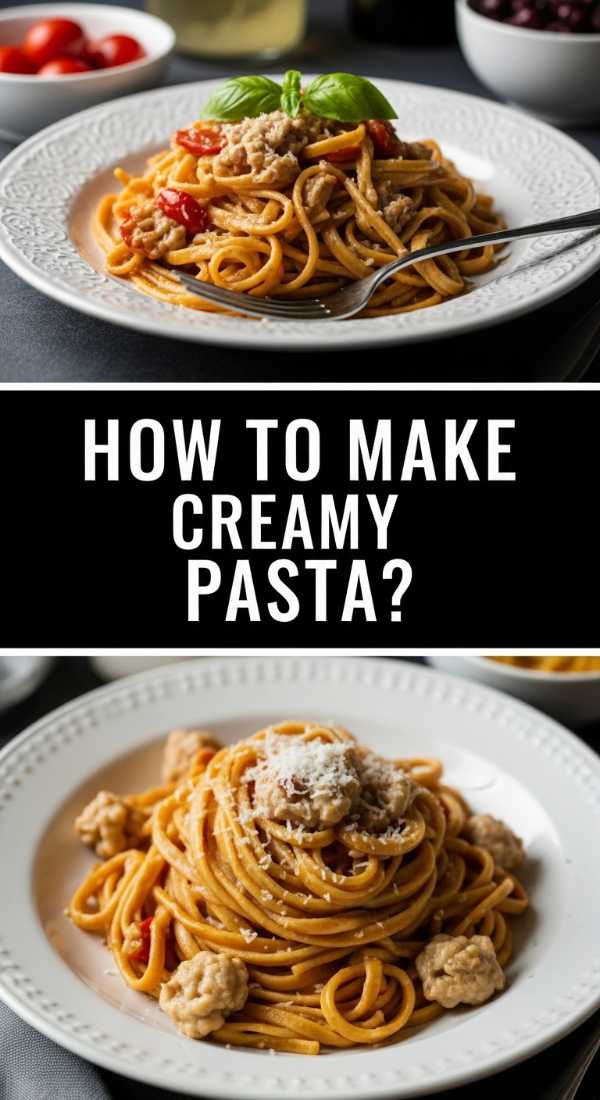
Why we love this
Creamy pasta is the ultimate crowd-pleaser, offering a luxurious, velvety texture that feels like a warm hug on a plate. We love how the sauce clings to every strand or shape, carrying the subtle notes of garlic, Parmesan, and black pepper in a smooth, rich emulsion. It provides a neutral yet decadent base for a food board, pairing perfectly with everything from roasted vegetables to seared meats. The silky mouthfeel and the comforting aroma of cheese and cream make it an essential element for any viral entertaining spread.
Ingredients
- 1 lb pasta (Fettuccine or Penne work great)
- 1 cup heavy cream
- 1/2 cup unsalted butter
- 1 cup freshly grated Parmesan cheese
- 2 cloves garlic, minced
- 1/2 cup reserved pasta water
- Salt and pepper
- Pinch of nutmeg (optional)
How to make it
- Bring a large pot of heavily salted water to a boil and cook your pasta according to the package directions until it is just ‘al dente’—firm to the bite.
- Before draining the pasta, carefully scoop out 1 cup of the starchy pasta water; this is the liquid gold that helps emulsify your sauce.
- In a large skillet over medium heat, melt the butter and add the minced garlic, cooking for about 1 minute until fragrant but not browned.
- Pour in the heavy cream and bring to a gentle simmer; let it bubble for 2-3 minutes until it starts to thicken slightly.
- Reduce the heat to low and whisk in the freshly grated Parmesan cheese a handful at a time, stirring constantly until the sauce is smooth and the cheese is fully melted.
- Add the cooked pasta directly into the sauce and toss vigorously with tongs or a pasta fork.
- Gradually add the reserved pasta water, 1/4 cup at a time, while tossing, until the sauce reaches a glossy, clingy consistency that perfectly coats the noodles.
- Season with salt, pepper, and a tiny pinch of nutmeg for depth, then transfer immediately to the board while the sauce is at its creamiest.
How to grill garlic shrimp
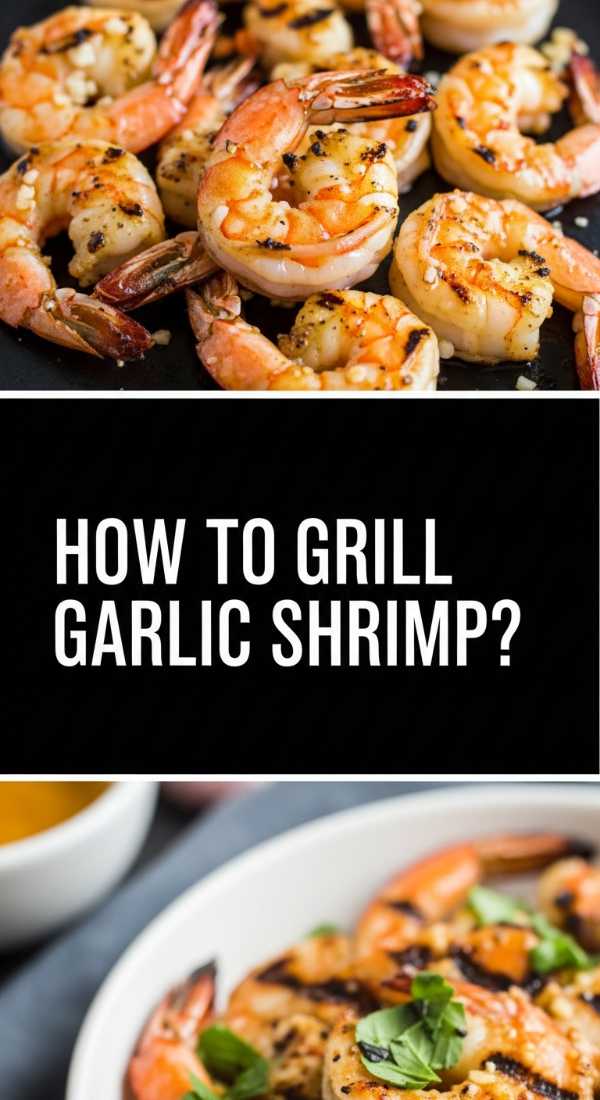
Why we love this
Grilling garlic shrimp adds a smoky, charred dimension to the sweet, delicate flavor of seafood, making it a high-impact addition to any party board. The snap of the shrimp’s exterior followed by the tender, buttery meat inside is a textural delight that guests will keep coming back for. Infused with plenty of garlic and a hint of spice, these shrimp are as aromatic as they are flavorful, providing a sophisticated finger food that feels fancy but is incredibly easy to prepare. They bring an elegant, coastal vibe to your entertaining spread.
Ingredients
- 1 lb large shrimp, peeled and deveined (tail on)
- 4 tbsp butter, melted
- 3 cloves garlic, minced
- 1 tbsp fresh lemon juice
- 1/2 tsp smoked paprika
- 1/4 tsp red pepper flakes
- Fresh parsley, chopped
How to make it
- If using wooden skewers, soak them in water for at least 30 minutes to prevent them from burning on the grill.
- In a medium bowl, combine the melted butter, minced garlic, lemon juice, smoked paprika, and red pepper flakes.
- Add the shrimp to the butter mixture and toss to coat; let them marinate for no more than 15-20 minutes (too much lemon juice will start to ‘cook’ the shrimp like ceviche).
- Thread the shrimp onto the skewers, pushing them close together so they stay juicy during the high-heat cooking.
- Preheat your grill or grill pan to medium-high heat and lightly oil the grates.
- Place the skewers on the grill and cook for 2-3 minutes per side. You are looking for the shrimp to turn opaque and pink with light char marks.
- Do not overcook; shrimp can turn rubbery in seconds. Once they form a ‘C’ shape and lose their translucency, they are done.
- Brush with any remaining garlic butter from the bowl during the last 30 seconds of grilling, then serve on the board with a final sprinkle of parsley.
How to roast herb chicken

Why we love this
Roast herb chicken is the quintessential centerpiece, offering a rustic elegance that is hard to beat. We love the combination of crackling, herb-flecked skin and meat so tender it practically falls off the bone. The scent of rosemary and thyme roasting alongside the chicken creates an atmosphere of traditional home cooking that is deeply comforting. It is a versatile dish that provides both visual appeal and a rich, savory flavor profile, serving as the perfect anchor for a harvest-style food board filled with roasted roots and crusty bread.
Ingredients
- 1 whole chicken (approx 4 lbs)
- 1/4 cup softened butter
- 2 tbsp fresh rosemary, chopped
- 2 tbsp fresh thyme, chopped
- 1 lemon, halved
- 1 head of garlic, halved crosswise
- Kosher salt and black pepper
How to make it
- Preheat your oven to 425°F (220°C). Remove the giblets from the chicken and pat the skin extremely dry with paper towels to ensure it gets crispy.
- Generously salt and pepper the inside of the cavity, then stuff it with the lemon halves and the halved head of garlic.
- In a small bowl, mix the softened butter with the chopped rosemary and thyme.
- Gently loosen the skin over the breast meat with your fingers and spread half of the herb butter directly onto the meat under the skin.
- Rub the remaining herb butter all over the outside of the chicken, coating every inch. Truss the legs with kitchen twine if you want a more compact, even shape.
- Place the chicken on a roasting rack in a pan and roast for 1 to 1.5 hours.
- The visual cue for doneness is clear juices when the thigh is pierced and skin that is deep golden brown and taut. An internal thermometer should read 165°F (74°C) in the thickest part of the thigh.
- Let the chicken rest for a full 15-20 minutes before carving; this is the most important step for a juicy bird. Carve into pieces and arrange on your board.
How to cook crispy salmon

Why we love this
Crispy salmon is a modern classic that brings a touch of luxury to your viral food board. The contrast between the glass-like, salty-crisp skin and the buttery, flake-apart flesh is a sensory experience that never fails to impress. We love it for its vibrant pink color and the way it pairs effortlessly with fresh greens or creamy sauces. When cooked correctly, it has a clean, delicate flavor that is heightened by a simple sear, making it a sophisticated yet accessible protein for any gathering. It is the ultimate healthy indulgence.
Ingredients
- 2-4 salmon fillets (6 oz each), skin-on
- 2 tbsp neutral oil (like canola or grapeseed)
- 1 tbsp unsalted butter
- Salt and pepper
- Lemon wedges for serving
How to make it
- Take the salmon out of the fridge 15 minutes before cooking. Use a sharp knife to gently scrape the skin side to remove any excess moisture, then pat the entire fillet dry with paper towels.
- Season both sides generously with salt and pepper right before they hit the pan; salting too early can draw out moisture and prevent crisping.
- Heat a non-stick or stainless steel skillet over medium-high heat. Add the oil and wait until it is shimmering and just beginning to smoke.
- Place the salmon fillets skin-side down in the pan. Use a spatula to press down firmly on each fillet for about 15 seconds to prevent the skin from curling.
- Turn the heat down to medium and let the salmon cook undisturbed for about 5-6 minutes. You will see the cooked color creeping up the side of the fillet; when it is about 75% of the way up, it is time to flip.
- Carefully flip the fillets and add the butter to the pan. Cook for only 1-2 minutes on the flesh side for a medium-rare to medium finish.
- The skin should be incredibly loud and crunchy when tapped with a fork.
- Remove from the pan and serve skin-side up on the board to maintain that crunch, accompanied by fresh lemon wedges.
Conclusion
Creating a viral food board is less about perfection and more about the abundance of flavor and the joy of the gathering. By mixing these hearty proteins, vibrant salads, and comforting sides, you offer your guests a culinary journey they can navigate at their own pace. Remember to play with heights, colors, and textures—use small bowls for sauces and scatter fresh herbs to tie everything together. Most importantly, enjoy the process of cooking and the company of those you share it with. Happy hosting!