
Easy, Aesthetic, and Delicious: How to Build the Perfect Simple Food Board
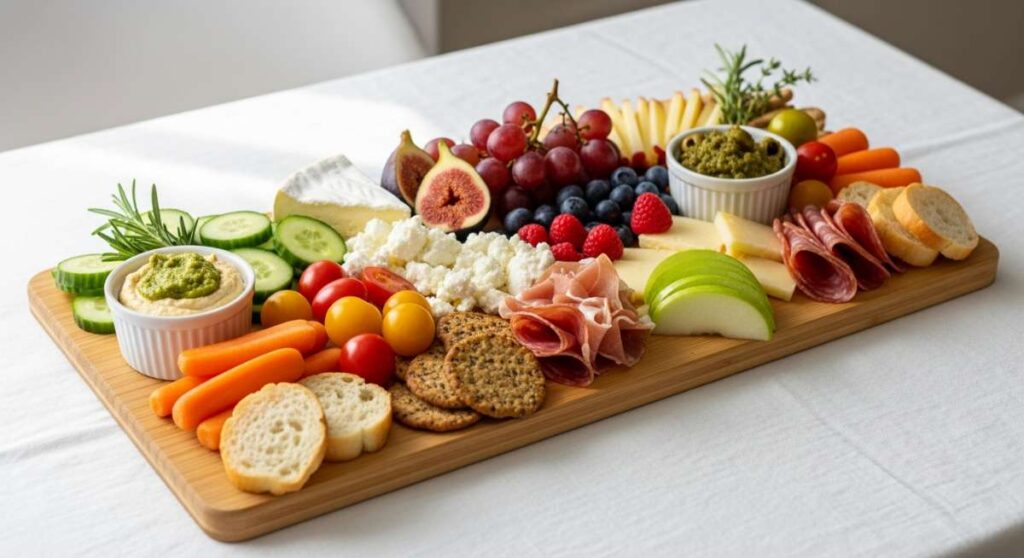
There is something undeniably magical about a gathering that centers around a beautifully curated food board. It’s more than just a meal; it’s an invitation to linger, to pick and choose your favorite flavors, and to enjoy the visual feast before the first bite is even taken. In our busy lives, the ‘food board’ lifestyle has become my favorite way to host because it strips away the formality of a sit-down dinner and replaces it with a relaxed, grazing-style atmosphere that feels both luxurious and effortless. Whether you are hosting a backyard sunset party or just treating your family to a special Tuesday night, these recipes are the building blocks of a truly viral-worthy spread.
The secret to a successful board isn’t just in the arrangement, but in the variety of textures and temperatures you offer. Imagine the crunch of fresh cucumber salad sitting next to the gooey, warm indulgence of a Rotel dip, or the smoky char of steak kabobs balanced by the chilled, ruby-red sweetness of a fresh strawberry pie. By focusing on simple, high-quality ingredients and vibrant colors, you can create a centerpiece that tastes as good as it looks. Let’s dive into the essential recipes that will make your next food board the talk of the town.
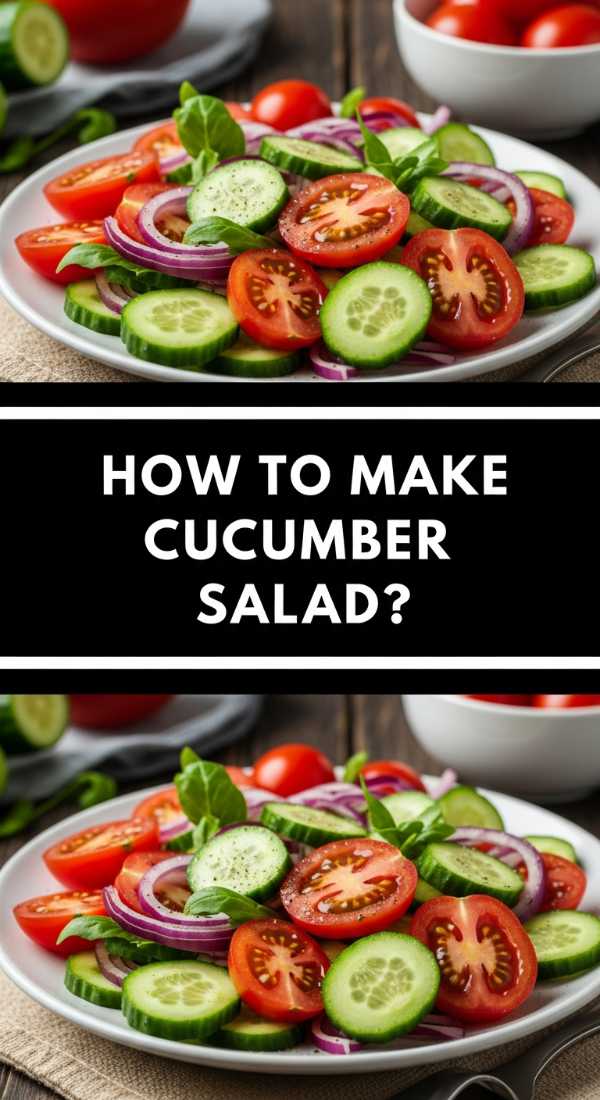
How to make cucumber salad?
Why we love this
This cucumber salad is the ultimate palate cleanser, offering a refreshing, watery crunch that cuts through richer flavors with ease. The aroma of fresh dill combined with the sharp, acidic tang of rice vinegar creates an instant summer vibe, making your kitchen smell like a garden oasis. As you bite into the thin, translucent slices, you get that satisfying snap followed by a cooling sensation that is absolutely essential for warm-weather hosting. It’s light, vibrant, and adds a beautiful pop of bright green to your board that looks stunning against wooden serving platters.
Ingredients
- 2 large English cucumbers, thinly sliced
- 1/2 red onion, thinly mandolined
- 1/2 cup rice vinegar
- 2 tablespoons fresh dill, chopped
- 1 tablespoon honey or sugar
- 1 teaspoon sea salt
- 1/2 teaspoon cracked black pepper
How to make it
- Begin by washing your English cucumbers thoroughly; since the skin is thin and sweet, there is no need to peel them. Use a mandoline slicer set to 1/8 inch to ensure every slice is uniform for that professional aesthetic.
- Place the sliced cucumbers and red onions in a large glass bowl and sprinkle with sea salt. Let them sit for about 10 minutes; this draws out excess moisture, ensuring your salad stays crunchy and doesn’t become watery on the board.
- In a separate small jar, whisk together the rice vinegar, honey, pepper, and chopped dill until the honey is completely dissolved and the dressing is emulsified.
- Drain any liquid that has pooled at the bottom of the cucumber bowl. Pour the vinaigrette over the vegetables and toss gently with tongs to coat every piece without breaking the delicate slices.
- Chill in the refrigerator for at least 30 minutes before serving. The cucumbers will slightly marinate and turn a deeper, more vibrant green, signaling they are ready to be plated.
How to make rotel dip?

Why we love this
Nothing says comfort food quite like a warm, velvety pot of Rotel dip. The smell of browned savory beef mixed with the spicy, zesty scent of diced tomatoes and green chilies is enough to bring everyone to the kitchen before you’ve even set the board down. The texture is thick and luscious, coating every chip perfectly without breaking it, and providing a rich, salty counterpoint to the fresh vegetables on your spread. It is the nostalgic, crowd-pleasing heart of the board that ensures no one leaves the table hungry, providing that satisfying, gooey cheese pull we all crave.
Ingredients
- 1 lb ground beef or spicy sausage
- 1 block (16 oz) Velveeta or processed cheese, cubed
- 1 can (10 oz) Ro-Tel Diced Tomatoes and Green Chilies
- 1/2 teaspoon garlic powder
- 1/4 cup whole milk (optional, for thinning)
- Fresh cilantro for garnish
How to make it
- Place a large skillet over medium-high heat and add your ground beef. Use a wooden spoon to break the meat into very small crumbles, as smaller pieces distribute better throughout the dip. Cook until the meat is deeply browned and no pink remains, which usually takes 7-9 minutes.
- Drain the excess grease from the skillet thoroughly; this step is crucial to prevent an oily film from forming on top of your cheese dip.
- Reduce the heat to low. Add the cubed cheese to the skillet. Cubing the cheese into 1-inch pieces ensures it melts evenly and prevents the bottom from scorching while the center is still solid.
- Pour in the entire can of Ro-Tel, including the juices. Stir continuously with a silicone spatula using a folding motion until the cheese is completely smooth and glossy.
- If the dip feels too thick, stir in a splash of milk one tablespoon at a time until you reach a pourable yet thick consistency. Transfer to a small slow cooker or a heavy ceramic bowl to keep warm, and garnish with cilantro just before serving.
How to make chicken wraps?

Why we love this
Chicken wraps are the perfect handheld addition to a food board, offering a balance of protein and fresh greens in a neat, aesthetic package. The contrast between the soft, flour tortilla and the crisp, cold Romaine lettuce inside creates a delightful textural experience that feels both substantial and light. When you drizzle a bit of creamy ranch or spicy mayo inside, it melds with the savory, seasoned chicken to create a flavor profile that is universally loved. They are easy to slice into ‘pinwheels’ or small halves, making them an ideal finger food that looks elegant when stacked in rows.
Ingredients
- 2 large flour tortillas
- 1 cup grilled chicken breast, sliced into strips
- 1/2 cup shredded carrots
- 1 cup chopped Romaine lettuce
- 2 tablespoons ranch dressing
- 1/2 cup shredded cheddar cheese
How to make it
- Start by warming your flour tortillas in a dry pan over medium heat for about 15 seconds per side. This makes the tortillas pliable and prevents them from tearing when you roll them tightly.
- Lay the warm tortilla flat on a clean cutting board and spread a thin, even layer of ranch dressing across the entire surface, leaving about a half-inch border at the edges to act as a seal.
- Layer your chopped Romaine lettuce in the center third of the tortilla, followed by a sprinkle of shredded carrots and cheddar cheese.
- Place the warm grilled chicken strips on top of the vegetables. Ensure the chicken is seasoned with salt and pepper beforehand for maximum flavor impact.
- Fold the sides of the tortilla inward toward the center, then firmly roll the tortilla from the bottom up, tucking the filling as you go. Slice diagonally with a sharp serrated knife to show off the colorful interior layers before placing them on your board.
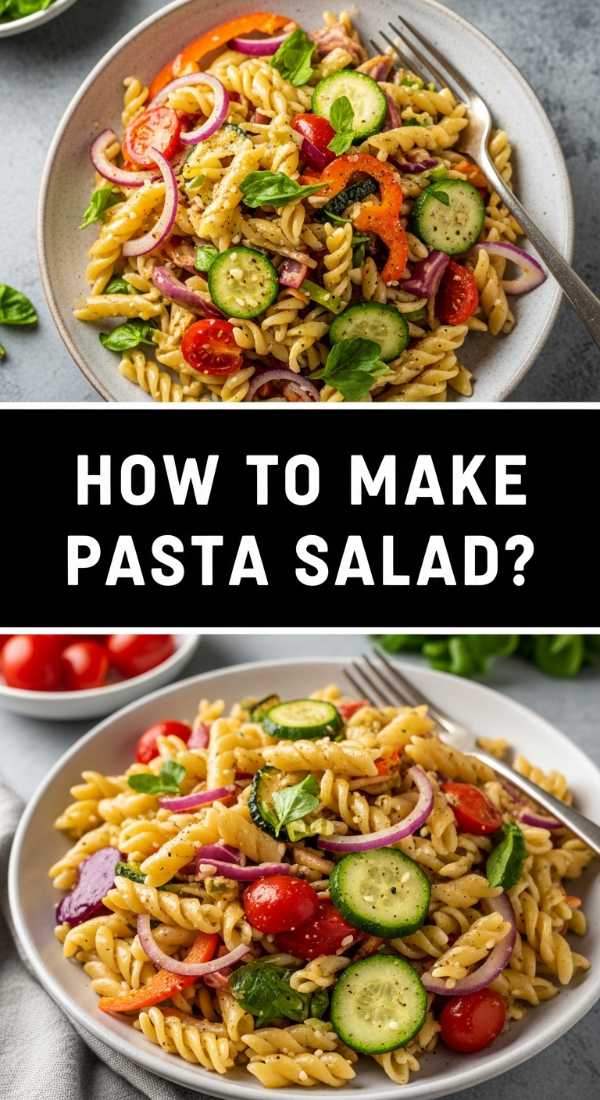
How to make pasta salad?
Why we love this
Pasta salad is a quintessential board staple because it is incredibly versatile and holds up beautifully at room temperature. Each spiral of pasta acts as a vessel for the zesty Italian dressing, while the mix of olives, peppers, and cheese provides a Mediterranean flair that feels sophisticated yet approachable. The aroma of dried oregano and garlic wafting from the bowl is mouth-watering, and the varied colors of the vegetables make it a visual centerpiece. It provides a hearty, starchy element to the board that satisfies the appetite while remaining bright and acidic.
Ingredients
- 1 lb rotini or fusilli pasta
- 1 cup Italian vinaigrette
- 1/2 cup black olives, sliced
- 1 cup cherry tomatoes, halved
- 1/2 cup cucumber, diced
- 1/2 cup feta or mozzarella pearls
- 2 tablespoons fresh parsley
How to make it
- Bring a large pot of heavily salted water to a rolling boil. Add the pasta and cook for exactly one minute less than the package directions specify for ‘al dente.’ This ensures the pasta doesn’t get mushy after it absorbs the dressing.
- Drain the pasta and immediately rinse it under cold running water. This stops the cooking process and removes excess starch, preventing the noodles from sticking together.
- Transfer the cooled pasta to a large mixing bowl. Add the cherry tomatoes, olives, cucumbers, and cheese. Mozzarella pearls are particularly aesthetic here as they mimic the shape of the tomatoes.
- Pour the Italian vinaigrette over the mixture and toss thoroughly. Use a high-quality oil-based dressing so it coats the pasta without becoming heavy or gloppy.
- Cover and refrigerate for at least two hours. Just before serving on your board, give it one last toss and add a fresh sprinkle of parsley to brighten the colors and flavors.
How to grill steak kabobs?

Why we love this
There is nothing quite like the charred, smoky aroma of steak kabobs hitting the grill to signal that a feast is beginning. The sizzle of the fat rendering against the high heat creates a beautiful crust on the outside while the inside remains tender and juicy. Eating food off a stick is inherently fun and communal, fitting perfectly with the ‘board’ philosophy of easy grazing. The contrast between the savory, umami-rich meat and the blistered, sweet peppers provides a complex flavor profile that feels high-end but is surprisingly simple to achieve.
Ingredients
- 1.5 lbs top sirloin steak, cut into 1-inch cubes
- 2 bell peppers (red and green), cut into chunks
- 1 large red onion, cut into wedges
- 1/4 cup olive oil
- 3 cloves garlic, minced
- 1 teaspoon smoked paprika
- Salt and pepper to taste
How to make it
- If using wooden skewers, soak them in water for at least 30 minutes to prevent them from catching fire on the grill. If using metal, ensure they are clean and lightly oiled.
- In a bowl, whisk together olive oil, minced garlic, paprika, salt, and pepper. Toss the steak cubes in this marinade and let them sit for 20 minutes at room temperature to take the chill off the meat, which ensures even cooking.
- Thread the skewers, alternating between steak, pepper, and onion. Don’t pack them too tightly; leaving a tiny bit of space between items allows the heat to circulate and char the edges of the vegetables.
- Preheat your grill to medium-high heat (about 400°F). Clean the grates and rub them with an oil-soaked paper towel to create a non-stick surface.
- Place the kabobs on the grill. Cook for 3-4 minutes per side, turning only once or twice. You are looking for clear grill marks and for the steak to reach an internal temperature of 135°F for a perfect medium-rare. Let them rest for 5 minutes before placing them on the board.
How to make strawberry pie?

Why we love this
A fresh strawberry pie is a showstopper for any dessert board, offering a brilliant, ruby-red glaze that catches the light beautifully. The smell of macerated berries and buttery pastry is nostalgic and sweet, evoking memories of summer fairs and family picnics. The texture is a masterclass in balance: the snap of the chilled, fresh strawberries against the silky, sweet glaze and the crumbly, salty crust creates a dessert that is refreshing rather than heavy. It provides the perfect sweet finale to your board, drawing everyone in for one last indulgent bite.
Ingredients
- 1 pre-baked 9-inch pie crust
- 6 cups fresh strawberries, hulled
- 1 cup sugar
- 3 tablespoons cornstarch
- 1/2 cup water
- 1 teaspoon vanilla extract
How to make it
- Select the most beautiful, uniform strawberries to remain whole; place these into your pre-baked and cooled pie crust, points facing up for a professional, aesthetic look.
- Take the remaining 2 cups of less-perfect berries and mash them in a small saucepan with a fork or potato masher until they are pulpy and juicy.
- Add the sugar, cornstarch, and water to the saucepan. Whisk over medium heat until the mixture reaches a boil. Continue to whisk for 2 minutes as the glaze thickens and turns from cloudy to a translucent, bright red.
- Remove from heat and stir in the vanilla extract. Let the glaze cool for about 10 minutes so it doesn’t cook the fresh berries in the crust, but is still warm enough to pour.
- Pour the glaze evenly over the whole strawberries in the pie shell, ensuring every berry is coated and glistening. Refrigerate for at least 3 hours to allow the glaze to set firmly before slicing.
How to make summer cocktails?

Why we love this
A tray of vibrant summer cocktails acts as the perfect liquid accessory for your food board, bringing a sense of celebration to the table. The sound of ice clinking against glass and the bright, citrusy scent of fresh lime and mint are incredibly inviting. These drinks provide a sharp, sparkling acidity that cleanses the palate between different snacks, ensuring every bite feels fresh. Whether you’re making a classic mojito or a spiked lemonade, the combination of muddled fruit and fizzy soda creates a refreshing experience that makes the whole meal feel like a special event.
Ingredients
- 2 oz white rum or vodka
- 1 oz fresh lime juice
- 1/2 oz simple syrup
- 6-8 fresh mint leaves
- Club soda to top
- Ice cubes and lime wheels for garnish
How to make it
- In a sturdy highball glass, place your fresh mint leaves and simple syrup. Use a muddler to gently press the leaves against the bottom of the glass to release the aromatic oils; do not shred the leaves, as this makes the drink bitter.
- Add the fresh lime juice. Using freshly squeezed juice is non-negotiable for a viral-quality cocktail, as bottled juice lacks the bright, essential oils of the zest.
- Fill the glass to the brim with large, clear ice cubes. Pour your choice of spirit over the ice.
- Use a long bar spoon to stir the mixture from the bottom up, ensuring the mint and syrup are well-integrated with the alcohol.
- Top with chilled club soda, leaving a little room at the top. Garnish with a fresh sprig of mint and a lime wheel, and serve immediately while the carbonation is at its peak.
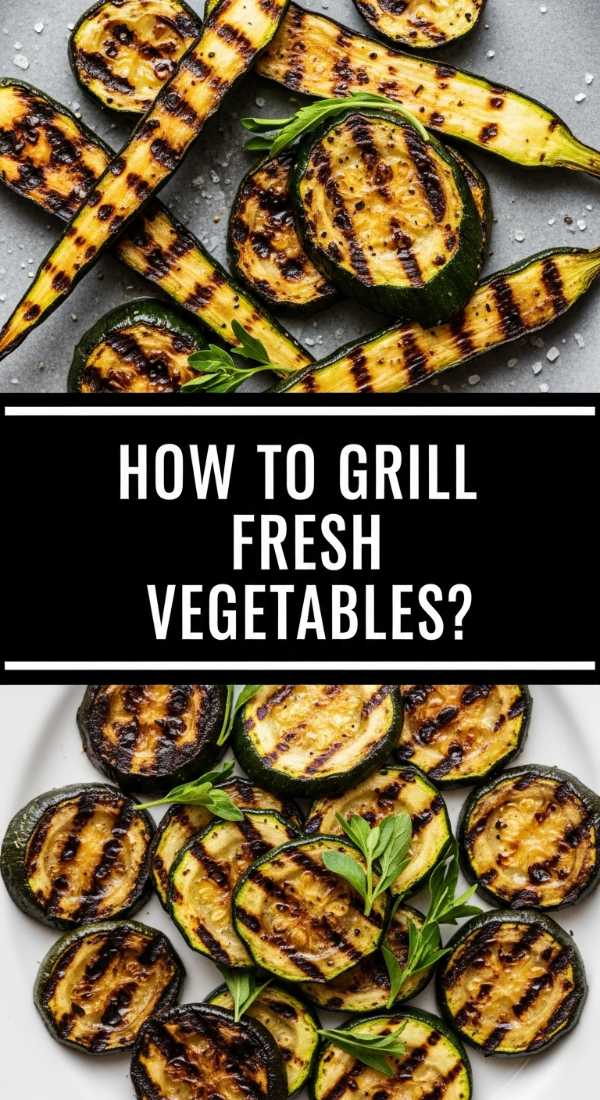
How to grill fresh vegetables?
Why we love this
Grilled vegetables are the unsung heroes of the food board, offering a caramelized sweetness and an earthy depth that raw veggies just can’t match. The sight of charred asparagus spears and striped zucchini rounds adds a rustic, gourmet feel to the spread. As they cook, the natural sugars in the vegetables concentrate, creating a tender-crisp texture that feels incredibly satisfying to eat. Drizzled with a little balsamic glaze or high-quality olive oil, they become a savory treat that even the most dedicated meat-eaters will reach for again and again.
Ingredients
- 2 zucchini, sliced into long planks
- 1 bunch asparagus, woody ends trimmed
- 1 red onion, sliced into thick rounds
- 3 tablespoons olive oil
- 1 teaspoon dried oregano
- Salt and flaky sea salt for finishing
How to make it
- Prepare your vegetables by cutting them into large, flat pieces that won’t fall through the grill grates. Planking the zucchini and keeping the onion rounds intact with toothpicks if necessary are great professional tricks.
- In a large tray, toss the vegetables with olive oil, oregano, and salt. Ensure every surface is lightly coated; the oil is what facilitates the Maillard reaction (browning) and prevents sticking.
- Heat your grill to a steady medium heat (around 350°F). You don’t want it screaming hot, or the vegetables will burn on the outside before they soften in the middle.
- Place the vegetables in a single layer on the grates. Grill the asparagus for 3-5 minutes, turning once, until they are bright green with dark char marks. Grill the zucchini and onions for 4-5 minutes per side.
- Remove the vegetables when they are tender but still have a slight ‘bite’ (al dente). Arrange them artfully on your board and finish with a sprinkle of flaky sea salt to make the flavors pop.
How to make hummingbird food?

Why we love this
While not for the humans at the table, having a hummingbird feeder nearby is the ultimate ‘lifestyle’ touch for an outdoor food board setting. There is a quiet, meditative joy in watching these tiny, iridescent creatures dart in for a drink while you enjoy your own meal. The simple act of providing nourishment for nature adds an element of mindfulness and beauty to your gathering that guests will absolutely adore. It’s a low-effort way to create a ‘living’ backdrop for your aesthetic lunch, making your garden feel like a curated sanctuary.
Ingredients
- 1 cup granulated white sugar
- 4 cups water
How to make it
- Mix the sugar and water in a medium saucepan. It is critical to use a 4:1 ratio of water to sugar, as this most closely mimics the natural nectar found in flowers; any stronger can be harmful to the birds’ kidneys.
- Heat the mixture on the stove just until it reaches a low boil. Boiling serves two purposes: it helps the sugar dissolve completely and it kills any bacteria or mold spores present in the water or sugar.
- Boil for 2 minutes, then remove from the heat immediately. Do not add red food coloring; the red parts of your feeder are enough to attract the birds, and dyes can be toxic to them.
- Let the nectar cool to room temperature. This is vital, as hot liquid can warp your feeder or harm the birds.
- Fill your clean bird feeder and store any extra nectar in a sealed glass jar in the refrigerator for up to a week. Hang the feeder in a shaded area near your board setup and wait for the magic to happen.
How to make summer soup?

Why we love this
A chilled summer soup, like a classic Gazpacho, is a sophisticated and unexpected addition to a food board. It offers a smooth, velvety texture that contrasts beautifully with the crunchier elements like chips or crackers. The aroma is purely of a summer garden—ripe tomatoes, spicy garlic, and cool cucumber blended into one refreshing sip. Served in small glass shooters or tiny bowls, it looks incredibly aesthetic and provides a concentrated burst of garden-fresh flavor that feels light, healthy, and cooling on a hot afternoon. It’s the ultimate ‘cool girl’ appetizer that elevates the entire spread.
Ingredients
- 4 cups ripe tomatoes, chopped
- 1 English cucumber, peeled and chopped
- 1 red bell pepper, seeded and chopped
- 2 cloves garlic, smashed
- 2 tablespoons sherry vinegar
- 1/4 cup extra virgin olive oil
- Salt and cumin to taste
How to make it
- Place the chopped tomatoes, cucumber, bell pepper, and garlic into a high-speed blender. For the best results, use ‘garden-ripe’ tomatoes that are soft to the touch and fragrant.
- Pulse the vegetables until the mixture is mostly broken down, then blend on high for 60 seconds until the texture is completely smooth and emulsified.
- While the blender is running on low, slowly stream in the extra virgin olive oil and sherry vinegar. This creates a creamy, stable emulsion that won’t separate as the soup sits.
- Season with salt and a pinch of cumin. Taste as you go; the acidity of the vinegar should balance the sweetness of the tomatoes.
- Pass the soup through a fine-mesh strainer if you want a truly ‘restaurant-quality’ silky texture. Chill in the refrigerator for at least 4 hours—gazpacho must be served ice-cold. Pour into small glasses to place on your food board just as guests arrive.
The Final Touch to Your Viral Food Board
Building the perfect food board is an art form that rewards creativity and a love for good ingredients. By combining these diverse recipes—from the savory sizzle of steak kabobs to the chilled elegance of summer soup—you create a tapestry of flavors that invites conversation and connection. Remember, the best boards aren’t just about the food; they are about the ease of the host and the joy of the guests. So, grab your largest platter, arrange your dishes with an eye for color and height, and enjoy the beautiful, delicious mess of a meal shared with those you love.