
Have you ever spent hours scrolling through your feed, your thumb pausing only for those perfectly curated spaces that look like they belong in a high-end magazine? We’ve all been there, mesmerized by the glow of string lights on a tiny balcony or the crisp, citrusy vibrancy of a summer tablescape. There is a specific kind of magic in creating a home that feels like an escape from the mundane—a place where every corner tells a story of intention, warmth, and a little bit of creative elbow grease.
The secret that the internet’s most viral decorators don’t always tell you is that these looks are surprisingly achievable. Whether you choose to invest in high-quality pieces or roll up your sleeves for a weekend DIY project, the goal is always the same: to create a sanctuary that reflects your soul. Today, we are diving deep into ten of the most coveted viral aesthetics, from hidden gardens to vintage campers, and I’m showing you exactly how to bring that dreamy, high-definition inspiration into your own reality.
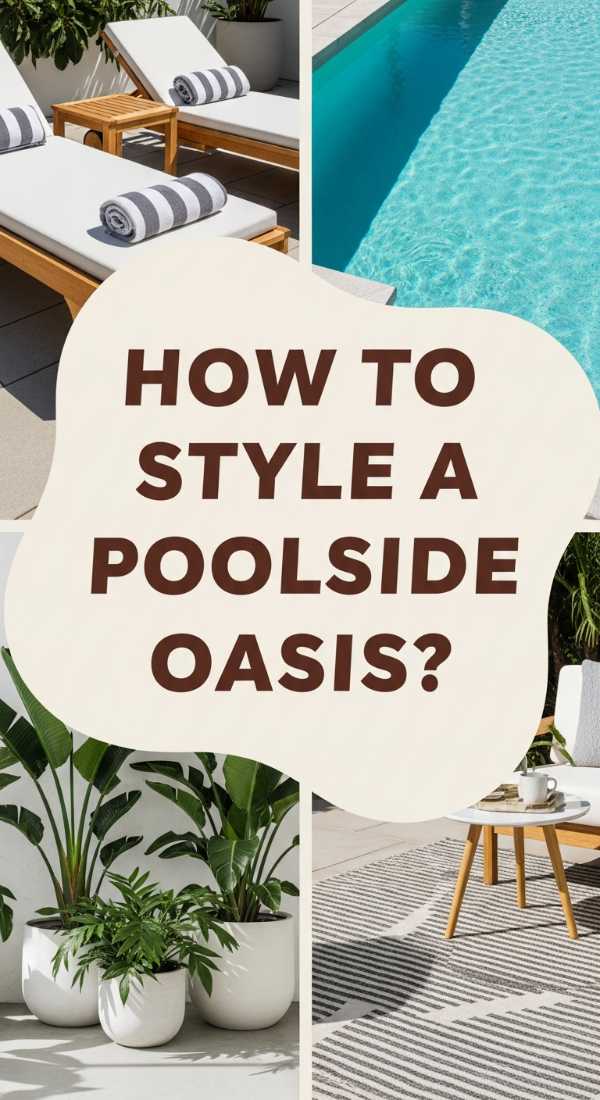
How to Design a Poolside Oasis for Ultimate Summer Relaxation
Why we love this
There is nothing quite like the sensory symphony of a perfect poolside retreat; it’s the feeling of sun-warmed skin meeting the cool, crisp embrace of turquoise water. Imagine the gentle rustle of oversized palm leaves providing a dappled shade while the subtle scent of coconut oil and sea salt hangs in the humid air. It is a space that prioritizes leisure, where the plush texture of a Turkish cotton towel and the rhythmic sound of water lapping against the tiles melt away every ounce of daily stress, turning your backyard into a permanent vacation destination.
Essential Elements:
- Weather-resistant oversized floor cushions
- Large-scale potted tropical plants (Monstera or Palm)
- Neutral-toned outdoor umbrellas with fringe detailing
- A rolling teak bar cart stocked with chilled glassware
- Soft ambient lighting using solar-powered lanterns
How to make it
- Assess your layout by clearing all debris and power-washing the deck to ensure a clean, bright foundation; visual cues for ‘doneness’ include the concrete returning to its original light gray shade.
- Zone your space by placing your largest furniture items, like loungers or a daybed, facing the sun’s path to maximize tanning potential while ensuring umbrellas are weighted with at least 50lbs to prevent wind-lift.
- Introduce texture by layering outdoor rugs made of jute or recycled plastic; ensure they are pulled tight and anchored under furniture legs to avoid tripping hazards.
- Apply a high-UV protectant spray to all fabrics to prevent fading; you will know it is dry when the fabric feels slightly stiff but regains its softness after 30 minutes of sun exposure.
- Arrange greenery in clusters of three at varying heights to create a ‘lush’ visual depth, ensuring pots have drainage holes to prevent root rot during summer storms.
How to Create a Secret Garden for Endless Outdoor Joy

Why we love this
A secret garden feels like a whispered promise kept between you and nature, a secluded nook where the world slows down to the pace of a blooming rose. The air here is different—heavy with the intoxicating, honeyed aroma of jasmine and the damp, earthy scent of moss-covered stones underfoot. It’s the ultimate escape where velvet-soft petals brush against your skin and the only soundtrack is the distant, melodic chirping of birds, creating a private sanctuary that feels both ancient and infinitely refreshing.
Essential Elements:
- Wrought iron bistro set with a weathered patina
- Climbing vines like Clematis or English Ivy
- A stone or gravel pathway with irregular edges
- Hidden solar fairy lights nestled in the foliage
- A small, bubbling stone water feature
How to make it
- Define the boundaries by installing a trellis or wooden lattice, securing it deeply into the soil (at least 12 inches) to withstand the weight of maturing heavy vines.
- Examine the soil pH and amend it with organic compost until it reaches a dark, crumbly consistency that feels like moist cake crumbs in your hand.
- Plant climbing species at the base of your trellis, spacing them 18 inches apart; use soft garden twine to ‘train’ the stems upward in a criss-cross pattern to encourage full coverage.
- Lay a weed barrier before pouring pea gravel for your path; rake the gravel until it is perfectly level, checking for ‘doneness’ by walking over it—it should feel firm and not shift excessively.
- Position your focal point, like a vintage bench, in the furthest corner to draw the eye inward and create a sense of discovery for anyone entering the space.
How to Bake Pastel Easter Cookies for the Perfect Spring Brunch

Why we love this
These cookies are more than just a treat; they are a bite-sized celebration of spring’s arrival, smelling faintly of sweet vanilla bean and almond zest. The snap of the crisp, buttery shortbread gives way to a smooth, melt-in-your-mouth royal icing that feels like silk on the tongue. Adorned in soft lavenders, mint greens, and blush pinks, they look like edible jewels on a brunch table, capturing the essence of a sunlit garden party and the nostalgic joy of a childhood Easter egg hunt.
Essential Elements:
- High-quality unsalted butter (chilled)
- Pure vanilla bean paste and almond extract
- Fine-mesh sieve for ultra-smooth powdered sugar
- Gel food colorings in pastel tones
- Precision piping bags and assorted metal tips
How to make it
- Cream your chilled butter and sugar on medium-low heat (speed) until just combined; do not over-aerate, as you want a flat surface for decorating.
- Chill the rolled dough for exactly 30 minutes before cutting shapes; this ensures the edges stay sharp and the ‘doneness’ visual cue is a golden-brown bottom with a pale top.
- Prepare royal icing by whisking egg whites and sugar until ‘stiff peaks’ form—the icing should stand straight up when the whisk is lifted.
- Thin your ‘flood’ icing with drops of water until it reaches a 10-second consistency; this means a line drawn through the icing disappears in exactly 10 seconds.
- Outline the cookie with thick icing first, then ‘flood’ the center; use a toothpick to pop any tiny air bubbles while the icing is still wet for a glass-like finish.
How to Transform a Small Apartment Patio for Cozy Evening Vibes
![]()
Why we love this
Small spaces have the unique potential to become the coziest corners of a home, especially when the sun sets and the city lights begin to twinkle. The combination of warm, amber-toned string lights and the plush, high-pile texture of an outdoor rug creates an inviting cocoon that feels worlds away from the hustle below. There’s a distinct feeling of intimacy here—the smell of a cedarwood candle mingling with the evening breeze, making it the perfect spot to unwind with a glass of wine and a soft knit blanket.
Essential Elements:
- Weatherproof Edison-style string lights
- Multi-functional storage ottoman or bench
- Privacy screen made of bamboo or artificial ivy
- Layered outdoor textiles (pillows and throws)
- Vertical wall planters for space-saving greenery
How to make it
- Maximize vertical space by mounting a grid wall or lattice; use zip ties to secure it to the railing, ensuring it doesn’t wobble when weight is applied.
- Install lighting by starting at the power source and draping ‘swags’ across the ceiling or railing; use command hooks designed for outdoor use to avoid damaging rental property walls.
- Select furniture that scales to the space; a visual cue for correct scaling is having at least 18 inches of walking space around the main seating area.
- Add ‘warmth’ through light levels; choose 2700K LED bulbs to mimic the glow of candlelight, which is scientifically proven to promote relaxation in small environments.
- Incorporate scent by placing potted lavender or rosemary near the seating; rub the leaves between your fingers to check for oil release—this provides a natural aromatherapy hit every time you sit down.
How to Style a Mother’s Day Brunch for a Heartfelt Family Celebration

Why we love this
A Mother’s Day brunch is an exercise in soft elegance, where the table becomes a canvas for gratitude and love. The aroma of freshly brewed floral tea and warm, flaky croissants fills the room, while the visual feast of peonies and ranunculus in crystal vases brings a vibrant energy to the setting. It is the tactile details that make it special—the cool touch of a marble serving platter, the rustle of linen napkins, and the sparkling clarity of mimosa flutes catching the morning light, all coming together to honor the most important women in our lives.
Essential Elements:
- Linen tablecloth in a soft neutral or floral print
- Mismatched vintage china for a whimsical touch
- Fresh floral centerpieces in varying heights
- Personalized place cards with handwritten notes
- Tiered serving stands for finger foods
How to make it
- Iron your linen tablecloth while it is slightly damp; the ‘visual cue’ for doneness is a smooth surface that still retains the natural, heavy drape of the fabric.
- Create a floral anchor by choosing one ‘thriller’ flower (like a large peony) and surrounding it with ‘fillers’ (like baby’s breath) and ‘spillers’ (like eucalyptus) for a professional look.
- Layer your place settings starting with a charger plate, then the dinner plate, and finally a folded napkin topped with a sprig of greenery to add a sensory element.
- Set up a self-serve beverage station; keep juices in chilled glass carafes and pre-cut fruit garnishes to ensure the host can remain present with guests.
- Adjust the room’s lighting to ‘soft focus’ by closing sheer curtains, allowing natural light to filter in without creating harsh shadows on the table.
How to Design a Graduation Cap for a Memorable Commencement Ceremony

Why we love this
The graduation cap is a tiny, square canvas of triumph, representing years of hard work and late-night study sessions. There is something so tactile and satisfying about the sparkle of glitter cardstock and the smooth finish of vinyl lettering under your fingertips. When you wear it, the slight weight of the decorations serves as a physical reminder of your achievement, and the personalized design ensures you stand out in a sea of identical gowns, making it a cherished keepsake of a pivotal life moment.
Essential Elements:
- Heavyweight glitter or patterned cardstock
- Industrial-strength adhesive (like E6000)
- 3D stickers, rhinestones, or silk flowers
- Vinyl lettering or metallic paint pens
- A ‘cap topper’ base to avoid damaging the fabric
How to make it
- Trace the square shape of your cap onto a topper base, ensuring you cut a small circular hole in the center for the tassel button to fit through.
- Layout your design ‘dry’ first; do not apply glue until you are satisfied with the visual balance—a professional tip is to leave a 1/4 inch margin around the edge for a clean look.
- Use a low-heat glue gun for delicate items like silk flowers to prevent melting, but use a permanent liquid adhesive for heavy rhinestones to ensure they survive the ‘cap toss.’
- Apply vinyl lettering by peeling the backing slowly; if the letter lifts, burnish it firmly with a credit card until it adheres flat to the cardstock surface.
- Allow the cap to cure flat for at least 24 hours; the visual cue for ‘doneness’ is that no elements shift when the cap is tilted vertically.
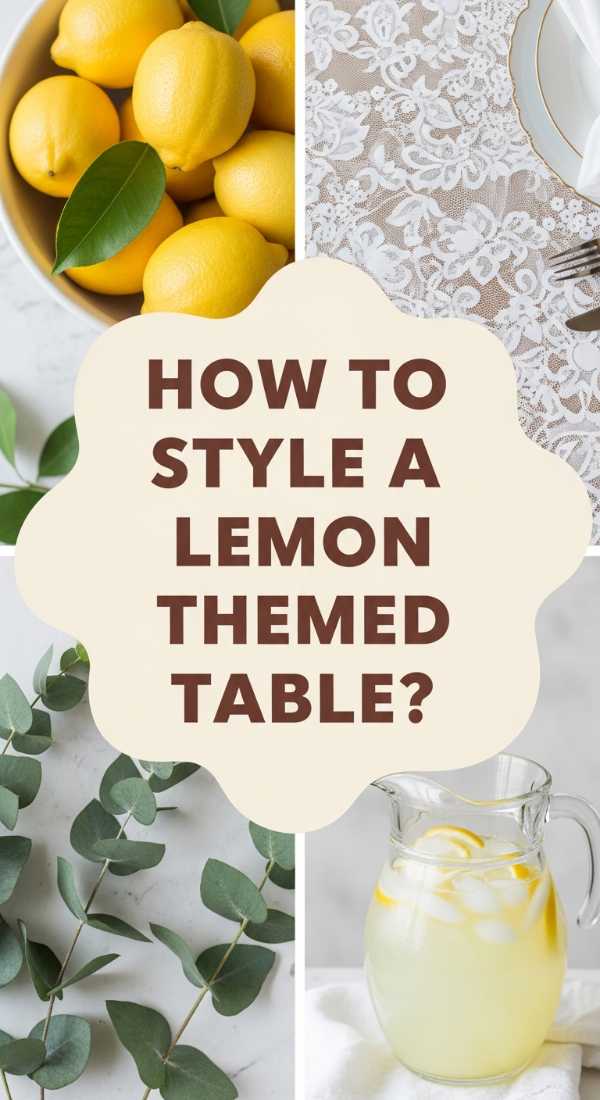
How to Arrange a Zesty Lemon Table for Fresh Summer Entertaining
Why we love this
A lemon-themed table is an instant mood booster, radiating the bright, citrusy energy of a sun-drenched Amalfi Coast afternoon. The vivid yellow of the fruit pops against crisp white linens, creating a visual contrast that feels incredibly clean and sophisticated. You can almost taste the tartness of a cold lemonade just by looking at the decor, and the faint, zesty scent of sliced citrus mingling with fresh basil leaves creates an olfactory experience that is both energizing and deeply welcoming for guests.
Essential Elements:
- Fresh, bright yellow lemons (various sizes)
- Greenery like eucalyptus, ruscus, or fresh basil plants
- Blue and white patterned ceramics (Chinoiserie style)
- Yellow taper candles in brass holders
- Woven rattan placemats for natural texture
How to make it
- Start with a neutral base; a white or pale blue tablecloth allows the yellow of the lemons to become the primary visual focal point without competing colors.
- Create a ‘runner’ of greenery down the center of the table; fluff the leaves to create volume, ensuring the height doesn’t block the line of sight between guests.
- Incorporate whole lemons directly into the greenery, then slice a few in half to expose the juicy interiors—this adds a ‘wet’ texture and boosts the natural aroma.
- Place blue and white plates at each setting; the visual cue for success is the classic ‘Mediterranean’ color palette which feels timeless and high-end.
- Use a microplane to zest a little lemon over the napkins or place cards right before guests arrive for a hidden burst of fragrance.
How to Decorate a Sacred Church Sanctuary for a Joyous Easter Service

Why we love this
Decorating a sanctuary for Easter is about capturing a sense of profound hope and renewal through the language of nature. The space becomes filled with the heady, sweet perfume of white Trumpet Lilies, their waxy petals gleaming under the soft glow of candlelight. It’s a multi-sensory experience where the visual purity of white fabrics and the lush green of palms create a feeling of peace and transcendence, turning the architecture into a living, breathing testament to the joy of the season.
Essential Elements:
- Dozens of potted White Easter Lilies
- Draping fabrics in white and gold (satin or organza)
- Large-scale wooden cross or focal point
- Pillar candles of varying heights
- Fresh palm fronds or spring greenery
How to make it
- Start by cleaning the altar area; use a soft microfiber cloth to remove dust from wood surfaces, as the visual cue for ‘readiness’ is a subtle, clean sheen.
- Drape the central cross with white fabric, allowing it to flow naturally; use ‘gathering’ techniques to create soft folds rather than tight pulls for a more ethereal look.
- Arrange lilies in tiers around the base of the altar; remove the yellow anthers (the pollen-bearing parts) from the flowers to prevent staining the white petals and to help the blooms last longer.
- Place candles in clusters, ensuring they are positioned away from flammable fabrics; use a long-reach lighter to keep the flame levels consistent across the display.
- Step back to the furthest pew to check the ‘scale’; decorations in a large sanctuary must be oversized to ensure they don’t look lost from a distance.
How to Aestheticize a Vintage Camper for the Ultimate Road Trip Adventure

Why we love this
There is a whimsical, nostalgic charm to a vintage camper that speaks to the wanderlust in all of us, evoking memories of campfire smoke and pine needles. Inside, the space is a masterclass in cozy efficiency, where every inch is covered in soft, tactile fabrics—think wool blankets, velvet cushions, and retro-patterned curtains. The air smells of old wood and fresh coffee, and the glow of battery-operated puck lights turns the small cabin into a golden-hued retreat that feels like a safe harbor no matter where the road leads.
Essential Elements:
- Peel-and-stick subway tile for a lightweight backsplash
- Custom-fitted cushions in durable, high-performance fabric
- Removable vinyl flooring in a light wood or bold tile pattern
- Macramé storage nets for a boho-chic look
- Battery-powered fairy lights and magnetic spice jars
How to make it
- Prep all surfaces with a degreaser; vintage campers often have a layer of hidden film that will prevent ‘peel-and-stick’ items from adhering correctly.
- Paint the interior walls a bright ‘warm white’; use a primer specifically designed for laminate or aluminum to ensure the paint doesn’t chip during travel vibrations.
- Install your backsplash by starting in the most visible corner; use a level to ensure the first tile is perfectly straight, as this dictates the ‘doneness’ of the entire wall.
- Layer your textiles using ‘sticky’ rug pads under cushions to prevent them from sliding while the vehicle is in motion.
- Switch to LED bulbs for all original fixtures to reduce battery drain; the visual cue for ‘modernizing’ is a consistent light temperature (warm white) throughout the small space.
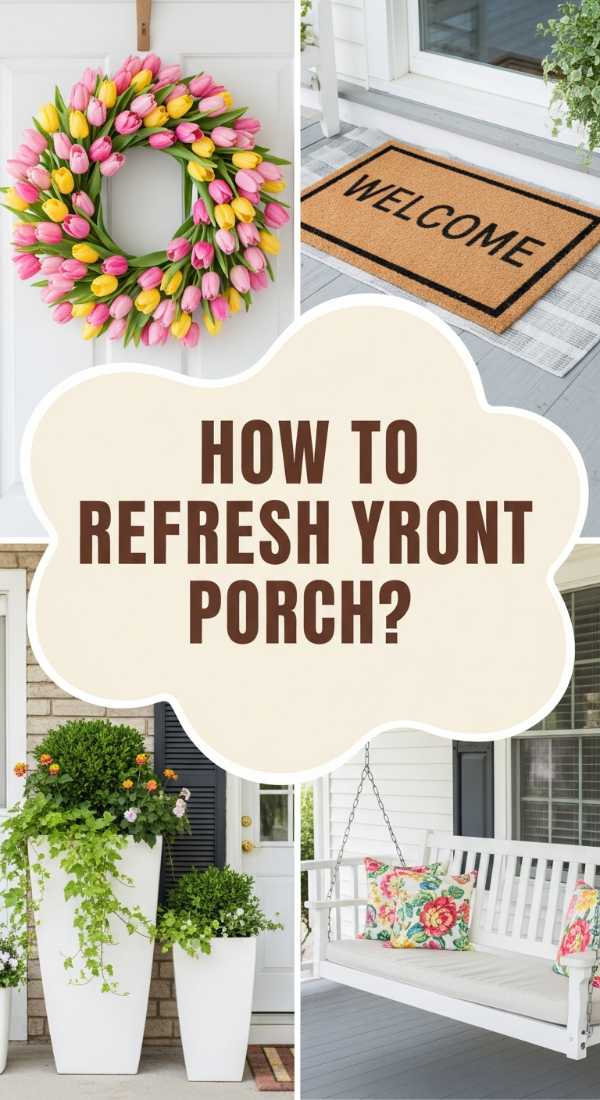
How to Refresh a Spring Front Porch for a Welcoming Home Entrance
Why we love this
Your front porch is the handshake of your home, and a spring refresh makes that first impression feel like a warm, sunny embrace. The sight of vibrant tulips in terracotta pots and a freshly painted front door instantly lifts the spirit, while the clean, grassy scent of a new coir doormat signals a fresh start. It’s a place where you can sit with a morning coffee, feeling the cool spring breeze while the soft texture of an outdoor pillow supports you, making the transition from the world to your private haven feel seamless and beautiful.
Essential Elements:
- A high-quality coir doormat with a welcoming message
- A seasonal wreath featuring silk or dried spring florals
- Symmetrical planters with ‘thriller, filler, spiller’ plants
- A freshly painted front door in a pop of color (like sage or coral)
- Comfortable seating, such as a rocking chair or porch swing
How to make it
- Deep clean the porch floor and siding with a soft-bristle brush and mild soap; the ‘visual cue’ is the removal of all winter salt and spiderwebs.
- If painting the door, sand it lightly first with 220-grit sandpaper until the shine is gone, then apply paint in thin, even coats to avoid drips and achieve a factory-smooth finish.
- Select a wreath that is roughly 50-70% of the width of the door; hang it at eye level (usually 57 inches from the ground) to create the most inviting focal point.
- Pot your spring flowers using a high-quality moisture-control potting mix; the ‘doneness’ cue for watering is when the soil feels like a wrung-out sponge—damp but not muddy.
- Layer a large patterned outdoor rug under your coir mat for a ‘viral’ designer look that adds weight and visual interest to the entryway.
Creating Your Own Viral Moments
At the end of the day, the internet’s most viral decor isn’t just about the items themselves—it’s about the feeling they evoke. It’s about creating a space where you can breathe, laugh, and feel completely at home. Whether you’re arranging lemons on a table or painting a vintage camper, remember that the most beautiful homes are the ones that are lived in and loved. So, take these tips, make them your own, and don’t be afraid to get a little creative. Your personal sanctuary is waiting!