

Curating Calm: The Ultimate Guide to Modern Home Aesthetics
There is a specific kind of magic that happens when you finally step through your front door and feel the weight of the world simply slide off your shoulders. We’ve all been there—scrolling through endless feeds of perfect homes, wondering how they manage to capture that elusive blend of peace and personality. Home isn’t just a place where we store our belongings; it’s a living, breathing sanctuary that reflects our internal state and nurtures our daily rhythms.
Creating a curated home isn’t about following every trend or spending a fortune on designer furniture. It’s about the intentionality of textures, the play of light against a wall, and the way a garden path feels underfoot. It’s about building a space that tells your story while offering a quiet retreat from the noise of the outside world. In this guide, we’re diving deep into the art of modern aesthetics, from the curb to the kitchen, to help you craft a home that feels like a deep, restorative exhale.
How to Create Curb Appeal with Natural Rock Flower Beds

Why we love this
There is something deeply grounding about the juxtaposition of rugged, ancient stone against the soft, fleeting beauty of seasonal blooms. We love natural rock flower beds because they bring a tactile, earthy texture to a home’s exterior that mulch simply cannot replicate. The way the sun warms the stones in the afternoon, releasing the faint, mineral scent of rain-washed granite, creates a sensory experience that feels both permanent and alive. It’s a low-maintenance way to add structural depth and a sense of timelessness to your garden.
Essential Elements:
- Large river rocks or decorative boulders
- Smaller pea gravel or river pebbles for filler
- Permeable landscape fabric
- Drought-tolerant perennials (like Lavender or Sedum)
- Metal or heavy-duty plastic edging
How to make it
- Begin by outlining the shape of your bed using a garden hose or spray paint, opting for organic, flowing curves rather than rigid straight lines to mimic nature.
- Excavate the area to a depth of about 4 inches, removing all grass and weeds to ensure a clean slate for your stone installation.
- Lay down high-quality, professional-grade landscape fabric across the entire area, securing it with landscape staples to prevent future weed growth while allowing water drainage.
- Place your largest focal rocks or boulders first; bury them slightly (about 1/3 deep) so they look like they are emerging naturally from the earth rather than just sitting on top.
- Cut ‘X’ shapes in the fabric to plant your chosen greenery, ensuring you space them according to their full-grown width to avoid overcrowding.
- Fill the remaining space with your smaller stones, layering them to a thickness of at least 2-3 inches to fully hide the fabric and provide a solid, polished finish.
How to Design a Nostalgic Sanctuary for the Ultimate Retro Teen Room

Why we love this
Stepping into a retro-inspired room feels like a warm hug from the past, blending the vibrant energy of the 70s and 80s with modern comfort. We adore this aesthetic because it celebrates tactile richness—think the fuzzy pile of a shag rug, the smooth coolness of chrome, and the velvet touch of a vintage bean bag. It creates a space that feels deeply personal and expressive, where the glow of a lava lamp and the crackle of a vinyl record provide a much-needed break from the digital saturation of modern life.
Essential Elements:
- Warm, earthy color palette (mustard, terracotta, avocado)
- Geometric patterned wallpaper or wall decals
- A dedicated record player station
- Layered lighting (neon signs, lava lamps, globe pendants)
- Macramé accents and velvet textiles
How to make it
- Select a primary “hero” color from a vintage era—like a burnt orange or a dusty teal—and apply it to an accent wall or through large-scale textiles like curtains.
- Incorporate various textures by layering a high-pile shag rug over hardwood floors, providing a soft, lounge-heavy atmosphere perfect for floor-sitting.
- Source or repurpose a low-profile media console to house a turntable and a curated collection of records, making music a physical, interactive experience.
- Install dimmable warm-toned lighting and supplement with a neon wall sign to create a moody, evening-appropriate glow that shifts the room’s energy.
- Add “nostalgia clusters” by framing old concert posters or displaying vintage tech, ensuring these items are grouped together to look like a curated collection rather than clutter.
How to Build a Dreamy Duck Habitat for a Clean Backyard Oasis

Why we love this
There is a unique serenity found in the gentle “patter-patter” of duck feet and the soft splashing of water in a well-kept pond. We love this because it transforms a standard backyard into a living ecosystem that feels like a private nature preserve. The sight of happy ducks preening their feathers under the shade of a weeping willow, combined with the rhythmic sound of a bubbling water filter, creates a tranquil atmosphere that invites you to slow down and observe the simple joys of animal husbandry.
Essential Elements:
- Recycled plastic pond liner or pre-formed pond
- High-capacity biological water filtration system
- Secure, predator-proof coop with ventilation
- Non-slip ramps for pond access
- Soft-textured forage plants (like clover or dandelion)
How to make it
- Choose a level spot in your yard that offers both sun and shade, then excavate a hole slightly larger than your pond liner, ensuring the edges are perfectly level to prevent overflow.
- Install a heavy-duty biological filter and pump system; ducks are messier than fish, so you need a system rated for double the actual water volume to keep the water crystal clear and odor-free.
- Build a sturdy perimeter fence using hardware cloth (not chicken wire) buried at least 6 inches underground to deter digging predators like foxes or raccoons.
- Construct a dry “docking” area around the pond using large flat stones or pavers to prevent the ducks from turning the surrounding grass into a mud pit.
- Place a ventilated, easy-to-clean coop nearby, bedded with thick hemp or straw, and ensure it can be locked securely every night to keep your feathered friends safe.
How to Elevate Your Garden Style with Whimsical Outdoor Murals
Why we love this
Outdoor murals are the ultimate expression of “garden as gallery,” turning a plain fence or a drab garage wall into a breathtaking focal point. We love how a mural can trick the eye, adding a sense of depth and mystery to a small space or bringing a burst of permanent color to a winter garden. The way the painted colors interact with the shifting natural light throughout the day creates a dynamic piece of art that breathes life and a sense of wonder into every corner of your outdoor sanctuary.
Essential Elements:
- Weather-resistant exterior acrylic paints
- UV-protective clear topcoat
- High-quality synthetic brushes and rollers
- A projector for sketching the design
- Proper surface primer for wood, brick, or stucco
How to make it
- Clean the surface thoroughly with a power washer to remove dirt and loose debris, then apply a high-adhesion exterior primer suited for your specific wall material.
- Wait for a clear, overcast day to project your design onto the wall at night, tracing the outlines with a pencil or a light-colored paint marker for accuracy.
- Start by painting the large background shapes using a roller to ensure even coverage, working from the top of the wall down to catch any inevitable drips.
- Layer in your details using smaller brushes, focusing on bold colors and high contrast to ensure the mural is visible and striking even from a distance.
- Allow the paint to cure for at least 48 hours before applying two coats of a non-yellowing, UV-resistant outdoor sealant to protect the art from fading and moisture damage.
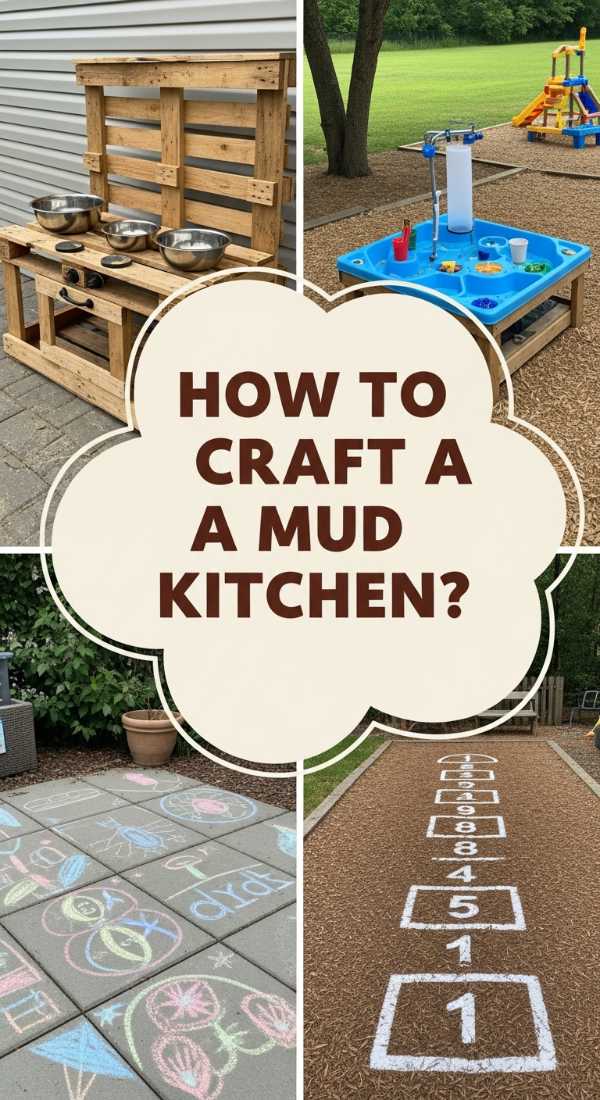
How to Craft a Nature Play Zone for Endless Backyard Fun

Why we love this
Nothing beats the sound of children laughing as they explore the wonders of the natural world right in their own backyard. We love nature play zones because they swap plastic slides for tactile, organic materials that spark imagination and sensory development. The smell of fresh pine chips, the feeling of smooth river stones in small hands, and the secret-fort vibe of a willow tunnel create a childhood wonderland that feels both magical and deeply connected to the earth.
Essential Elements:
- Log rounds for balance beams and seating
- A “mud kitchen” with old pots and pans
- Cedar wood chips for a soft landing zone
- Live willow branches for a living tunnel
- Sand and water play table
How to make it
- Define the zone using a border of large, smooth logs to keep the play materials contained while providing natural seating for adults and children alike.
- Install a thick layer (at least 6 inches) of playground-grade cedar mulch to provide a safe, aromatic, and cushioned surface for active play.
- Build a simple mud kitchen using a weather-resistant wooden bench, a drop-in stainless steel sink, and a collection of vintage kitchenware for endless sensory exploration.
- Plant willow switches in two parallel rows and arch them over the top, tying them together with twine to create a “living tunnel” that grows thicker and more magical each year.
- Dedicate a corner to a large sand pit filled with fine-grain play sand and smooth pebbles, encouraging tactile play and the construction of miniature landscapes.
How to Modernize a Vintage Ranch for a Sophisticated Home Exterior

Why we love this
There is a quiet sophistication in the transformation of a mid-century ranch into a modern masterpiece. We love this aesthetic because it honors the long, low lines of the original architecture while introducing crisp, contemporary textures. The contrast of dark charcoal trim against natural cedar siding, paired with the glow of oversized windows, creates a home that feels grounded in history but perfectly tailored for a stylish, modern lifestyle. It’s an exercise in clean lines and understated luxury.
Essential Elements:
- Monochromatic paint scheme (black, charcoal, or deep navy)
- Horizontal cedar slat accents
- Modern, minimalist house numbers and mailbox
- Large-format concrete pavers for the walkway
- Updated black-frame windows
How to make it
- Remove outdated shutters and ornate trim to emphasize the ranch’s inherent horizontal lines, creating a cleaner and more expansive visual profile.
- Paint the main body of the house in a deep, matte neutral tone, ensuring the soffits and gutters match for a seamless, high-end look.
- Install sections of horizontal cedar siding near the entryway or under windows to introduce warmth and a high-contrast natural texture against the dark paint.
- Upgrade the front door to a modern design with frosted glass lites, choosing a hardware finish—like satin brass or matte black—that coordinates with new light fixtures.
- Redesign the entryway path using oversized square concrete pavers set in a bed of dark basalt gravel, providing a rhythmic and sophisticated approach to the home.
How to Design a Poolside Lounge for the Perfect Summer Retreat

Why we love this
A poolside lounge is the ultimate symbol of leisure, where the air smells of coconut lime and the water reflects the dancing sunlight. We love this because it creates an outdoor “living room” that feels like a permanent vacation. The combination of plush, weather-resistant textiles, the cooling presence of water, and the shade of a wide umbrella provides a sensory escape that recharges the soul. It’s about creating a space where the hours melt away into a blissful blur of blue and gold.
Essential Elements:
- High-quality, quick-dry lounge chairs
- Outdoor area rug to define the space
- Cantilever umbrella for adjustable shade
- Side tables for drinks and books
- Potted tropical plants (like Palms or Bird of Paradise)
How to make it
- Arrange your furniture in a way that encourages conversation, grouping loungers in pairs with a shared side table for a cohesive, resort-style layout.
- Lay down a large, UV-stabilized outdoor rug in a neutral tone to anchor the space and protect bare feet from hot deck surfaces.
- Select cushions with high-performance outdoor fabric (like Sunbrella) in a light, airy color palette to keep the area feeling cool and inviting even in direct sun.
- Position a large cantilever umbrella so it can be pivoted to provide shade as the sun moves throughout the afternoon, ensuring all-day comfort.
- Incorporate tall, lush greenery in large ceramic planters to create a sense of privacy and add a vibrant, tropical energy to the poolside atmosphere.
How to Achieve Pantry Perfection for a Stress Free Kitchen Experience

Why we love this
Opening a perfectly organized pantry is like taking a deep breath for your brain. We love this aesthetic because it turns a utilitarian chore into a moment of visual peace. The uniform look of clear glass jars filled with colorful grains, the clean scent of dried herbs, and the tactile satisfaction of a bamboo lid clicking into place make daily meal prep feel like a curated experience rather than a frantic search. It’s about bringing order to the heart of the home, creating a sense of abundance and calm.
Essential Elements:
- Uniform glass or BPA-free plastic canisters
- Airtight bamboo or stainless steel lids
- Matching woven baskets for bulky items
- Tiered risers for canned goods
- A consistent labeling system
How to make it
- Empty the entire pantry and discard any expired items, then wipe down every shelf with a mild cleaner to create a fresh, neutral canvas for your organization.
- Sort all dry goods into categories—baking, grains, snacks, breakfast—to determine exactly how many containers and baskets you will need for each group.
- Decant bulk items like flour, sugar, and pasta into uniform clear jars; this not only looks beautiful but also allows you to see exactly when supplies are running low.
- Utilize tiered risers for canned goods and spices so that every label is visible at a glance, preventing “lost” items from migrating to the back of the shelf.
- Apply minimalist, water-resistant labels to every container at the same height to create a rhythmic, professional look that is as functional as it is aesthetic.
How to Light Up Your Entryway for a Magical Evening Glow

Why we love this
The right entryway lighting is the “warm hug” of home design, greeting you with a soft, amber glow as twilight falls. We love this because it transforms the functional act of coming home into a magical transition. The interplay of shadows and highlights on your architectural features, combined with the safety and warmth of a well-lit path, creates an enchanting first impression. It’s about using light to sculpt the evening landscape, making your home feel like a beacon of hospitality and security.
Essential Elements:
- Warm-toned LED bulbs (2700K – 3000K)
- Architectural sconces or a statement pendant
- Low-voltage path lights
- Uplights for trees or structural features
- Smart timers or motion sensors
How to make it
- Identify the three layers of light: ambient (the overall glow), task (lighting the door lock), and accent (highlighting a tree or texture).
- Install high-quality sconces at eye level on both sides of the front door to create a symmetrical, welcoming frame that illuminates visitors’ faces.
- Place low-voltage LED path lights along the walkway, staggering them rather than placing them in a straight line to create a more natural, inviting flow.
- Position small uplights at the base of your most attractive trees or architectural columns to add dramatic depth and height to your home’s evening silhouette.
- Connect the entire system to a smart timer that automatically activates at sunset, ensuring your home is always glowing and welcoming when you return.
How to Grow a Living Privacy Screen for a Secluded Garden Haven
[IMAGE_10]
Why we love this
There is nothing quite like the soft, rustling sound of a living wall swaying in the breeze. We love living privacy screens because they provide seclusion without the harsh, boxed-in feeling of a traditional fence. The scent of pine or cedar, the vibrant green backdrop that changes with the seasons, and the way the foliage filters the sunlight create a private sanctuary that feels like a hidden forest. It’s a way to reclaim your peace and quiet while contributing to the local ecosystem.
Essential Elements:
- Fast-growing evergreens (like Arborvitae or Leyland Cypress)
- Drip irrigation system
- Organic slow-release fertilizer
- Thick wood chip mulch
- Measuring tape and garden stakes
How to make it
- Research the mature width of your chosen plants and mark their center points with stakes, ensuring they are spaced close enough to overlap but far enough to allow airflow.
- Dig a continuous trench rather than individual holes; this encourages the roots to spread laterally and creates a more unified, solid screen over time.
- Amend the soil with high-quality compost before planting to give your screen the nutrient boost it needs for rapid, healthy growth in the first two years.
- Install a simple drip irrigation line along the base of the plants to ensure they receive consistent moisture without wasting water through evaporation.
- Apply a 3-inch layer of mulch around the base of the entire screen to retain moisture, suppress weeds, and provide a finished, professional garden look.
Wrapping Up Your Aesthetic Journey
Curating a modern home aesthetic is a journey of a thousand small, intentional choices. Whether you are planting a living screen for privacy or decanting your spices into glass jars, each step brings you closer to a space that truly resonates with your soul. Remember, your home is a reflection of you—so take your time, enjoy the process, and let your unique personality shine through every corner and crevice of your sanctuary.
Frequently Asked Questions
How do I maintain a rock flower bed?
Simply use a leaf blower on a low setting to remove debris once a week, and occasionally hose down the rocks to keep their colors vibrant and dust-free.
Are ducks louder than chickens for a backyard?
Generally, ducks are quieter than roosters, though female ducks have a distinct “quack” that is more audible than a hen’s cluck. Proper spacing and happy ducks minimize noise.
What is the best paint for an outdoor mural?
Always use high-quality exterior acrylic house paint. It is designed to expand and contract with the weather and contains UV inhibitors to prevent the colors from fading in the sun.