

Class of 2026: The Hottest Seasonal Nail Trends for Graduation & Beyond
Oh, my loves, can you feel that shift in the air? It’s that magical, bittersweet bridge between the final exams of senior year and the wide-open horizon of summer. To my Class of 2026 besties: you’ve worked so hard, cried over midterms, and laughed until your stomach hurt in the dorm halls. Now, as you prepare to walk across that stage, I want you to feel every bit as radiant as your future looks. Your hands are going to be holding that hard-earned diploma, and they deserve to be draped in something special.
Think of this guide as a warm, cloud-soft embrace for your transition from student to graduate. We’re moving from the soft, budding florals of May right into the high-voltage energy of Summer 2026. Whether you’re a minimalist who loves a clean peach glaze or a bold soul ready to rock summer goth, I’ve curated these trends just for you. Let’s make sure your mani is as unforgettable as your graduation day memories.
12 Easy Steps to Perfect May Nails
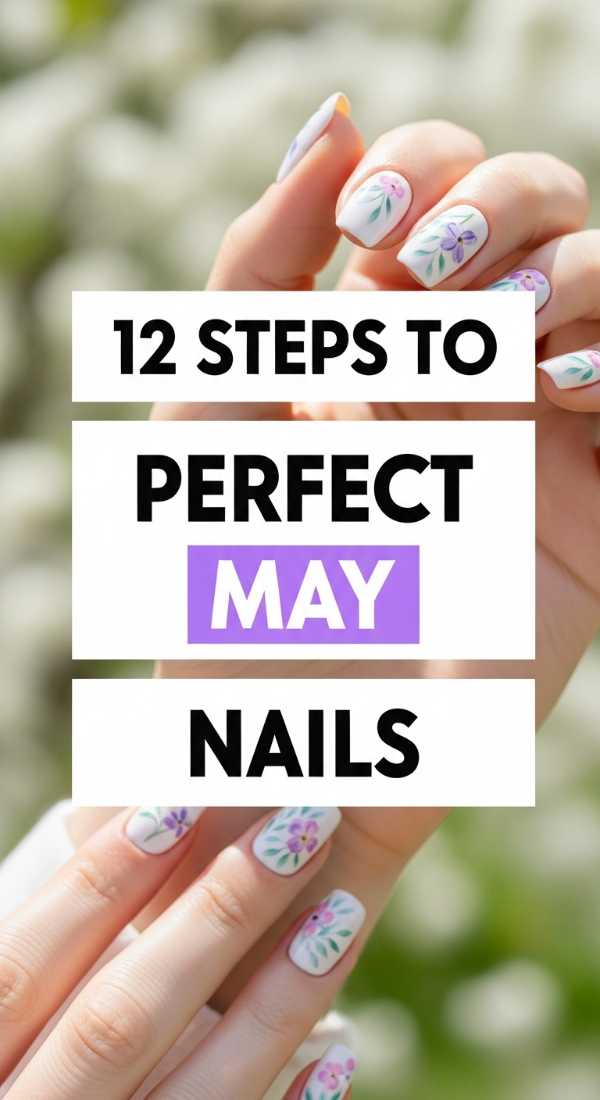
Why to love this Design:
May is all about that gentle awakening, loves. These nails are like a soft whisper of spring—delicate, airy, and perfectly suited for those final garden parties before the big day. They bridge the gap between being a student and stepping into your power with a look that is polished but still whimsical.
Essential Elements:
- Sheer milky white base
- Tiny pressed dried flowers
- Gold leaf flakes
- Ultra-glossy top coat
How to Prepare:
- Sanitize and shape nails into a soft almond.
- Push back cuticles gently.
- Apply a high-quality base coat.
- Apply two coats of milky white polish.
- Place dried flowers using tweezers while wet.
- Add small flecks of gold leaf for dimension.
- Seal with a builder gel for a smooth surface.
- Cure under UV/LED lamp.
- Apply a second layer of top coat.
- Clean any excess with alcohol.
- Massage in rose-scented cuticle oil.
- Buff the edges for a snag-free finish.
Budget Range
- Drugstore Milky Polish ($9)
- Dried Flower Kit ($12)
- Gold Leaf Sheet ($5)
5 Simple Ways to Style Graduation Nails

Why to love this Design:
Graduation is your spotlight moment! These styles focus on timeless elegance that won’t look dated when you look back at your photos in twenty years. It’s about matching your gown while letting your personality shine through the details.
Essential Elements:
- Pearl chrome powder
- Micro-french tips
- Velvet magnetic finish
- Monogram decals
How to Prepare:
- Match your base color to your graduation gown’s secondary color.
- Use a liner brush to create a whisper-thin french tip.
- Apply a pearl chrome rub for a ‘glazed’ finish.
- Add a tiny ‘2026’ decal on the ring finger.
- Finish with a long-wear gel top coat to prevent chipping during the ceremony.
Budget Range
- Chrome Powder ($15)
- Detail Liner Brush ($8)
- Year Decals ($6)
10 Secrets to Master Summer 2026 Nail Trends

Why to love this Design:
The 2026 vibe is all about ‘Digital Ethereal’—it’s futuristic yet organic. Mastering these secrets means you’ll be ahead of the curve at every beach club and graduation trip. It’s about texture, light, and a touch of the unexpected.
Essential Elements:
- Aura gradients
- 3D water droplets
- Holographic shimmers
- Iridescent foils
How to Prepare:
- Invest in a quality makeup sponge for aura effects.
- Keep a matte top coat handy for texture contrast.
- Use clear builder gel to create 3D drops.
- Mix pigment powders into clear gel for custom shades.
- Always prime with a pH balancer.
- Layer sheer colors for depth.
- Keep edges thin to avoid bulk.
- Use a LED flashlight for quick setting.
- Apply cuticle oil twice daily.
- Seal the free edge religiously.
Budget Range
- Aura Sponges ($5)
- Clear Builder Gel ($18)
- Holographic Foil Set ($12)
7 Quick Steps to Apply Sunset Chrome Nails
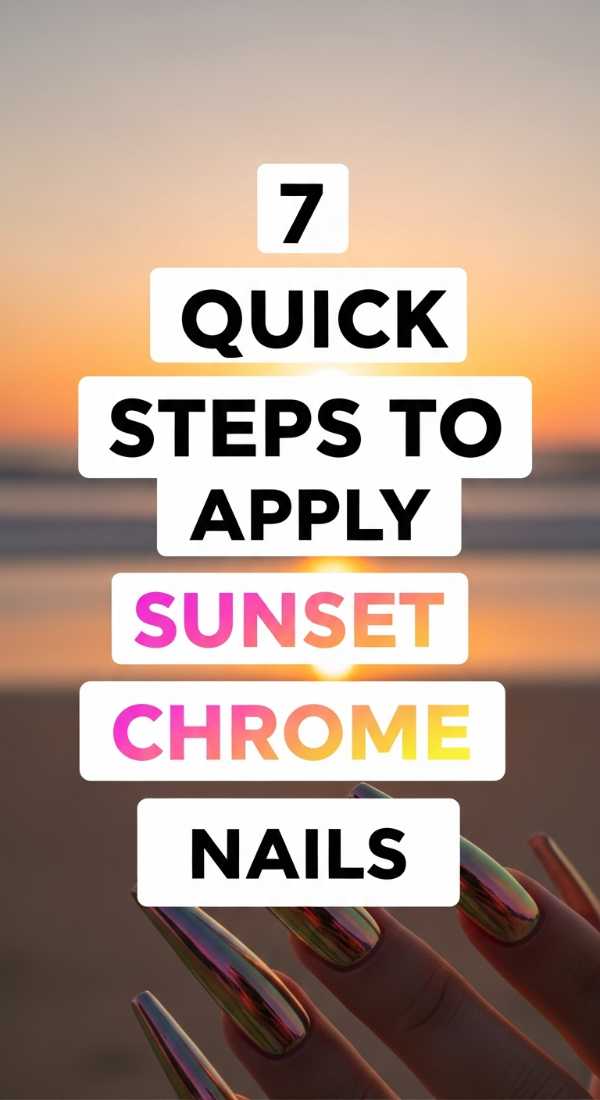
Why to love this Design:
There is nothing quite like a summer sunset, and now you can wear it on your fingertips. This look is warm, inviting, and glows beautifully against sun-kissed skin. It’s the ultimate ‘vacation mode’ manicure for the Class of 2026.
Essential Elements:
- Orange-to-pink gradient base
- Golden chrome powder
- No-wipe top coat
How to Prepare:
- Apply a base of vibrant coral.
- Sponge on a bright yellow at the tips.
- Apply a no-wipe top coat and cure.
- Rub golden chrome powder over the entire surface.
- Dust off excess powder with a soft brush.
- Apply a final high-gloss top coat.
- Cure for double the time to ensure a mirror finish.
Budget Range
- Sunset Polish Duo ($14)
- Gold Chrome Rub ($11)
- High-Gloss Top Coat ($12)
4 Ways to Rock Neon Yellow Nails this Summer
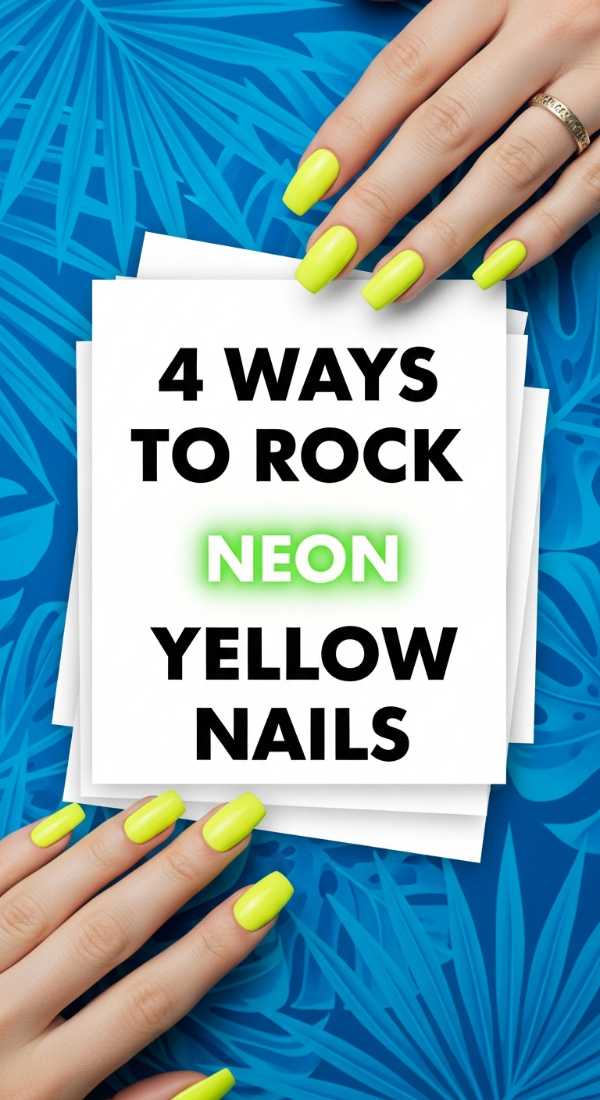
Why to love this Design:
Neon yellow is for the boldest hearts in the Class of 2026. It screams confidence, joy, and the energy of a thousand summer suns. It’s the perfect way to stand out in those crowded graduation party photos.
Essential Elements:
- Matte neon finish
- Negative space accents
- Geometric black lines
- White base coat (to make neon pop)
How to Prepare:
- Always start with a white base coat to ensure the yellow is blindingly bright.
- Try a matte top coat for a modern, ‘high-fashion’ look.
- Combine with negative space half-moons for a chic edge.
- Add thin black stripes for a sporty, graphic vibe.
Budget Range
- Neon Yellow Polish ($10)
- Opaque White Base ($9)
- Matte Top Coat ($11)
6 Tips to Match Your Hands and Toes Nails
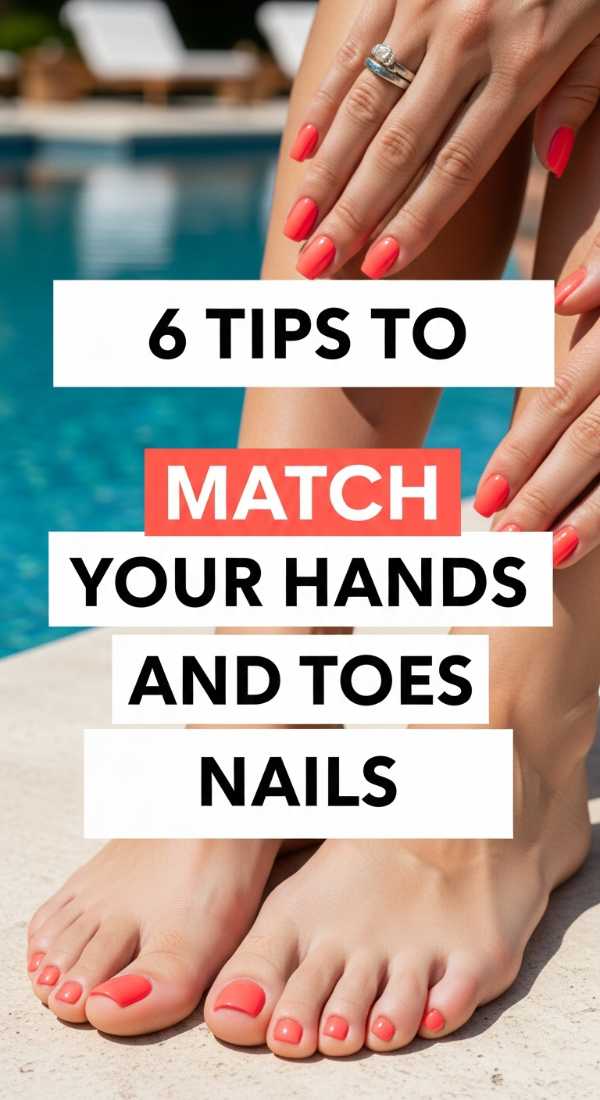
Why to love this Design:
Nothing says ‘put together’ like a cohesive mani-pedi. It’s that effortless polish that makes you feel like a total boss as you transition from the graduation stage to the beach. Cohesion is the secret to aesthetic harmony.
Essential Elements:
- Complementary color palettes
- Consistent finish (all matte or all gloss)
- Shared accent finger/toe
How to Prepare:
- Pick one shade darker for your toes than your hands.
- Use the same glitter or chrome on the big toe and the ring finger.
- Maintain the same nail shape (e.g., square) for both.
- Ensure the undertones (warm or cool) match across all polishes.
- Apply a thicker top coat on toes for longevity.
- Hydrate both cuticles with the same nourishing oil.
Budget Range
- Mani-Pedi Polish Set ($22)
- Foot File and Buffer ($10)
- Shea Butter Foot Cream ($15)
8 Easy Techniques for Lemon Nails Designs
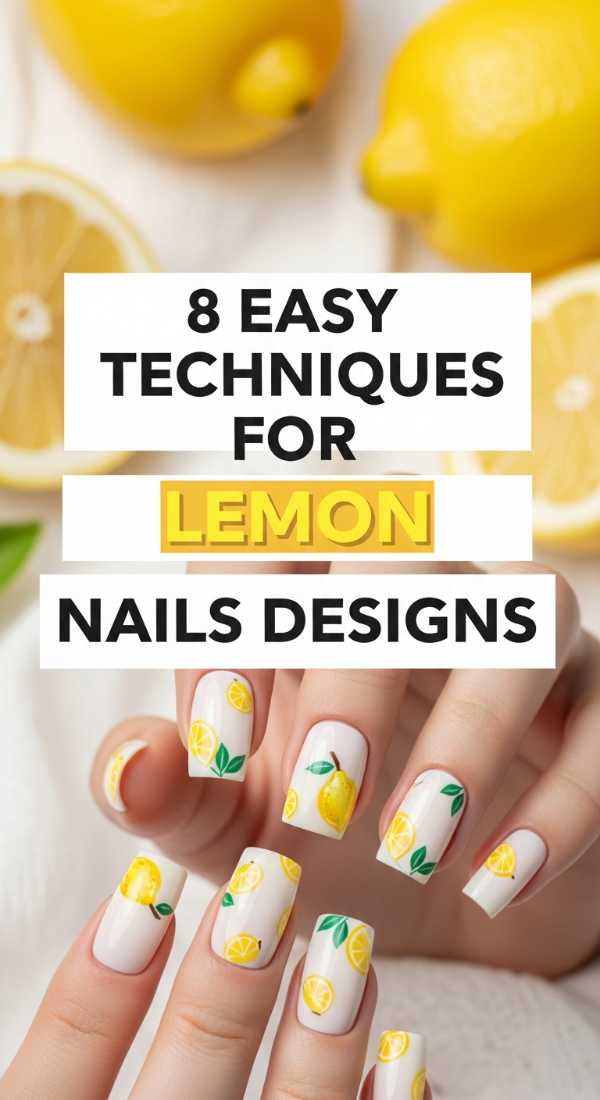
Why to love this Design:
When life gives you lemons, make them into nail art! This design is juicy, fresh, and incredibly sweet. It’s perfect for those post-graduation brunches and summer picnics with your besties.
Essential Elements:
- Yellow ‘slices’
- Green leaf accents
- White ‘pith’ details
- Textured sugar finish
How to Prepare:
- Paint a yellow semi-circle at the base of the nail.
- Use a fine brush to draw white lines for segments.
- Add tiny green leaves using a dotting tool.
- Sprinkle clear glitter on wet polish for a ‘sugared’ effect.
- Use a matte top coat for the skin of the lemon.
- Add clear gel drops for ‘juice’ droplets.
- Seal the edges to prevent peeling.
- Keep the background color neutral (like nude or white).
Budget Range
- Lemon Yellow Art Paint ($7)
- Detailing Brush Set ($12)
- Fine Clear Glitter ($5)
5 Steps to Combine Teal and Coral Nails

Why to love this Design:
Teal and coral are the ultimate summer power couple. The cool depth of teal balances the fiery energy of coral perfectly. It’s a sophisticated take on tropical vibes that feels fresh for 2026.
Essential Elements:
- Turquoise cream polish
- Vibrant coral cream polish
- Gold striping tape
How to Prepare:
- Paint alternating nails in teal and coral.
- On the middle nail, create a half-and-half split.
- Apply gold striping tape over the seam.
- Apply a second coat of each color for maximum opacity.
- Finish with a plump gel-effect top coat.
Budget Range
- Teal & Coral Duo Pack ($18)
- Gold Striping Tape ($4)
- Gel-Effect Top Coat ($13)
9 Ways to Create Summer Goth Nails

Why to love this Design:
Who says dark colors are only for winter? Summer Goth is all about moodiness in the sunshine. It’s edgy, mysterious, and perfect for the graduate who marches to the beat of their own drum.
Essential Elements:
- Black jelly polish
- Silver chrome stars
- Sheer lace stamping
- Dark cherry accents
How to Prepare:
- Use a ‘jelly’ black for a translucent, smoky look.
- Layer silver celestial charms over a dark base.
- Try a matte black with glossy tips.
- Incorporate deep burgundy ‘blood’ drips.
- Use a sheer black tint over holographic glitter.
- Add tiny silver studs at the cuticle.
- Experiment with smoke-effect marbling.
- Keep nails long and stiletto-shaped for drama.
- Finish with a high-shine top coat to catch the summer light.
Budget Range
- Black Jelly Polish ($12)
- Silver Star Charms ($8)
- Stamping Plate Kit ($20)
11 Steps to Design Perfect Peach Nails
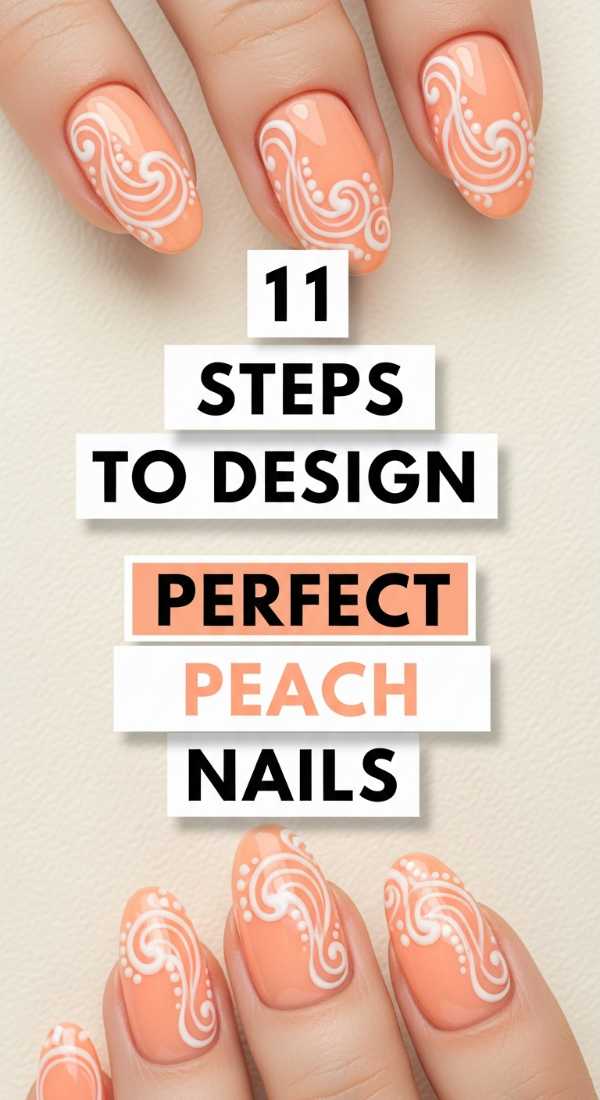
Why to love this Design:
Peach is the color of softness and serenity. It’s incredibly flattering on every skin tone and feels like a warm hug for your hands. It’s the perfect ‘clean girl’ aesthetic for 2026.
Essential Elements:
- Creamy peach base
- Apricot shimmer
- Nude-to-peach ombré
How to Prepare:
- Exfoliate hands for a smooth canvas.
- Apply a ridge-filling base coat.
- Apply two thin layers of creamy peach.
- Sponge apricot shimmer onto the tips.
- Blend carefully for a seamless transition.
- Add a tiny pearl at the base of each nail.
- Clean up edges with a brush dipped in acetone.
- Apply a UV-protectant top coat to prevent yellowing.
- Massage in a peach-scented lotion.
- Check for evenness under natural light.
- Cure one last time for a rock-hard finish.
Budget Range
- Peach Cream Polish ($10)
- Apricot Shimmer ($11)
- Nail Pearls ($6)
A Future as Bright as Your Mani
My dearest Class of 2026, as you step off that stage and into the warm summer sun, remember that you are capable of anything. Your nails are just a small reflection of the vibrant, multifaceted person you’ve become. Whether you chose the softest peach or the boldest neon, wear it with pride. You’ve earned this moment, and I am so, so proud of you. Go forth and shine, my loves!