

Chic Spaces, Charmed Life: A Guide to Modern Lifestyle Design
Have you ever walked into a room and felt an immediate sense of belonging, as if the walls themselves were exhaling a long-held breath of relief? There is a profound magic in curating a life that feels as good on the inside as it looks on the outside. It isn’t just about the furniture we buy or the colors we paint; it’s about the way the afternoon light hits a marble countertop or the sound of a vintage garden gate swinging shut. This is lifestyle design—the intentional art of weaving beauty into the mundane until the ordinary becomes extraordinary.
We often spend our lives waiting for the ‘perfect’ time to host that party, build that garden, or renovate that corner, but the truth is that a charmed life is built in the small, daily choices. It’s in the tactile pleasure of a linen napkin and the refreshing chill of a backyard plunge pool. Today, I’m sharing ten transformative ways to elevate your surroundings, blending soul-stirring aesthetics with the functional warmth that makes a house a home. Let’s dive into a world where every detail matters.
How to Curate Earth Tone Palettes for Home Harmony

Why we love this
There is a grounding, primal comfort in earth tones that transcends fleeting trends, offering a sensory embrace of terracotta, sage, and warm ochre. When you walk into a room bathed in these hues, you can almost smell the sun-baked clay and feel the velvety texture of weathered stone against your palms. These colors create a visual rhythm that mimics the natural world, instantly lowering cortisol levels and making even the most modern space feel rooted in history. It is the ultimate palette for those who crave a sanctuary that feels quiet, sophisticated, and deeply connected to the land.
Essential Elements:
- Base color in a warm neutral (oatmeal or sand)
- Accent shades in burnt sienna, moss green, and slate
- Natural wood furniture with visible grain
- Textured textiles like bouclé, linen, and jute
- Hand-thrown ceramic vessels in matte finishes
How to make it
- Identify the natural light levels in your room; darker spaces benefit from warmer ochres to prevent a muddy feel, while bright rooms can handle deep, moody terracottas.
- Select a primary ‘anchor’ color for the walls—aim for a flat or eggshell finish to enhance the organic, chalky texture of earth tones.
- Layer in ‘secondary’ colors through large furniture pieces, ensuring that wood tones contrast slightly with the wall color (e.g., dark walnut against sand-colored walls).
- Introduce ‘pop’ earth tones via smaller accents like throw pillows or vases; think of a single deep burgundy cushion against an olive green sofa.
- Incorporate various textures to prevent the palette from looking flat; mix a rough-woven jute rug with a soft, brushed cotton throw and smooth ceramic lamps.
- Adjust your lighting to warm-toned bulbs (2700K-3000K) to enhance the richness of the pigments during the evening hours.
How to Design a Dreamy Bloom Bar for Floral Magic

Why we love this
A bloom bar is more than just a flower station; it is an interactive sensory experience that fills a room with the intoxicating scent of jasmine, eucalyptus, and fresh-cut stems. The sight of organized petals in a gradient of colors evokes a sense of whimsical abundance, while the cool, damp stems provide a tactile connection to nature’s bounty. It transforms a simple gathering into a creative workshop, where guests can feel the delicate veins of a leaf and the silkiness of a rose petal. It is a celebration of ephemeral beauty that brings life and vibrant energy to any corner of your home.
Essential Elements:
- A sturdy table or console at counter height
- Assorted glass jars, galvanized buckets, or ceramic pitchers
- A variety of focal flowers (Peonies, Ranunculus)
- Filler greens (Eucalyptus, Queen Anne’s Lace)
- Professional floral shears and twine
- Customized brown paper wraps or ribbons
How to make it
- Select a location with ample space for guests to move around and access the flowers from at least three sides.
- Prep your vessels by cleaning them thoroughly and filling them with cool water and floral preservative to ensure the blooms stay turgid.
- Organize your flowers by category: ‘thrillers’ (the big, showy blooms), ‘fillers’ (smaller clusters), and ‘spillers’ (draping greenery).
- Process every stem by stripping any leaves that would sit below the water line to prevent bacterial growth and a foul odor.
- Give each stem a fresh 45-degree angle cut under water before placing it in its display bucket, allowing for maximum hydration.
- Arrange the buckets on the bar in a height-staggered layout, placing taller greenery at the back and delicate focal flowers at the front for easy access.
- Provide a ‘station’ at the end of the bar with precut twine, wet paper towels to wrap the stems, and decorative paper for guests to package their creations.
How to Style an Easter Front Porch for Seasonal Charm
Why we love this
An Easter front porch is the ultimate herald of spring, welcoming visitors with the scent of damp soil and the bright, hopeful sight of budding tulips. We love the way it blends the nostalgia of pastel hues with the crisp, clean air of a new season, creating a transition zone that feels like a breath of fresh air. The texture of a grapevine wreath against a sturdy door and the softness of a moss-lined basket create a multi-dimensional display that celebrates rebirth. It’s a way to tell the neighborhood that winter is officially over and that joy is blooming just outside your threshold.
Essential Elements:
- A layered rug setup (jute base + patterned top)
- Natural grapevine or boxwood wreath
- Oversized lanterns with LED candles
- Baskets filled with faux or real eggs and moss
- Potted spring bulbs (Daffodils, Hyacinths, Tulips)
- A weather-resistant wooden bench or rocking chair
How to make it
- Start with a clean slate by power-washing the porch and cleaning the front door to ensure your decor pops against a fresh backdrop.
- Layer your floor textiles; place a large, durable jute rug down first, then center a smaller, spring-themed mat on top for a high-end, designer look.
- Anchor the space with large-scale items, such as a pair of tall planters on either side of the door, filled with a mix of pussy willow branches and flowering bulbs.
- Hang your wreath using a ribbon that matches your color scheme (think soft lavender or gingham), ensuring it is positioned at eye level.
- Create ‘vignettes’ on steps or benches by grouping items in odd numbers; place a large lantern next to a medium basket of moss-covered eggs.
- Add a pop of life with seasonal flowers; if the weather is still frosty, use high-quality silk tulips tucked into the soil of your pots for a foolproof look.
- Integrate soft lighting by setting timers on your lanterns to glow as the sun begins to set, highlighting the textures of your decor.
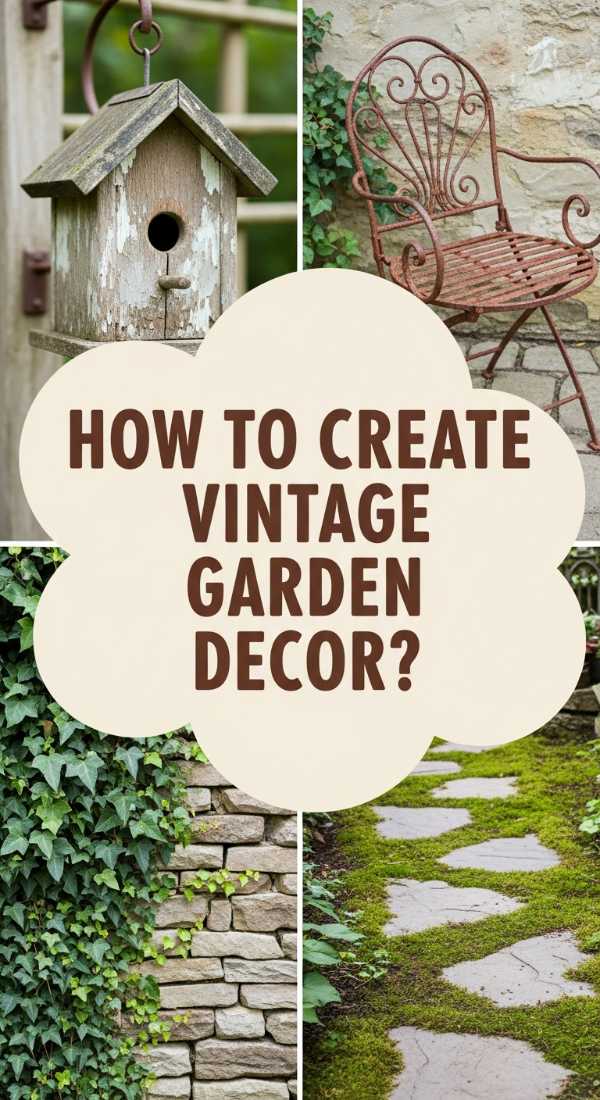
How to Create Vintage Garden Decor for Backyard Bliss
Why we love this
There is a romantic, timeless quality to vintage garden decor that suggests a space has been loved and tended for generations. We are drawn to the weathered patina of rusted iron gates, the soft crumble of terracotta pots, and the way moss clings to the crevices of a stone cherub. It’s an aesthetic that values the ‘perfectly imperfect,’ where the scent of damp earth mixes with the history of found objects. This style creates a secret-garden atmosphere that feels private, storied, and incredibly soothing—a place where time seems to slow down among the ivy and ancient wood.
Essential Elements:
- Weathered terracotta or stone planters
- Rusted iron trellis or garden gates
- Antique wooden benches or bistro sets
- Clutter-free paths made of pea gravel or reclaimed brick
- Vintage-style lanterns and birdcages
- Whimsical statuary (rabbits, birds, or classic busts)
How to make it
- Source authentic pieces from flea markets, estate sales, or antique shops, looking for items with natural aging rather than faux distressing.
- If using new terracotta pots, accelerate the ‘aged’ look by rubbing them with yogurt or manure and leaving them in a shady spot to encourage moss growth.
- Install a focal point, such as a vintage wrought-iron arbor at the entrance of a path, and plant climbing roses or clematis to soften the metal lines.
- Create ‘found’ moments by half-burying an old stone urn or placing a weathered birdcage on a pedestal hidden among the ferns.
- Use reclaimed materials for pathways; old bricks laid in a herringbone pattern provide an instant sense of history and stability.
- Incorporate ‘living’ decor by allowing some ivy to grow over your vintage structures, blending the man-made items with the botanical surroundings.
- Treat any wood pieces with a clear, matte sealant to prevent further rot while maintaining the grey, weathered appearance you desire.
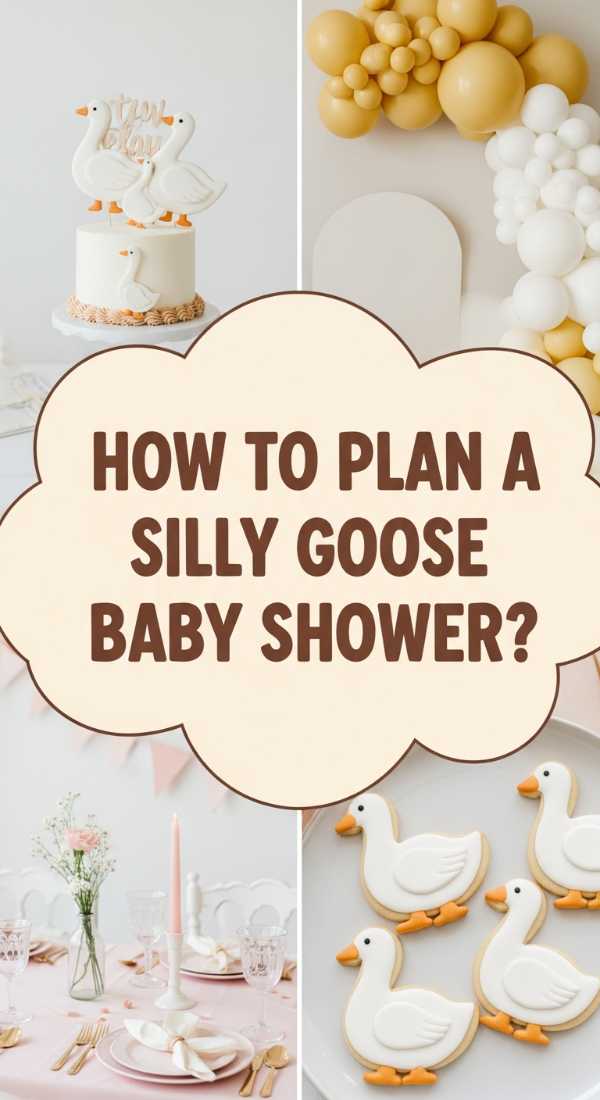
How to Plan a Silly Goose Baby Shower for Sweet Memories

Why we love this
The ‘Silly Goose’ theme is a refreshing, whimsical departure from traditional baby showers, offering a playful charm that feels both classic and contemporary. We love the way it incorporates soft, downy textures like white feathers and plush fabrics, paired with the rustic scent of dried straw and wildflowers. It’s a theme that celebrates the lighthearted joy of a new arrival without taking itself too professional, allowing for giggles and genuine connection. The visual palette of cream, soft yellow, and sage green creates a cozy, nursery-rhyme atmosphere that leaves every guest feeling nostalgic and warm-hearted.
Essential Elements:
- Goose-themed invitations and signage
- White and yellow floral arrangements (Daisies, Baby’s Breath)
- Custom sugar cookies in goose and egg shapes
- Linens in gingham or solid cream
- Plush goose toys for table decor and gifts
- ‘Mother Goose’ storybook guestbook
How to make it
- Define your color palette—stick to creams, soft yellows, and muted greens to keep the ‘goose’ theme feeling sophisticated rather than cartoonish.
- Create a ‘nest’ for the gift area using a large wicker basket lined with soft white blankets and surrounded by bundles of dried wheat or pampas grass.
- Design a dessert table featuring a simple white cake topped with a ‘Silly Goose’ wooden topper, surrounded by ‘nest’ cupcakes (toasted coconut shavings).
- Organize a guestbook station where friends can sign a classic Mother Goose treasury book, providing a keepsake for the baby’s nursery.
- Style your tablescapes with gingham runners and small ceramic geese tucked into floral centerpieces made of daisies and chamomile.
- Plan ‘low-stress’ activities, such as a ‘guess the number of golden eggs’ jar or a simple station for decorating onesies with bird motifs.
- Send guests home with ‘feathered’ favors, such as small jars of local honey or white chocolate-covered pretzels labeled as ‘Goose Treats.’
How to Decorate a Big Little Bed for Sisterly Bonding

Why we love this
A ‘Big Little Bed’—a shared sleeping space for sisters—is the heartbeat of childhood memories, where whispers are shared long after the lights go out. We love the visual symmetry of matching headboards and the tactile comfort of layers of quilted bedding and soft-knit throws. It creates a cocoon-like environment where the air is filled with the scent of lavender laundry detergent and the soft glow of a nightlight. This design encourages a unique bond, providing a safe and beautiful space for siblings to grow together, sharing dreams and stories in a room that feels intentionally crafted for two.
Essential Elements:
- Twin beds with matching frames (iron or upholstered)
- Coordinated but not identical bedding sets
- Central nightstand accessible to both beds
- Symmetrical wall art or personalized name signs
- Soft area rug that spans the space between beds
- Reading lamps with adjustable arms
How to make it
- Measure your space carefully to ensure there is at least 24 inches of clearance between the beds for easy movement and a shared nightstand.
- Choose a cohesive theme—like ‘English Garden’ or ‘Boho Starry Night’—to allow for individual expression within a unified aesthetic.
- Select a shared nightstand that features at least two drawers or shelves, giving each sister her own ‘secret’ storage space for treasures.
- Layer the bedding: start with high-quality cotton sheets, add a medium-weight quilt, and finish with a decorative duvet at the foot of the bed for texture.
- Personalize the wall space above each headboard with the child’s initial or a unique piece of art that reflects their specific personality while staying in the color scheme.
- Install a central ‘bonding’ rug that is plush and soft, providing a comfortable place for them to sit and play together on the floor.
- Use ‘smart’ lighting; dimmable lamps allow one sister to read while the other drifts off to sleep, fostering a respectful shared environment.
How to Install a Stock Tank Plunge Pool for Summer Cooling
Why we love this
The stock tank plunge pool is the ultimate symbol of modern-industrial summer cool, offering a refreshing escape from the heat without the commitment of a full-scale pool. We love the tactile sensation of the smooth, galvanized metal and the way the sun glints off the crystal-clear water on a sweltering afternoon. It’s a design that feels rugged yet chic, bringing a touch of high-end ranch life to any backyard. The sound of a gentle filter pump adds a soothing ambient noise, turning a simple metal tub into a luxury oasis where you can soak with a cold drink and let the world melt away.
Essential Elements:
- Galvanized steel stock tank (8-foot diameter is ideal)
- Above-ground pool pump and filter system
- Hole saw and waterproof sealant (marine grade)
- Inlet and outlet plungers
- Level ground base (sand or gravel)
- Chlorine dispenser and testing kit
How to make it
- Select a perfectly level spot in your yard; any slight slope will put uneven pressure on the tank and cause leaks over time.
- Prep the base by removing grass and laying down a 2-inch layer of leveled sand or fine gravel to prevent the tank from sinking or shifting.
- Clean the interior of the tank with a mild soap to remove any manufacturing oils before you begin the plumbing process.
- Use a hole saw to drill two holes in the side of the tank—one for the water intake and one for the return—ensuring they match the size of your pump fittings.
- Install the inlet and outlet plungers using generous amounts of marine-grade silicone sealant on both the inside and outside to ensure a 100% watertight seal.
- Connect the hoses to your filter pump, ensuring all clamps are tightened securely to prevent air from entering the system.
- Fill the tank with water, checking for leaks as the water level rises; once full, prime the pump and begin your chemical treatment (chlorine) to keep the water clear.
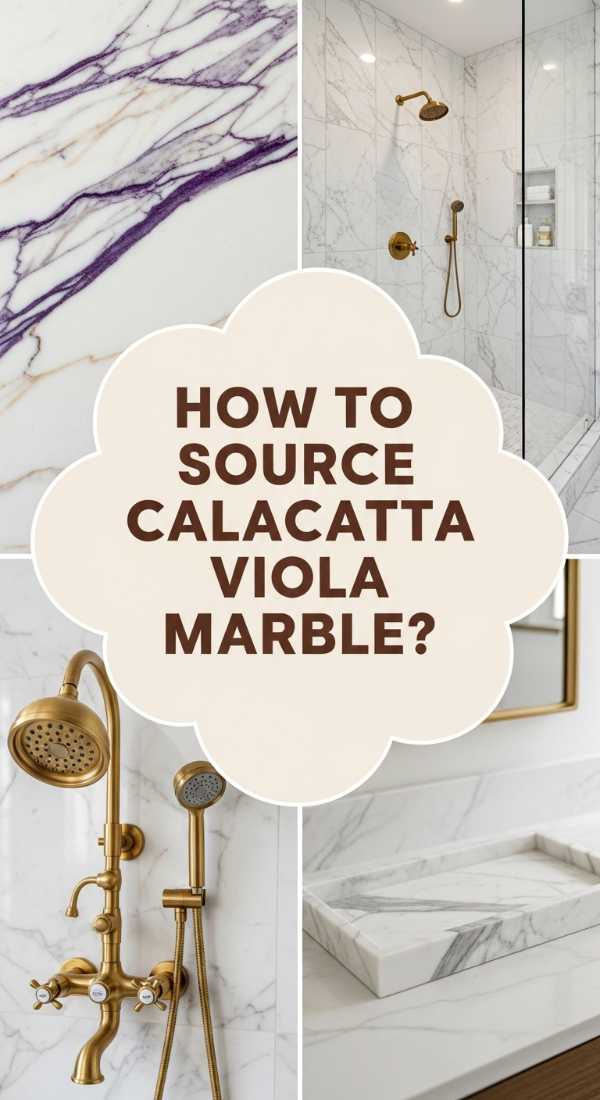
How to Source Calacatta Viola Marble for Luxury Showers

Why we love this
Calacatta Viola marble is the crown jewel of interior design, known for its dramatic, deep burgundy veining that snakes across a crisp white background like fine wine spilled on linen. We love the sheer opulence of this stone; it feels cold and substantial to the touch, evoking the grandeur of Italian villas and high-fashion ateliers. In a shower, the steam intensifies the color of the veins, creating a spa-like atmosphere that is both invigorating and deeply sophisticated. It is a material that doesn’t just decorate a room—it commands it, offering a visual feast of natural artistry that is entirely unique to every slab.
Essential Elements:
- Slabs or large-format tiles of Calacatta Viola marble
- High-quality penetrating stone sealer
- Neutral pH stone cleaner
- Professional marble fabricator/installer
- Minimalist plumbing fixtures (Brass or Polished Nickel)
- Implicit lighting to highlight veining
How to make it
- Visit a local stone yard in person; Calacatta Viola varies wildly in its veining, and you must select the specific slab that speaks to your aesthetic.
- Request a ‘book-matched’ set of slabs if you are doing a full-wall installation, which allows the veins to mirror each other for a stunning, symmetrical effect.
- Work with a fabricator who specializes in marble; this stone is softer than granite and requires precise cutting and mitered edges for a seamless look.
- Ensure your shower substrate is waterproofed using a professional system (like Schluter) before the marble is installed to prevent moisture from trapping behind the stone.
- Once installed, apply two coats of a premium penetrating sealer to protect the marble from soap scum and staining, as marble is naturally porous.
- Opt for a ‘honed’ finish rather than ‘polished’ for shower floors to provide more slip resistance and a softer, more modern look.
- Use a white, non-sanded grout to keep the focus entirely on the marble’s natural patterns rather than the joint lines.
How to Build a Roadside Farm Stand for Community Connection
Why we love this
There is a humble, heartwarming beauty in a roadside farm stand—a structure that represents the labor of the land and the kindness of a community. We love the aroma of fresh cedar mixed with the scent of sun-ripened tomatoes and the rough-hewn texture of a chalkboard sign. It’s a tactile bridge between the grower and the neighbor, creating a space where the exchange of goods feels personal and storied. Whether it’s filled with eggs, flowers, or sourdough, a farm stand brings a touch of slow-living charm to the edge of your property, inviting passersby to pause and appreciate the seasons.
Essential Elements:
- Weather-resistant wood (Cedar or Pressure-Treated)
- Corrugated metal or shingle roof
- Built-in shelving and produce bins
- Large, legible chalkboard for pricing
- Secure ‘Honor System’ cash box or Venmo QR code
- Flowering planters to attract attention
How to make it
- Design your stand with a wide overhang on the roof to protect your produce (and your customers) from rain and direct midday sun.
- Build the frame using 4×4 posts for stability, ensuring the base is anchored to the ground or heavy enough to withstand high winds.
- Install slanted shelves at eye level to allow for better visibility of your goods, using slats instead of solid wood to allow for air circulation.
- Paint or stain the wood with an exterior-grade finish to prevent rot; a classic white or a dark forest green often draws the eye from the road.
- Create clear, professional signage—use a large ‘FARM STAND’ header and smaller chalkboards that can be updated daily as items sell out.
- Secure a heavy-duty lockbox to the frame for cash payments, or prominently display a weather-proofed QR code for digital payments like Venmo or PayPal.
- Landscape the area around the stand with hardy perennials like Lavender or Black-Eyed Susans to create a welcoming, permanent look.
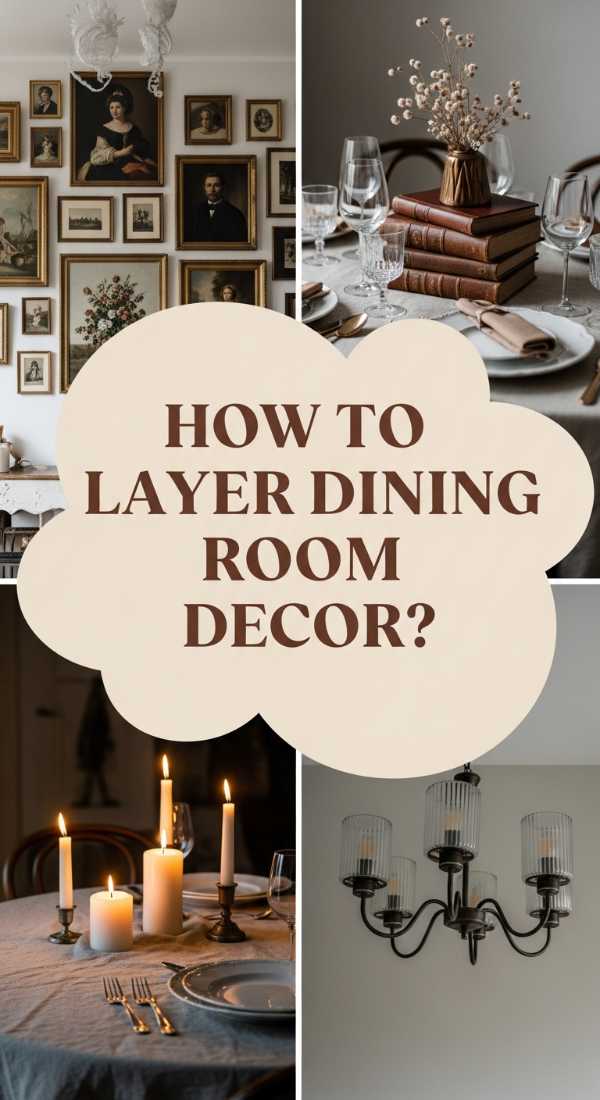
How to Layer Dining Room Decor for Intellectual Elegance
[IMAGE_10]
Why we love this
Intellectual elegance in a dining room is about creating a space that feels curated over time, where every object invites conversation and curiosity. We love the sensory layering of heavy linen tablecloths against the smooth, cool surface of a mahogany table, paired with the flicker of beeswax candles that cast long shadows over leather-bound books. This style isn’t about being ‘stuffy’; it’s about a rich, tactile environment where the clink of silverware sounds like a symphony and the surroundings feel as thoughtful as the menu. It is a room designed for long dinners, deep thoughts, and the beautiful friction of different ideas.
Essential Elements:
- A collection of vintage and modern books
- Textured table linens (Linen, Velvet, or Silk)
- Mixed metal candlesticks with taper candles
- Layered lighting (Sconces, Chandeliers, and Accent Lamps)
- Curated gallery wall or large-scale historical map
- Natural elements like dried herbs or dark greenery
How to make it
- Start with your ‘foundation’—a high-quality rug with a subtle, sophisticated pattern (like an Oushak or a dark Persian) to anchor the room.
- Layer your window treatments by using a sheer linen under a heavier velvet drape to create depth and control the ambient light.
- Style your sideboard or buffet with stacks of books in varying heights, topped with a small piece of sculpture or a magnifying glass for that ‘library’ feel.
- When setting the table, use a ‘tone-on-tone’ approach; a charcoal linen cloth with slate grey napkins creates a sophisticated, moody base.
- Mix your dinnerware; pair heirloom china with modern, matte-black cutlery to keep the look from feeling like a museum display.
- Introduce ‘life’ through dark, moody botanicals—think magnolia leaves, eucalyptus, or deep purple calla lilies in a vintage brass vase.
- Focus on the lighting; use dimmers on all overhead fixtures and supplement with wall sconces at eye level to create a warm, golden glow that encourages guests to linger.
Conclusion: Designing Your Charmed Life
As we’ve explored everything from the grounding warmth of earth tones to the luxurious veins of Calacatta Viola, it becomes clear that lifestyle design is not a destination, but a beautiful, ongoing practice. By choosing to surround ourselves with textures that comfort us, colors that inspire us, and spaces that foster connection, we are not just decorating rooms—we are crafting the backdrop of our most cherished memories. I hope these ideas serve as a spark for your own creativity, reminding you that your home is the canvas upon which your charmed life is painted. Happy designing!