
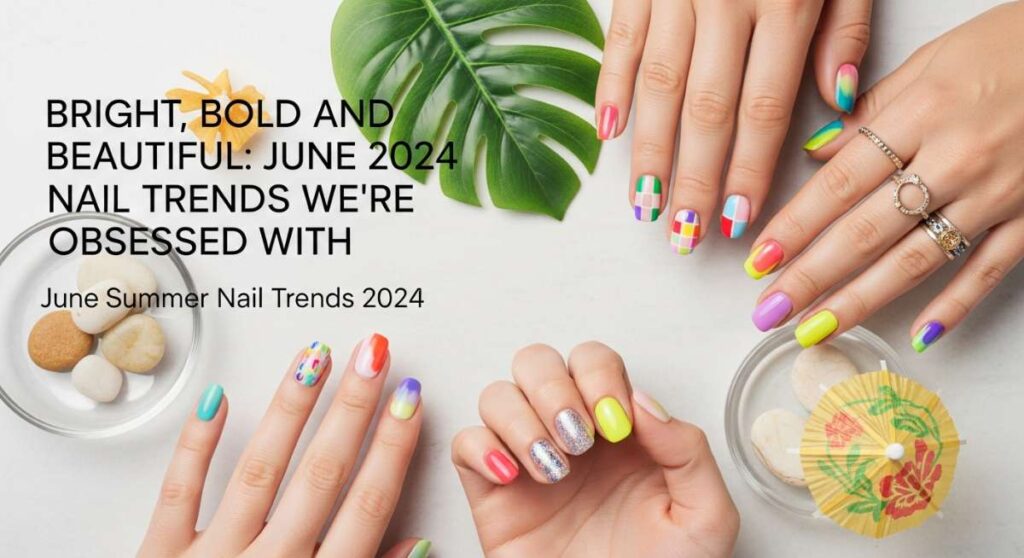
Bright, Bold, and Beautiful: June 2024 Nail Trends We’re Obsessed With
Hi loves! Can you feel it? The air is finally getting that sweet, honey-thick warmth that only June can bring. As we step into the sun-drenched days of 2024, I’ve been sitting on my porch, iced matcha in hand, dreaming of all the ways we can bring that vibrant summer energy right to our fingertips. There is something so magical about looking down and seeing a pop of color that instantly lifts your spirit, isn’t there?
This month isn’t just about a fresh coat of polish; it’s about a mood. It’s about the feeling of sand between your toes and the glow of a sunset that never seems to end. I’ve curated these looks like a little love letter to your summer self—soft, bold, and entirely you. Let’s dive into these trends together, like we’re chatting over a beach towel, and find the perfect look for your June adventures!
5 simple steps for 3D hibiscus nails
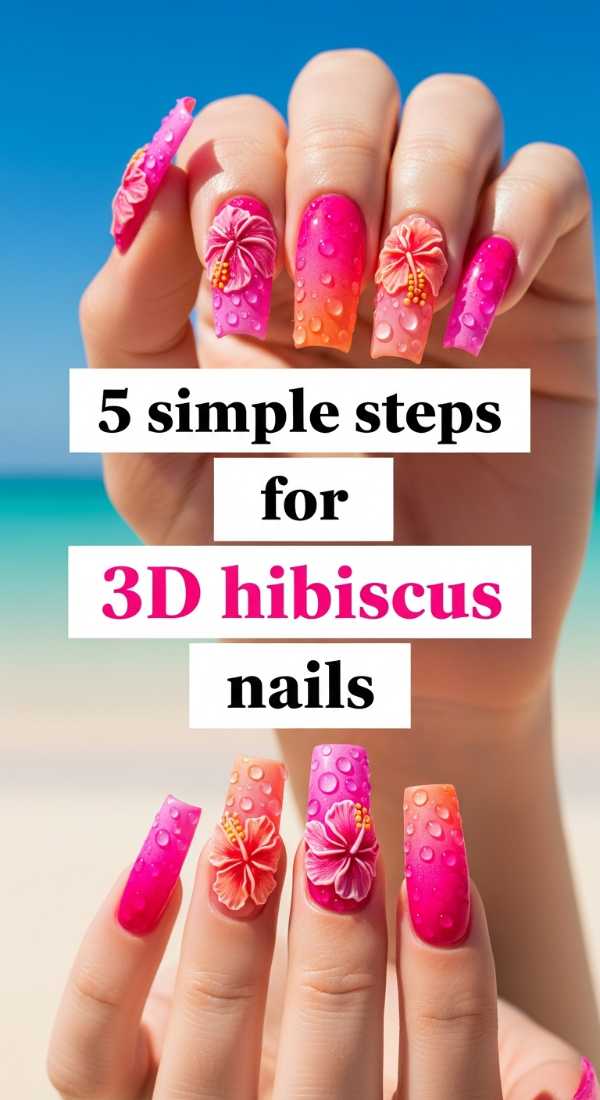
Why to love this Design:
Oh sweethearts, there is nothing that says ‘island getaway’ quite like a hibiscus flower. Adding a 3D texture makes the bloom literally pop off your nails, creating a tactile piece of art that feels like a tropical breeze. It’s playful, sophisticated, and deeply romantic all at once.
Essential Elements:
- Thick white building gel or 3D carving gel
- Vibrant pink or red gel polish
- Fine liner brush
- Yellow bead or gel for the stamen
- Glossy top coat
How to Prepare:
- Apply your base color and cure.
- Using a fine liner brush, place five small dollops of 3D gel in a circle.
- Drag the center of each dollop toward the middle to create petal shapes.
- Cure, then lightly tint the petals with your pink polish for depth.
- Add a tiny yellow dot in the center and seal with a top coat.
Budget Range
- Saviland 3D Nail Carving Gel – $8.99
- Beetles Gel Liner Set – $12.50
- Standard UV Lamp – $15.00
Get neon summer gradients in 3 easy minutes
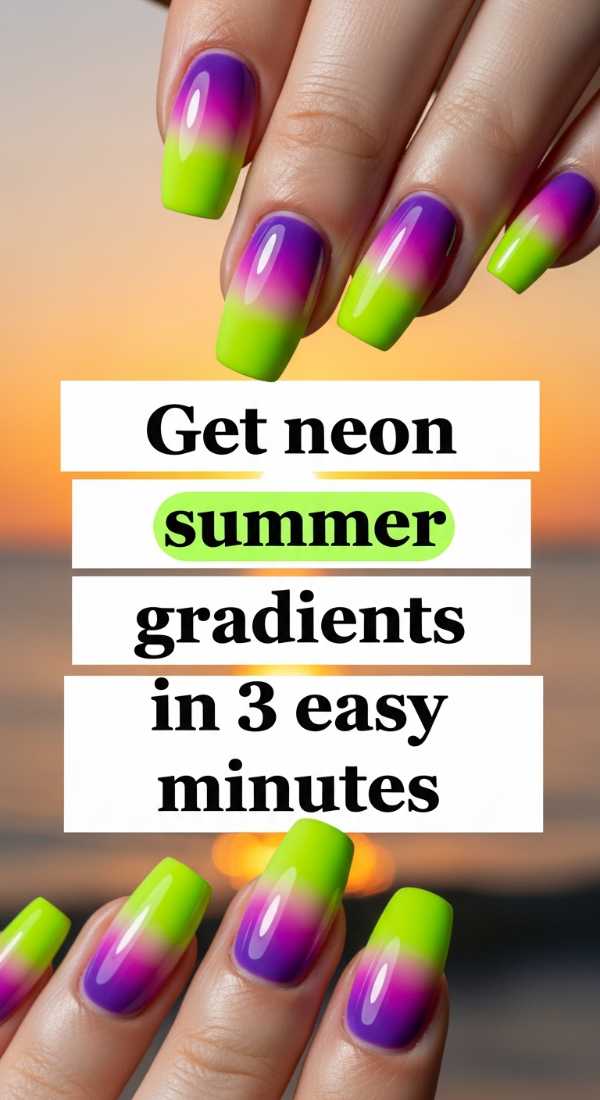
Why to love this Design:
If you’re a busy bee but still want that high-impact ‘wow’ factor, neon gradients are your best friend. They capture the essence of a June sunset—electric, warm, and fading into a dream. It’s a literal party on your nails that takes less time than making your morning coffee!
Essential Elements:
- Neon pink and orange gel polish
- Small makeup sponge
- Liquid latex (for easy cleanup)
- Matte or glossy top coat
How to Prepare:
- Apply liquid latex around your cuticles to save cleaning time.
- Paint a strip of pink and a strip of orange onto your makeup sponge.
- Dab the sponge onto your nail 2-3 times until blended.
- Repeat for more intensity if needed.
- Peel off the latex and add your top coat!
Budget Range
- Modelones Neon Gel Collection – $16.99
- Wedge Makeup Sponges (Bulk) – $5.00
- Liquid Latex Barrier – $7.00
4 hacks for perfect water drop nail art
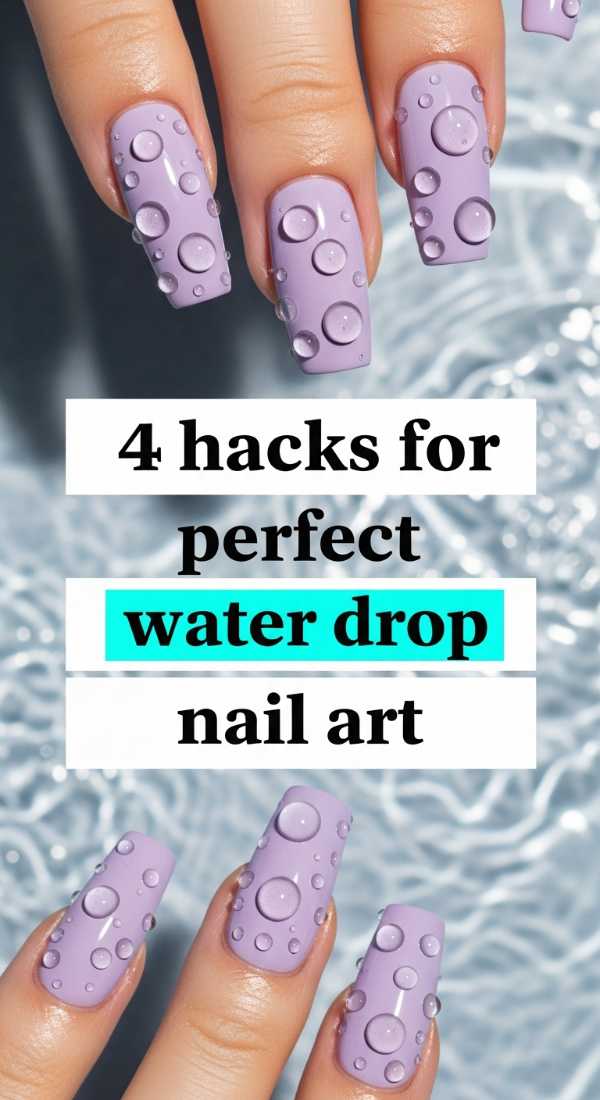
Why to love this Design:
There is something so incredibly refreshing about ‘wet’ look nails. It looks like you’ve just emerged from a crystal-clear pool, with tiny droplets of water lingering on your polish. It’s minimalist yet avant-garde, and honestly, it’s a total conversation starter at any summer brunch.
Essential Elements:
- Non-wipe top coat (thick consistency)
- Dotting tool
- Matte top coat (for the base)
- UV/LED lamp
How to Prepare:
- Apply your base color and cover with a matte top coat for a dry ‘sand’ effect.
- Use a dotting tool to pick up a large bead of clear non-wipe top coat.
- Gently place different-sized droplets over the matte surface.
- Flash cure immediately so the drops don’t flatten out.
Budget Range
- Kupa Gelfinity No-Wipe Top Coat – $14.00
- Nail Art Dotting Tool Set – $4.99
- Mia Secret Matte Finish – $9.00
Create tropical holiday nails with 6 easy tools
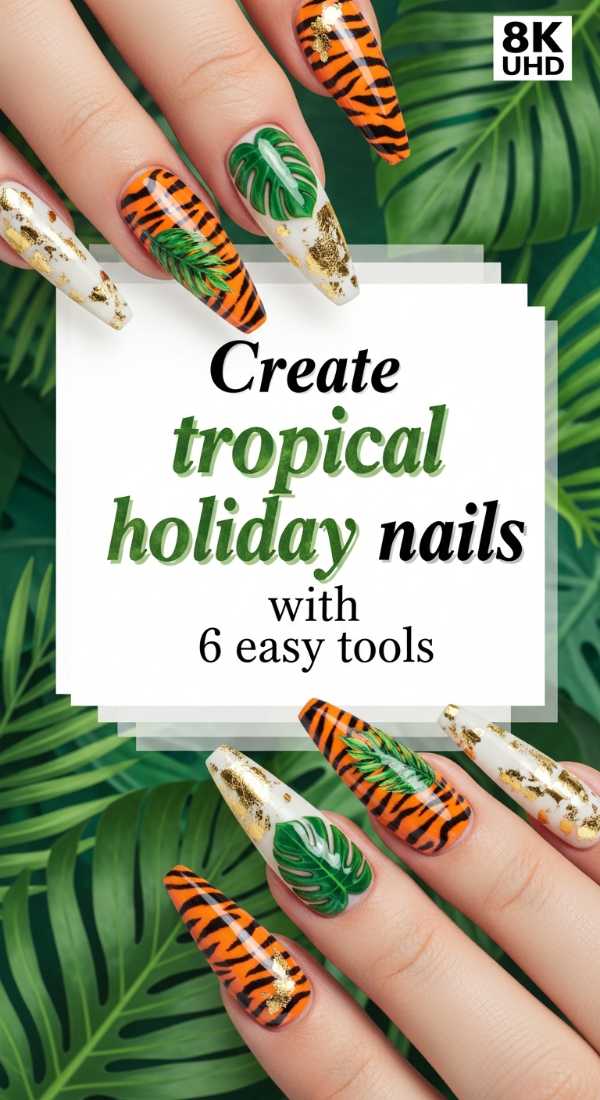
Why to love this Design:
Loves, we don’t need a professional studio to create a masterpiece. This look is all about using simple tools to create lush palm leaves and sandy textures. It’s like carrying a tiny postcard of your dream vacation wherever you go.
Essential Elements:
- Detailing brush
- Sponging tool
- Dotting pen
- Nail stamp (palm leaf patterns)
- Tweezers
- Small palette for mixing
How to Prepare:
- Sponge a sandy beige base onto the bottom half of the nail.
- Use your stamp to apply a crisp palm leaf in deep emerald green.
- Detail the leaf veins with your fine brush for extra realism.
- Add tiny ‘coconuts’ with your dotting pen.
- Place a few gold flakes using tweezers for a sun-kissed look.
- Finish with a high-shine top coat.
Budget Range
- Nicole Diary Stamping Plates – $6.99
- Gold Leaf Foil Flakes – $5.50
- Artistic Nail Detailer Brush – $11.00
Design your summer trip nails in 10 minutes
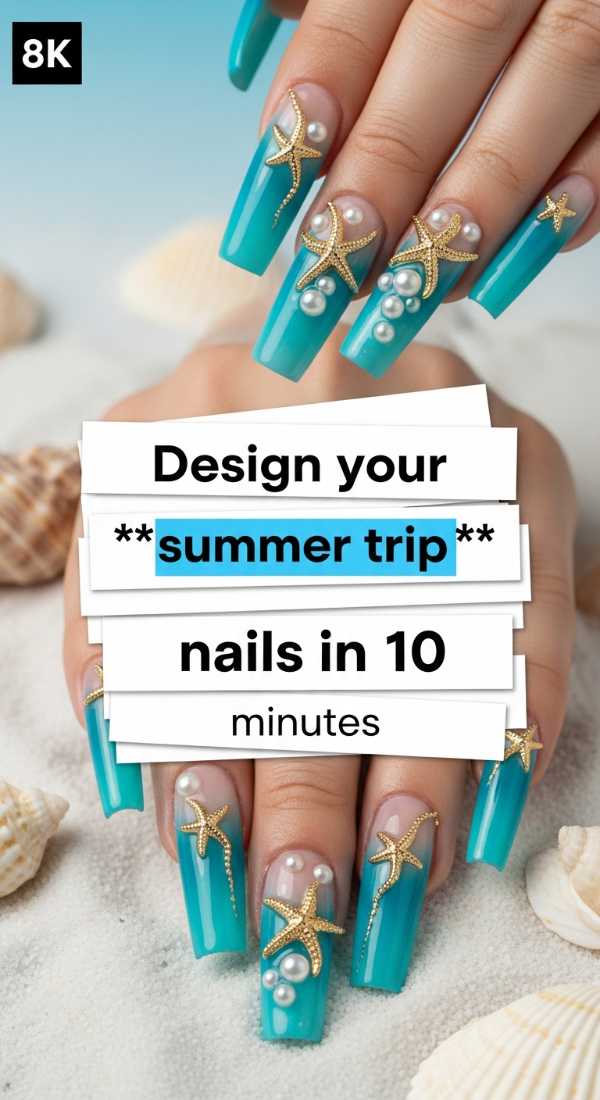
Why to love this Design:
We’ve all been there—the suitcase is packed, the Uber is outside, and your nails are bare! This design is for the girl on the go who refuses to sacrifice style for speed. It’s chic, efficient, and perfectly curated for travel photos.
Essential Elements:
- High-quality press-on nails
- Nail glue or adhesive tabs
- Stickers (sunsets or tiny airplanes)
- Mini nail file
How to Prepare:
- Buff your natural nails lightly to remove oils.
- Size your press-ons and apply a drop of glue to each.
- Press firmly for 15 seconds.
- Apply a tiny travel-themed sticker to your ring finger.
Budget Range
- Olive & June Press-On System – $10.00
- Dashing Diva Nail Stickers – $8.00
- NYK1 Super Strong Glue – $12.00
3 ways to add gold starfish to June nails
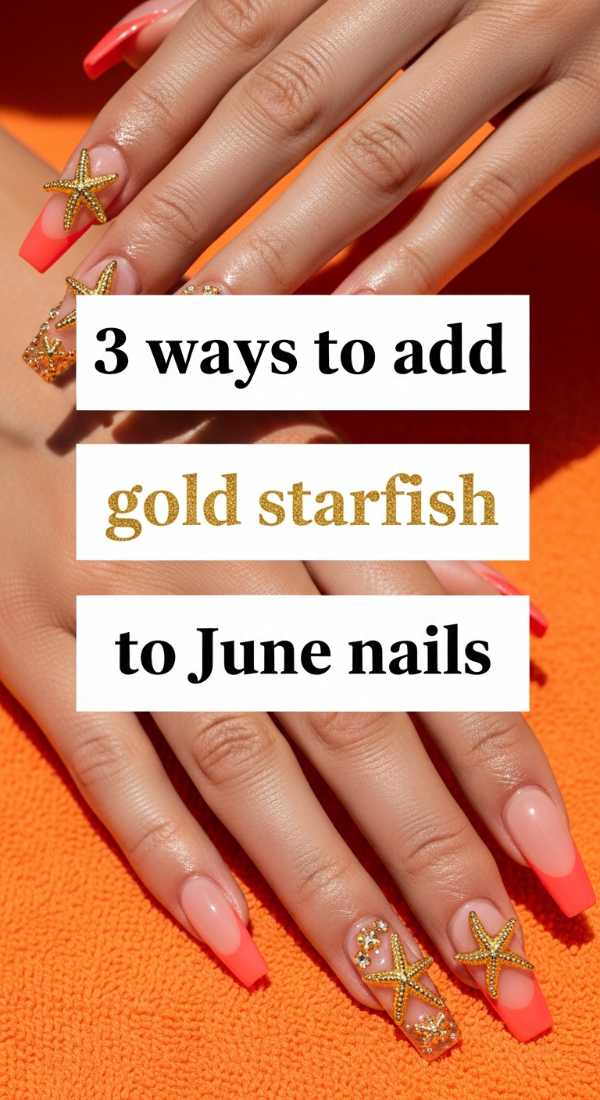
Why to love this Design:
Gold accents in the summer are just… *chef’s kiss*. Adding a tiny starfish charm adds a touch of ‘mermaid core’ luxury to your look. It’s the perfect way to elevate a simple blue or nude manicure into something that feels like royalty under the sea.
Essential Elements:
- Gold starfish charms
- Rhinestone glue or thick gel
- Tweezers
- Ocean blue gel polish
How to Prepare:
- Method 1: Place the charm on a wet top coat and cure.
- Method 2: Use specific jewelry glue for a more secure, long-term hold.
- Method 3: Encapsulate the charm in clear builder gel for a smooth finish.
Budget Range
- 3D Gold Sea Shell/Starfish Charms – $7.99
- Makartt Rhinestone Glue – $9.99
- OPI ‘Shore Is Something’ Polish – $11.50
Master the 3D butterfly look in 5 steps
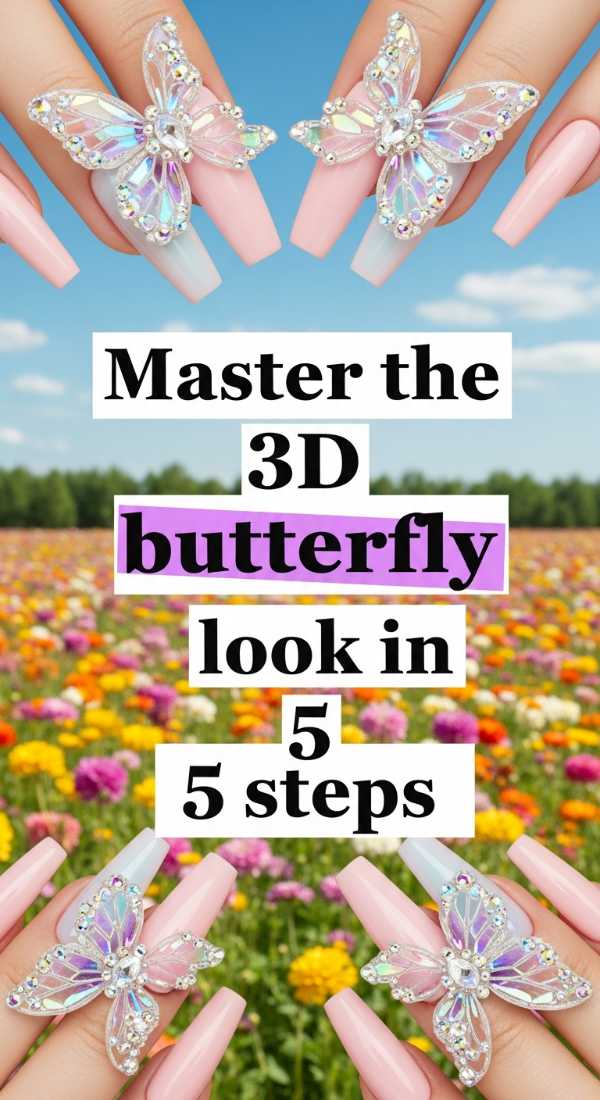
Why to love this Design:
Butterflies represent transformation, and what is summer if not a beautiful transformation of the soul? These 3D wings flutter with every movement of your hands, making you feel like a garden fairy. It’s whimsical, delicate, and deeply feminine.
Essential Elements:
- Pre-made 3D butterfly wings or mold
- Iridescent gel polish
- Clear structure gel
- Miniature pearls
- Fine tweezers
How to Prepare:
- Apply an iridescent base coat that shifts in the light.
- Apply a small bead of structure gel where you want the butterfly.
- Set the wings into the gel at a slight angle for a ‘flying’ effect.
- Place a tiny pearl at the center of the wings.
- Cure thoroughly and avoid the wings with your final top coat.
Budget Range
- Butterfly Nail Art Molds – $6.00
- Born Pretty Iridescent Gel – $8.50
- Half-Round Nail Pearls – $4.00
Achieve vibrant June nails with 4 color blends

Why to love this Design:
Sometimes one color just isn’t enough to capture how we feel! Blending four vibrant shades creates a ‘tie-dye’ or ‘aura’ effect that is very on-trend for June 2024. It’s expressive and matches every outfit in your summer wardrobe.
Essential Elements:
- Electric blue, lime green, hot pink, and sunny yellow polishes
- Blooming gel (for the ‘aura’ effect)
- Blending brush
- White base color
How to Prepare:
- Apply a white base to make the colors pop.
- Apply a thin layer of blooming gel (don’t cure!).
- Drop small dots of each color onto the wet gel.
- Watch the colors bleed together, then cure once you love the pattern.
Budget Range
- Kodi Professional Blooming Gel – $13.00
- Gellen Vivid Colors Set – $15.99
- Professional Ombre Brush – $7.00
7 techniques for ultra-long summer holiday nails
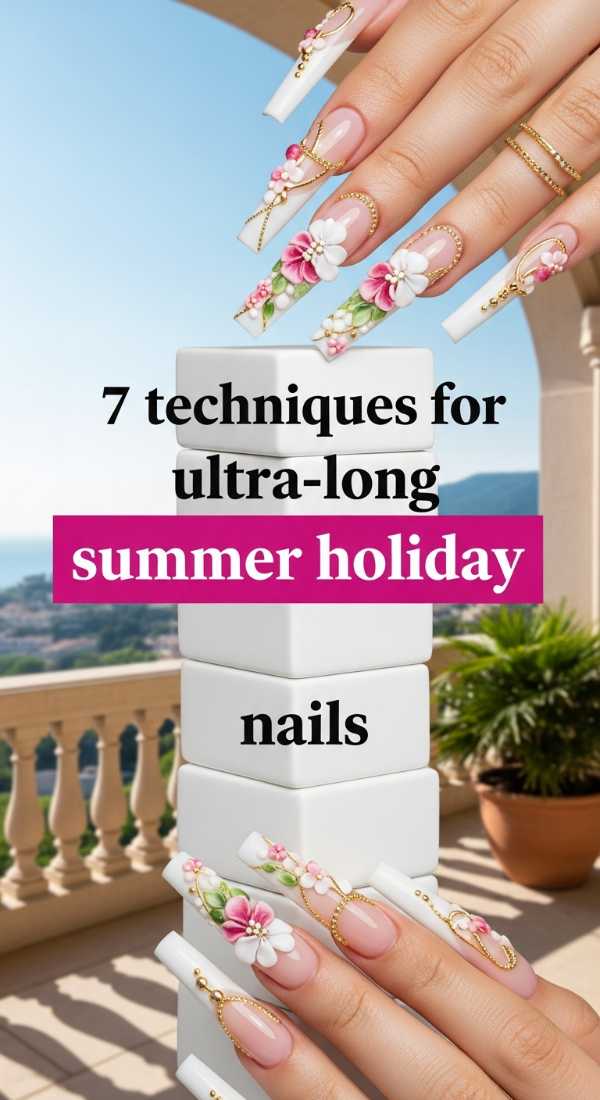
Why to love this Design:
Summer is the time to go big or go home, darlings! Ultra-long nails provide the perfect canvas for intricate art and make your fingers look incredibly elegant. Whether you’re holding a cocktail or a seashell, these nails make a statement.
Essential Elements:
- Extra long coffin or stiletto tips
- Polygel or Acrylic system
- Nail forms
- E-file (for shaping)
- Strengthening primer
- Top coat
- Cuticle oil
How to Prepare:
- Apply nail forms and extend your length using Polygel.
- Shape the sidewalls meticulously for a sleek look.
- Use an e-file to refine the surface.
- Apply a ‘vacation’ shade like coral or turquoise.
- Add a double layer of top coat for strength.
- Hydrate with oil!
- Cure for double the time for maximum durability.
Budget Range
- Morovan Polygel Kit – $25.00
- MelodySusie Portable E-File – $20.00
- Extra Long Nail Tips (500pcs) – $12.00
Copy these 5 viral June nail designs today
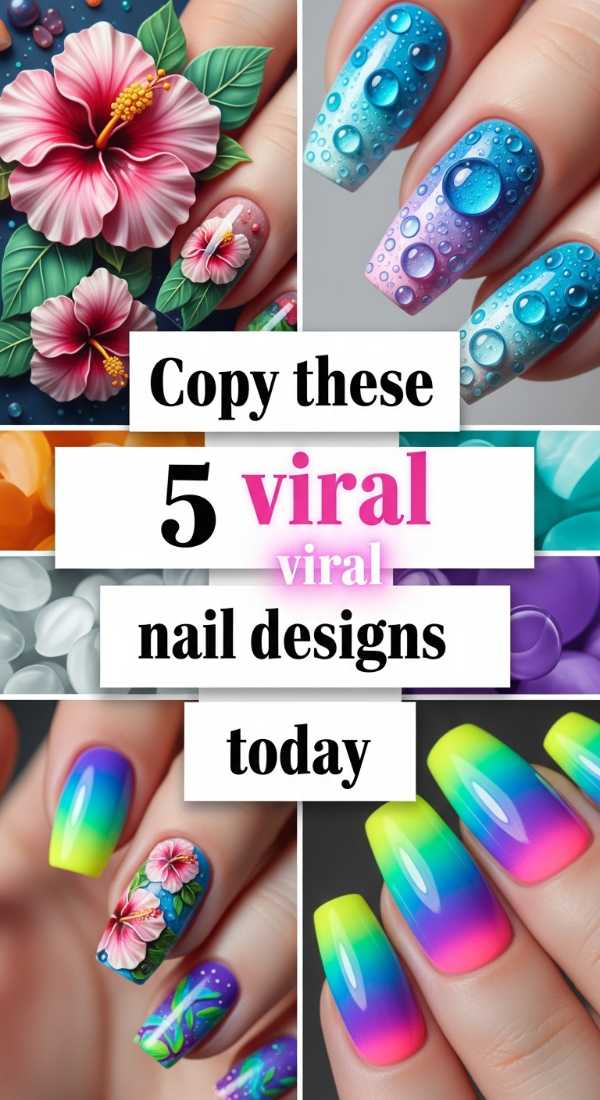
Why to love this Design:
Want to look like you just walked off a Pinterest board? These viral designs—from ‘glazed donut’ summer editions to ‘jelly’ nails—are the current royalty of social media. They are tried, tested, and guaranteed to get you those double-taps.
Essential Elements:
- Chrome powder (pearl finish)
- Jelly (translucent) polishes
- Silver ‘molten’ gel
- Fruit decals
- Glossy finish
How to Prepare:
- For Jelly Nails: Apply three thin coats of translucent pink.
- For Glazed Summer: Rub pearl chrome over a light peach base.
- For Molten Metal: Trace silver gel around the edges of the nail.
- For Fruit: Stick tiny strawberry decals onto a clear base.
- Always finish with a high-shine coat to lock in the viral glow.
Budget Range
- Artdone Chrome Powder – $9.00
- Gaoy Jelly Gel Set – $14.99
- 3D Fruit Slices for Nails – $5.99
Keep Shining, Loves!
I hope these designs spark a little bit of joy in your heart as you prepare for the beautiful month ahead. Remember, your nails are just an extension of the light you already carry inside. Whether you go for bold neons or delicate butterflies, wear them with a smile and a sense of adventure. I can’t wait to see which look you choose for your June stories! Stay bright, stay bold, and most importantly, stay you. Until next time, sending you so much love and sunshine!