

Bloom Into Spring: The Hottest May Nail Trends & Aesthetic Tutorials
Hello, my loves! Can you feel it? That soft, golden warmth finally peeking through the clouds, the scent of fresh rain on the pavement, and the first whisper of peonies waking up in the garden. May is finally here, and it feels like a long, cloud-soft embrace after a chilly winter. It’s the season of renewal, and there’s no better way to celebrate this fresh energy than by treating ourselves to a little bit of color and creativity right at our fingertips.
I’ve spent my mornings lately sipping lavender lattes and sketching out designs that make me feel light, airy, and completely in love with the world. I wanted to create a space for us to explore these trends together—something simple, beautiful, and therapeutic. Whether you’re a pro with a brush or just looking for a mindful moment of self-care, these tutorials are designed to help you bloom right alongside the flowers outside your window. Let’s dive into our May nail sanctuary together.
5 Easy Steps to Paint Heart Nails
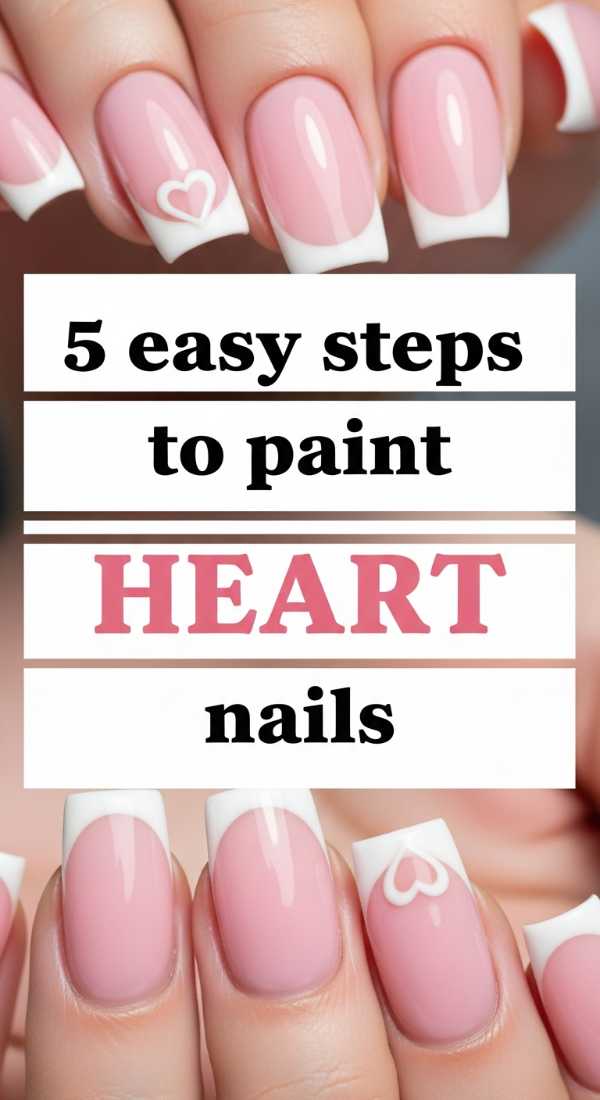
Why to love this Design:
Loves, there is something so incredibly sweet and romantic about a tiny heart on your ring finger. It’s like carrying a little secret whisper of self-love with you throughout the day. It’s subtle, dainty, and perfectly fits that ‘coquette’ aesthetic we are all dreaming about this spring.
Essential Elements:
- Pale blush base polish
- Deep rose or cherry red detail polish
- A toothpick or a fine-point dotting tool
- High-shine top coat
How to Prepare:
- Apply two thin coats of your pale blush base and let them dry completely.
- Dip your toothpick into the red polish.
- Place two small dots side-by-side where you want the top of the heart to be.
- Drag each dot downward to meet at a single point in the center, forming a ‘V’ shape.
- Fill in the center and seal with a top coat once dry.
Budget Range
- Essie ‘Slightly Chalky’ ($10)
- Sally Hansen Insta-Dri Red ($6)
- Wooden toothpicks ($1)
3 Quick Ways to Style May Stripes
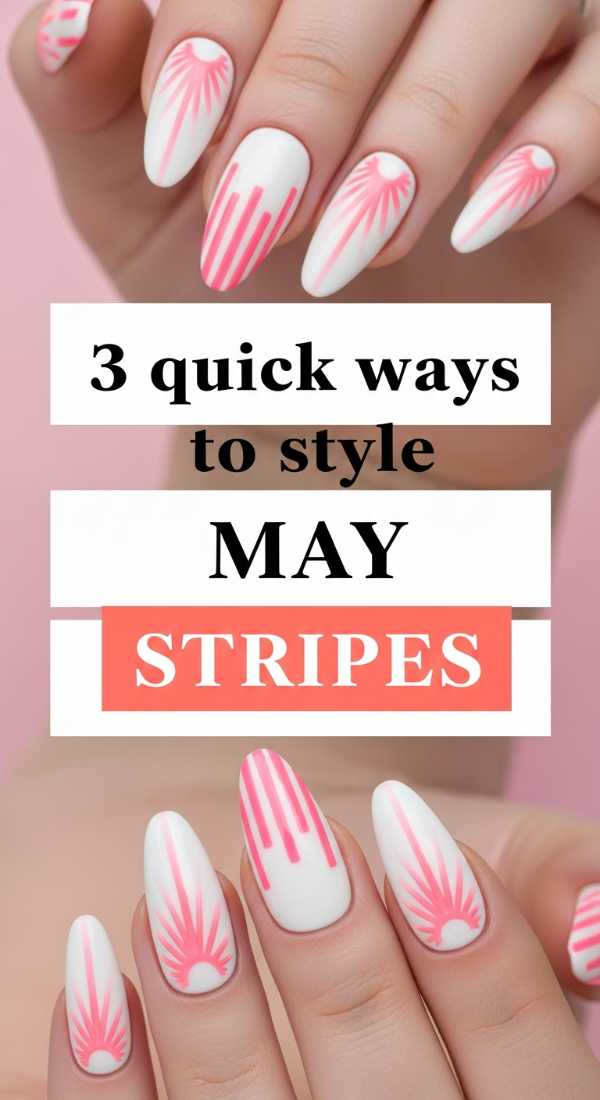
Why to love this Design:
Stripes don’t have to be rigid or nautical; in May, we’re doing them with a whisper-light touch. Think of them as soft rays of morning light stretching across your nails. They add just enough structure to keep things chic without losing that airy, spring feel.
Essential Elements:
- Nude or sheer base
- Pastel blue or mint striping polish
- A steady hand or striping tape
How to Prepare:
- For vertical stripes, draw one thin line down the center of the nail for an elongating effect.
- For a modern look, try a single horizontal stripe near the cuticle area.
- For a playful vibe, create mismatched diagonal stripes on every other nail.
Budget Range
- Zoya Naked Manicure ($12)
- Holler and Glow Nail Tape ($5)
- Art Deco Detailer Pen ($4)
4 Pro Tips for Perfect Polka Dots
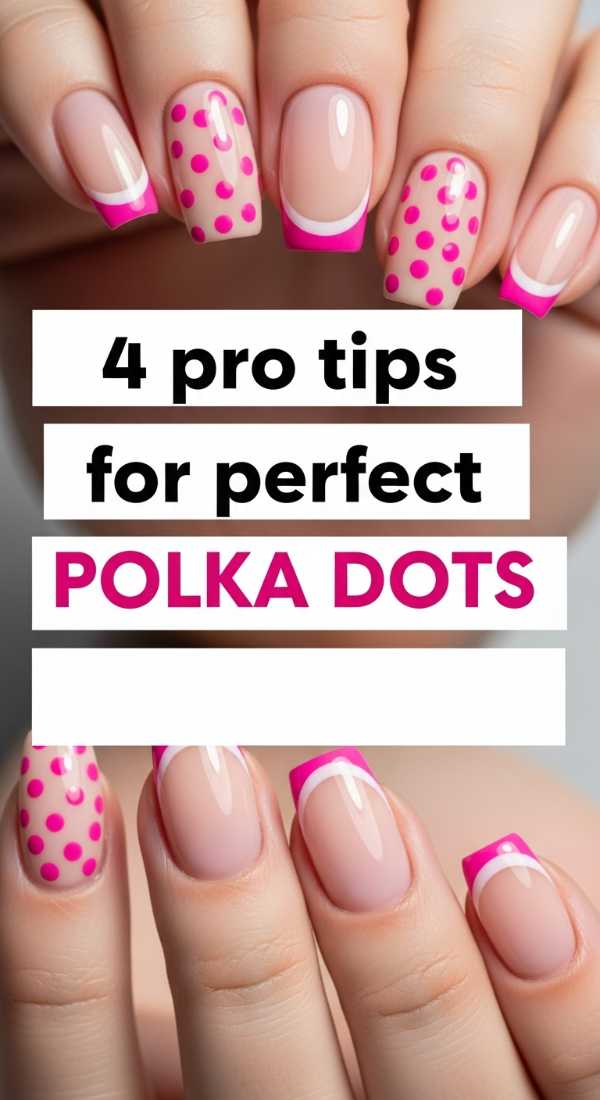
Why to love this Design:
If you’re feeling a bit whimsical today, polka dots are the answer. They remind me of vintage sundresses and garden tea parties. It’s a playful, timeless look that is almost impossible not to smile at when you see it on your keyboard.
Essential Elements:
- Creamy white base
- Assorted pastel polishes (yellow, lilac, pink)
- Different sized dotting tools
How to Prepare:
- Apply your white base and ensure it is smooth.
- Dip the largest end of your dotting tool into the lilac and space out three main dots.
- Use a smaller tool to fill the gaps with pink and yellow dots.
- Vary the pressure to get different sizes for a ‘bubble’ effect.
Budget Range
- OPI Alpine Snow ($11)
- Generic Dotting Tool Set ($7 on Amazon)
- Mini Pastel Polish Bundle ($15)
6 Simple Steps for French Tip Designs
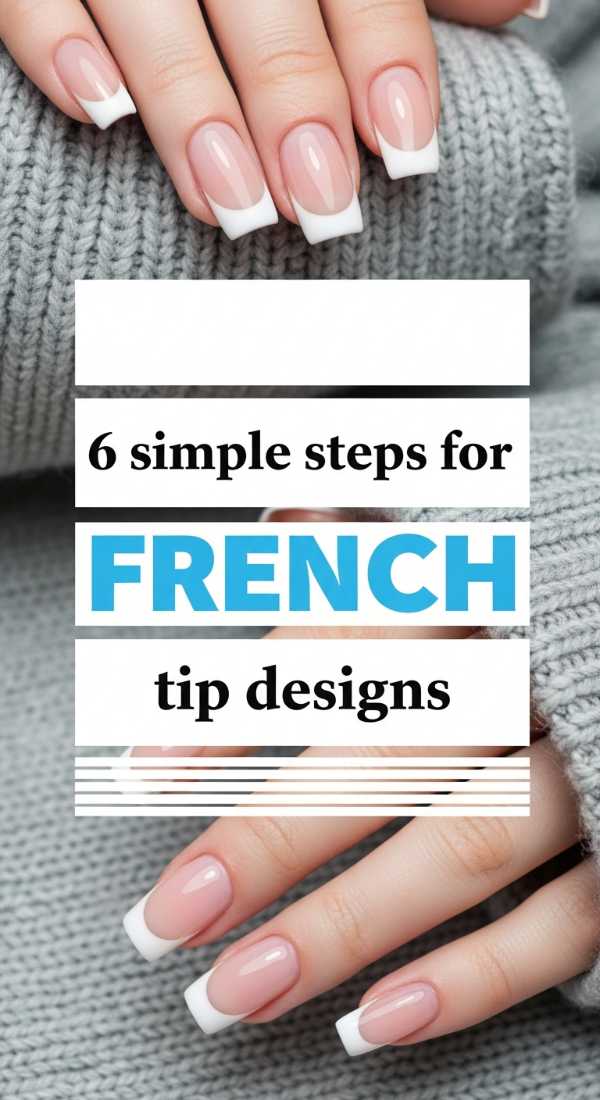
Why to love this Design:
The French manicure is a forever love, but for spring, we’re giving it a colorful makeover. Instead of stark white, we are using soft, milky tones that blend beautifully with the natural nail. It’s the ultimate ‘clean girl’ aesthetic for the May season.
Essential Elements:
- Sheer pink base
- Silicone nail stamper
- Soft white or pastel tip color
How to Prepare:
- Paint your base and let it dry.
- Apply a thick layer of the tip color onto the silicone stamper.
- Gently press the tip of your nail into the stamper at a 45-degree angle.
- Clean up the edges with a brush dipped in remover.
- Thin out the smile line if it looks too thick.
- Apply a plump top coat.
Budget Range
- Orly Bonder Base ($10)
- Silicone Stamper Tool ($8)
- Beetles Gel Liner Polish ($9)
5 Easy Methods for Soft Pink Nails
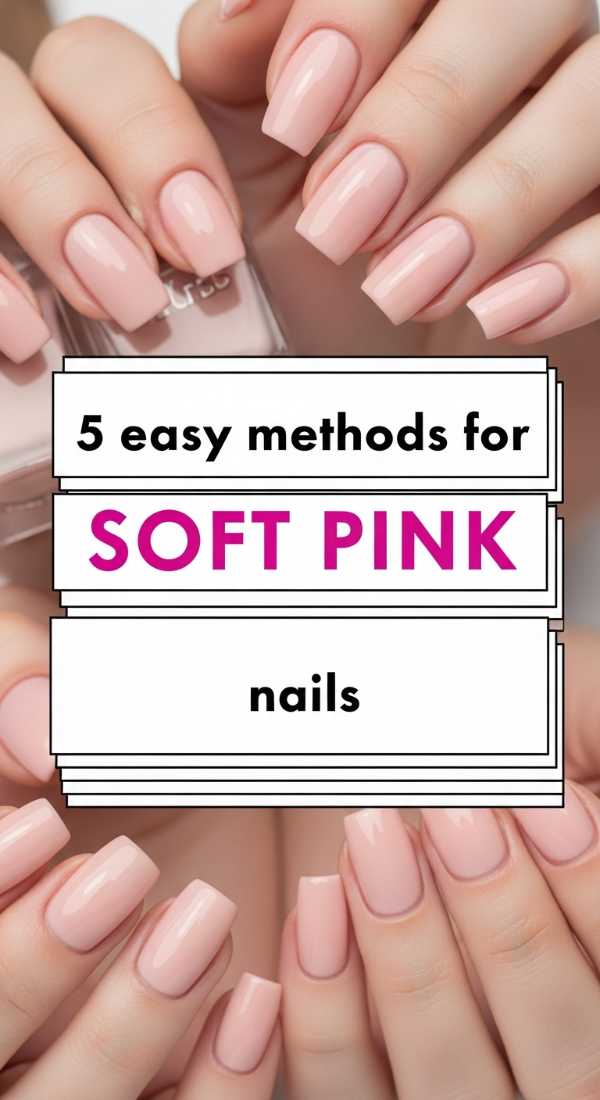
Why to love this Design:
Soft pink is like a cloud-soft embrace for your hands. It’s the most versatile May trend because it works for every occasion, from a morning coffee date to a spring wedding. It’s feminine, grounding, and effortlessly polished.
Essential Elements:
- Translucent pink polish
- Matte or Glossy top coat
- Nail buffer
How to Prepare:
- Buff your nails to a smooth surface to avoid streaks.
- Apply one very thin coat of translucent pink.
- Apply a second coat, focusing on the center of the nail.
- If you want a ‘jelly’ look, mix your pink with a bit of clear top coat.
- Finish with a high-gloss top coat to mimic a gel finish.
Budget Range
- Olive & June ‘BEB’ ($9)
- Revlon ColorStay Top Coat ($7)
- Glass Nail File ($10)
7 Quick Hacks for May Floral Art
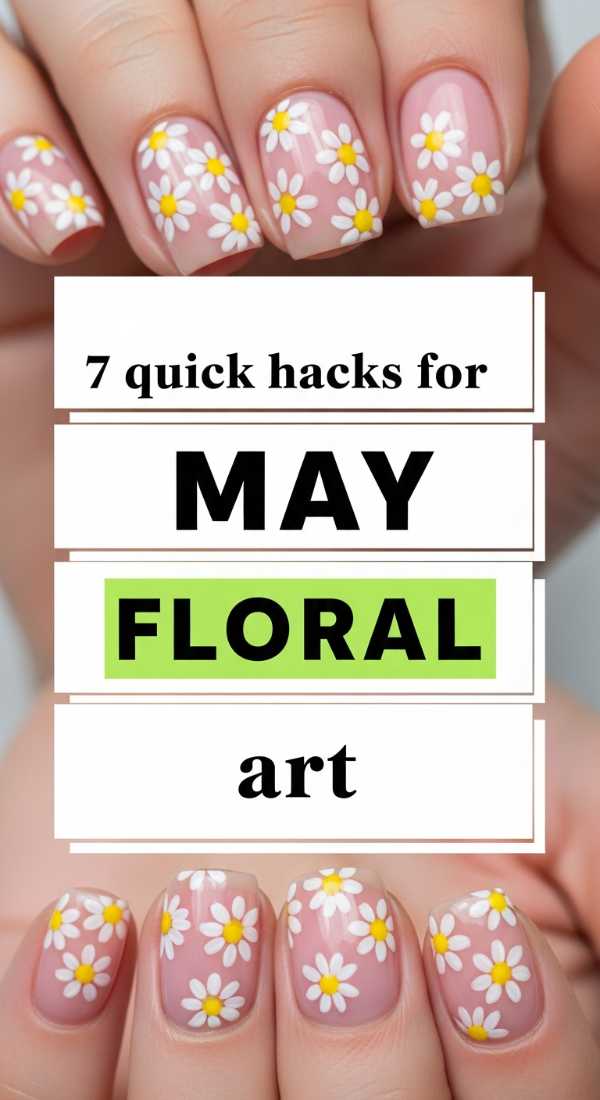
Why to love this Design:
Is it even May if we aren’t wearing a garden on our fingertips? Floral art is the heartbeat of spring. Don’t be intimidated—these aren’t meant to be perfect oil paintings; they are meant to look like ditsy, delicate wildflowers scattered in a meadow.
Essential Elements:
- Light green polish (for leaves)
- Bright yellow and white polish
- Thin detail brush
How to Prepare:
- Start with a neutral base.
- Place a tiny yellow dot for the flower center.
- Use a toothpick to pull five white dots around the yellow center.
- Add a tiny green ‘flick’ next to the flower for a leaf.
- Use a matte top coat for a ‘pressed flower’ look.
- Mistake hack: If a petal is messy, add a tiny gold glitter speck over it.
- Keep the flowers varying in size for a natural look.
Budget Range
- Nail Art Brush Set ($6)
- China Glaze ‘Shore Feels Good’ ($8)
- Gold Glitter Polish ($5)
4 Steps to Master Lavender May Trends
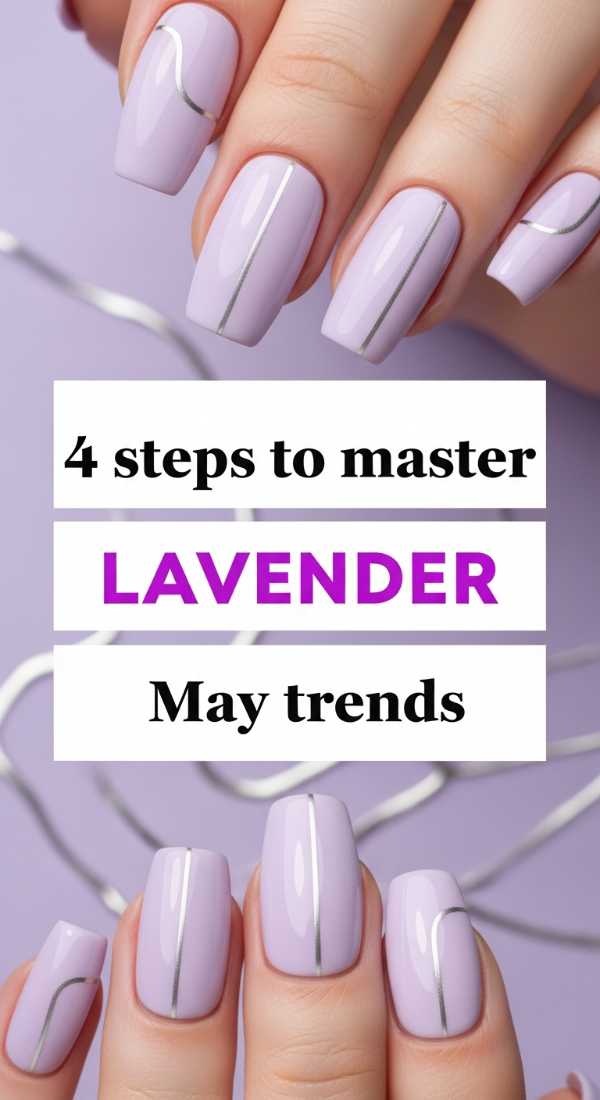
Why to love this Design:
Lavender reminds me of those quiet, misty May mornings when everything is still. It’s a color that signifies calm and grace. It’s modern enough to be trendy but soft enough to be a daily staple.
Essential Elements:
- Lavender crème polish
- Iridescent shimmer topper
- Cuticle oil
How to Prepare:
- Cleanse nail beds with alcohol to ensure the purple pigment sticks.
- Apply two coats of lavender crème.
- Swipe a single layer of iridescent shimmer over the ring finger only.
- Massage cuticle oil in daily to keep the lavender looking fresh against hydrated skin.
Budget Range
- Lights Lacquer ‘Geller’ ($13)
- Cuccio Revitalize Oil ($9)
- Sinful Colors ‘Low-Key Lavender’ ($3)
3 Easy Ways to Wear Sage Green
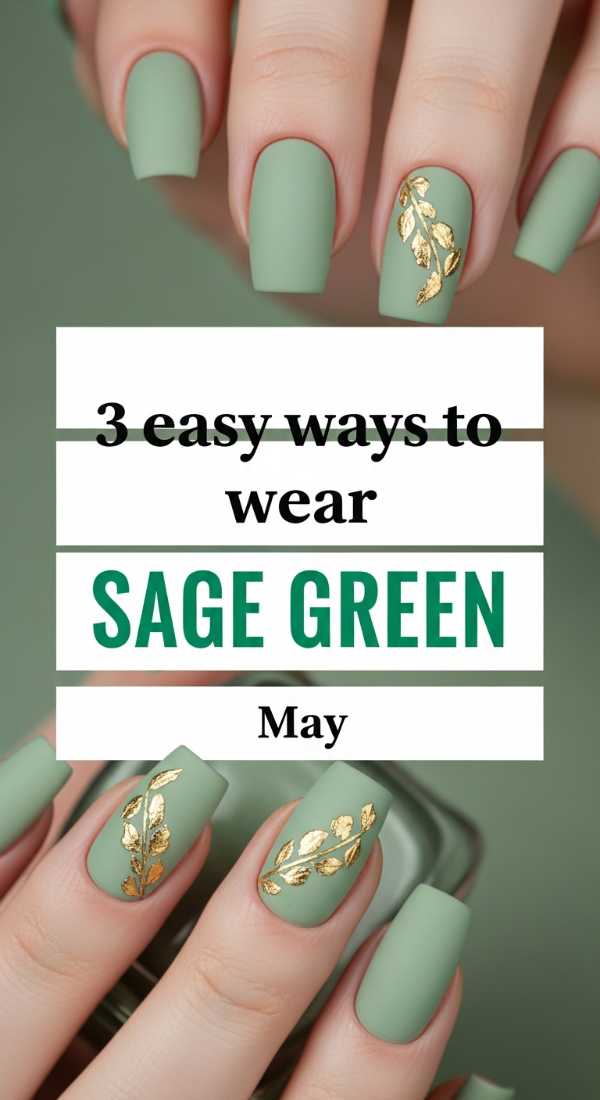
Why to love this Design:
Sage is the neutral we all needed this season. It’s earthy, grounding, and surprisingly flattering on every skin tone. It feels like a walk through a botanical garden—peaceful and revitalizing.
Essential Elements:
- Sage green polish
- Gold foil flakes
- Tweezers
How to Prepare:
- Paint all nails sage green except the middle finger.
- On the middle finger, use tweezers to place tiny bits of gold foil on the wet polish.
- Try a ‘mismatched’ look by pairing sage with a creamy beige on the thumb.
Budget Range
- Ella + Mila ‘Pistachio’ ($11)
- Gold Leaf Flakes ($5)
- Revlon ‘High Gloss’ ($6)
5 Steps to Get the Peach Glow
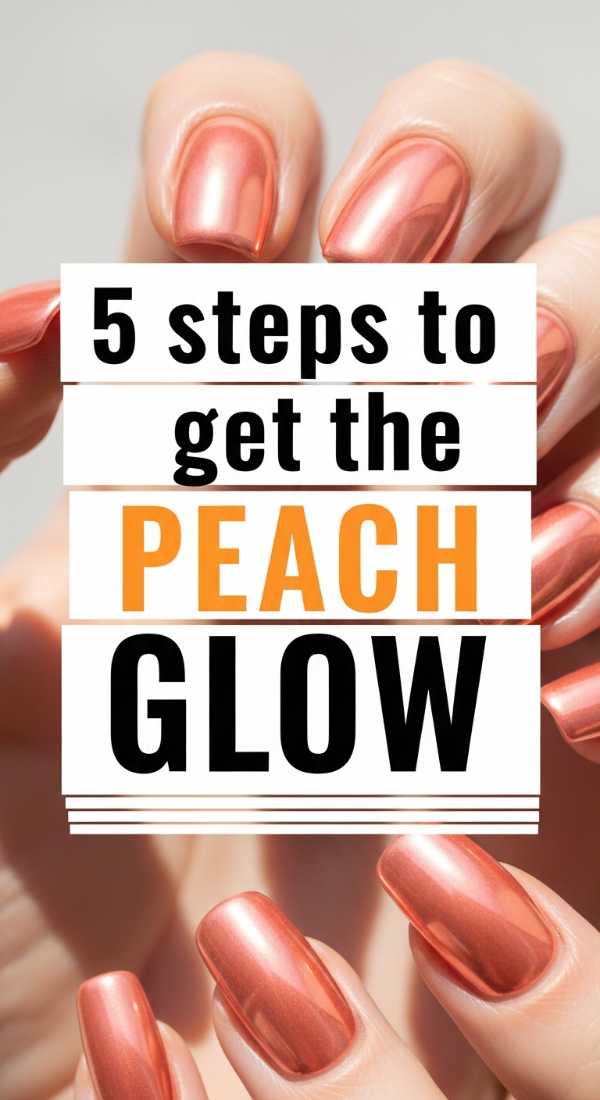
Why to love this Design:
Peach is that perfect bridge between spring blooms and summer heat. It gives your hands a warm, healthy glow. It’s juicy, vibrant, and looks absolutely stunning in the sunlight.
Essential Elements:
- Peach or apricot polish
- Pearl chrome powder
- Sponge applicator
How to Prepare:
- Apply two coats of peach polish.
- Wait until it is ‘tacky’ but not fully dry.
- Rub a tiny amount of pearl chrome powder over the surface using the sponge.
- Brush off excess powder with a fluffy makeup brush.
- Seal with a specialized ‘no-wipe’ top coat to keep the chrome effect.
Budget Range
- Essie ‘Check in to Check Out’ ($10)
- Chrome Powder Tin ($9)
- Makeup Sponges ($3)
6 Simple Rules for Daisy Nail Art
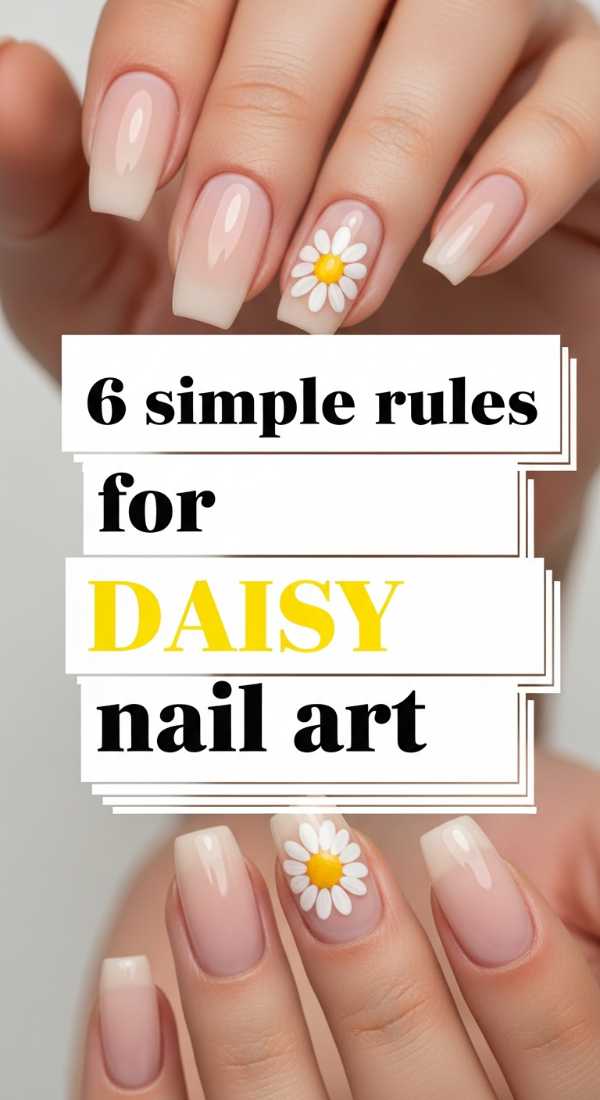
Why to love this Design:
Daisies are the ultimate symbol of a fresh start. They are cheerful, resilient, and so iconic for the month of May. This design is perfect for those of us who want a ‘boho-chic’ vibe without much effort.
Essential Elements:
- Sunshine yellow polish
- Crisp white polish
- Clear base coat
How to Prepare:
- Keep your base clear or very sheer to let the daisies ‘pop’.
- Only put daisies on the corners of the nails for a French-inspired look.
- Use a bobby pin if you don’t have a dotting tool.
- Five petals are the ‘sweet spot’ for a daisy shape.
- Don’t worry about symmetry; nature isn’t symmetrical!
- Finish with a fast-dry top coat so your flowers don’t smudge.
Budget Range
- Sally Hansen ‘Mellow Yellow’ ($6)
- Wet n Wild White ($2)
- Seche Vite Fast Dry Top Coat ($9)
Wrap Yourself in Color
I hope these tutorials bring a little spark of joy to your week, my loves. Taking twenty minutes out of a busy day to sit down, put on some lo-fi beats, and paint something beautiful is a form of meditation. Your hands do so much for you—they hold coffee mugs, they type out kind messages, they hug the people you love—so they deserve to be adorned in the colors of spring. Share your creations with me, and remember that even if your lines aren’t perfectly straight, they are uniquely yours. Stay soft, stay bright, and keep blooming!
Frequently Asked Questions
How can I make my DIY nail art last longer?
The secret is all in the prep! Make sure to swipe your nails with rubbing alcohol before you start to remove any natural oils. Also, always cap the free edge (the very tip) with your top coat to prevent chipping.
What if I don’t have professional dotting tools?
Don’t worry at all! You can use things from around your house like bobby pins, the end of a makeup brush, a toothpick, or even a dried-out ballpoint pen. They work just as well!
Are these trends safe for natural nails?
Absolutely! As long as you use a good quality base coat to prevent staining and hydrate your cuticles with oil daily, your natural nails will stay healthy and strong while looking fabulous.