
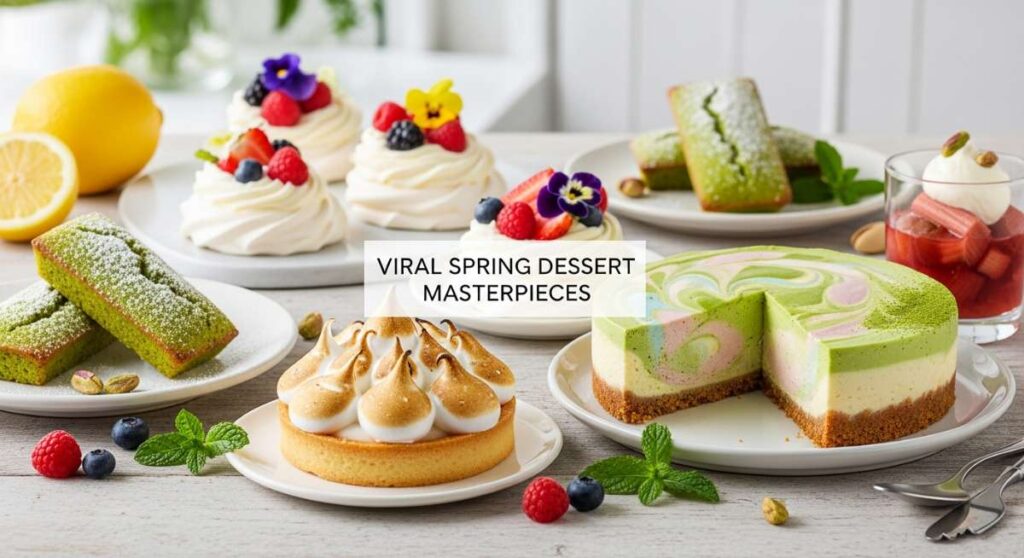
Hello, my loves! As the sun begins to linger just a little longer and the first whispers of blossoms start to dance on the breeze, my heart always turns toward the kitchen. There is something so profoundly healing about the shift from heavy, winter spices to the bright, cloud-soft textures of spring baking. It is a season of rebirth, and I truly believe our desserts should mirror that same light, airy joy that we feel when we finally open the windows to let the fresh air in.
Lately, my feed has been absolute sunshine, filled with viral treats that look like they were plucked straight from a fairytale meadow. I know how intimidating some of those ‘perfect’ bakery photos can be, but I want to let you in on a little secret: those ethereal textures and vibrant flavors are completely within your reach. Today, I am sharing the heart and soul of my spring kitchen with you, so we can bake this season into something truly unforgettable together.
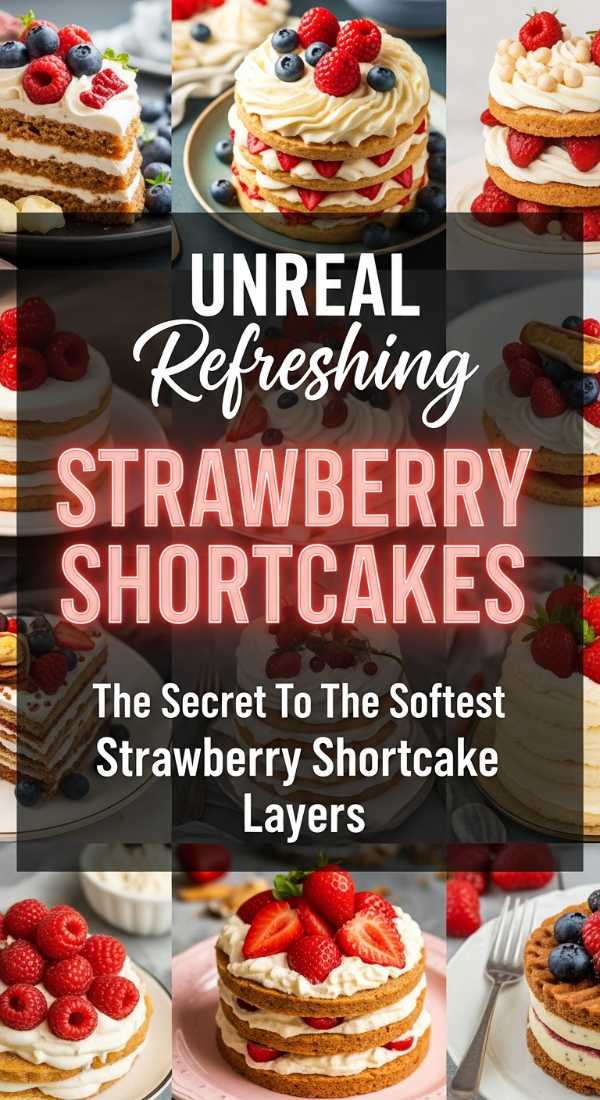
The Secret To The Softest Strawberry Shortcake Layers
Why we love this
There is nothing quite like biting into a layer of cake that feels like a warm, sugary hug. These layers are specifically designed to be the softest foundation for your spring berries, absorbing just enough juice without ever becoming soggy. We love this because it brings a sense of nostalgia while maintaining a modern, sophisticated crumb that stays moist for days. It is the kind of cake that makes your guests close their eyes in pure, unadulterated bliss.
Ingredients
- 2 cups cake flour (sifted)
- 1.5 cups granulated sugar
- 1 tablespoon baking powder
- 1/2 teaspoon salt
- 1/2 cup unsalted butter (softened)
- 1 cup whole milk (room temperature)
- 4 large egg whites
- 2 teaspoons vanilla bean paste
How to make it
- Preheat your oven to 350°F (175°C) and generously grease two 8-inch round cake pans, lining the bottoms with parchment paper for an easy release.
- In a large mixing bowl, whisk together your sifted cake flour, sugar, baking powder, and salt until the mixture is light and aerated.
- Add the softened butter and half of the milk, mixing on low speed until the dry ingredients are moistened, then increase to medium for two minutes to build structure.
- In a separate jug, whisk the remaining milk with the egg whites and vanilla bean paste until well combined.
- Gradually add the egg white mixture to the batter in three stages, beating for about 30 seconds after each addition to ensure the batter is silky and pale.
- Divide the batter evenly between your prepared pans and bake for 25-30 minutes, or until a tester comes out clean and the tops spring back gently.
How To Get That Perfect Zesty Lemon Glaze Every Time

Why we love this
A glaze can truly make or break the visual appeal and taste profile of your spring loaves and cookies. This particular recipe focuses on achieving that elusive balance between a sharp, citrus punch and a smooth, opaque finish that clings beautifully to every curve. It provides a bright, crackly contrast to soft bakes that feels like a burst of sunshine in every single bite. It is the ultimate finishing touch for anyone who craves that high-end bakery aesthetic at home.
Ingredients
- 2 cups powdered sugar (sifted)
- 3 tablespoons fresh lemon juice
- 1 tablespoon lemon zest
- 1 tablespoon heavy cream
- A pinch of fine sea salt
How to make it
- Place your sifted powdered sugar in a medium glass bowl, ensuring there are no stubborn lumps left behind for a perfectly smooth finish.
- Whisk in the fresh lemon juice one tablespoon at a time, watching as the sugar transforms into a thick, glossy liquid.
- Stir in the heavy cream, which is the secret to achieving that professional-looking opacity and a rich, creamy mouthfeel.
- Fold in the lemon zest and the tiny pinch of salt to amplify the citrus notes and balance out the intense sweetness of the sugar.
- Check the consistency; it should be thick enough to coat the back of a spoon but thin enough to drizzle in elegant, slow-moving ribbons.
- Pour the glaze over your cooled treats immediately, allowing it to set for at least 20 minutes until it forms a delicate, sugary crust.
The Ultimate Trick For A Silky Smooth Spring Treat

Why we love this
Spring is the season of delicate textures, and nothing embodies that more than a perfectly set, silky panna cotta or custard. We love this trick because it removes the guesswork and the fear of ‘graininess’ that often plagues homemade milk-based desserts. The result is a treat that wobbles beautifully on the plate and melts away the moment it touches your tongue. It is an effortless way to impress your loves with a dessert that feels incredibly high-end and thoughtful.
Ingredients
- 2 cups heavy cream
- 1/3 cup granulated sugar
- 1 vanilla bean (split and scraped)
- 1.5 teaspoons powdered gelatin
- 2 tablespoons cold water
- A drop of honey
How to make it
- Sprinkle the gelatin over the cold water in a small bowl and let it sit for 5-10 minutes to bloom into a thick, sponge-like consistency.
- In a saucepan, combine the heavy cream, sugar, and the vanilla bean seeds and pod over medium heat until the sugar dissolves completely.
- Bring the cream to a very gentle simmer—do not let it boil—then remove it from the heat to preserve the delicate dairy fats.
- Whisk in the bloomed gelatin while the cream is still hot, stirring continuously until every single crystal has melted into the liquid.
- Strain the entire mixture through a fine-mesh sieve into a clean jug to remove the vanilla pod and any tiny undissolved gelatin bits.
- Pour into individual ramekins and chill in the refrigerator for at least 6 hours, or ideally overnight, for the most luxurious set imaginable.
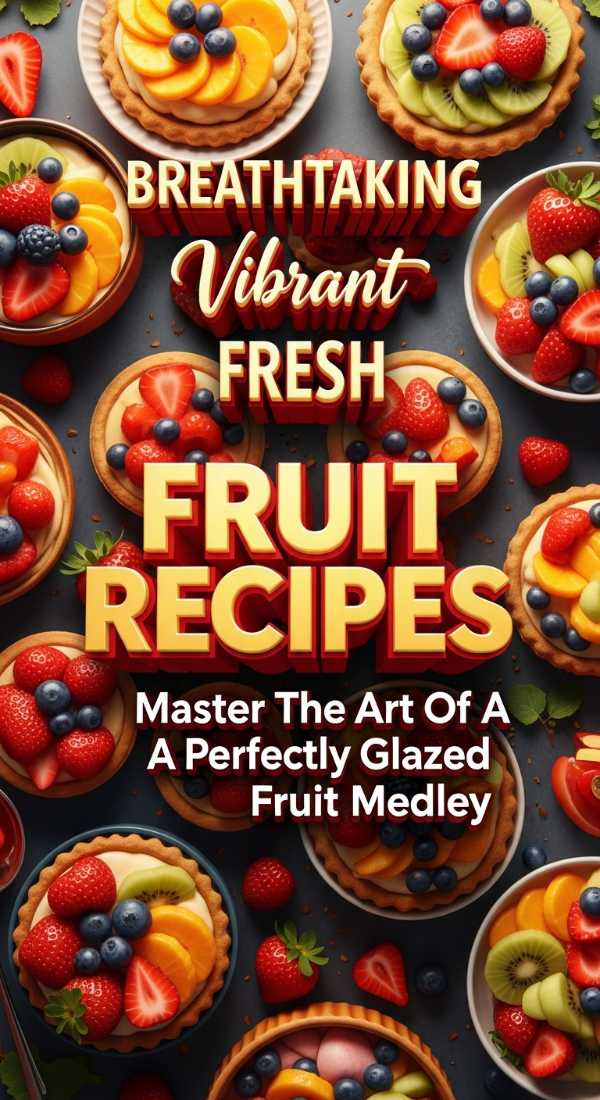
Master The Art Of A Perfectly Glazed Fruit Medley
Why we love this
There is a special kind of magic in a fruit tart or medley that glistens like precious jewels under the morning sun. This technique is about more than just shine; it’s about preserving the vibrant colors of spring berries and stone fruits while adding a subtle sweetness. We love how it turns a simple bowl of fruit into a centerpiece-worthy masterpiece that feels fresh and sophisticated. It is the easiest way to elevate your brunch game and make every berry look like a work of art.
Ingredients
- 1 cup mixed fresh berries (strawberries, blueberries, raspberries)
- 1/4 cup apricot preserves
- 1 tablespoon water
- 1 teaspoon lemon juice
- Fresh mint leaves for garnish
How to make it
- Wash and thoroughly dry your fruit, as any excess moisture will prevent the glaze from adhering properly to the skin.
- In a small saucepan, combine the apricot preserves and the tablespoon of water over low heat, whisking until the jam becomes liquid.
- Once the mixture is bubbling slightly, strain it through a sieve to remove any fruit chunks, leaving you with a clear, golden syrup.
- Stir in the lemon juice to add a hint of acidity that will keep the fruit looking bright and prevent the glaze from being too cloying.
- Using a soft pastry brush, gently paint the warm glaze over the fruit, ensuring each piece is thinly and evenly coated.
- Let the fruit sit for 10 minutes to allow the glaze to set before arranging them on your cakes, tarts, or in a beautiful crystal bowl.
Why This Strawberry Shortcake Is Better Than Any Bakery

Why we love this
We’ve all had those bakery shortcakes that look stunning but taste a bit dry or overly manufactured, haven’t we? This version wins because it prioritizes the harmony between a buttery, slightly salty biscuit and the macerated sweetness of hand-picked strawberries. We love it because it feels honest, rustic, and incredibly generous with its proportions of cold, whipped cream. It is a dessert that invites you to slow down and savor the messy, beautiful reality of homemade goodness.
Ingredients
- 1 quart fresh strawberries (sliced)
- 1/4 cup sugar (for strawberries)
- 2 cups all-purpose flour
- 1 tablespoon baking powder
- 1/2 cup cold salted butter
- 3/4 cup heavy cream (plus more for whipping)
- 1 teaspoon vanilla extract
How to make it
- Toss your sliced strawberries with the 1/4 cup of sugar and let them sit for at least 30 minutes to create a natural, sweet syrup.
- In a large bowl, cut the cold salted butter into your flour and baking powder mixture until it resembles coarse, pea-sized crumbs.
- Slowly pour in the heavy cream and vanilla, stirring just until a shaggy dough forms, being careful not to overwork the gluten.
- Pat the dough out onto a floured surface and cut into thick rounds, then bake at 425°F (220°C) until the tops are golden and crisp.
- Whip additional heavy cream with a touch of sugar until soft peaks form, keeping it light and cloud-like for the best texture.
- Split the warm biscuits in half, pile on the syrupy strawberries, and finish with a massive dollop of the freshly whipped cream.
Discover The Hidden Ingredient For Intense Lemon Flavor

Why we love this
Sometimes, even with all the juice in the world, a lemon dessert can feel a little flat or one-dimensional in its flavor profile. This hidden ingredient trick unlocks the aromatic oils found deep within the peel, providing a multi-layered citrus experience that is truly transformative. We love this because it costs nothing extra but changes the entire character of your bake from ‘lemon-flavored’ to ‘pure lemon essence.’ It is the secret weapon of every seasoned pastry chef that you can start using today.
Ingredients
- The zest of 3 large organic lemons
- 1 cup granulated sugar
- Your recipe’s required butter or liquid
How to make it
- Place your measured granulated sugar into a clean mixing bowl and add the freshly grated zest of three lemons directly on top.
- Using your fingertips, rub the lemon zest into the sugar for about 2-3 minutes until the sugar becomes moist and intensely fragrant.
- You will notice the sugar turning a pale yellow color as it absorbs the essential oils released from the zest during the rubbing process.
- Let this ‘lemon sugar’ sit for 10 minutes to fully infuse before proceeding with the rest of your cake or cookie recipe as usual.
- When creaming your butter, add this infused sugar first to ensure the citrus flavor is distributed evenly throughout the entire batter.
- The result will be a bright, zesty aroma that permeates every crumb, offering a sophisticated depth that juice alone simply cannot provide.
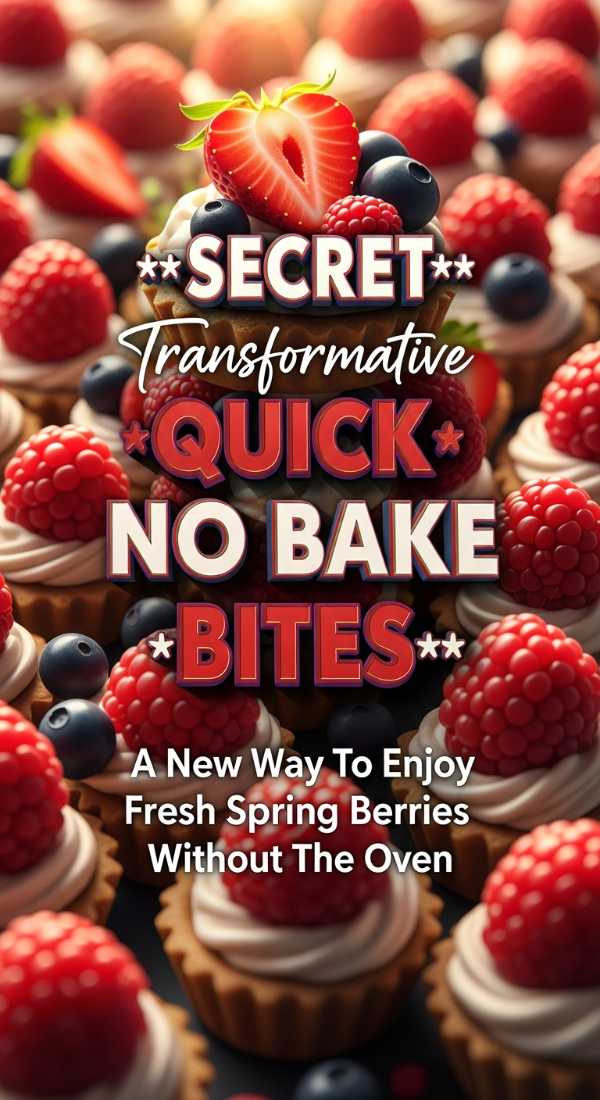
A New Way To Enjoy Fresh Spring Berries Without The Oven
Why we love this
On those first warm days when you simply don’t want to turn on the oven, this no-bake approach is a total lifesaver for dessert lovers. We love this method because it highlights the raw, vibrant integrity of spring berries while pairing them with a chilled, velvety component. It’s light, refreshing, and takes only minutes to assemble, making it perfect for spontaneous patio gatherings or quiet evenings. It proves that you don’t need heat to create something that feels indulgent and celebratory of the season.
Ingredients
- 2 cups mixed berries
- 1 cup mascarpone cheese (chilled)
- 1/2 cup heavy whipping cream
- 3 tablespoons honey or maple syrup
- Crushed digestive biscuits or graham crackers
How to make it
- In a medium bowl, whisk the chilled mascarpone and heavy cream together until the mixture is thick, airy, and holds its shape.
- Fold in two tablespoons of the honey or maple syrup, ensuring the sweetness is folded in gently to maintain the mixture’s volume.
- Place a layer of crushed biscuits at the bottom of your serving glasses to provide a satisfying, sandy crunch that mimics a crust.
- Top the biscuit layer with a generous spoonful of the sweetened mascarpone cream, smoothing it out to create a clean visual layer.
- Toss your fresh berries with the remaining tablespoon of honey and pile them high on top of the cream, letting the juices drip down.
- Serve immediately or chill for 30 minutes to allow the flavors to meld into a cool, refreshing spring parfait that everyone will adore.
Elegant Sweets That Are Surprisingly Easy To Make At Home

Why we love this
There is a common misconception that elegant, ‘fancy’ desserts require years of professional training and expensive kitchen equipment to master. We love these mini-pavlovas because they look like expensive boutique items but are actually made from the simplest pantry staples. They offer a stunning contrast between a crisp, sugary shell and a soft, marshmallow-like interior that feels incredibly luxurious. This recipe is your ticket to hosting a high-tea or dinner party that leaves your guests wondering when you went to culinary school.
Ingredients
- 4 large egg whites (room temperature)
- 1 cup superfine sugar
- 1 teaspoon white vinegar
- 1/2 tablespoon cornstarch
- 1 teaspoon vanilla extract
How to make it
- Preheat your oven to a very low 250°F (120°C) and line a large baking sheet with parchment paper for the meringues.
- Whisk the egg whites until soft peaks form, then add the superfine sugar one tablespoon at a time while continuing to beat on high.
- Continue whisking until the meringue is stiff, glossy, and you can no longer feel any sugar granules when rubbing the mixture between fingers.
- Gently fold in the vinegar, cornstarch, and vanilla extract; these ingredients are the secret to that iconic marshmallowy center we all crave.
- Spoon the mixture into eight small mounds on the baking sheet, using the back of a spoon to create a small nest in the center.
- Bake for 60 minutes, then turn the oven off and leave the pavlovas inside with the door slightly ajar until they are completely cooled.
Every Trick You Need For Fluffy Shortcake Biscuits

Why we love this
The perfect shortcake biscuit is a thing of architectural beauty: tall, flaky, and light enough to float away if not for the berries. We love these tricks because they transform a basic dough into a multi-layered masterpiece that provides the perfect ‘crunch’ to accompany soft fruit. It’s all about the science of cold fats and gentle handling, which results in a biscuit that shatters beautifully when bitten. Once you master these small movements, you will never go back to store-bought biscuits or flat, heavy scones again.
Ingredients
- 3 cups all-purpose flour
- 1/4 cup granulated sugar
- 1 tablespoon baking powder
- 3/4 cup very cold unsalted butter (grated)
- 1 cup cold buttermilk
- 1 egg (for washing)
How to make it
- The biggest secret: grate your very cold butter using a box grater and keep it in the freezer until the exact moment you need it.
- Whisk your dry ingredients together, then quickly toss the frozen butter shreds into the flour so every piece is individually coated and separated.
- Make a well in the center and pour in the cold buttermilk, stirring with a fork just until the dough barely clings together.
- Turn the dough onto a floured surface and gently fold it over itself 5-6 times; this creates the physical layers that will puff up in the oven.
- Cut your biscuits straight down with a sharp cutter—never twist it—as twisting seals the edges and prevents the biscuit from rising.
- Brush the tops with a simple egg wash and bake at 425°F (220°C) for 12-15 minutes until they are impressively tall and golden brown.
The Foolproof Method For A Smooth And Tangy Lemon Filling

Why we love this
A truly great lemon filling should be bold, unapologetically tangy, and as smooth as silk, without a single lump in sight. We love this foolproof method because it uses a controlled heat technique that prevents the eggs from curdling, ensuring a professional result every time. It is the heart of every great lemon bar, tart, or cake filling, providing that essential zing that cuts through sweet pastry. Mastering this curd will give you the confidence to tackle any citrus-based dessert with total ease and grace.
Ingredients
- 4 large egg yolks
- 3/4 cup granulated sugar
- 1/2 cup fresh lemon juice
- 1/2 cup unsalted butter (cubed)
- 1 tablespoon lemon zest
- A pinch of salt
How to make it
- Create a double boiler by placing a heat-proof glass bowl over a saucepan of simmering water, ensuring the bottom of the bowl doesn’t touch the water.
- Whisk the egg yolks, sugar, and lemon juice together in the bowl constantly to prevent the heat from cooking the eggs too quickly.
- Continue whisking for about 10 minutes until the mixture thickens significantly, reaching a consistency that can coat the back of a wooden spoon.
- Remove the bowl from the heat and immediately whisk in the cold cubes of butter one by one until the filling is rich and glossy.
- Stir in the lemon zest and salt, then pass the entire mixture through a fine-mesh strainer to ensure the texture is perfectly uniform.
- Cover the surface directly with plastic wrap to prevent a skin from forming and refrigerate until the filling is firm and ready to use.
Embracing the Sweetness of the Season
As we wrap up this journey through the flavors of spring, I hope you feel a sense of excitement bubbling up in your heart. Baking is so much more than just following a set of instructions; it is a way to share our love, our presence, and the beauty of the passing seasons with those who matter most. Whether you’re making a simple fruit medley or a towering strawberry shortcake, remember that the most important ingredient is the joy you find in the process. Happy baking, my loves, and may your kitchens always be filled with the scent of lemons and fresh berries!
Frequently Asked Questions
Q: Can I use frozen berries if fresh ones aren’t available?
A: While fresh is always best for texture and shine, you can use frozen berries for fillings and cakes. Just be sure to thaw and drain them well to avoid excess moisture ruining your crumb!
Q: How do I store these spring desserts to keep them fresh?
A: Most fruit-based desserts are best enjoyed on the day they are made. However, you can store lemon curd and cakes in the fridge for 2-3 days. Just be sure to bring cake to room temperature before serving for the best texture.
Q: What if my lemon glaze is too runny?
A: Don’t worry! Simply whisk in a little more sifted powdered sugar, one tablespoon at a time, until you reach your desired thickness. The consistency can vary depending on the humidity in your kitchen.