
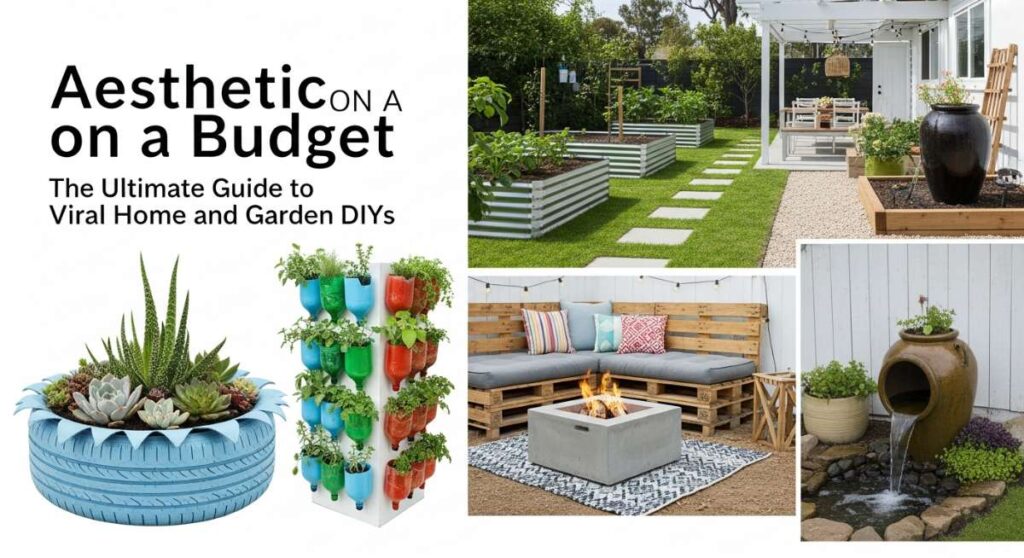
Have you ever spent hours scrolling through your social media feed, sighing at those perfectly curated, sun-drenched backyard oases and chic, lived-in interiors? It’s easy to feel like a high-end home aesthetic is reserved only for those with a massive renovation budget, but I’m here to tell you that your home can be your favorite sanctuary without breaking the bank. There is something deeply grounding about rolling up your sleeves and creating a space that reflects your soul, turning the ordinary into the extraordinary with just a bit of elbow grease and a lot of heart.
We all deserve a home that feels like a hug the moment we walk through the door. Whether it’s the way the morning light hits a new flower bed or the nostalgic glow of a neon sign in your favorite corner, these DIY projects are more than just home improvements—they are ways to cultivate joy. This guide is my love letter to the power of DIY, curated to help you achieve those viral, high-end looks with approachable materials and creative thinking.
From lush vertical gardens to the playful vibes of the early 2000s, I’ve rounded up ten of the most aesthetic, viral-worthy DIYs that will completely transform your living space. We’re moving beyond simple crafts into full-scale transformations that will make your neighbors stop and stare. Let’s dive into the ultimate guide to making your home and garden dreams a reality!
How to Design Flower Beds for Maximum Curb Appeal
Why we love this
There is nothing quite like the sensory explosion of a well-designed flower bed in peak bloom; the sweet, heady scent of jasmine mingling with the earthy musk of fresh mulch creates an instant sense of peace. Visually, the layering of vibrant purples against soft silvers and deep greens provides a textured tapestry that makes any home feel expensive and loved. Walking up to your front door becomes a daily ritual of beauty, as the sight of swaying petals and the hum of happy pollinators turn a simple yard into a living masterpiece that feels both intentional and wild.
Essential Elements:
- Borders (stone, brick, or wood)
- High-quality organic topsoil and mulch
- A mix of perennials and annuals (staggered heights)
- Landscaping fabric for weed prevention
- Hand trowel and gardening gloves
How to make it
- Begin by outlining your bed’s shape using a garden hose or spray paint to create fluid, organic curves rather than rigid straight lines; this mimics natural landscapes and adds a high-end feel.
- Remove the existing grass within the perimeter using a sharp spade, ensuring you dig at least 3 inches deep to clear out roots and prevent regrowth.
- Lay down a layer of heavy-duty landscaping fabric, securing it with garden staples to create a professional-grade weed barrier that saves you hours of future maintenance.
- Mix 4 inches of organic compost into your topsoil to ensure your plants have a nutrient-rich environment; the soil should feel crumbly and moist, like a chocolate cake, rather than packed and dry.
- Arrange your plants while still in their nursery pots, placing the tallest varieties at the back or center and the shortest at the edges; look for visual balance and color contrast before you commit to digging.
- Dig holes twice as wide as the root balls, tease the roots gently to encourage outward growth, and plant them level with the soil surface.
- Apply a 2-3 inch layer of cedar or hardwood mulch across the entire bed, keeping it an inch away from plant stems to prevent rot, and give the entire area a deep, slow soak to settle the soil.
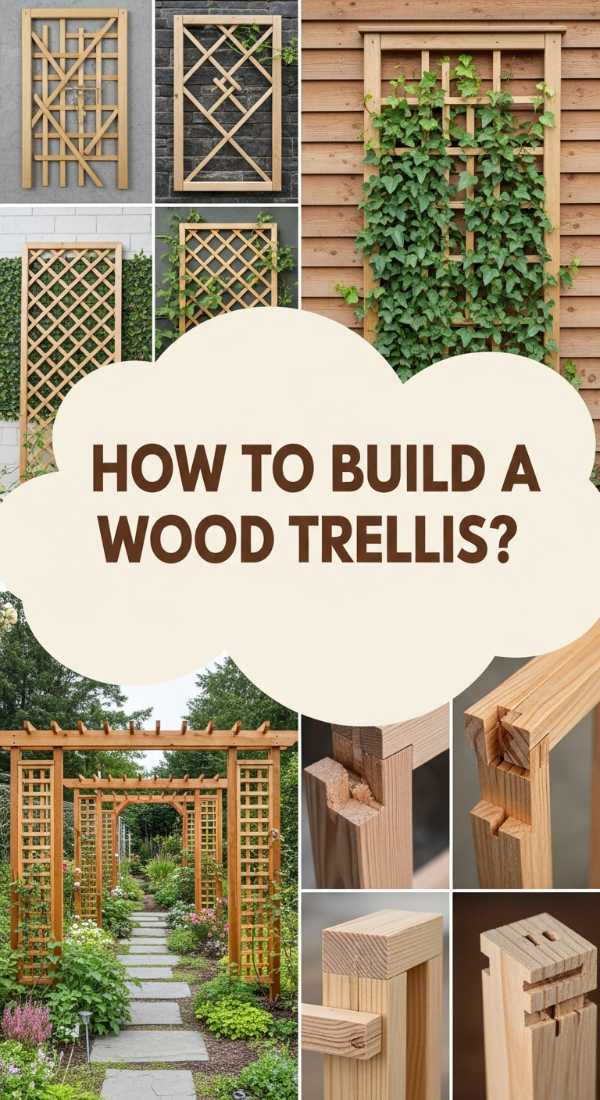
How to Build a Wood Trellis for a Vertical Secret Garden

Why we love this
A vertical garden brings an architectural elegance that draws the eye upward, turning a flat fence or a blank wall into a towering display of greenery and wood. We love the warmth of the natural cedar grain as it begins to silver over time, providing a sturdy skeleton for climbing vines like clematis or wisteria to weave through. The feeling of standing under a lush, vertical canopy offers a sense of privacy and seclusion, transforming a standard backyard into a secret garden escape where the air feels cooler and the world feels miles away.
Essential Elements:
- Pressure-treated or cedar 2×2 lumber
- Outdoor-rated wood screws
- Wood stain or sealant
- Electric drill and miter saw
- Climbing plants (vines or ivy)
How to make it
- Measure your designated wall or fence space and cut your vertical supports to the desired height, typically between 5 and 7 feet for a dramatic impact.
- Cut your horizontal slats to width; for a modern grid look, ensure all slats are exactly the same length, or vary them for a more rustic, tapered appearance.
- Lay your vertical beams on a flat surface and mark your spacing intervals—standard 12-inch gaps create a clean, open grid that is easy for plants to grip.
- Pre-drill pilot holes at every intersection to prevent the wood from splitting; this is a professional tip that ensures the structural integrity of your trellis for years of outdoor exposure.
- Secure the horizontal slats to the vertical beams using galvanized wood screws, checking for squareness with a carpenter’s square after the first few attachments.
- Sand any rough edges and apply a high-quality outdoor stain or clear sealant to protect the wood from UV damage and moisture rot; wait at least 24 hours for it to be fully tack-free.
- Mount the trellis to your wall using spacers (like small blocks of wood) to leave a 1-2 inch gap between the trellis and the wall, allowing air to circulate and the vines to wrap around the back of the slats.
How to Landscape with Rocks for a Low Maintenance Front Yard
Why we love this
Landscaping with stone offers a sophisticated, desert-chic aesthetic that replaces the stress of a thirsty lawn with the serene beauty of varied textures and cool tones. We love the way smooth river rocks or jagged slate chips catch the light after a rainstorm, their colors deepening into rich grays and ochres. It’s a sensory experience of structure and permanence—the crunch of gravel underfoot provides an audible satisfying feedback, while the visual cleanliness of a rock garden creates a minimalist, high-end look that stays pristine all year round with almost zero effort.
Essential Elements:
- River rocks, pea gravel, or lava rocks
- Heavy-duty weed barrier fabric
- Edging material (steel or plastic)
- Large focal point boulders
- Drought-tolerant plants (succulents or ornamental grasses)
How to make it
- Excavate the area by removing 2 to 4 inches of soil to ensure your rock layer sits flush with the rest of your yard rather than mounding awkwardly on top.
- Install your edging material along the perimeter, securing it firmly with stakes to create a crisp line that keeps your stones from migrating into your neighbor’s driveway.
- Roll out a professional-grade landscaping fabric, overlapping the seams by at least 6 inches to ensure no stubborn weeds can find a way through the gaps.
- Position your large focal point boulders first, burying the bottom third of the stone so it looks like a natural outcropping rather than a rock just dropped on the surface.
- Cut “X” shapes into the fabric where you want to place your plants, dig the holes, and install your drought-tolerant greenery, ensuring they are well-fed before covering the area.
- Pour your chosen rocks into the area, using a garden rake to spread them evenly to a depth of about 2-3 inches; visual cues for doneness include the total concealment of the fabric and a level surface.
- Rinse the rocks with a hose to remove dust and reveal their true colors, then step back and enjoy a yard that never needs mowing or heavy watering.
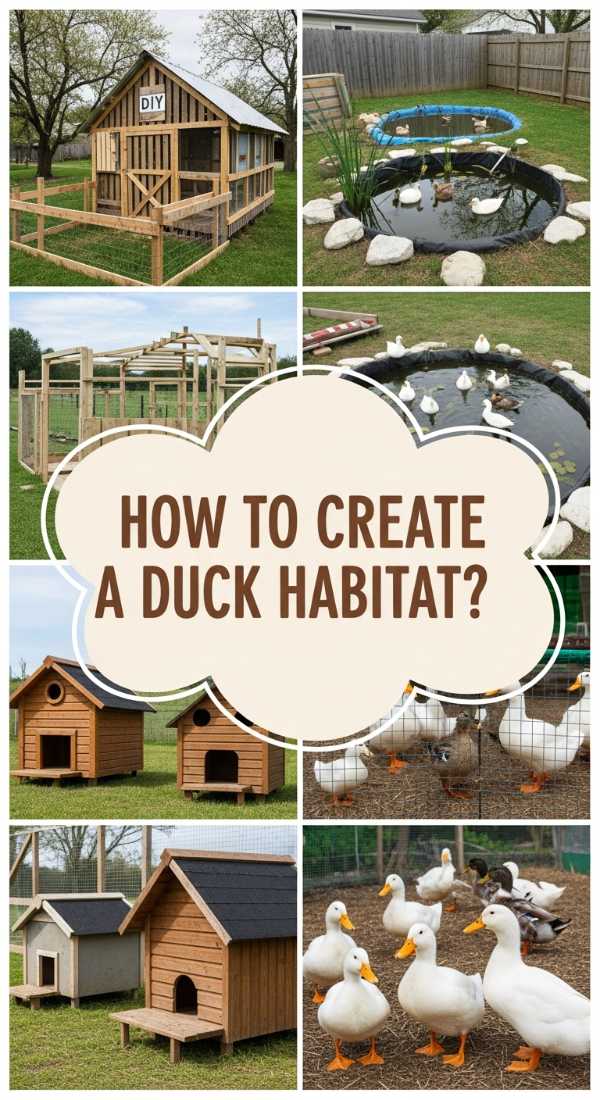
How to Create a Duck Enclosure for a Happy Backyard Habitat
Why we love this
There is nothing more whimsical than the soft quacks and energetic splashing of happy ducks in a backyard habitat designed specifically for their needs. We love the combination of rustic wooden structures and the sparkling movement of water, creating a lively corner of the garden that feels like a mini-homestead. The scent of fresh straw and the sight of ducks waddling through a secure, breezy run brings an unparalleled sense of pastoral peace and a daily connection to nature that is both grounding and joyful.
Essential Elements:
- Hardware cloth (not chicken wire) for predator proofing
- Pressure-treated lumber for the frame
- A small plastic pool or pre-formed pond
- Secure latches and hinges
- Bedding (straw or pine shavings)
How to make it
- Construct a sturdy rectangular frame using 2×4 lumber, ensuring the enclosure is at least 4-5 feet high so you can easily step inside for cleaning and egg collection.
- Attach 1/2-inch hardware cloth to the exterior of the frame using heavy-duty staples every 2 inches; hardware cloth is essential as it is the only mesh strong enough to stop predators like raccoons.
- Build a raised wooden sleeping hut inside the enclosure with a sloped roof to shed rain and a wide door for easy access; the floor should be elevated at least 6 inches off the ground to keep it dry.
- Install a “predator apron” by burying the hardware cloth 12 inches into the ground around the perimeter or extending it flat along the ground outwards to prevent animals from digging underneath.
- Dig a shallow hole to inset your duck pool so the ducks can easily hop in and out; ensure there is a drainage system or a way to easily tip and refill the water daily.
- Line the floor of the sleeping hut with 4 inches of fresh straw, which provides excellent insulation and stays drier than wood shavings in high-moisture duck environments.
- Add a secure, lockable gate with a carabiner or two-step latch system, ensuring the enclosure is fully secured every evening when the sun begins to set.
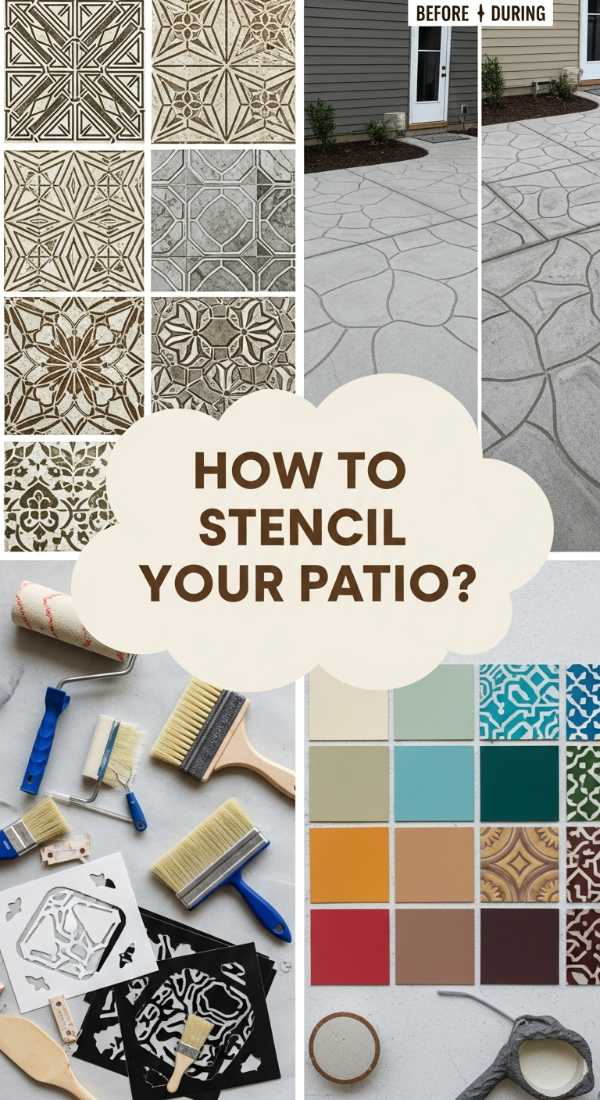
How to Use Concrete Stencils for a Designer Patio Look

Why we love this
Transforming a boring, gray concrete slab into a stunning faux-tile masterpiece feels like a total home magic trick. We love the way a crisp, geometric pattern or a delicate Moroccan motif can instantly elevate an outdoor space, making it feel like an expensive European courtyard. The smooth, painted finish feels cool under bare feet during the summer, and the visual weight of the design anchors your patio furniture, turning a basic backyard into a high-style destination for morning coffees and late-night cocktails under the stars.
Essential Elements:
- Large-scale concrete stencil
- Concrete-specific primer and paint (two contrasting colors)
- Painter’s tape and a stencil adhesive spray
- Small foam rollers or a stippling brush
- Outdoor concrete sealer
How to make it
- Pressure wash your concrete patio thoroughly to remove all dirt, oil, and loose debris; the concrete must be bone-dry and “squeaky clean” for the paint to bond effectively.
- Apply a base coat of concrete paint (this will be your “grout” color) using a long-handled roller; wait at least 24 hours until the paint is no longer tacky before proceeding.
- Position your stencil in a corner or the center (depending on the pattern’s flow) and secure it with painter’s tape or a light mist of adhesive spray to prevent it from shifting.
- Load your foam roller with the second paint color, but then roll most of it off onto a paper towel; the “dry roller” technique is the professional secret to preventing paint from bleeding under the stencil.
- Dab or roll the paint onto the stencil with light, even pressure, checking a small corner to ensure your lines are crisp and the coverage is solid.
- Carefully lift the stencil and realign it with the registration marks to continue the pattern across the entire surface, allowing the paint to dry for 12-24 hours.
- Apply two thin coats of clear concrete sealer to protect your artwork from UV rays and foot traffic, ensuring a professional, glossy or matte finish that lasts for years.
How to Style a Nostalgic Room for the Ultimate Y2K Aesthetic
Why we love this
Step into a time machine fueled by glitter, neon, and pure unadulterated fun! The Y2K aesthetic is all about breaking the rules of “minimalism” and embracing a playful, maximalist energy that feels like a celebration of youth. We love the tactile mix of inflatable furniture, fuzzy textures, and holographic accents that catch the light in a thousand different ways. It’s a room that doesn’t take itself too seriously—a candy-colored sanctuary where the glow of a lava lamp and the sight of butterfly clips create a space that is as much a mood as it is a design choice.
Essential Elements:
- Pastel and neon color palette (pinks, blues, purples)
- Beaded curtains and lava lamps
- Holographic or iridescent wall art
- Inflatable or velvet accent chairs
- CD wall or retro electronics
How to make it
- Select a bold base color for your walls or a large area rug—think bubblegum pink or electric lavender—to set the high-energy tone of the era immediately.
- Install a beaded curtain in the doorway; choose acrylic beads that catch and refract the light, adding that signature shimmering 2000s movement to the room.
- Create a focal wall using old CDs; apply them in a tight grid pattern using removable mounting putty to create a massive, rainbow-reflecting mirror effect.
- Incorporate lighting layers using a combination of neon signs, sunset lamps, and traditional lava lamps to create a soft, multi-colored glow that feels like a music video set.
- Layer textures by adding a faux-fur throw over an inflatable chair or a clear acrylic side table; the contrast between “plastic” and “soft” is a core tenet of the Y2K look.
- Display nostalgic tech, like a clear-cased telephone or a vintage gaming console, on open shelving to serve as both conversation pieces and functional decor.
- Accessorize with butterfly motifs and smiley faces—whether through throw pillows or small decals—to finish the space with that specific late-90s/early-00s optimism.
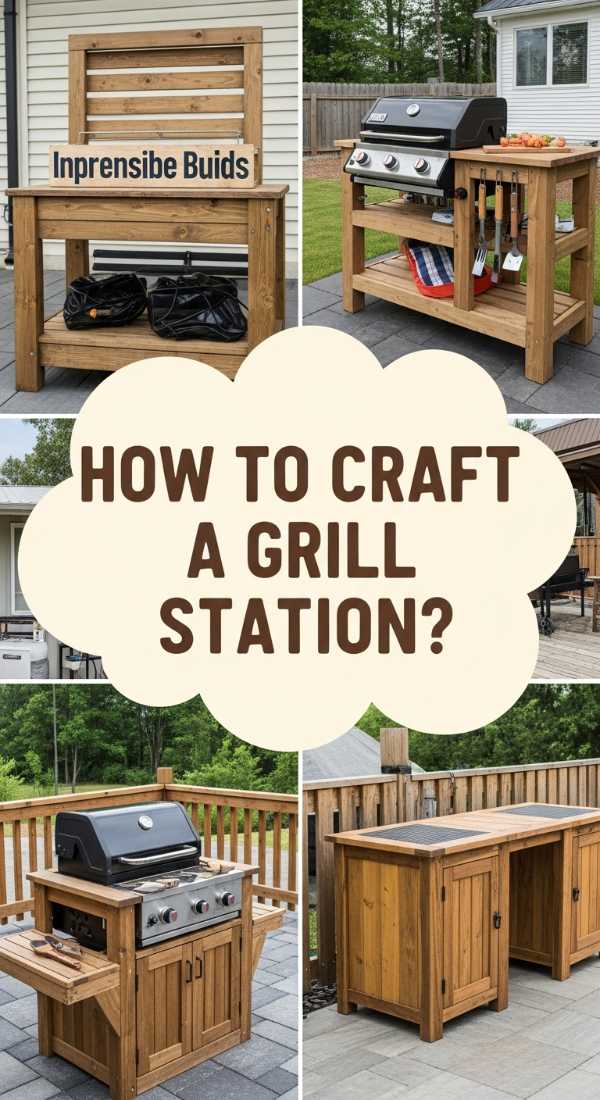
How to Craft a Grill Station for the Perfect Outdoor Kitchen

Why we love this
There is a primal, satisfying joy in cooking outdoors, and a dedicated grill station turns a simple barbecue into a professional culinary experience. We love the smell of cedar wood warming in the sun combined with the sizzling aroma of a perfectly seared steak. This station provides a sense of organization and flow, with everything you need right at your fingertips. It transforms the cook from a solitary worker into the host of the party, creating a magnetic gathering spot where friends can lean against the counter with a drink while the smoke rises lazily into the evening sky.
Essential Elements:
- 4×4 pressure-treated posts for the frame
- Cedar planks or weather-resistant siding
- Butcher block or stone countertop
- Stainless steel hooks and a bottle opener
- Heavy-duty casters (if you want it mobile)
How to make it
- Design your frame dimensions based on your grill’s height; a standard 36-inch counter height is most ergonomic for prep work and serving.
- Build the base frame using 4×4 posts and 2×4 cross-beams, securing them with heavy-duty lag bolts to ensure the station can support the weight of a stone top or heavy cast-iron accessories.
- Add a middle shelf using cedar slats spaced 1/2 inch apart for air circulation, which is the perfect visual cue for a “professional” build and provides storage for charcoal or wood chips.
- Wrap the exterior of the frame in cedar planks, leaving a small gap for wood expansion, and secure them with stainless steel finishing nails to avoid rust streaks.
- Install your countertop; if using wood, apply multiple coats of food-grade mineral oil, or if using stone, secure it with exterior-grade construction adhesive.
- Attach functional hardware like a magnetic strip for grill tools, a towel rack, and a mounted bottle opener to make the station fully self-contained.
- Apply a UV-resistant outdoor finish to the cedar to maintain its rich color, and ensure your grill has at least 6 inches of clearance from any wood surfaces to prevent heat damage.
How to Brighten Your Garden with Solar Light Hacks
Why we love this
When the sun dips below the horizon, a well-lit garden takes on a magical, ethereal quality that feels like something out of a fairytale. We love the way soft, warm solar lights can highlight the silhouettes of trees and guide you down a path with a gentle, flickering glow. It’s an effortless way to extend the usability of your outdoor space into the night, creating a cozy atmosphere that is both romantic and safe. The best part is the “set it and forget it” nature of solar power—watching your garden slowly wake up with light as twilight fades is a daily moment of pure wonder.
Essential Elements:
- Solar-powered path lights and string lights
- Glass jars or lanterns
- Shepherd’s hooks
- Zip ties or clear outdoor adhesive
- Replacement rechargeable solar batteries
How to make it
- Map out your “light path” by identifying focal points like large trees, water features, or the edges of walkways where shadows are darkest.
- Hack standard solar path lights by removing the plastic stakes and placing the light pucks inside frosted glass jars or vintage lanterns for a diffused, high-end look.
- For a floating effect, hang solar lanterns from black shepherd’s hooks at varying heights along your flower beds to create depth and visual interest at eye level.
- Wrap solar-powered fairy lights tightly around tree trunks or through the rafters of a pergola; use clear zip ties to secure them so the hardware is invisible during the day.
- Position the solar panels in areas that receive at least 6-8 hours of direct sunlight; if a panel is in the shade, many models allow you to detach and move the panel to a sunnier spot.
- Clean the solar panels with a damp cloth once a month; dust and pollen can reduce charging efficiency by up to 30%, which is a key tip for keeping your lights bright all night.
- Replace the factory batteries with high-capacity NiMH rechargeable batteries after the first year to ensure the lights stay on for the full duration of the evening.
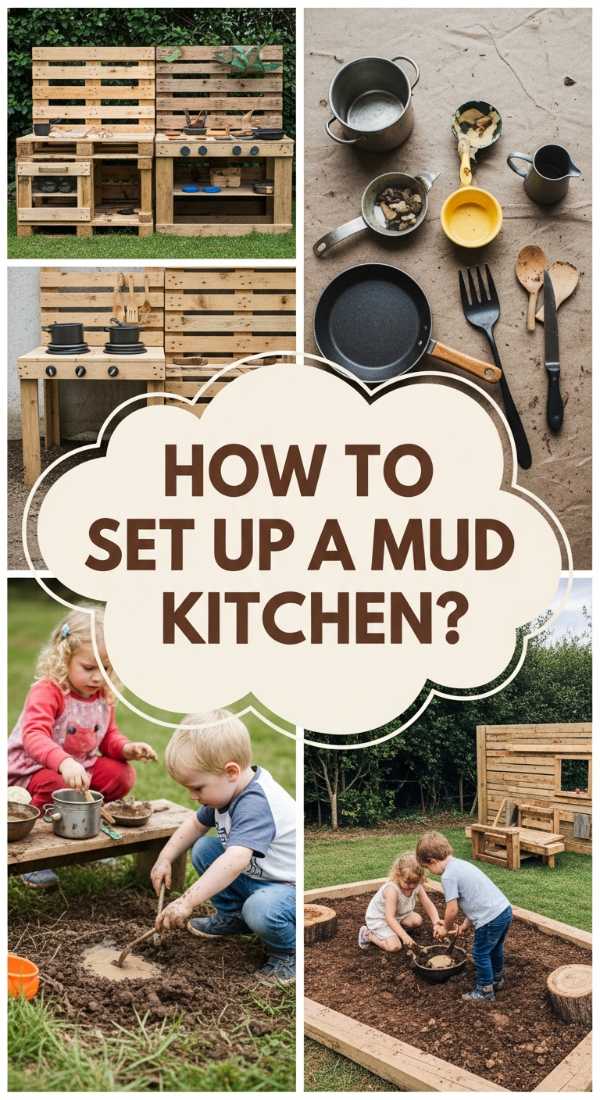
How to Set Up a Mud Kitchen for Endless Outdoor Play
Why we love this
A mud kitchen is a celebration of the messy, sensory, and imaginative world of childhood. We love the earthy, damp smell of soil being turned into “chocolate cakes” and the sound of wooden spoons clacking against old metal pots. It’s a space where “getting dirty” is the goal, fostering a deep connection to the environment and hours of creative play. Seeing a child concentrated on pouring water or decorating a mud pie with fallen leaves is a reminder of the simple joys of life and the beauty of a backyard that is meant to be lived in and loved.
Essential Elements:
- Repurposed wooden pallets or a small potting bench
- Old stainless steel sink or plastic washbasins
- Real kitchen utensils (whisks, spoons, ladles)
- Outdoor-safe chalkboard paint
- Hooks for hanging pots and pans
How to make it
- Source two heat-treated (HT) wooden pallets; these are safe for kids as they haven’t been treated with harsh chemicals like MB pallets.
- Disassemble one pallet to use the wood for a tabletop and shelving, and use the other as the backboard/support for the kitchen.
- Cut a hole in the tabletop that is slightly smaller than the lip of your sink or washbasin, ensuring it sits securely and can be removed for easy cleaning.
- Sand every square inch of the wood with 120-grit sandpaper to remove any splinters; visual cues for doneness include a smooth, slightly rounded edge on all corners.
- Apply a coat of outdoor-rated clear sealant or colorful exterior paint to protect the wood from the inevitable water and mud exposure.
- Paint a section of the backboard with chalkboard paint so the “menu of the day” can be updated regularly by the little chefs.
- Screw in hooks for the utensils and place a variety of “ingredients” nearby, such as a bucket of water, a bin of dirt, and a basket of pinecones or pebbles to spark immediate play.
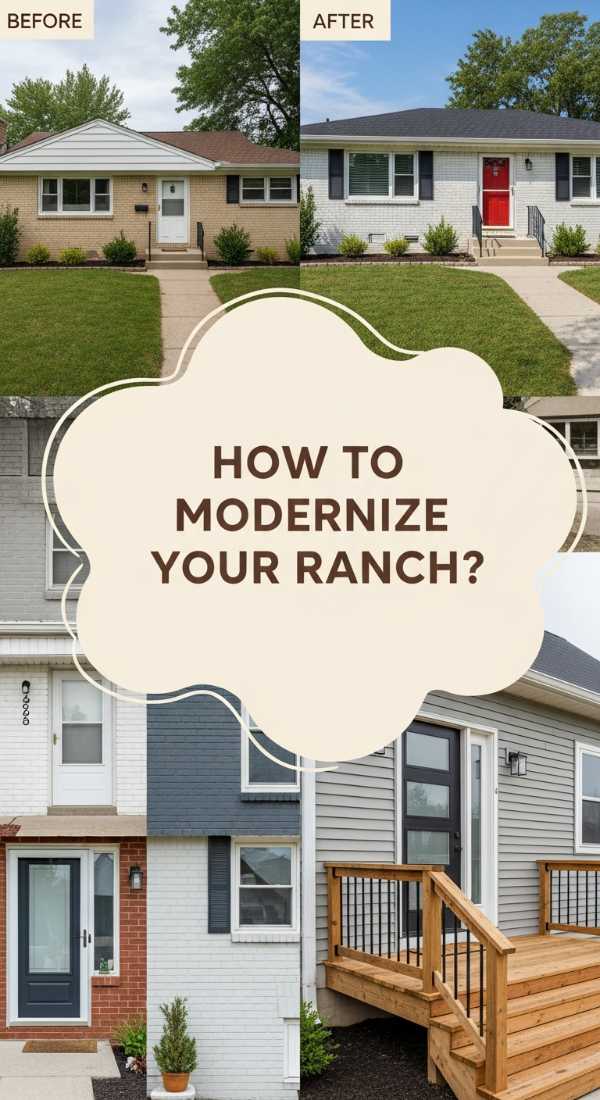
How to Modernize a Ranch Exterior for a Fresh New Look
[IMAGE_10]
Why we love this
The transformation of a dated ranch-style home into a sleek, modern masterpiece is one of the most satisfying DIY journeys you can take. We love the contrast of crisp, dark trim against a clean white or sage green body, and the way natural wood accents breathe life into a once-flat facade. It feels like giving a classic story a brand-new cover; the home retains its sturdy, nostalgic bones while reflecting a contemporary, sophisticated energy that increases curb appeal ten-fold and makes you feel proud every time you pull into the driveway.
Essential Elements:
- High-quality exterior paint and primer
- Modern black house numbers and hardware
- Natural wood (cedar) for shutters or porch columns
- Sleek, updated light fixtures
- Paint sprayer or high-nap rollers
How to make it
- Deep clean the entire exterior with a power washer to remove years of oxidation and dirt; let the siding dry for a full 48 hours before applying any product.
- Scrape off any peeling paint and apply a high-adhesion exterior primer to any bare spots or areas where you are changing the color drastically (e.g., dark to light).
- Use a professional paint sprayer for the body of the house for a seamless, factory-finish look; apply the paint in long, overlapping strokes to avoid “tiger striping.”
- Paint the trim, window frames, and front door in a bold, contrasting color like charcoal gray or matte black to create that sought-after modern definition.
- Replace old, dated shutters with DIY cedar slat shutters; the warm wood tones break up the paint and add an organic, expensive feel to the ranch silhouette.
- Swap out gold or silver hardware for oversized, modern black house numbers and a sleek handle set on the front door to act as the “jewelry” of the house.
- Update the porch lighting with geometric, minimalist fixtures that cast light both up and down, emphasizing the house’s clean lines even after the sun sets.
Conclusion
Transforming your home into a viral-worthy sanctuary doesn’t require a professional crew or a bottomless bank account—it just takes the courage to start. Each of these projects, from the simple glow of solar hacks to the structural beauty of a custom grill station, adds a layer of personality and love to your space. Remember that the most beautiful homes aren’t just the ones that look good in photos; they are the ones that are filled with the memories of the hands that built them. So, pick one project this weekend, gather your supplies, and start creating the aesthetic life you’ve always dreamed of!
FAQ Section
Q: What is the most budget-friendly way to start a DIY home transformation?
A: Paint is almost always your best friend. Whether it’s refreshing your front door, stenciling a patio, or updating a room’s aesthetic, a gallon of paint provides the highest visual impact for the lowest cost.
Q: How do I ensure my outdoor wood projects last through the winter?
A: The secret is in the sealant. Always use pressure-treated wood or naturally rot-resistant wood like cedar, and apply a high-quality UV-rated outdoor sealant every 1-2 years to prevent moisture from seeping into the grain.
Q: I’m a beginner; which project should I try first?
A: Start with the Solar Light Hacks or the Rock Landscaping. These require the fewest power tools and offer immediate “wow” factor with very low risk of error!