

Have you ever walked into a room and felt an immediate sense of peace, or scrolled through a feed and felt a spark of ‘I could do that’ energy? We live in an era where our surroundings are no longer just functional; they are reflections of our souls, curated to bring joy, productivity, and a little bit of magic into the everyday. This blog post is a love letter to the small shifts and big transformations that turn a house into a sanctuary and a routine into a lifestyle.
In this guide, we are diving deep into the aesthetic movements that are currently taking over our hearts. From the crisp lines of a perfectly landscaped front yard to the whimsical, storybook charm of a tiny apartment, there is something here for every dreamer. Let’s explore how we can elevate our environments, one intentional choice at a time, and reclaim the beauty of our personal spaces.
How to Achieve Curb Appeal with Simple Front Yard Landscaping
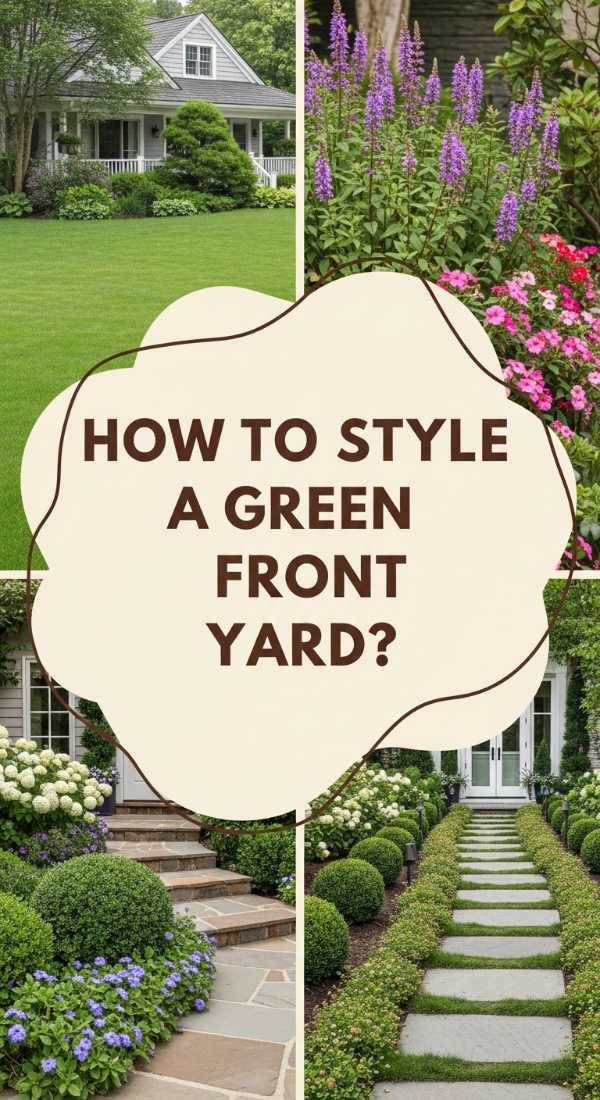
Why we love this
There is nothing quite like the feeling of pulling into your driveway after a long day and being greeted by a lush, intentional garden. The scent of freshly laid cedar mulch, the vibrant green of neatly trimmed boxwoods, and the soft glow of solar-powered lanterns create an atmosphere of immediate belonging. It is the ultimate first impression that whispers ‘welcome home’ to you and your guests, blending the rugged beauty of nature with the polished touch of homeownership.
Essential Elements:
- Natural wood mulch (dark brown or black for contrast).
- Low-maintenance perennials like lavender or hostas.
- Modern solar-powered path lights.
- Polished river stones for drainage areas.
- A statement planter near the entrance.
How to make it
- Begin by defining your borders; use a sharp spade to cut clean, curved lines into the turf to separate the lawn from your garden beds, ensuring a professional, crisp finish.
- Clear out all weeds and debris, then lay down a high-quality landscape fabric to prevent future growth, securing it with garden staples.
- Arrange your plants according to their height—place taller evergreens at the back and shorter, colorful perennials in the front to create a tiered, three-dimensional look.
- Apply a thick, 3-inch layer of mulch over the entire bed; use your hands or a rake to spread it evenly, making sure to leave a small gap around the stems of plants to prevent rot.
- Install your solar lights at even intervals along the walkway, pushing them firmly into the ground so they stand perfectly vertical for a high-end, symmetrical appearance.
How to Create an Inspiring Office Cubicle for Maximum Productivity

Why we love this
Transforming a sterile cubicle into a cozy hub of inspiration is a total game-changer for your mental well-being during the 9-to-5 grind. Imagine the soft tactile sensation of a felt desk mat under your wrists and the warm, amber glow of a small desk lamp replacing those harsh overhead fluorescents. It’s about creating a micro-environment that smells faintly of your favorite essential oil and looks like a space where big ideas are born and goals are crushed daily.
Essential Elements:
- A large felt or leather desk mat.
- A warm-toned LED desk lamp.
- Small potted plants (like snake plants or succulents).
- A magnetic mood board or grid.
- Ergonomic wrist rests in aesthetic colors.
How to make it
- Start with a complete deep clean; wipe down every surface with a microfiber cloth to remove dust and static, creating a fresh canvas for your aesthetic journey.
- Layer your textiles by placing your desk mat down first; this serves as an anchor for your keyboard and mouse, immediately softening the hard plastic surface of the desk.
- Position your task lighting to the side of your monitor to reduce glare; choose a bulb with a ‘warm white’ color temperature (around 2700K) to create a soft, inviting ambiance.
- Organize your wall space using a grid or magnetic board; pin up only items that spark joy or keep you on track, avoiding clutter by leaving at least 30% of the board empty.
- Introduce a ‘living’ element by placing a low-light plant in a corner; ensure the pot has a saucer to protect your desk from water and choose a ceramic finish that matches your color palette.
How to Elevate Your Tech Aesthetic with Stunning Speaker Wallpapers

Why we love this
We often forget that our tech is part of our decor, and giving your smart speakers or screen-based devices a visual upgrade is like putting a piece of digital art on your wall. The way a high-resolution, abstract wallpaper can glow in a darkened room adds a layer of futuristic sophistication to your living space. It’s the perfect marriage of sound and sight, turning a functional gadget into a curated design element that matches your mood or the season.
Essential Elements:
- High-resolution digital art files (4K preferred).
- Photo editing app (for resizing).
- Smart speaker with a display (like Echo Show or Google Nest Hub).
- A cohesive color palette.
How to make it
- Source high-quality images from sites like Unsplash or Pinterest; look for textures like ‘liquid marble’ or ‘minimalist landscapes’ that won’t distract from the time and weather overlay.
- Open your image in an editing app and crop it specifically to the aspect ratio of your device (usually 16:9 or 16:10); this prevents awkward stretching or black bars on the edges.
- Adjust the brightness and contrast of the image so that the digital clock and notifications remain legible; lowering the ‘exposure’ slightly often makes the text pop beautifully.
- Upload the photo through your device’s companion app; navigate to ‘Clock Face’ or ‘Wallpaper’ settings and select the ‘Personal Photos’ option.
- Set the transition speed to ‘Static’ if you want a permanent art piece, or ‘Slow Fade’ if you want to cycle through a collection of matching aesthetic images.
How to Build a Stylish Pool Deck on a Budget

Why we love this
There is nothing quite like the luxury of stepping out onto a warm wooden deck before a refreshing dip in the water. Building your own deck on a budget brings a sense of immense pride, and the aesthetic of sun-bleached wood against sparkling blue water is the epitome of summer bliss. You can almost feel the texture of the grain under your bare feet and smell the sweet combination of sunscreen and cedar as you lounge in your own DIY paradise.
Essential Elements:
- Pressure-treated timber or reclaimed pallets.
- Decking screws (weather-resistant).
- Wood stain or sealant in a ‘driftwood’ or ‘honey’ tone.
- Outdoor rug and floor pillows.
- String lights for the perimeter.
How to make it
- Level the ground around your pool area thoroughly; use a mixture of sand and gravel to create a stable base, ensuring there is no standing water that could rot your frame.
- Construct a simple box frame using 2x4s; use a level at every corner to ensure the structure is perfectly flat, as even a slight tilt will be noticeable once the water is in view.
- Lay your decking boards across the frame, leaving a 1/8-inch gap between each for drainage and wood expansion; use a spacer tool to keep these gaps perfectly consistent.
- Sand the surface of the wood with 80-grit sandpaper to remove splinters and rough patches, creating a smooth finish that is safe for bare feet.
- Apply two coats of weather-resistant stain using a long-handled roller; work in the direction of the grain and allow 24 hours between coats for maximum absorption and protection.
How to Add Privacy to Your Patio with Vinyl Lattice Panels
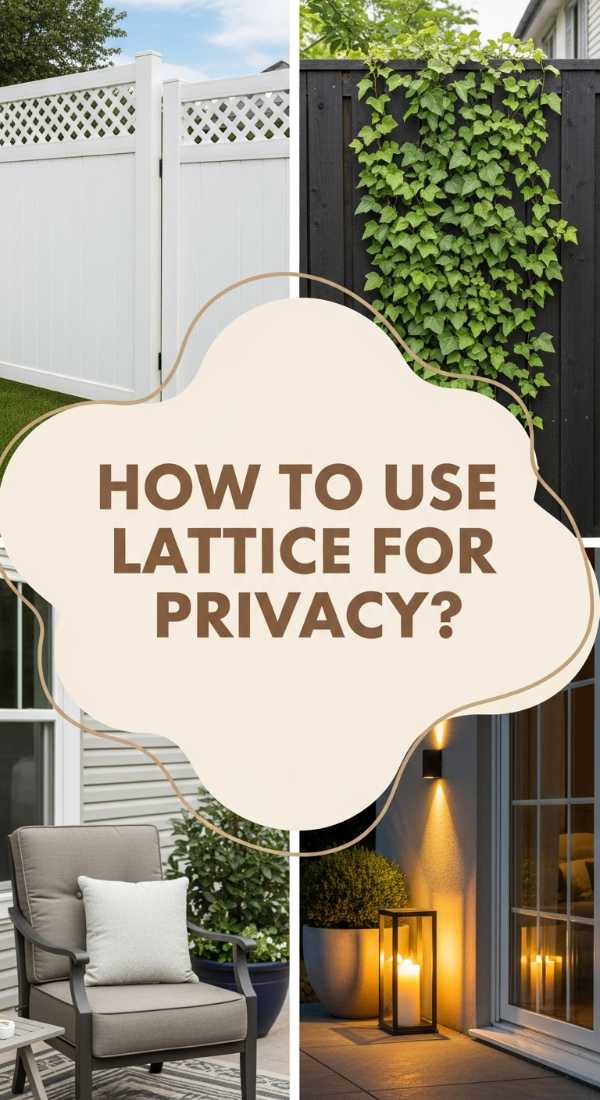
Why we love this
Privacy is the ultimate luxury in an outdoor space, and vinyl lattice panels offer a chic, low-maintenance way to create a secluded sanctuary. We love the way the sunlight filters through the diamond pattern, creating dancing shadows across your patio furniture. It provides that much-needed barrier from the outside world while still allowing a gentle breeze to flow through, making your morning coffee or evening wine feel like a private retreat in a hidden garden.
Essential Elements:
- White or charcoal vinyl lattice panels.
- Pressure-treated 4×4 posts.
- Lattice U-channel molding for a finished edge.
- Stainless steel screws.
- Climbing vines (like clematis or jasmine).
How to make it
- Determine the height of your privacy wall and set your 4×4 posts into the ground using fast-setting concrete; ensure they are spaced exactly the width of your lattice panels apart.
- Slide the vinyl lattice into the U-channel molding; this framing piece hides the raw edges of the lattice and gives the entire project a high-end, architectural look.
- Pre-drill holes through the molding into the wooden posts to prevent the vinyl from cracking; use a drill bit slightly smaller than your screws for a snug fit.
- Mount the panels at least 2 inches off the ground to allow for easy leaf blowing and to prevent debris from piling up against the bottom of the frame.
- Weave the tendrils of a climbing plant into the bottom of the lattice; as the plant grows, it will fill the gaps with greenery and fragrant blooms, further enhancing your privacy.
How to Design a Vibrant Summer Table Centerpiece for Outdoor Dining

Why we love this
A beautiful centerpiece is the heartbeat of an outdoor dinner party, turning a simple meal into a festive celebration of the season. We are obsessed with the mix of organic textures—the waxy skin of lemons, the soft silvery leaves of eucalyptus, and the flickering light of unscented pillar candles. It’s a sensory experience that anchors the table, inviting conversation and lingering long after the sun goes down and the stars come out.
Essential Elements:
- A wooden dough bowl or long tray.
- Fresh citrus fruits (lemons, limes, oranges).
- Dried or fresh eucalyptus branches.
- Glass hurricane vases with white candles.
- Small sprigs of lavender or rosemary.
How to make it
- Place your primary vessel (like a wooden tray) in the dead center of the table; this acts as the boundary for your arrangement and keeps the table looking organized.
- Set three glass hurricane vases of varying heights inside the tray; adding height creates visual interest and ensures the candlelight is visible from all angles of the patio.
- Tuck large sprigs of eucalyptus around the base of the candles; let some leaves spill over the edges of the tray onto the tablecloth for a relaxed, ‘undone’ look.
- Fill the remaining gaps with whole citrus fruits; choose a variety of sizes and colors to add pops of vibrant yellow and orange against the muted green of the herbs.
- Finish by scattering tiny sprigs of rosemary or lavender throughout the arrangement; these will release a subtle, appetite-stimulating fragrance as guests sit down to eat.
How to Decorate a Patriotic Front Porch for a Festive Welcome

Why we love this
There is a classic, nostalgic charm to a patriotic porch that feels both timeless and deeply welcoming. The bold contrast of navy blue, crisp white, and vibrant red against a porch swing or a dark front door creates an immediate sense of celebration and community. We love the way a heavy cotton flag snaps in the wind and how a well-placed bunting can make even the simplest home look like a scene from a classic summer movie.
Essential Elements:
- Vintage-style tea-stained American flag.
- Pleated fan buntings for railings.
- Red geraniums in white ceramic pots.
- Navy blue throw pillows for outdoor seating.
- A natural coir doormat with a simple ‘hello’ or star pattern.
How to make it
- Start by hanging your main flag at a 45-degree angle near the front door; ensure the bracket is anchored into a stud so it remains secure during summer thunderstorms.
- Attach pleated buntings to your porch railing using clear zip ties; space them evenly and pull them taut so the ‘fans’ hang perfectly symmetrical across the front.
- Flank your front door with two large white planters filled with red geraniums; the height of the flowers should reach about one-third of the way up the door for proper scale.
- Layer your textiles by placing navy blue pillows on any chairs or swings; look for ‘sunbrella’ fabric which resists fading from the harsh July sun.
- Update your doormat to a clean, minimalist design; a fresh mat is the finishing touch that pulls the red, white, and blue elements together into a cohesive greeting.
How to Curate a Whimsical Apartment Aesthetic for a Magical Home

Why we love this
Whimsical decor is all about embracing your inner child and creating a space that feels like it belongs in a fairytale. We love the soft, ethereal glow of fairy lights hidden in sheer curtains and the way a gallery wall of vintage mirrors can make a tiny apartment feel like a hall of magic. It’s a style that prioritizes wonder, using soft textures, unexpected pops of color, and curved lines to create a home that feels like a warm hug from a storybook.
Essential Elements:
- Sheer voile curtains in soft pastels.
- Warm-toned fairy lights or ‘curtain’ lights.
- Vintage ornate mirrors in various sizes.
- Velvet floor cushions or a scalloped rug.
- Whimsical art prints featuring botanicals or stars.
How to make it
- Install a double curtain rod; hang your blackout curtains on the outer rod and sheer voile panels on the inner rod to create a layered, dreamy window treatment.
- Weave copper-wire fairy lights behind the sheer panels; the fabric will diffuse the light, creating a soft, magical ‘glow’ rather than harsh individual points of light.
- Create a ‘mirror gallery’ on your largest wall; start with the biggest mirror in the center and spiral outward with smaller, uniquely shaped frames to bounce light around the room.
- Incorporate ‘soft’ furniture pieces like a velvet bean bag or a round, scalloped rug; avoiding sharp corners helps maintain the flow and ‘whimsy’ of the aesthetic.
- Scent the space with a light, floral reed diffuser; notes of peony or sweet pea complement the visual softness and complete the enchanting atmosphere.
How to Design a Serene Aquarium Setup for a Relaxing Living Room

Why we love this
A well-designed aquarium is essentially ‘living art’ that brings the tranquil pulse of the underwater world into your living room. The rhythmic sound of bubbling water and the sight of graceful fish darting through emerald-green plants have a scientifically proven calming effect on the mind. It’s a focal point that changes every second, offering a serene escape from the digital noise of our daily lives while adding a sophisticated, organic element to your home decor.
Essential Elements:
- A rimless glass aquarium for a modern look.
- Natural driftwood and dragon stone.
- Live aquatic plants (Anubias or Java Fern).
- Quiet canister filter to maintain crystal-clear water.
- Dimmable LED aquarium light with a ‘sunset’ mode.
How to make it
- Place your aquarium on a dedicated, level stand away from direct sunlight; this prevents algae blooms and ensures the weight is distributed safely across the floor joists.
- Layer the bottom with 2 inches of nutrient-rich aquatic soil; slope it higher toward the back to create a sense of depth and a ‘valley’ effect for your hardscape.
- Arrange your driftwood and stones following the ‘Rule of Thirds’; place your main focal point slightly off-center to create a more natural and visually pleasing composition.
- Carefully plant your greenery using long aquascaping tweezers; tuck the roots of Anubias into crevices in the driftwood rather than burying them, as their rhizomes need water flow.
- Fill the tank slowly by pouring water over a small plate to avoid disturbing the soil; once full, add a water conditioner and let the system ‘cycle’ for two weeks before adding fish.
How to Maintain a Low Maintenance Front Yard for Effortless Beauty

Why we love this
Low-maintenance landscaping is the ultimate gift to your future self, offering high visual impact with minimal weekend labor. We love the minimalist, desert-modern aesthetic of smooth river rocks paired with the architectural shapes of drought-tolerant succulents. It’s about working with nature instead of against it, creating a front yard that looks pristine and ‘designed’ year-round without the need for constant mowing, watering, or weeding.
Essential Elements:
- Pea gravel or crushed slate in a neutral tone.
- Large decorative boulders for focal points.
- Drought-tolerant plants (Agave, Yucca, or Lavender).
- Commercial-grade weed barrier fabric.
- Clean metal or composite edging.
How to make it
- Remove all existing grass and 2 inches of topsoil; this ensures your rock layer will sit flush with your driveway and won’t spill over onto the pavement.
- Lay down a heavy-duty, woven landscape fabric; overlap the seams by at least 6 inches and secure with garden staples every foot to ensure no weeds can penetrate.
- Strategically place 3 to 5 large boulders in ‘trios’; bury the bottom third of each boulder in the ground so they look like natural outcroppings rather than just sitting on top.
- Cut small ‘X’ shapes in the fabric to plant your succulents; choose varieties that are native to your zone to ensure they thrive with only natural rainfall.
- Pour your chosen rock mulch (like Mexican beach pebbles) to a depth of 3 inches; rake it level and hose it down to remove dust, revealing the true color and shine of the stones.
The Art of Living Well
Designing a life you love isn’t about perfection; it’s about the intentionality you bring to your space. Whether you’re planting a low-maintenance garden or curating a whimsical corner in your apartment, these changes reflect a commitment to your own happiness. We hope these trends inspire you to pick up a shovel, a paintbrush, or even just a new set of fairy lights to start your own lifestyle transformation today.
Frequently Asked Questions
Have questions about elevating your lifestyle? We’ve got the answers to help you get started on your aesthetic journey.