
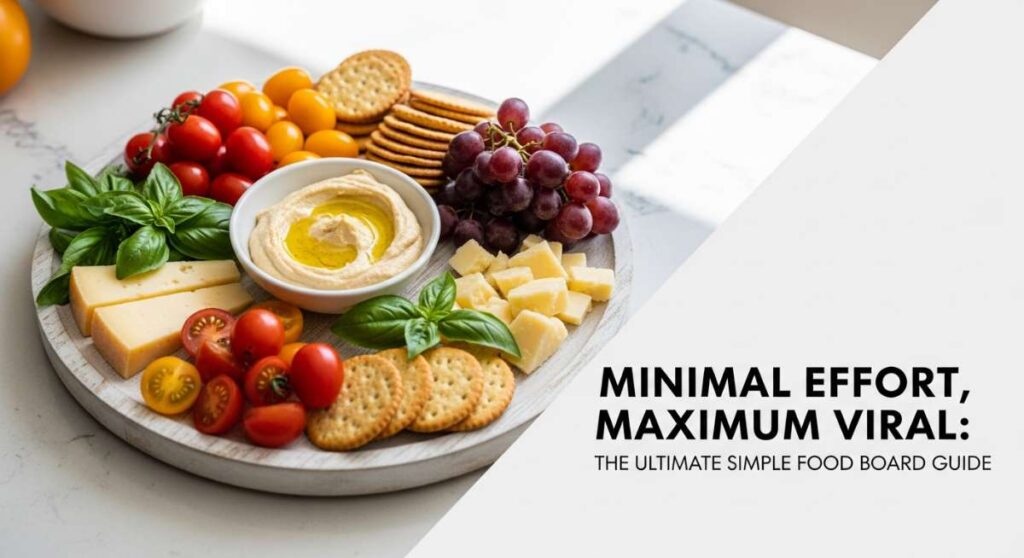
We’ve all been there: you want to host a beautiful get-together or pack a dream lunch, but the thought of spending four hours in the kitchen feels like a chore rather than a joy. Lately, I’ve been obsessed with the ‘food board’ movement because it celebrates the art of assembly over the stress of cooking. It’s about taking high-quality, simple ingredients and arranging them in a way that feels like a celebration. Whether you’re planning a sunset picnic or just trying to survive a Tuesday with kids, these boards are your secret weapon for effortless, viral-worthy hosting.
The magic happens when you stop worrying about perfection and start focusing on color, texture, and variety. There is something so incredibly satisfying about a table filled with small bites that everyone can graze on at their own pace. It creates a relaxed, conversational atmosphere that fancy plated dinners often miss. In this guide, I’m sharing my top ten ways to build simple food boards that look like a million bucks but take minutes to put together. Let’s dive into the ultimate guide to living your best, most aesthetic foodie life!
How to make picnic sandwiches?

Why we love this
There is nothing quite like the smell of a fresh, crusty baguette mingled with the salty aroma of cured meats and the sharp tang of aged provolone. These sandwiches are designed to be sturdy, meaning they actually get better as they sit, allowing the olive oil and balsamic to soak into the bread without making it soggy. Every bite is a crunch-filled journey that transports you to a sun-drenched park in Paris, offering a satisfying weight that keeps you full for an entire afternoon of exploring. It’s the ultimate comfort food for the outdoor soul, balancing richness with the freshness of crisp arugula.
Ingredients
- Long French baguette or ciabatta loaf
- Thinly sliced prosciutto or dry salami
- Sharp provolone cheese slices
- Fresh arugula
- Roasted red peppers (jarred is fine)
- Extra virgin olive oil and balsamic glaze
- Dried oregano and sea salt
How to make it
- Slice the baguette lengthwise, ensuring you don’t cut all the way through one side to create a ‘hinge’ that keeps ingredients tucked in.
- Drizzle the bottom half generously with extra virgin olive oil and a few streaks of balsamic glaze; this creates a moisture barrier.
- Layer the provolone cheese first to prevent the bread from getting damp from the vegetables.
- Fold the prosciutto or salami ribbons over the cheese to add volume and texture; do not lay them flat.
- Add the roasted red peppers, patting them dry first with a paper towel to remove excess brine.
- Top with a handful of arugula and a sprinkle of dried oregano and sea salt.
- Wrap the entire sandwich tightly in parchment paper and tie with kitchen twine; let it sit for at least 30 minutes before slicing into individual portions to allow flavors to meld.
How to style aesthetic platters?
Why we love this
A truly aesthetic platter is a feast for the eyes before it ever touches the tongue, playing with height, color gradients, and organic shapes. We love this because it turns ‘random fridge finds’ into a curated work of art that guests can’t stop photographing for their feeds. The secret lies in the ‘controlled chaos’—the way a cluster of green grapes spills over a wedge of brie or how a handful of walnuts fills a gap between crackers. It feels abundant and generous, evoking a sense of luxury and care that makes every guest feel like a VIP at your table.
Ingredients
- Various cheeses (Brie, Manchego, Goat)
- Fresh fruits (Grapes, berries, sliced figs)
- Nuts (Marcona almonds, walnuts)
- Crackers and breadsticks of different shapes
- Honey or fig jam
- Fresh herbs for garnish (Rosemary or thyme)
How to make it
- Start by placing your largest items first, which are usually the cheeses or small bowls for jams, to create ‘anchor points’ on the board.
- Fan out crackers or bread slices in a curved ‘S’ shape around the cheese to create movement and lead the eye across the platter.
- Group fruits by color; place a large cluster of grapes in one corner and scatter vibrant berries in the opposite diagonal to balance the visual weight.
- Fill the medium-sized gaps with nuts or dried fruits, ensuring no large areas of the board are left visible.
- Place a small honey dipper inside your jam bowl or drizzle honey directly over the goat cheese for a glossy, professional finish.
- Tuck small sprigs of fresh rosemary or thyme into any remaining tiny holes to add a pop of green and a wonderful herbal fragrance.
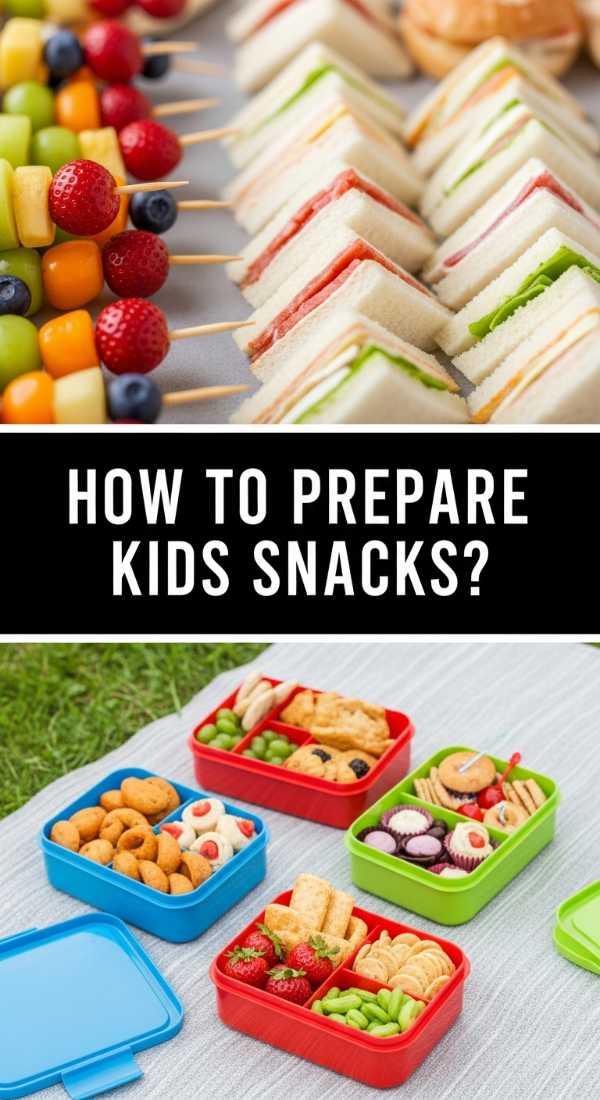
How to prepare kids snacks?

Why we love this
Preparing kids’ snacks as a board is a game-changer for picky eaters because it removes the pressure of a single ‘meal’ and replaces it with a fun, interactive discovery zone. We love the bright, primary colors of orange slices, green cucumbers, and red strawberries that make healthy eating feel like a playground. The textures are varied—from the creamy dip to the snap of a carrot—keeping little hands busy and engaged. It turns a routine snack time into a moment of creativity, where kids feel empowered to choose their own combinations in a mess-free, manageable way.
Ingredients
- Apple slices (soaked in lemon water to prevent browning)
- Mini cucumber rounds
- Cheese cubes or string cheese pieces
- Whole grain crackers
- Greek yogurt dip or hummus
- Pretzel sticks
- Blueberries or grapes (halved for safety)
How to make it
- Use a muffin tin or a low-rimmed wooden board to keep different food groups separated, which is often more appealing to children.
- Cut fruits and vegetables into fun shapes using small cookie cutters—stars or hearts work wonders for increasing ‘eatability.’
- Place the dip (hummus or yogurt) in a central, sturdy bowl that won’t tip over.
- Arrange the crackers and pretzels in little ‘fences’ around the fruit sections to create a structured look.
- Ensure all items are bite-sized; for younger children, slice grapes and cherry tomatoes lengthwise to ensure they are safe to swallow.
- Add a few ‘hidden’ treats like two or three dark chocolate chips or a few raisins to encourage exploration of the healthier items.
How to pack date wraps?
Why we love this
Date wraps are the ultimate ‘nature’s candy’ with a sophisticated, savory twist that feels incredibly indulgent yet surprisingly healthy. The sticky, caramel-like sweetness of the Medjool date contrasts perfectly with the creamy saltiness of goat cheese and the smoky, crisp finish of a toasted almond or piece of bacon. When you bite into one, you get an explosion of textures—chewy, creamy, and crunchy all at once. They are small, bite-sized powerhouses of flavor that look like jewels on a platter, making them the perfect conversation starter at any gathering.
Ingredients
- Large Medjool dates
- Goat cheese or cream cheese
- Roasted almonds or walnut halves
- Optional: Thinly sliced prosciutto or bacon
- Honey for drizzling
- Flaky sea salt
How to make it
- Using a small paring knife, make a lengthwise slit in each date and remove the pit while keeping the fruit mostly intact.
- Open the date slightly and use a small spoon or piping bag to fill the cavity with about a teaspoon of room-temperature goat cheese.
- Press one roasted almond or walnut half into the cheese for a satisfying interior crunch.
- If using meat, wrap a half-strip of prosciutto or bacon tightly around the date, securing it with a toothpick.
- If wrapping in bacon, place on a parchment-lined baking sheet and bake at 400°F (200°C) for 10-15 minutes until the bacon is crispy and the date is slightly caramelized.
- If serving raw, simply drizzle with a tiny bit of honey and a sprinkle of flaky sea salt to enhance the natural sweetness of the fruit.
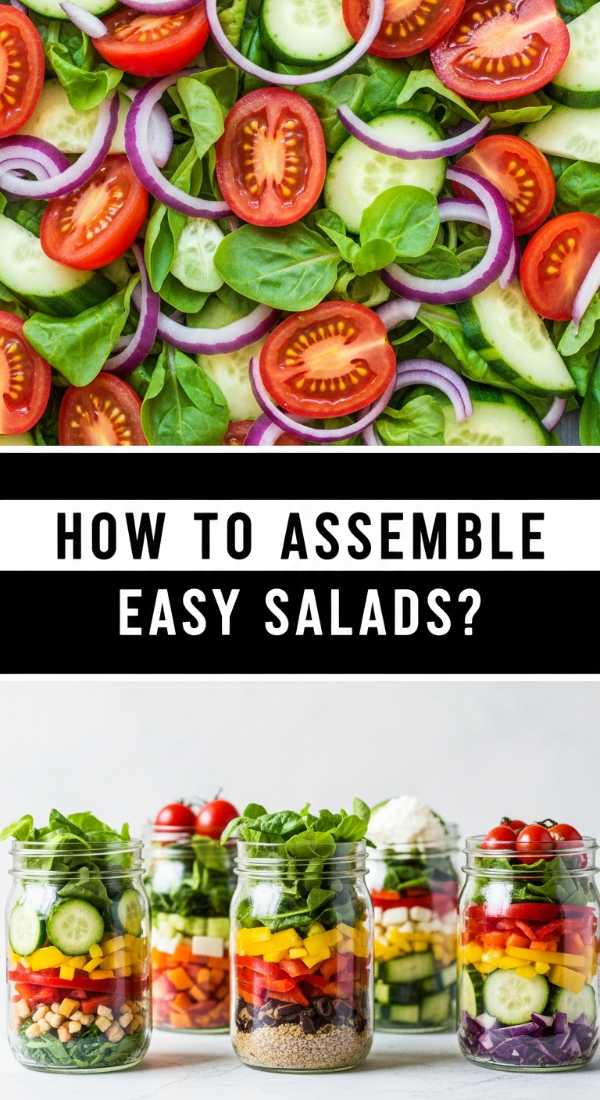
How to assemble easy salads?
Why we love this
An assembled salad board is a refreshing departure from the soggy, tossed greens we’re used to, allowing every ingredient to maintain its distinct integrity and crunch. We love the vibrant aesthetic of deconstructed salads where the deep purples of beets, the bright greens of avocado, and the snowy whites of feta take center stage. It allows guests to customize their plates, ensuring no one gets an ingredient they don’t like. The aroma of fresh citrus vinaigrette and torn basil leaves makes the whole experience feel like a spa day on a plate—clean, crisp, and revitalizing.
Ingredients
- Mixed greens or baby spinach base
- Sliced cucumbers and cherry tomatoes
- Sliced avocado (add lime juice to prevent browning)
- Crumbled feta or goat cheese
- Toasted sunflower seeds or pine nuts
- Lemon-tahini or balsamic vinaigrette on the side
How to make it
- Lay a thin, even bed of greens across the entire surface of a large, flat platter rather than a deep bowl.
- Arrange the larger vegetables, like cucumber slices and tomato halves, in distinct diagonal rows or small clusters across the greens.
- Place the avocado slices in a fan shape in one corner, ensuring they are coated in citrus to stay bright green and appetizing.
- Sprinkle the cheese and toasted seeds evenly over the top to ensure every potential scoop has a bit of everything.
- Instead of dressing the salad, place the vinaigrette in two or three small decorative jars with spoons at different points on the board.
- Finish with a final flourish of freshly cracked black pepper and a few edible flowers or microgreens for that high-end restaurant look.
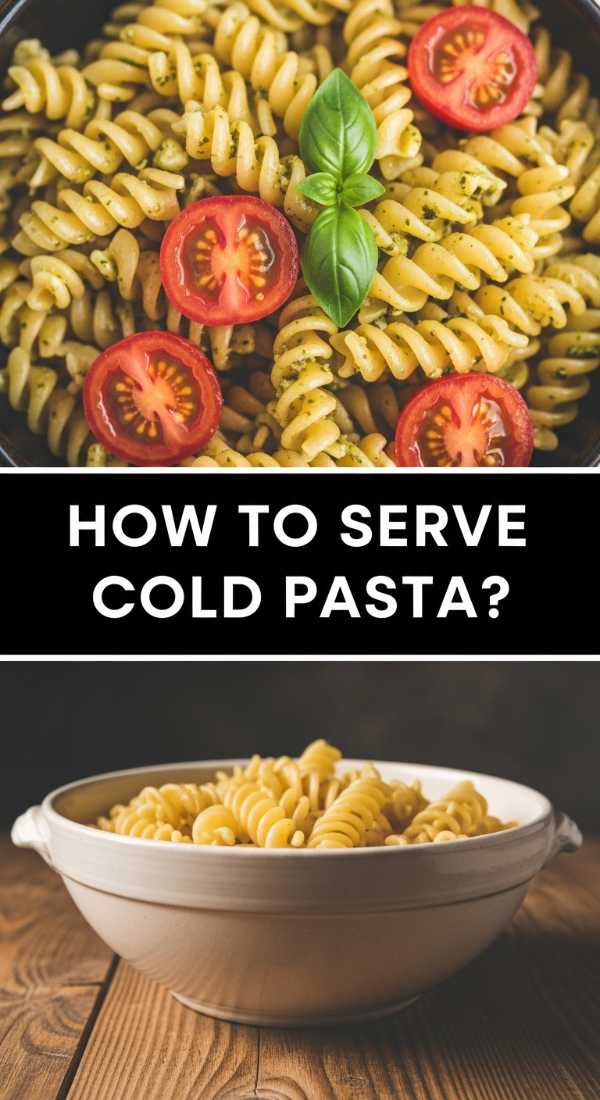
How to serve cold pasta?

Why we love this
Cold pasta boards are the unsung heroes of summer entertaining, offering a hearty, carb-rich base that stays delicious even in the heat. There’s a wonderful ‘al dente’ chewiness to the pasta that pairs beautifully with the juicy snap of fresh vegetables and the silky coat of a herb-infused oil. We love how the pasta acts as a canvas for bold flavors like sundried tomatoes, kalamata olives, and fresh mozzarella pearls. It’s a nostalgic, picnic-ready dish that feels sophisticated when served on a flat board with artfully arranged toppings rather than being stirred into a messy heap.
Ingredients
- Fusilli or Rotini pasta (short shapes hold sauce better)
- Basil pesto or sun-dried tomato pesto
- Mozzarella pearls (bocconcini)
- Kalamata olives and marinated artichokes
- Fresh cherry tomatoes, halved
- Fresh basil leaves
How to make it
- Boil the pasta in heavily salted water until just ‘al dente’; overcooking will lead to a mushy texture once cooled.
- Immediately drain and rinse the pasta under cold running water to stop the cooking process and remove excess starch.
- Toss the cooled pasta in a bowl with a light coating of olive oil or a thin layer of pesto to prevent the pieces from sticking together.
- Spread the pasta across the center of your board, creating a slight mound in the middle.
- Dot the mozzarella pearls, olives, and artichokes throughout the pasta, pushing some into the crevices so they stay put.
- Garnish with a generous amount of torn fresh basil and a sprinkle of red pepper flakes for a hint of heat before serving at room temperature or chilled.
How to bake healthy muffins?

Why we love this
There is nothing quite like the cozy, comforting aroma of cinnamon and baked oats wafting through the house on a lazy Sunday morning. These muffins are a viral favorite because they manage to feel like a decadent treat while being packed with fiber and natural sweeteners that keep your energy levels steady. The texture is moist and dense, studded with bursts of tart blueberries or rich dark chocolate chips that melt in your mouth. Serving them on a board with a side of nut butter and fresh fruit turns a simple baked good into a complete, Instagrammable breakfast experience.
Ingredients
- 2 cups rolled oats (blended into flour)
- 2 ripe bananas, mashed
- 2 eggs or flax eggs
- 1/2 cup Greek yogurt or applesauce
- 1 tsp baking soda and a pinch of salt
- 1/2 cup blueberries or dark chocolate chips
- 1 tsp cinnamon
How to make it
- Preheat your oven to 350°F (175°C) and grease a muffin tin or use high-quality paper liners.
- In a large bowl, whisk the mashed bananas, eggs, and yogurt until the mixture is smooth and pale.
- Gently fold in the oat flour, baking soda, salt, and cinnamon using a spatula; do not overmix, or the muffins will become tough.
- Fold in your ‘mix-ins’ (blueberries or chips) by hand so they are evenly distributed throughout the batter.
- Fill each muffin cup about 3/4 full to allow room for the muffins to rise and create that signature rounded ‘muffin top.’
- Bake for 18-22 minutes; test for doneness by inserting a toothpick into the center—it should come out clean or with just a few moist crumbs.
- Let them cool in the pan for 5 minutes before transferring to a wire rack; serve warm on a board with honey or almond butter for dipping.
How to prepare beach fruit?

Why we love this
When the sun is high and the sand is hot, nothing is more revitalizing than a board of ice-cold, hydrating fruit that tastes like a tropical vacation. The combination of sweet melon, tart lime, and a hint of mint is incredibly refreshing, cutting through the heat with every juicy bite. We love the high-contrast colors of deep pink watermelon against bright green kiwi and golden pineapple. It’s a low-maintenance way to stay hydrated and satisfied while lounging, and the addition of a little chili-lime seasoning can transform simple fruit into a complex, savory-sweet snack that feels totally gourmet.
Ingredients
- Watermelon, cantaloupe, or honeydew
- Fresh pineapple chunks
- Slices of kiwi and mango
- Fresh lime wedges
- Fresh mint leaves
- Optional: Tajin or chili-lime seasoning
How to make it
- Chill all fruit in the refrigerator for at least 4 hours before prepping; beach fruit must be served as cold as possible.
- Cut the melons into large, uniform wedges or use a melon baller for fun, spherical shapes that are easy to grab.
- Arrange the fruit on a large, chilled tray, grouping by color to create a rainbow effect from one side to the other.
- Tuck lime wedges into the gaps; the acidity of the lime juice not only adds flavor but helps keep the fruit looking fresh.
- Scatter fresh mint leaves over the top—the aroma will intensify as the fruit sits in the sun.
- If you like a kick, sprinkle half the board with chili-lime seasoning just before serving to give your guests options.
How to create cheese boards?

Why we love this
The cheese board is the undisputed queen of viral food content because it represents the ultimate intersection of culinary science and artistic expression. We love the sophisticated interplay of a creamy, earthy Camembert against a sharp, crystalline aged Cheddar or a funky, crumbly Blue. Each bite is a new adventure, especially when paired with the right accompaniment—a smear of spicy honey here, a crunch of a Marcona almond there. It’s a slow-eating experience that encourages people to linger, taste, and discuss the nuances of the flavors, making it the perfect centerpiece for a long evening of wine and conversation.
Ingredients
- 3-4 types of cheese (Soft, Hard, Aged, Blue)
- Cured meats (Prosciutto, Soppressata)
- Fresh fruit (Grapes, pear slices)
- Dried fruit (Apricots, cranberries)
- Nuts and olives
- Crackers and a sliced baguette
How to make it
- Selection is key: Choose one soft cheese (Brie), one hard cheese (Manchego), and one ‘wildcard’ like a truffle cheese or a blue cheese.
- Place the cheeses on the board while cold to make them easier to handle, but let them sit for 30-60 minutes before serving to reach room temperature for maximum flavor.
- Cut hard cheeses into wedges or cubes, but leave soft cheeses whole with a dedicated knife for each to prevent flavor mixing.
- Create ‘meat roses’ by folding slices of salami in half and then half again, tucking them tightly together to create a floral look.
- Fill the empty spaces with a mix of sweet (dried apricots) and salty (marinated olives) to provide a variety of pairing options.
- Always include at least two types of vehicles: a neutral cracker that doesn’t compete with the cheese and a crusty bread for the softer varieties.
How to make chicken wraps?
[IMAGE_10]
Why we love this
Chicken wraps are the perfect blend of protein-packed satisfaction and fresh, crunchy greens, all held together in a soft, pillowy tortilla. We love the versatility of this dish—you can go from a Mediterranean vibe with tzatziki to a spicy buffalo style in seconds. The contrast between the warm, seared chicken and the cool, crisp lettuce creates a sensory experience that is both filling and light. They are incredibly easy to eat on the go, making them a favorite for busy lunch breaks or casual backyard gatherings where you want a substantial meal without the need for a fork and knife.
Ingredients
- Cooked chicken breast (grilled or rotisserie)
- Large flour tortillas or spinach wraps
- Shredded lettuce or mixed greens
- Sliced tomatoes and red onions
- Creamy dressing (Ranch, Caesar, or Hummus)
- Avocado slices
How to make it
- If starting from scratch, season chicken breasts with salt, pepper, and garlic powder, then sear in a hot pan over medium-high heat for 6-7 minutes per side until the internal temperature reaches 165°F (74°C).
- Let the chicken rest for 5 minutes before slicing into thin strips; this keeps the juices inside so the wrap isn’t dry.
- Warm the tortillas in a dry pan for 10 seconds per side; this makes them more pliable and less likely to tear during rolling.
- Spread a thin layer of your chosen dressing across the center of the tortilla, leaving about 2 inches of space from the edges.
- Layer your greens, tomatoes, onions, and chicken strips in the center third of the wrap.
- Fold the bottom edge up over the filling, tuck in the sides, and roll tightly from the bottom to the top.
- For a professional touch, place the finished wrap back in the hot pan for 30 seconds on each side to ‘seal’ the seam and add a light golden crunch to the exterior.
Wrapping Up Your Board Journey
Creating these boards is more than just a way to eat; it’s a way to slow down and enjoy the process of making something beautiful. I hope this guide inspires you to clear off your largest wooden board and start experimenting with flavors and textures. Remember, there are no mistakes in board-building—only delicious discoveries. Tag me in your creations, and let’s keep making the everyday feel a little more extraordinary!