
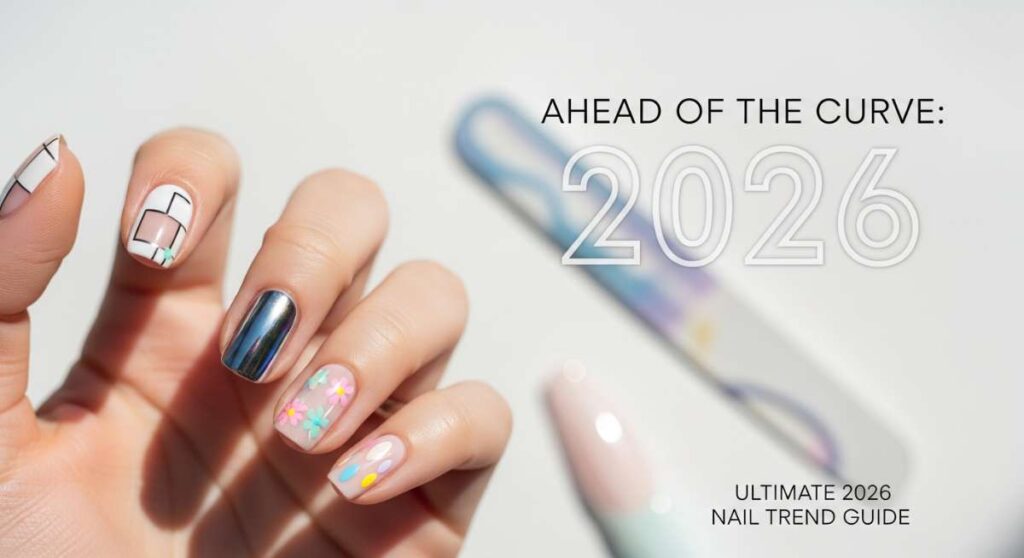
Ahead of the Curve: Everything You Need to Know About 2026 Nail Art
Hi my loves! I’m sitting here with a warm lavender latte, looking out at the horizon and thinking about how much our self-expression evolves through the seasons. There is something so special about the way a fresh set of nails makes us feel—it’s like a tiny, sparkling suit of armor that tells the world exactly who we are before we even say a word. As we look toward 2026, the trends are leaning so deeply into that soft, ethereal magic we all crave.
I’ve spent the last few weeks whispering with top artists and diving deep into the aesthetic shifts of the future to bring you this ultimate guide. We’re moving away from the harsh and moving toward the ‘felt’—textures that mimic the sky, colors that evoke a memory, and shapes that feel like a soft embrace. Let’s dream together about what your beautiful hands will look like in the year to come.
The Ultimate 2026 Nail Trend Guide
7 Steps to Get Sunset Chrome Nails
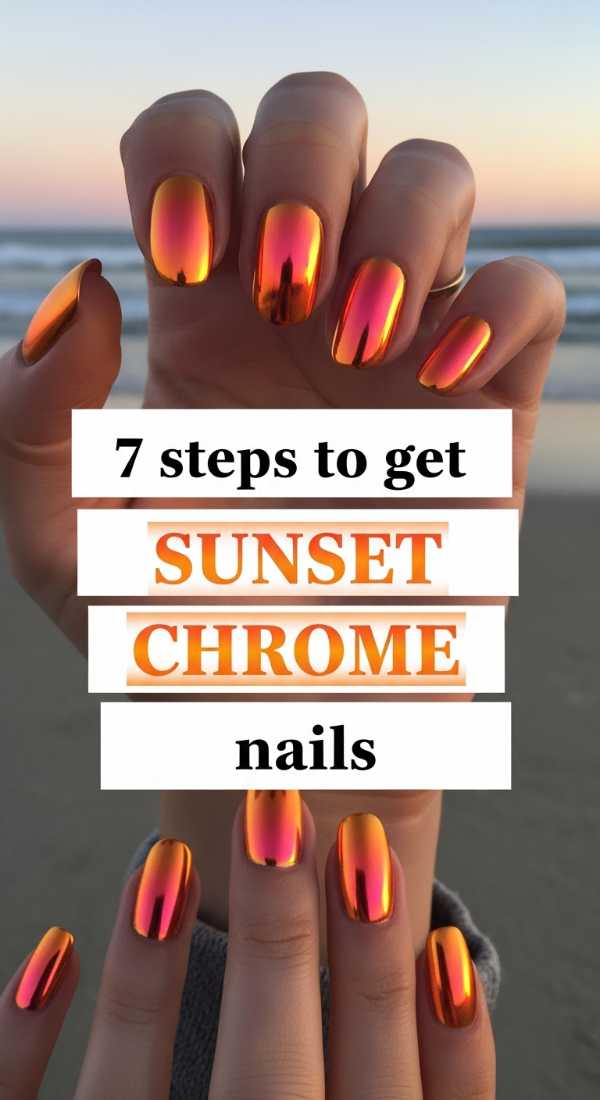
Why to love this Design:
There is something so magical about a sunset captured on your fingertips. In 2026, we’re taking that classic gradient and giving it a high-shine, futuristic chrome finish that looks like liquid light. It’s for the dreamers who want to carry a piece of the golden hour with them all day long.
Essential Elements:
- Neon Orange and Hot Pink cream polishes
- Fine-milled Pearl Chrome powder
- Sponge applicators
- High-gloss no-wipe top coat
How to Prepare:
- Gently push back cuticles and buff the nail surface for a smooth canvas.
- Apply a clear base coat to protect your natural nails.
- Paint the bottom half of the nail neon orange and the top half pink.
- Use a makeup sponge to blur the line where the colors meet while wet.
- Apply a no-wipe top coat and cure under a UV/LED lamp.
- Rub the pearl chrome powder over the cured top coat until it glows.
- Seal with a final layer of high-gloss top coat and hydrate with oil.
Budget Range
- OPI ‘No Tan Lines’ Polish ($11)
- Essie ‘Beautie n’ the Beast’ Pink ($10)
- Artdone Pearl Chrome Powder Kit ($9)
5 Ways to Prep Graduation Nails

Why to love this Design:
Graduation is such a soulful milestone, my loves. It’s a bridge between who you were and who you are becoming. For 2026, graduation nails are all about ‘Sophisticated Sparkle’—classy enough for the ceremony but shimmering enough for the after-party.
Essential Elements:
- Neutral ‘your nails but better’ base
- Delicate gold leaf or micro-glitter
- Long-wear gel formula
- Almond or Oval shape for elegance
How to Prepare:
- Choose a shape that elongates your fingers for those ‘handing over the diploma’ photos.
- Start your strengthening routine two weeks prior with a keratin treatment.
- Select a base shade that complements your graduation gown’s secondary colors.
- Incorporate your graduation year in a tiny, minimalist font on the ring finger.
- Ensure a professional-grade top coat is used to prevent chipping during celebrations.
Budget Range
- CND SolarOil Cuticle Conditioner ($13)
- Olive & June ‘SC’ Neutral Polish ($9)
- Nail Art Gold Flakes by Beetles ($7)
10 Ideas for May Birthday Nails

Why to love this Design:
May is the heart of spring, a time of blooming and rebirth. For my May babies, 2026 is all about botanical whimsy. Think of your nails as a tiny garden that never fades, reflecting the emerald green of your birthstone and the soft petals of lily of the valley.
Essential Elements:
- Emerald green accents
- Pressed dried flowers
- Dew-drop 3D gel effects
- Sheer milky bases
How to Prepare:
- Try a ‘Milky Emerald’ French tip.
- Add tiny 3D ‘dew drops’ using thick builder gel.
- Use real dried flowers encapsulated in clear builder gel.
- Go for a matte moss green with one holographic accent nail.
- Experiment with ‘Velvet’ magnetic polish in sage green.
- Apply delicate butterfly decals.
- Try an aura nail in shades of soft meadow green.
- Add gold wire ‘stems’ for a vintage botanical look.
- Use iridescent flakes to mimic morning mist.
- Keep it simple with a high-shine emerald glass finish.
Budget Range
- ILNP ‘Reminisce’ Multi-chrome Polish ($12)
- Maniology Dried Flower Set ($10)
- Modelones Builder Gel ($8)
4 Steps to Perfect Summer 2026 Nails
Why to love this Design:
Summer 2026 is going to be all about ‘Fluidity.’ We want nails that look like they are part of the ocean or the shimmering heat haze. It’s about feeling free, sun-kissed, and absolutely effortless in your own skin.
Essential Elements:
- Jelly polishes
- Iridescent ‘Glazed Donut’ powder
- Short, natural ‘active’ lengths
- Cool-toned blues and warm corals
How to Prepare:
- Shape nails into a soft square to prevent breakage during summer activities.
- Apply two thin layers of a ‘Jelly’ translucent polish for a stained-glass look.
- Buff in a light iridescent powder for that ‘wet’ look shine.
- Apply a UV-resistant top coat to keep the colors from fading in the sun.
Budget Range
- Cirque Colors Jelly Polish ($12)
- Seche Vite Fast Dry Top Coat ($9)
- Manucurist Paris Active Glow ($16)
3 Easy Ways to Paint Lemon Nails

Why to love this Design:
Lemon nails are like a squeeze of sunshine! They are playful, zesty, and bring a smile to everyone’s face. In 2026, we are moving away from flat stickers and toward textured, juicy-looking citrus art that feels fresh and fun.
Essential Elements:
- Bright primary yellow polish
- White detail liner
- Matte and gloss contrast top coats
How to Prepare:
- The Dotting Tool Method: Use a large dotting tool to create two yellow circles, then a fine liner to add white segments.
- The Sponge Texture Method: Dab yellow polish with a sea sponge to create the ‘pith’ texture before adding a gloss rind.
- The Negative Space Method: Paint a yellow lemon ‘arch’ at the base of a clear nail for a chic, minimalist vibe.
Budget Range
- Sally Hansen ‘Sun-Kissed’ ($6)
- Winstonia Professional Nail Art Brushes ($8)
- Orly Matte Top Coat ($12)
6 Steps for Teal and Coral Nails
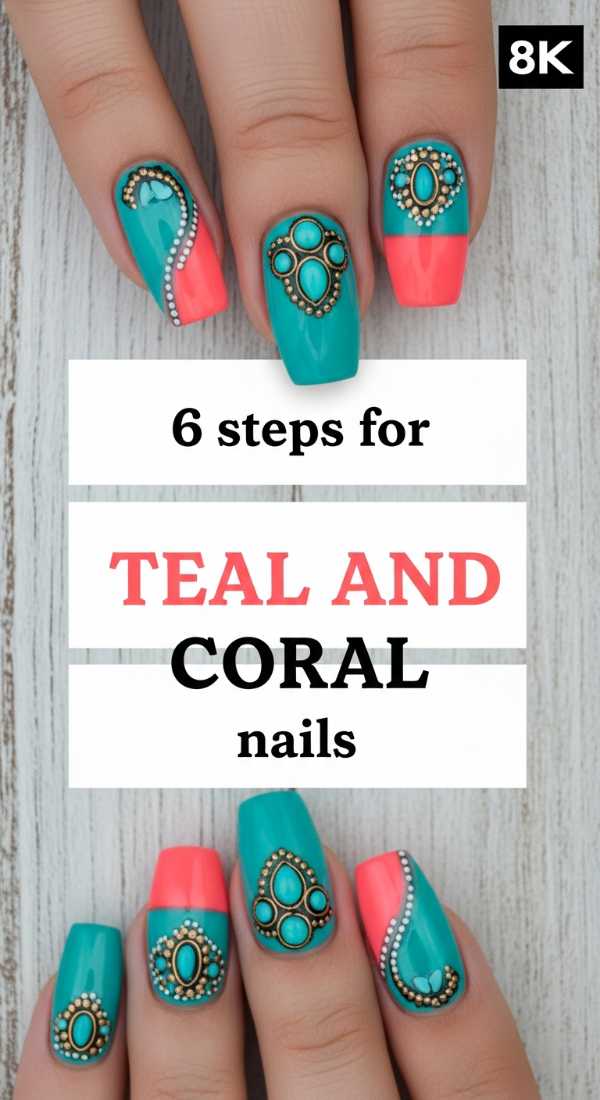
Why to love this Design:
Teal and coral are a match made in tropical heaven. This duo represents the meeting of the deep sea and the vibrant reef. It’s a high-contrast look that feels balanced, energetic, and sophisticated for those warm 2026 nights.
Essential Elements:
- Deep teal cream polish
- Vibrant coral cream polish
- Striping tape
- Silver foil accents
How to Prepare:
- Apply a nourishing base coat to prevent staining from the deep teal pigment.
- Paint the thumb, index, and pinky in Teal.
- Paint the middle and ring fingers in Coral.
- On the Teal nails, use striping tape to create a thin Coral diagonal line.
- On the Coral nails, add a small touch of silver foil at the cuticle.
- Seal everything with a thick, plush top coat for a professional finish.
Budget Range
- Zoya ‘Cecilia’ Teal ($12)
- Essie ‘Check In To Check Out’ Coral ($10)
- Makartt Nail Foil Glue Kit ($11)
5 Ways to Style Summer Goth Nails

Why to love this Design:
Who says dark colors are just for winter? ‘Summer Goth’ is a major 2026 mood. It’s about taking those moody, dark elements and making them airy and light—like a sheer black lace dress on a hot day.
Essential Elements:
- Sheer ‘Smoke’ black polish
- Silver 3D chrome droplets
- Pointed stiletto or coffin shapes
- Matte finishes
How to Prepare:
- Layer a sheer black ‘jelly’ over a natural nail for a ‘veiled’ look.
- Use silver chrome pens to draw delicate gothic filigree or thorns.
- Contrast a matte black base with glossy black French tips.
- Incorporate ‘pierced’ nail charms on the pinky for an edgy touch.
- Use charcoal grey instead of true black for a softer, sun-bleached gothic vibe.
Budget Range
- Lights Lacquer ‘Spilled Milk’ Sheer ($13)
- Saviland Silver Chrome Paint ($9)
- Aora Grip Nail Charms ($15)
8 Steps to Recreate Pucci Nails

Why to love this Design:
The iconic 60s prints are making a huge comeback in 2026! Pucci-inspired nails are all about psychedelic swirls, bold colors, and a sense of jet-set luxury. It’s wearable art that feels vintage yet totally ahead of the curve.
Essential Elements:
- Palette of 4-5 contrasting colors (Lavender, Orange, Teal, White)
- Ultra-fine detail brush
- Steady hand or a silicone stamping mat
How to Prepare:
- Paint a solid white base to make the colors pop.
- Pick your first color (e.g., Lavender) and draw a large, curvy ‘amoeba’ shape.
- Outline that shape with a thin line of a darker shade.
- Fill in the surrounding space with swirls of Orange and Teal.
- Add tiny white ‘dots’ or ‘bubbles’ within the shapes.
- Use a clean brush dipped in acetone to crisp up any overlapping lines.
- Ensure each color layer is slightly set before adding the next to avoid bleeding.
- Apply a smoothing top coat to level out the different layers of polish.
Budget Range
- Holler and Glow Bold Polish Set ($15)
- Beetles Liner Gel Polish Set ($16)
- Glisten & Glow Smoothing Top Coat ($9)
4 Methods for Sunset Aura Nails
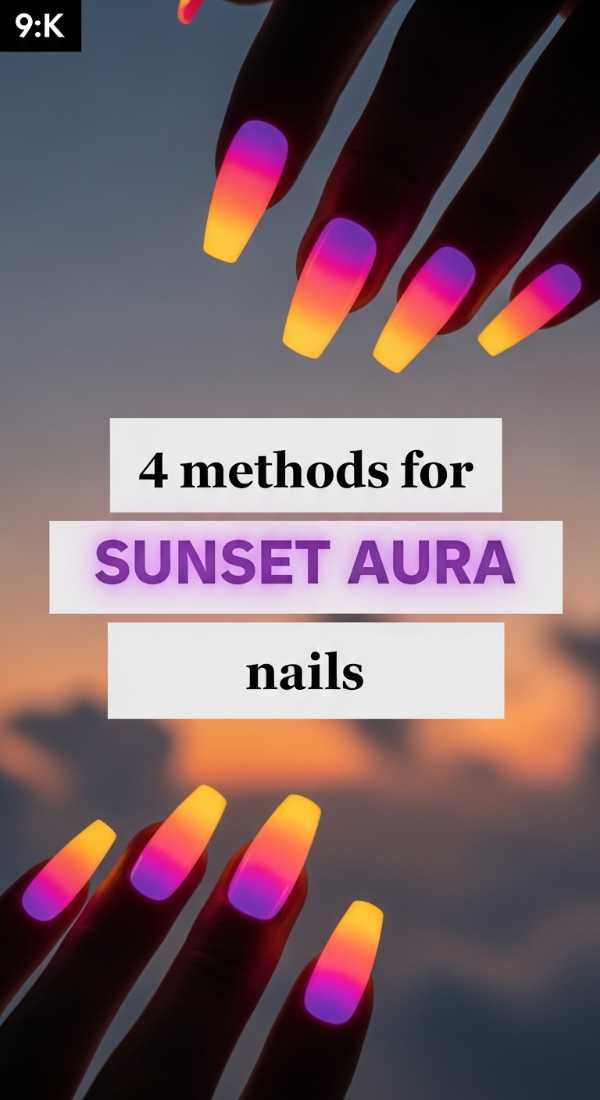
Why to love this Design:
Aura nails are so deeply spiritual and personal. They represent your energy field, and the ‘Sunset’ variation uses warm oranges, soft purples, and glowing yellows to create a sense of peace and radiates positive vibes.
Essential Elements:
- Makeup sponges
- Eyeshadow palette (or pigment powders)
- Milky white base polish
- Matte top coat (for the powder method)
How to Prepare:
- The Airbrush Method: Use a handheld mini airbrush to spray a concentrated circle of orange in the center of a purple nail.
- The Eyeshadow Method: Apply a matte top coat, then rub sunset-colored eyeshadow into the center of the nail with a Q-tip.
- The Wet-on-Wet Method: Drop a bead of orange into a wet clear base and let it spread naturally.
- The Sponge Method: Dab a small circle of color onto the center of the nail, blending outwards in concentric circles.
Budget Range
- Pinkiou Airbrush Kit ($35)
- Juvia’s Place Eyeshadow Palette ($15)
- Mora Nail Pigment Powders ($12)
5 Tips to Match Hands and Toes
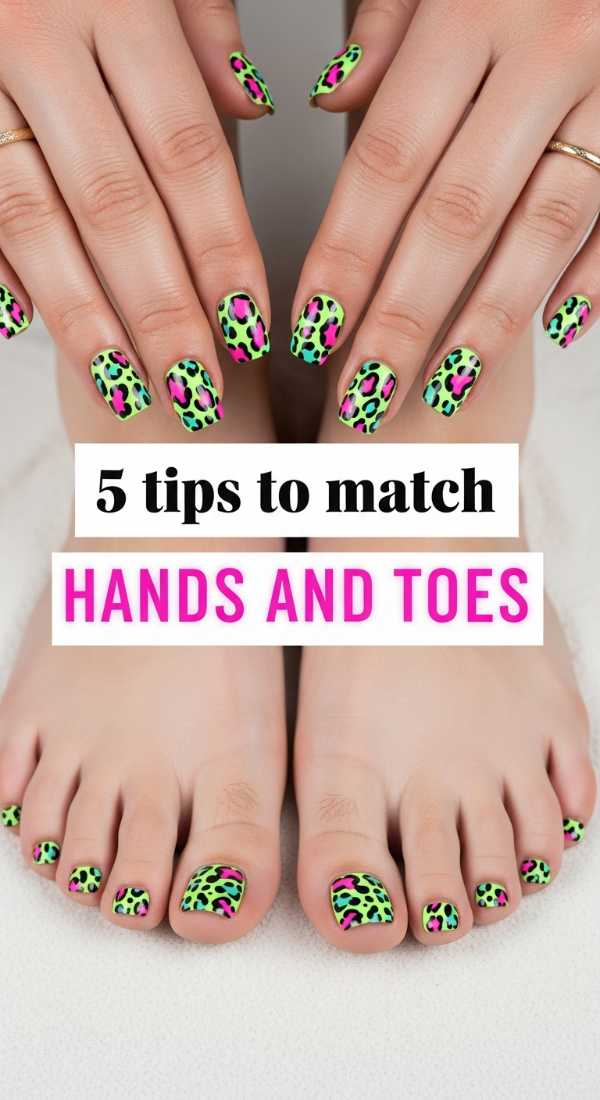
Why to love this Design:
In 2026, ‘matching’ doesn’t mean ‘identical.’ It’s about creating a cohesive story between your manicure and pedicure. It feels intentional, polished, and oh-so-chic, like you have your whole life together (even if you’re just winging it!).
Essential Elements:
- Complementary color palettes
- Consistent finish (all matte or all gloss)
- Shared accent motifs
How to Prepare:
- Use the ‘Inverted’ rule: If your fingers are light with dark accents, make your toes dark with light accents.
- Keep the big toe as the ‘statement’ nail that mirrors the design on your ring finger.
- Stick to the same ‘temperature’—cool tones for both or warm tones for both.
- Use the same glitter or shimmer topper over two different base colors to tie them together.
- Always ensure your toe shape is square and neat to contrast a more ‘artistic’ fingernail shape.
Budget Range
- Deborah Lippmann Gel Lab Pro Pair ($20)
- Olive & June Mani/Pedi System ($50)
- Holo Taco ‘Flakie’ Topper ($13)
Stay Beautiful, Stay You
As we move into 2026, remember that these trends are just a playground for your own beautiful spirit. Whether you choose the fiery glow of sunset chrome or the quiet elegance of a graduation neutral, make sure it feels like *you*. Your hands do so much work—they hold loved ones, they create art, and they navigate your world. Treat them with the love they deserve. I can’t wait to see which of these looks you’ll make your own, my loves!