
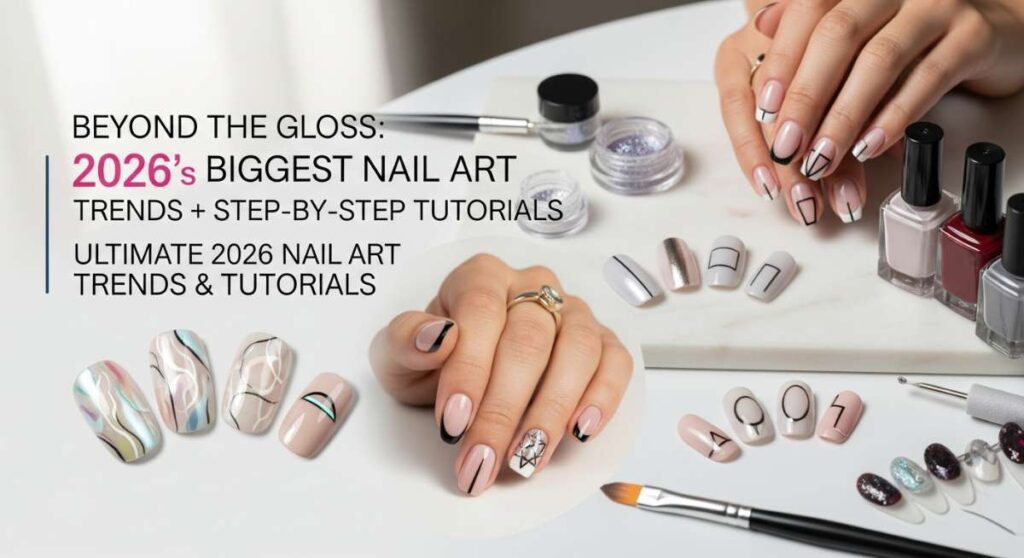
Beyond the Gloss: 2026’s Biggest Nail Art Trends + Step-by-Step Tutorials
Hi loves, I’ve missed our little heart-to-hearts. As we step into the beautiful unknown of 2026, I’ve been thinking a lot about how we use our hands to navigate the world. They carry our stories, they hold the people we love, and they deserve to be treated like the masterpieces they are. This year, nail art isn’t just about ‘finishing a look’—it’s a soft whisper of who we are, a way to paint our dreams right onto our fingertips.
I’ve curated this list with so much love, focusing on trends that feel like a warm, cloud-soft embrace. Whether you’re celebrating a milestone or just want to feel a little more ‘you’ during your morning coffee, these tutorials are designed to be your creative sanctuary. Let’s dive into the colors and textures that will define our year, one stroke at a time.
7 easy steps to style your May birthday nails

Why to love this Design:
There is something truly magical about a May birthday. It’s that sweet spot where spring fully blooms and the air feels like a soft promise. This design captures that transition with ethereal pastels and tiny, delicate floral accents that feel like they’ve just drifted down from a cherry blossom tree. It’s soft, feminine, and perfectly celebrates your personal new year.
Essential Elements:
- Soft sage green and petal pink base colors
- Micro-pearl decals
- Ultra-fine liner brush
- Non-wipe glossy top coat
How to Prepare:
- Shape nails into a soft almond to mimic flower petals.
- Apply a hydrating base coat to protect the natural nail.
- Apply two thin coats of your chosen pastel shade.
- Use a dotting tool to create five small dots in a circle for simple daisies.
- Place a micro-pearl in the center of each flower while the polish is tacky.
- Seal everything with a high-shine top coat.
- Massage rose-scented cuticle oil around the edges for a spa-like finish.
Budget Range
- Essie Enamel in ‘Sage You Love Me’ – $10
- Nail Art Micro-Pearls (Bulk pack) – $6
- Rose Cuticle Oil – $8
5 simple ways to prep your graduation nails

Why to love this Design:
Graduation is such a monumental milestone, a bridge between who you were and who you are becoming. For 2026, we are moving away from overly heavy glitter and toward a ‘refined celebration’ look. These nails are designed to look stunning in photos while holding your diploma, offering a sophisticated sheen that says you’ve arrived.
Essential Elements:
- Sheer ‘milky’ white polish
- Champagne gold foil flakes
- Buffing block
- Tweezer for foil placement
How to Prepare:
- Gently push back cuticles to maximize nail bed space for a clean, professional look.
- Buff the nail surface slightly to ensure the sheer polish lays perfectly flat.
- Apply two coats of milky white polish for a semi-translucent base.
- Carefully press small flecks of gold foil onto the tips of the ring and middle fingers.
- Apply a thick ‘plumping’ top coat to encapsulate the foil and prevent snagging.
Budget Range
- OPI Funny Bunny Polish – $11
- Gold Leaf Foil Sheets – $5
- Seche Vite Dry Fast Top Coat – $9
4 quick steps to apply sunset chrome nails
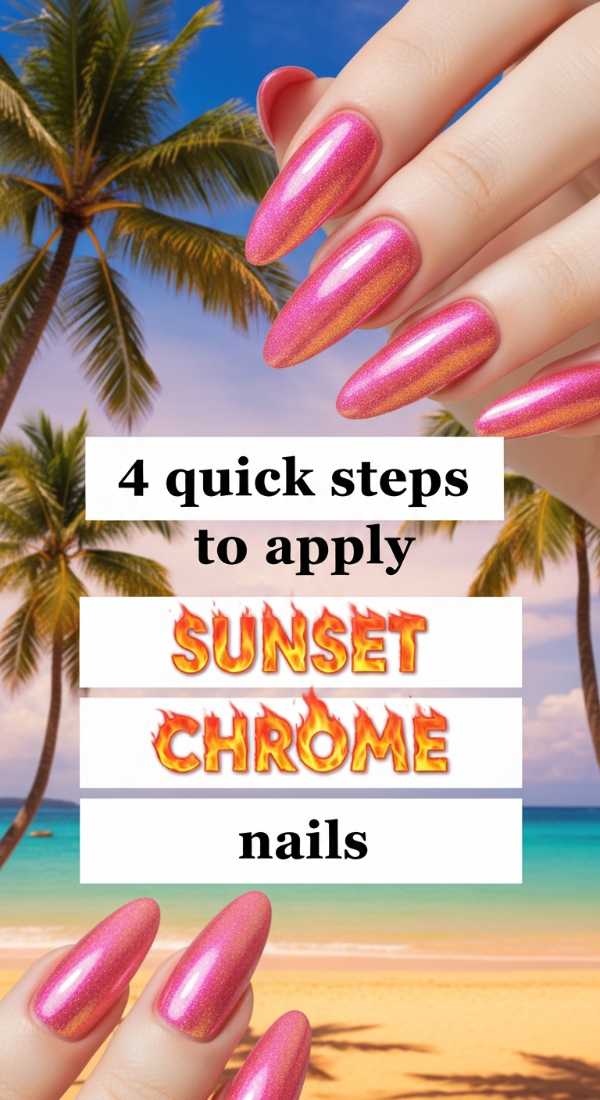
Why to love this Design:
If I could capture the exact moment the sun dips below the horizon and wear it on my fingertips, I would. Luckily, 2026’s chrome technology makes this a reality. This look reflects light in a way that feels alive—shifting from orange to pink to gold with every movement of your hands. It’s pure magic in a jar.
Essential Elements:
- Burnt orange gel base
- Sunset iridescent chrome powder
- Silicone applicator tool
- LED/UV lamp
How to Prepare:
- Apply and cure a warm orange or coral gel base color.
- Apply a ‘no-wipe’ top coat and cure for only 30 seconds (it should be slightly tacky).
- Use the silicone tool to rub the chrome powder vigorously into the nail until it glows.
- Cure a final top coat to lock in that metallic, holographic sunset finish.
Budget Range
- Born Pretty Chrome Powder – $7
- Gelish Soak-Off Gel Polish – $12
- Mini LED Nail Lamp – $15
6 moves to master pucci summer nails
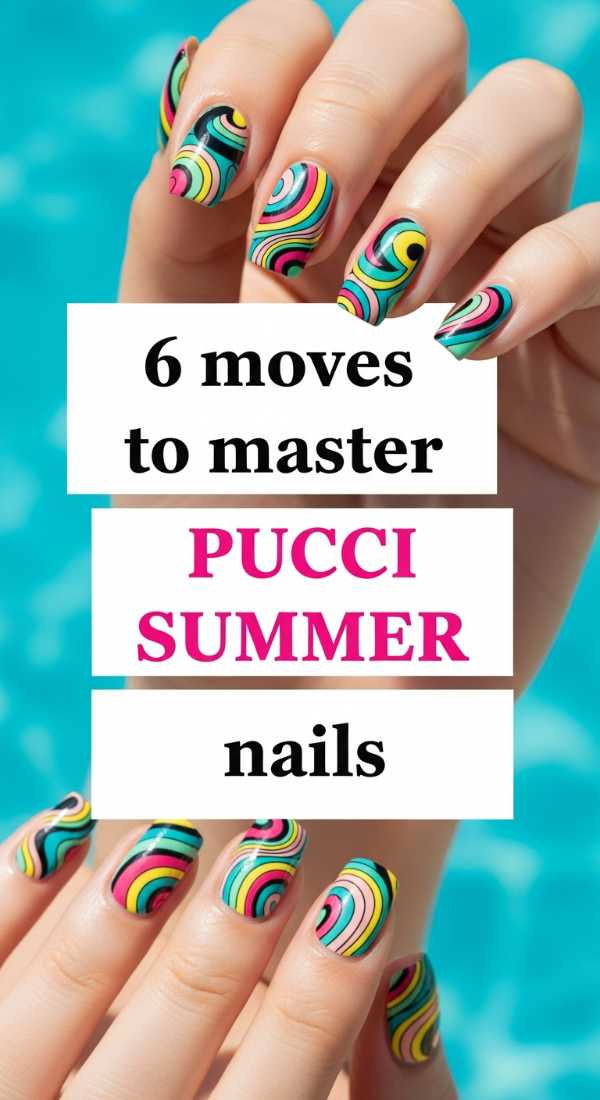
Why to love this Design:
Stepping into the height of summer, we are craving that vintage, high-fashion energy. Inspired by the iconic 1960s prints, these nails are a playground of swirling colors. They are bold, artistic, and look incredible paired with a simple white linen dress. It’s for the girl who isn’t afraid to be the center of attention.
Essential Elements:
- Vibrant turquoise, hot pink, and lemon yellow polishes
- Black and white detail liners
- Long-striping brush
- Steady hand or masking tape
How to Prepare:
- Start with a crisp white base to make the colors pop.
- Paint organic, wavy shapes using your brightest colors on different sections of the nail.
- Use a thin liner brush and black polish to outline the shapes, giving them that ‘print’ look.
- Add small white dots or ‘islands’ within the colored shapes for depth.
- Keep the lines fluid; imperfection is part of the Pucci charm.
- Finish with a matte top coat for a modern, fabric-like texture.
Budget Range
- Holler and Glow Brights Set – $12
- Winstonia Professional Nail Art Brushes – $10
- Sally Hansen Matte Top Coat – $7
3 tricks for perfect lemon and blue nails
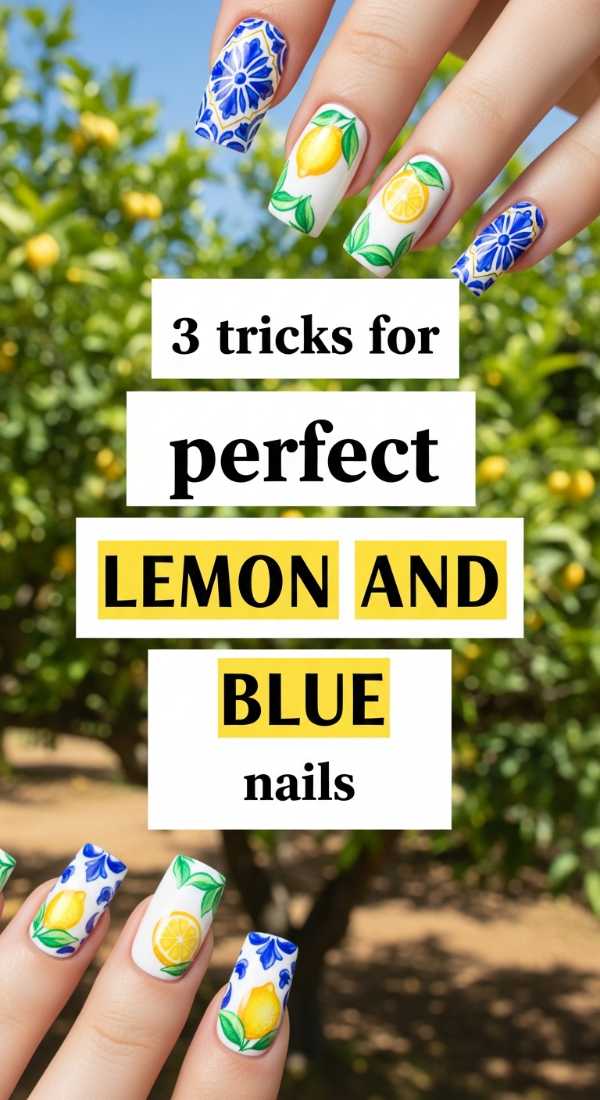
Why to love this Design:
Nothing says ‘summer escape’ quite like the crisp contrast of zesty lemons against a Mediterranean blue. This trend is all about the ‘Amalfi Coast’ aesthetic—it feels clean, refreshing, and deeply chic. It’s the visual equivalent of a cold glass of lemonade on a porch in Italy.
Essential Elements:
- Royal blue polish
- Lemon yellow polish
- Fine-tipped nail pen
How to Prepare:
- Alternate nails with solid royal blue and a nude base.
- On the nude nails, draw small yellow circles and add tiny green leaves using a nail pen.
- Add a ‘porcelain tile’ pattern in blue on the thumb for a coordinated, artisanal feel.
Budget Range
- Zoya Professional Lacquer in ‘Blue’ – $12
- Nail Art Pens (Yellow/Green) – $9
- Base Coat Strengthening Formula – $10
5 steps to create summer goth nails
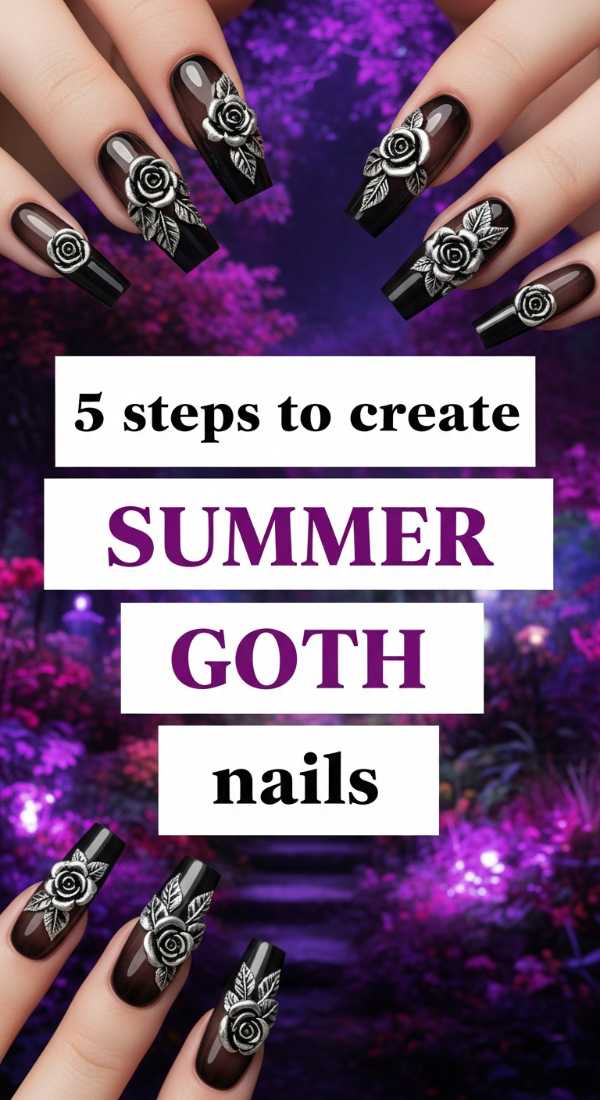
Why to love this Design:
Who says the sunshine can’t have a bit of a shadow? Summer Goth is for my loves who find beauty in the mysterious even when it’s 90 degrees out. We’re using sheer blacks and deep burgundies but keeping them light with negative space and ‘jelly’ finishes so they don’t feel heavy in the heat.
Essential Elements:
- Black ‘jelly’ polish (translucent)
- Silver spider-web decals or hand-painted thin lines
- Square-shaped tips
- Cuticle moisturizer
How to Prepare:
- Apply one coat of black jelly polish to create a ‘smoked’ glass effect.
- Use a silver liner to draw a single delicate web on the corner of the ring finger.
- Add a tiny silver stud at the base of the nail for a ‘pierced’ look.
- Apply a high-gloss top coat to make the black look like obsidian.
- Finish with a heavy-duty moisturizer to keep the dark aesthetic looking clean.
Budget Range
- Cirque Colors Jelly Polish – $12
- Silver Nail Art Studs – $5
- CeraVe Therapeutic Hand Cream – $11
8 easy ways to rock neon cheetah print nails

Why to love this Design:
Sometimes, we just need to roar. Neon cheetah print is the ultimate dopamine hit for your hands. It takes a classic, fierce pattern and updates it for 2026 with electric greens and pinks. It’s loud, it’s proud, and it’s surprisingly easy to achieve once you find your rhythm.
Essential Elements:
- Neon green or pink base
- Dark brown or black ‘C’ shape polish
- Gold glitter centers
- Flat-head brush
How to Prepare:
- Apply two coats of neon green as your high-visibility base.
- Using a dotting tool, place irregular ‘blobs’ of gold glitter across the nail.
- Wait for the glitter to dry slightly.
- Take your black polish and draw two or three small ‘C’ shapes or brackets around the gold blobs.
- Add a few random black dots in the empty spaces to fill out the print.
- Work in small sections so the polish doesn’t dry too quickly.
- Use a clean-up brush dipped in acetone for crisp edges.
- Seal with a UV-resistant top coat to prevent the neon from fading in the sun.
Budget Range
- China Glaze Electric Nights Collection – $8
- Beetles Nail Art Liner Gel – $9
- Pure Acetone Clean-up Kit – $6
4 steps to blend your sunset aura nails

Why to love this Design:
Aura nails have been a favorite for a while, but 2026 is breathing new life into them with sunset gradients. Instead of a single ‘energy’ color, we are blending pinks into oranges into soft purples. It looks like a soft glow emanating from the center of your nail, symbolizing inner peace and radiance.
Essential Elements:
- Makeup sponge (wedges)
- Creamy pink, orange, and lilac polishes
- Liquid latex (optional, for skin protection)
How to Prepare:
- Paint your nail a solid, light peach color.
- Apply pink, orange, and purple stripes onto a small makeup sponge.
- Gently dab the sponge onto the center of the nail, repeating to build color intensity.
- Apply a top coat immediately while the colors are slightly wet to help the ‘blur’ effect.
Budget Range
- Real Techniques Makeup Sponges – $6
- Barry M Gelly Hi-Shine Polish – $7 each
- Pueen Liquid Latex – $9
2 simple steps to match hands and toes nails

Why to love this Design:
There is a quiet sense of peace that comes with having perfectly coordinated hands and toes. It feels intentional and put-together. For 2026, we aren’t necessarily doing ‘exact matches’ but rather ‘sister shades’—colors that live in the same family but offer a slight variation for interest.
Essential Elements:
- Complementary color duo (e.g., Lavender and Deep Plum)
- Consistent top coat finish (both matte or both glossy)
How to Prepare:
- Choose a lighter version of your favorite color for your hands and a darker, more grounded version for your toes.
- Ensure the ‘finish’ is identical (e.g., both must have a chrome topper or both must be high-gloss) to tie the look together.
Budget Range
- Olive & June ‘The Perfect Pair’ Sets – $18
- Revlon ColorStay Gel Envy – $9
5 easy tips for teal western nails
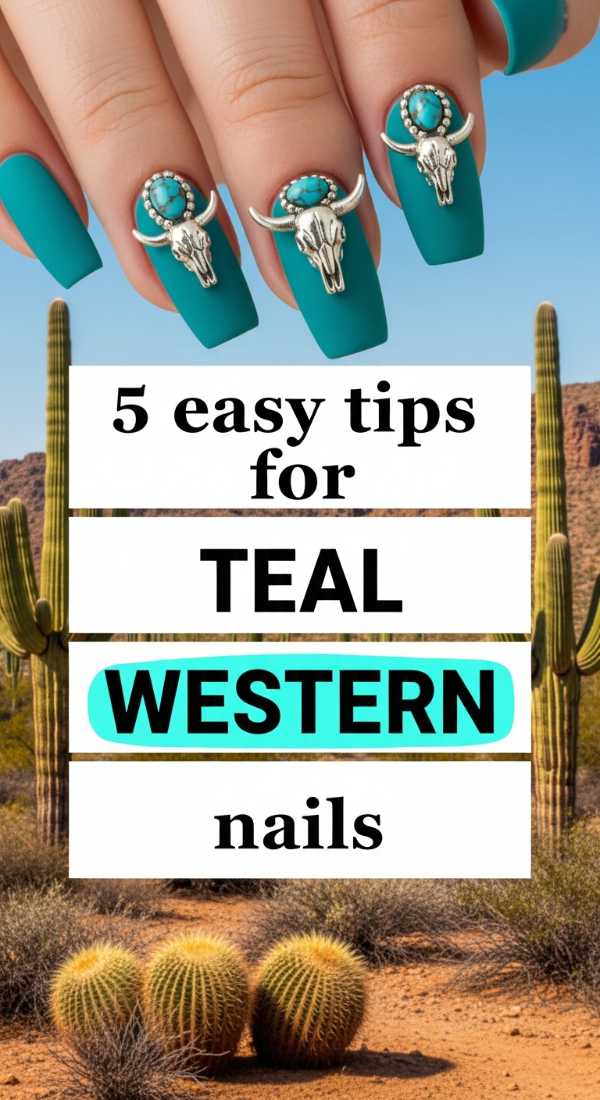
Why to love this Design:
Dust off your boots, loves! Teal Western is the trend that perfectly balances rugged charm with high-end chic. Think turquoise jewelry meets ranch aesthetics. It’s earthy but vibrant, making it the perfect transition style for those who love the great outdoors but want to keep it glamorous.
Essential Elements:
- Deep teal or turquoise cream polish
- Copper metallic striper
- Matte finish top coat
- Tiny turquoise stones
How to Prepare:
- Apply two coats of a rich teal polish to all nails.
- Use a copper metallic pen to draw a ‘lasso’ swirl or a simple geometric steer head on the thumb.
- On the ring finger, place a single turquoise stone at the cuticle line using nail glue.
- Apply a matte top coat to the teal areas for a ‘suede’ Western feel.
- Keep the copper lines glossy for a mixed-texture look that feels expensive.
Budget Range
- Orly Lacquer in ‘Teal Unleashed’ – $12
- Copper Nail Art Pen – $8
- Individual Turquoise Flat-back Gems – $5
The Canvas of You
As we wrap up our journey through the biggest trends of 2026, I want you to remember one thing: these are just suggestions. The real magic happens when you take these ideas and make them your own. Whether you choose the fierce energy of neon cheetah or the soft glow of a sunset aura, let your nails be a reflection of the beautiful light you carry inside. You are the artist of your own life, my loves. Paint it with bold colors, soft strokes, and a whole lot of heart. Until next time, stay glowing!