
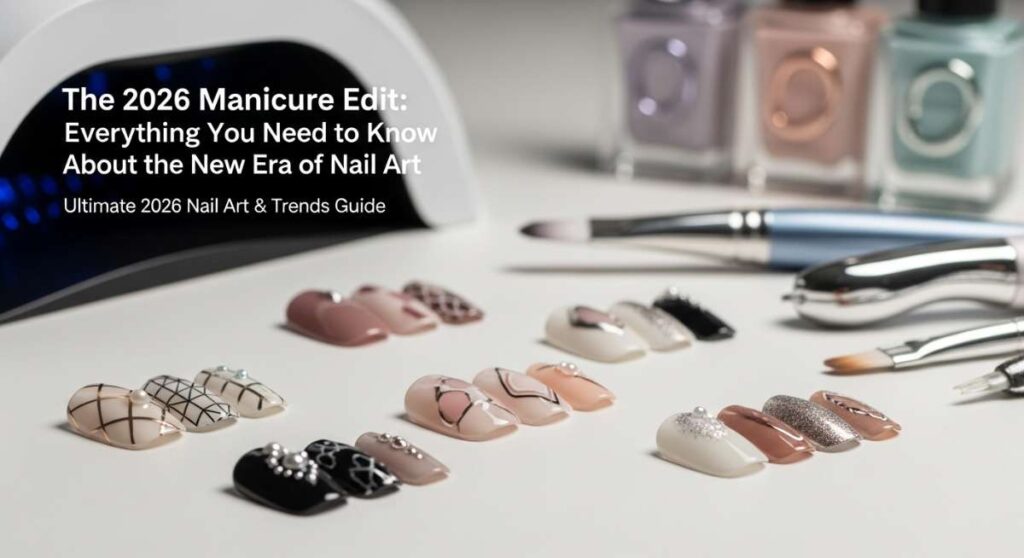
The 2026 Manicure Edit: Everything You Need to Know About the New Era of Nail Art
Hello, my loves. Welcome back to our cozy little corner of the internet. I’m sitting here with a steaming cup of rose petal tea, looking out at the morning mist, and I couldn’t help but think about how much our self-care rituals have evolved. There is something so incredibly soulful about a fresh manicure—it’s more than just polish; it’s the way we carry ourselves, the way we gesture during deep conversations, and the little spark of joy we see every time we type on our keyboards.
As we step fully into 2026, the ‘vibe’ has shifted. We are moving away from the harsh, over-perfected looks of the past and into a world that celebrates soft textures, digital-dream aesthetics, and a touch of organic whimsy. It’s about nails that feel like a cloud-soft embrace for your hands. I’ve spent weeks curated this guide for you, my darlings, to make sure your fingertips are ready for the magic this year holds.
Whether you’re celebrating a milestone, heading to the desert for a weekend getaway, or just want to feel a bit more like the goddess you are, this 2026 edit is our collective mood board. Let’s dive into these trends together, shall we?
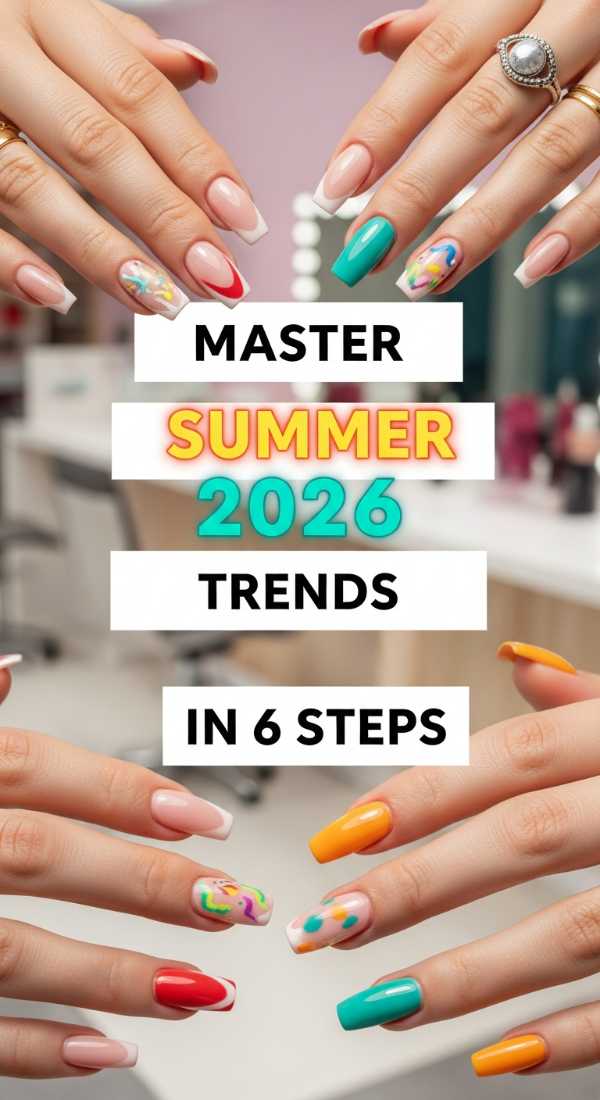
Master summer 2026 trends in 6 steps
Why to love this Design:
The core of 2026 is all about ‘Bio-Digital Jelly’—a look that combines the natural health of your nail with futuristic, translucent finishes. It feels like looking through a sea-glass window into a digital paradise. It’s light, breathable, and perfectly captures that effortless summer glow we all crave.
Essential Elements:
- Translucent jelly polishes in ‘Seafoam’ and ‘Orchid’
- 3D ‘Water Drop’ gel accents
- Ultra-glossy ‘Glass Skin’ top coat
- Soft almond nail shaping
How to Prepare:
- Gently push back cuticles and buff for a smooth, natural canvas.
- Apply one thin layer of a sheer, tint-based jelly polish.
- Flash cure for 30 seconds to maintain that ‘see-through’ magic.
- Use a builder gel to drop tiny ‘raindrop’ beads onto the nail surface.
- Lightly dust a holographic pigment over the tips.
- Seal with a non-wipe high-gloss top coat for that wet look.
Budget Range
- Zoya Jelly Drink Collection: $12.00
- Modelones 3D Sculpture Gel: $8.99
- Holo Taco Unicorn Skin: $13.00
Design your graduation nails in 4 steps

Why to love this Design:
Graduation is such a tender, transitional moment, my loves. For 2026, we are leaning into ‘Academic Opulence.’ It’s about celebrating your hard work with sophisticated pearlescents and tiny, meaningful charms that whisper success rather than shouting it.
Essential Elements:
- Mother-of-pearl base color
- Micro-fine gold leaf
- Miniature silk tassel charms
- Square-oval (Squoval) shaping
How to Prepare:
- Shape nails into a clean squoval to mirror the structure of a mortarboard.
- Apply two coats of a luminous pearl finish to symbolize your bright future.
- Place a single flake of gold leaf at the base of the ring finger.
- Finish with a long-wear protective sealant to ensure your mani survives the diploma hand-off!
Budget Range
- Essie ‘Slipper Hit’: $10.00
- Nail Art Gold Flakes (Bulk): $6.50
- Olive & June Super Glossy Top Coat: $9.00
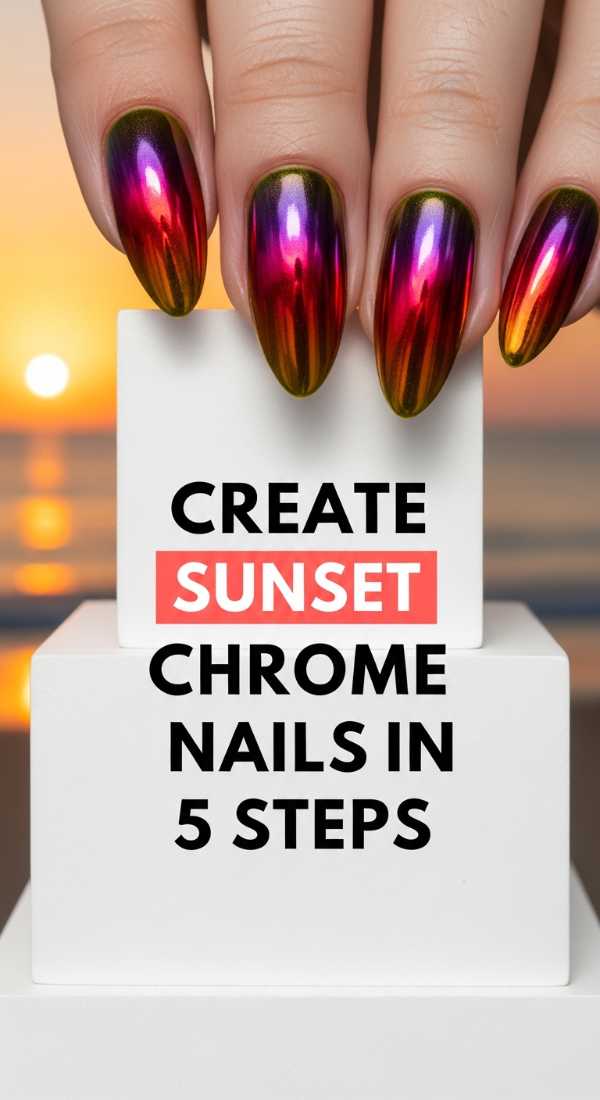
Create sunset chrome nails in 5 steps
Why to love this Design:
Imagine the sky right at that golden hour when the sun kisses the horizon—that’s what these nails represent. In 2026, chrome has evolved from ‘metallic’ to ‘ethereal.’ It’s a melting pot of warm oranges and cool purples that feels like a hug from the universe.
Essential Elements:
- Peach and Lavender base shades
- Liquid Chrome solution
- Silicone applicator tools
- Soft-focus blurring buffer
How to Prepare:
- Prepare the nail with a dehydrator to ensure the chrome grips perfectly.
- Apply a gradient base of peach near the cuticle and lavender at the tip.
- Cure a specialized ‘Chrome Base’ tack-free gel over the colors.
- Rub the liquid chrome powder in circular motions until a mirror shine emerges.
- Lock it in with a UV-stable top coat to prevent any yellowing from the summer sun.
Budget Range
- Daily Charme Sunset Mirror Powder: $15.00
- Gelish Foundation Base: $14.50
- Born Pretty Liquid Chrome: $7.00
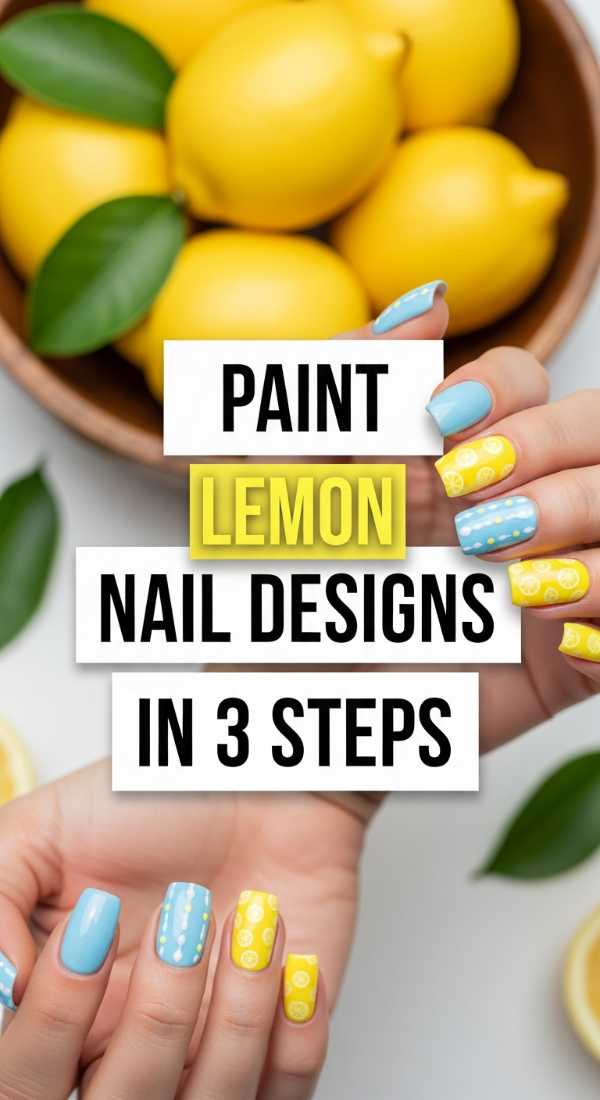
Paint lemon nail designs in 3 steps
Why to love this Design:
There is nothing quite as refreshing as ‘Limoncello Chic.’ This design is for my loves who want a pop of zest and joy. It’s nostalgic, sweet, and reminds us of sun-drenched afternoons in a Mediterranean garden. It’s minimalism with a twist of citrus.
Essential Elements:
- Pastel yellow ‘Butter’ polish
- Fine-liner brush for detail
- Matte top coat for a ‘Fruit Skin’ texture
How to Prepare:
- Paint your nails a soft, creamy off-white or nude base.
- Using a dotting tool, place two yellow circles side-by-side to create the ‘lemon’ body.
- Add a tiny green leaf flick with your liner brush and seal with a soft matte finish.
Budget Range
- OPI ‘Exotic Birds Do Not Tweet’: $11.50
- Winstonia Fine Liner Brush Set: $9.00
- Sally Hansen Miracle Gel Matte: $8.00
Style your May birthday nails in 7 steps
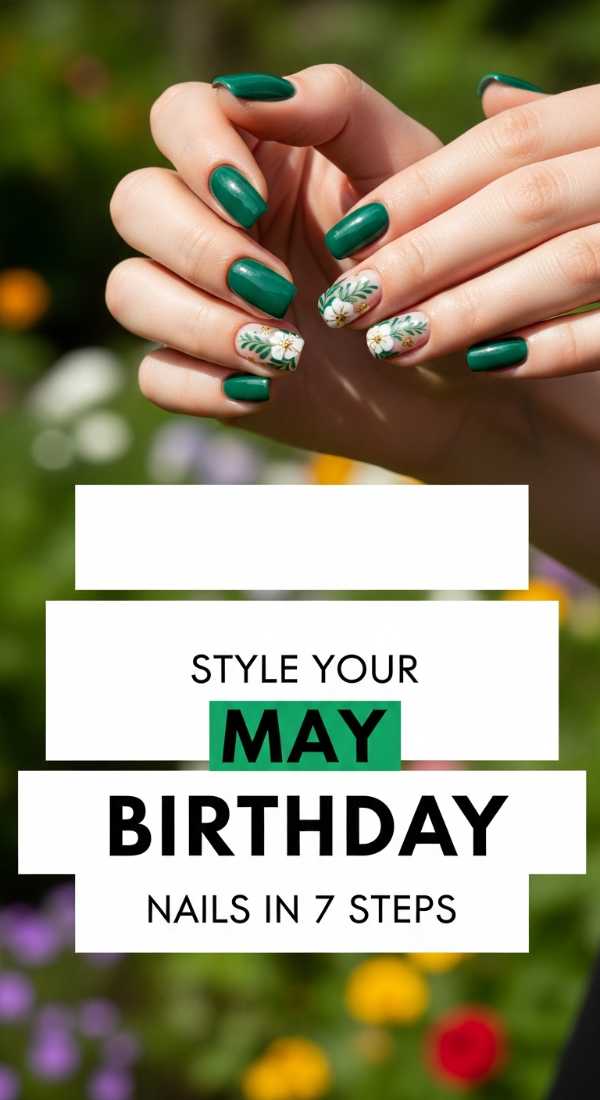
Why to love this Design:
To my May darlings: your birthstone is the emerald, and in 2026, we are celebrating you with ‘Velvet Forest’ aesthetics. This design is rich, grounding, and deeply connected to the earth. It feels luxurious yet whisper-soft, like moss underfoot.
Essential Elements:
- Deep emerald magnetic cat-eye polish
- Real dried floral embeds
- Gold wire accents
- Stiletto or long coffin shape
How to Prepare:
- Start with a clean, lengthened nail shape to provide a large ‘gemstone’ canvas.
- Apply the emerald magnetic polish and hold the magnet diagonally for 10 seconds.
- Cure and apply a thin layer of clear builder gel.
- Carefully place tiny dried white flowers into the wet gel.
- Wrap a micro-thin gold wire around the nail edge for a ‘jewelry’ effect.
- Flood the nail with a thick ‘Plump’ top coat to encase the flowers.
- Final cure for 90 seconds to ensure the 3D elements are secure.
Budget Range
- KBShimmer Magnetic Polish: $12.00
- Dried Nail Flowers (Amazon): $5.00
- Nail Thoughts Builder Gel: $20.00
Finish teal western nails in 4 steps
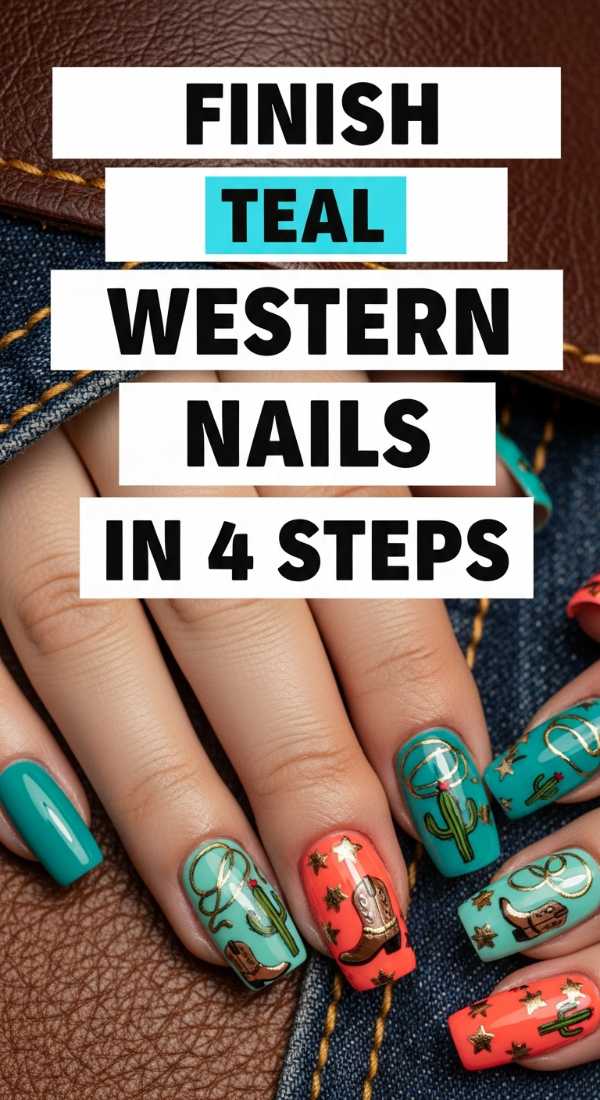
Why to love this Design:
The ‘Coastal Cowgirl’ vibe has matured into ‘Teal Western Noir.’ Think turquoise stones set in aged silver. It’s for the adventurous soul who loves the desert but keeps her heart near the water. It’s rugged yet incredibly refined.
Essential Elements:
- Turquoise ‘crackling’ polish
- Silver metallic paint
- Stamped cow-print accents
How to Prepare:
- Apply a solid teal base and let it dry completely.
- Use a ‘crackle’ medium or a dry-brush technique with black to create a stone-vein effect.
- Stamp a subtle cow-print pattern on just the thumb and ring finger for a western nod.
- Frame the nail with a thin line of metallic silver paint to mimic a silversmith’s work.
Budget Range
- Cirque Colors ‘Lapis’: $14.00
- MoYou London Western Stamping Plate: $10.00
- Maniology Silver Foil Polish: $9.00
Apply summer goth nails in 5 steps
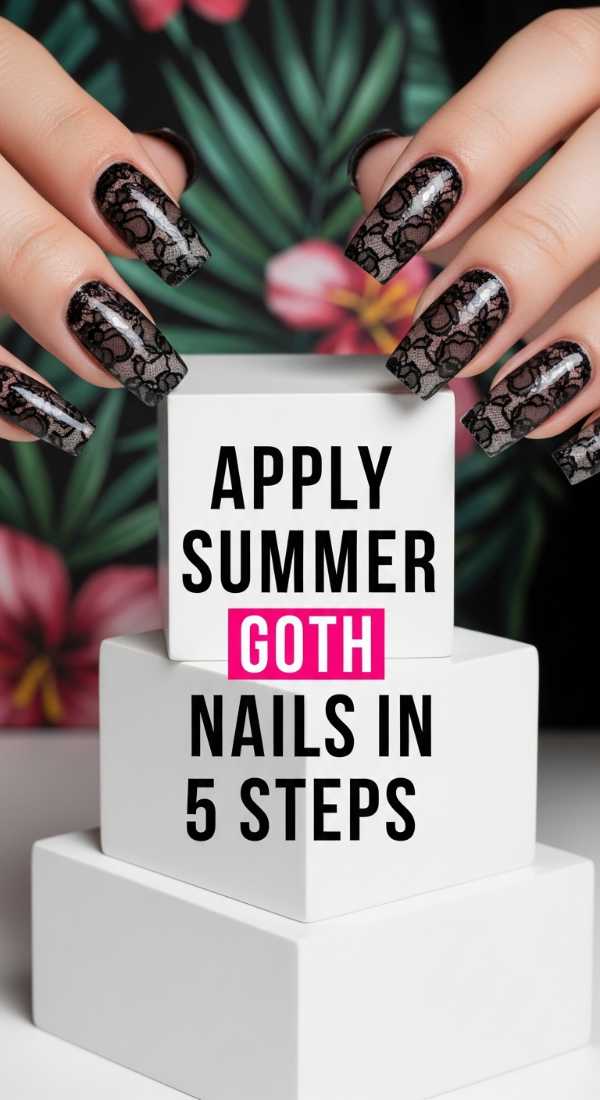
Why to love this Design:
Who says dark colors are only for winter? ‘Summer Goth’ is a 2026 staple. It’s all about sheer blacks, lace textures, and silver spikes, but kept ‘airy’ so it doesn’t feel heavy in the heat. It’s moody, romantic, and so very chic.
Essential Elements:
- Sheer ‘Smoke’ black polish
- Matte lace stickers
- Tiny silver micro-studs
How to Prepare:
- Apply one coat of sheer smoke polish—we want it to look like a veil.
- Press a lace-patterned nail decal onto the center of the nail.
- Apply a matte top coat over the lace to give it a fabric-like feel.
- Use nail glue to place three silver micro-studs at the cuticle line.
- Finish the tips with a glossy black French line for a ‘high-fashion’ contrast.
Budget Range
- Lights Lacquer ‘Spooky’ Sheer: $13.00
- Nail Art Studs (Silver): $4.00
- Orly Matte Top Coat: $12.00
Blend sunset aura nails in 3 steps

Why to love this Design:
Aura nails are staying with us in 2026 because they represent our energy. The sunset palette—radiating from a warm core to a cool edge—is like a visual meditation. It’s soft, blended, and looks beautiful on every skin tone.
Essential Elements:
- Makeup sponge (wedge)
- Vibrant pink and soft orange polishes
- Blurring base coat
How to Prepare:
- Apply a blurring base coat to neutralize the nail bed color.
- Dab pink and orange polish onto a makeup sponge and gently tap the center of the nail.
- Apply a high-shine top coat while the colors are still slightly tacky to help them bleed together perfectly.
Budget Range
- BeautyBlender (Mini): $8.00
- China Glaze Neon Collection: $7.50 per bottle
- Seche Vite Dry Fast Top Coat: $9.95
Detail neon cheetah print nails in 6 steps
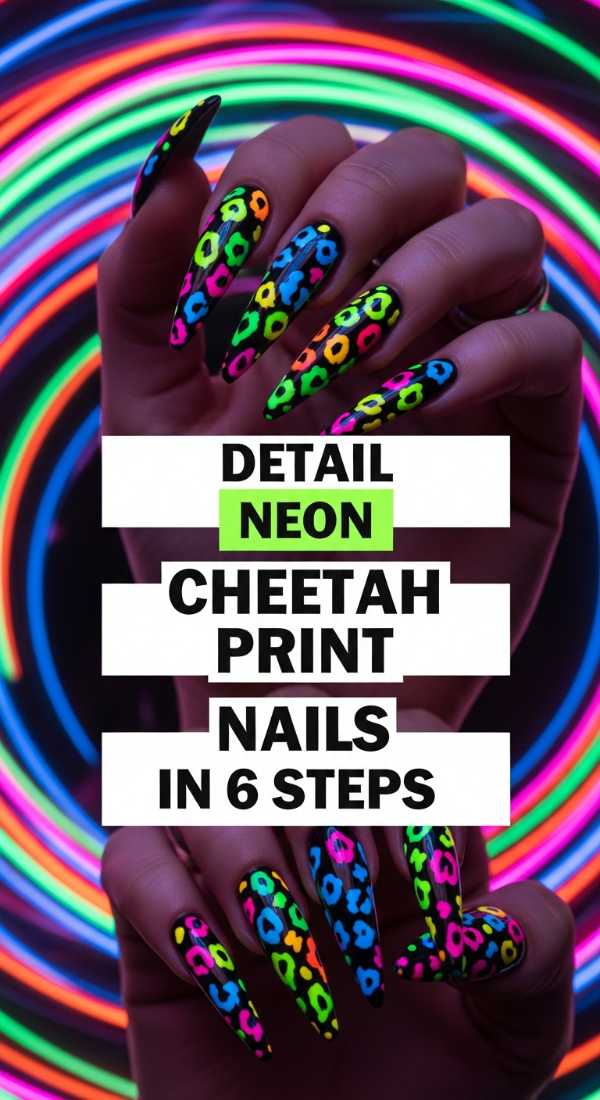
Why to love this Design:
We are calling this ‘Cyber-Jungle.’ It’s the classic animal print we love, but reimagined for the digital age with neon pulses. It’s fierce, loud, and perfect for those summer nights when you want to feel absolutely electric.
Essential Elements:
- Neon Lime or Electric Pink base
- Matte Black liner polish
- Reflective glitter centers
How to Prepare:
- Apply two coats of your chosen neon base—the brighter, the better!
- Use a dotting tool to create irregular ‘blobs’ of reflective glitter.
- Outline the blobs with two or three ‘C’ shapes using a black liner brush.
- Add random tiny black dots in the empty spaces to fill out the print.
- Cure under a UV lamp to set the intricate linework.
- Finish with a ‘Diamond’ top coat to make those glitter centers pop.
Budget Range
- Kiara Sky Neon Gelly: $12.99
- Beetles Nail Liner Set: $15.00
- Flash Reflective Glitter Powder: $6.00
Copy luxury Pucci nails in 5 steps
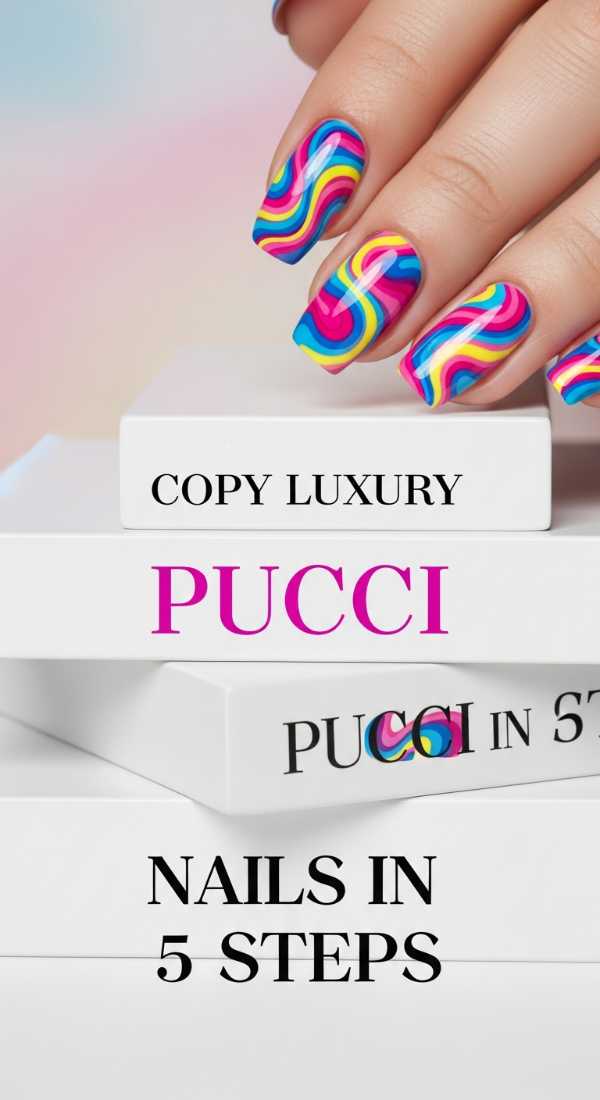
Why to love this Design:
Inspired by the iconic 60s and 70s prints, ‘Luxury Pucci’ nails are all about movement and retro-glamour. The swirling shapes and bold color blocking feel like a vintage scarf blowing in the breeze of a yacht. It’s total ‘Rich Girl’ energy.
Essential Elements:
- A palette of 4 contrasting colors (e.g., Teal, Coral, Cream, Lavender)
- Long-striping brush
- Precision cleanup brush
How to Prepare:
- Start with a cream-colored base for a vintage ‘canvas’ feel.
- Using a long-striping brush, draw a large ‘S’ curve across the nail.
- Fill in the sections created by the curve with alternating bold colors.
- Outline the shapes with a very thin line of white or black to define the print.
- Clean up the edges with acetone and a precision brush before sealing with a plush top coat.
Budget Range
- Holme & Hadfield Display Case (to show them off!): $45.00
- Essie Gel Couture Palette: $13.00 per bottle
- Alpha Brush #000: $22.00
A New Era of Self-Expression
My loves, as we wrap up this 2026 edit, I want you to remember that your nails are the smallest canvas you own, but they hold so much power. Whether you choose the quiet elegance of graduation pearls or the wild energy of neon cheetah, let it be a reflection of the beautiful soul you are. Don’t be afraid to experiment, to smudge a little, and to find beauty in the process. You are a masterpiece in progress, and your hands are the tools you use to create your world. Stay soft, stay bright, and I’ll see you in the next edit.
Manicure Magic: Your Questions Answered
Q: How do I make my 2026 manicure last through a beach vacation?
A: The secret is all in the ‘capping’! Make sure you run your top coat along the very edge of the nail tip. This ‘seals’ the color and prevents sand and salt water from lifting the polish. Also, apply a fresh layer of top coat every three days!
Q: Is the ‘Aura’ trend hard to do at home?
A: Not at all, darling! If you don’t have an airbrush, the makeup sponge method I mentioned is your best friend. The key is to use very little polish on the sponge and build the color slowly.
Q: What nail shape is the most ‘in’ for 2026?
A: While we love all shapes, the ‘Soft Almond’ is the reigning queen. It elongates the fingers and provides the perfect organic shape for the bio-digital and jelly trends we’re seeing everywhere.