
Sizzle and Shine: The Ultimate Guide to 2026 Summer & Graduation Nail Art
Hello, my beautiful loves! Can you feel it? That sweet, buzzing energy in the air that only comes when the world is on the cusp of something new. As we drift into the sun-drenched days of 2026, many of you are preparing to walk across a stage, toss a cap, and step into a brand-new chapter. My heart is just bursting with pride for everything you’ve accomplished!
Whether you’re a graduate celebrating your hard-won success or you’re simply here to soak up every drop of the summer sun, your hands deserve a little piece of that magic. Nails aren’t just an accessory; they are a tiny canvas for your soul’s celebration. I’ve spent weeks curated the most soul-stirring trends for this season, and I can’t wait to share them with you.
From the softest morning mists to the electric pulse of a summer night, these designs are meant to make you feel confident, radiant, and completely yourself. So, grab a glass of iced lavender lemonade, find a cozy sunbeam to sit in, and let’s dive into the colors and textures that will define your 2026 summer story.
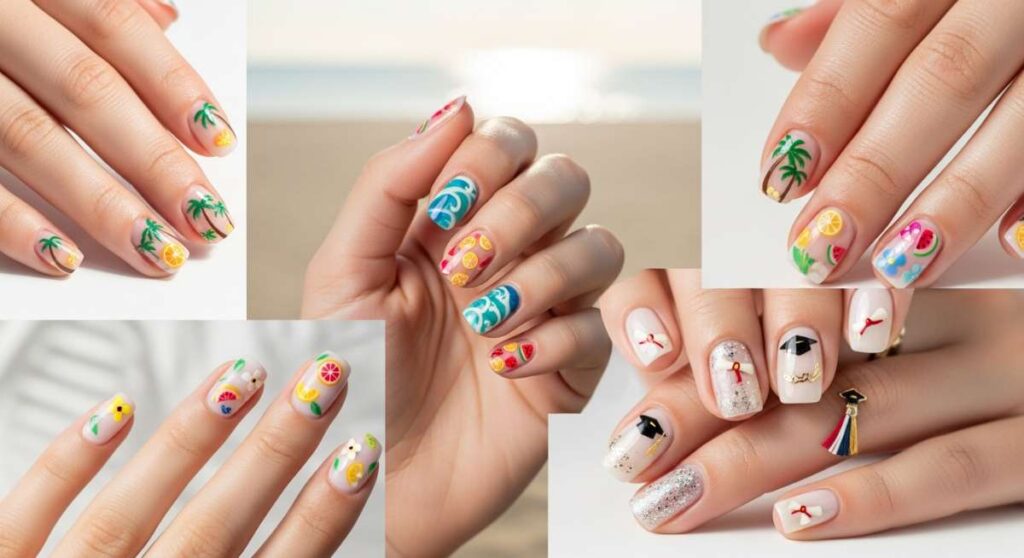
Graduation Glam: Your Achievement in Polish

Why to love this Design:
This look is all about honoring your journey. It balances the sophistication of a major life milestone with the playful sparkle of the freedom that comes right after graduation. It’s like a soft hug for your hands as you hold that diploma.
Essential Elements:
- Soft cream or ‘milky’ base colors
- Micro-fine silver or gold glitter for the tips
- Tiny, hand-painted ‘2026’ or graduation cap charms
- A high-gloss top coat for that ‘new beginning’ shine
How to Prepare:
- Shape your nails into a classic almond or oval for a timeless look.
- Apply a nourishing base coat to protect your natural nails.
- Paint two thin layers of your chosen milky neutral shade.
- Use a sponge to dab glitter onto the tips for a gradient effect.
- Seal everything with a long-wear top coat to ensure it lasts through all the parties.
Budget Range
- OPI Infinite Shine in ‘Funny Bunny’ ($13)
- Essie Enamel in ‘Penny Talk’ for accents ($10)
- Sally Hansen Insta-Dri Top Coat ($7)
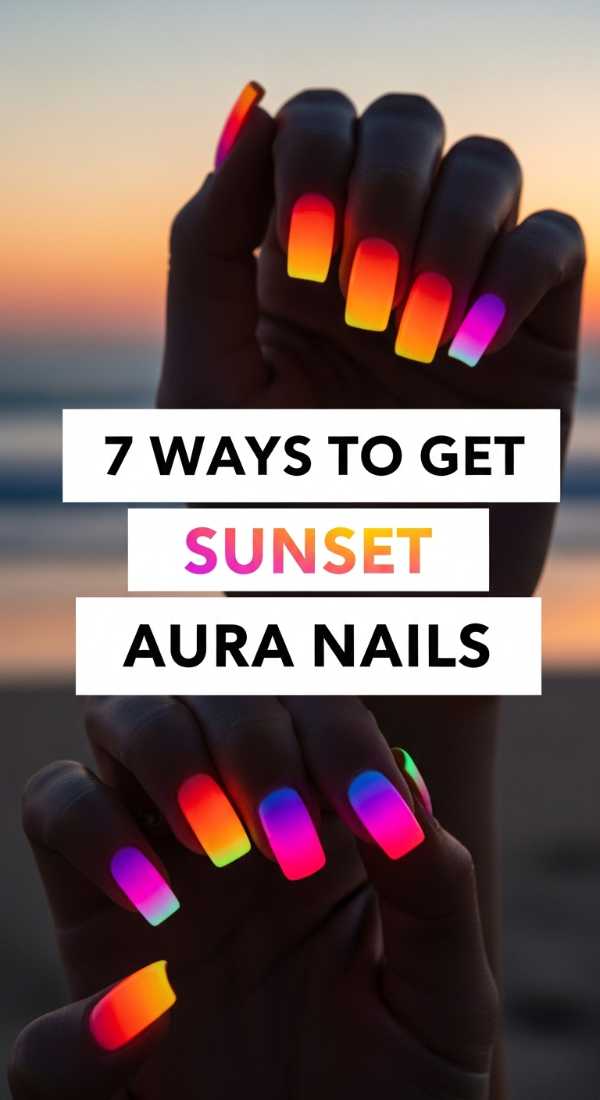
Sunset Aura Dreams
Why to love this Design:
Imagine the sky at 8:46 PM—that magical blur of peach, violet, and gold. Aura nails are a soft-focus dream that feels deeply personal and energetic, perfect for those long summer evenings with friends.
Essential Elements:
- A neutral or sheer white base
- Vibrant pink and orange pigments
- An airbrush tool or makeup sponge for blending
- Matte or glossy finish options
How to Prepare:
- Start with a clean, buffed nail surface.
- Apply a sheer base color and cure if using gel.
- Use a small sponge to dab a bright orange circle in the center.
- Layer a smaller pink circle over the orange.
- Softly blend the edges outward until the colors melt together.
- Add a third ‘aura’ of purple at the very center for depth.
- Finish with a high-shine top coat to make the colors ‘pop’.
Budget Range
- Beetles Gel Polish ‘Summer Sunset’ Set ($20)
- Makeup sponges (any drugstore brand, $4)
- Gelish Harmony Top It Off ($15)
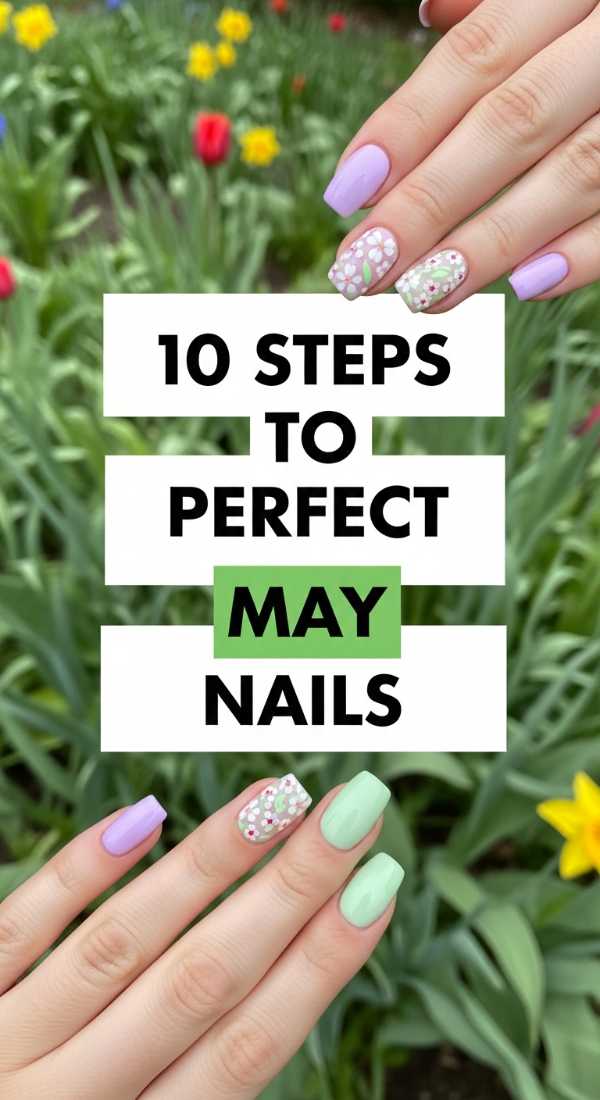
May’s Blooming Mani
Why to love this Design:
May is the bridge between the spring’s awakening and summer’s full bloom. These nails are a love letter to the flowers that are just starting to peek through, reminding us that growth takes time but is always beautiful.
Essential Elements:
- Sage green and cornflower blue accents
- Hand-painted daisy or wildflower details
- Small pearl embellishments
- A mix of matte and glossy textures
How to Prepare:
- Prep your cuticles with a moisturizing oil.
- Apply a sheer pink base to all nails.
- On the ring finger, paint thin green lines for stems.
- Use a dotting tool to create white flower petals.
- Add a tiny yellow dot in the center of each flower.
- Paint the index and pinky fingers a solid sage green.
- Apply a matte top coat to the solid colors for a modern touch.
- Add a tiny pearl to the center of one flower using nail glue.
- Let the glue dry completely before moving.
- Seal the floral art with a glossy top coat for contrast.
Budget Range
- Zoya Professional Lacquer in ‘Sage’ ($12)
- Holo Taco ‘Dotting Tool’ set ($15)
- Olive & June ‘Baby Blue’ ($9)
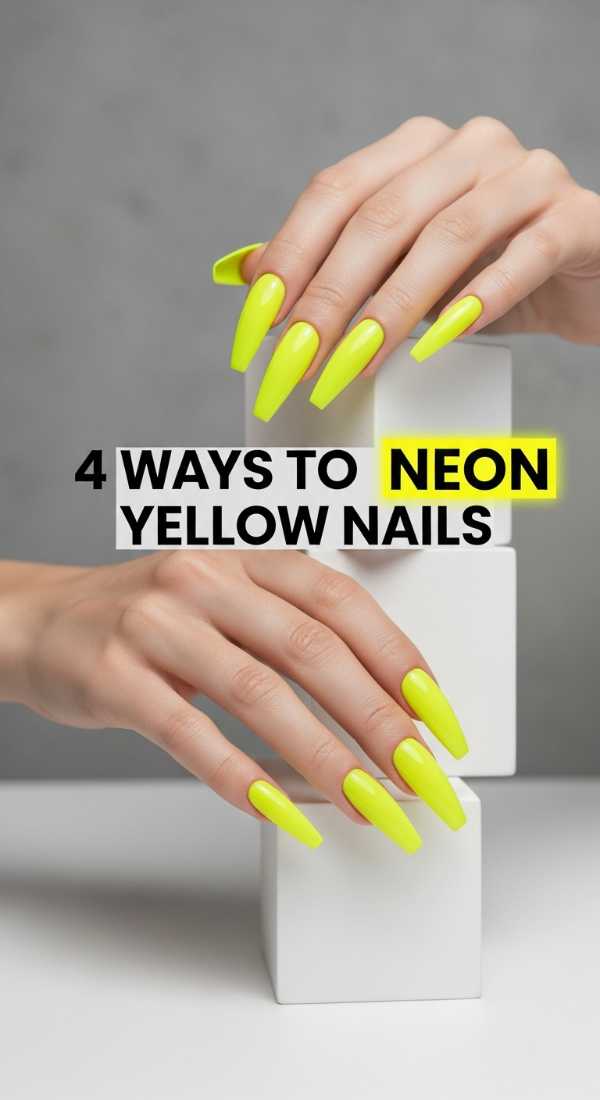
Electric Neon Yellow
Why to love this Design:
This is the color of pure joy! Neon yellow is for my loves who aren’t afraid to stand out. It’s a high-energy, ‘look at me’ shade that screams pool parties and loud music.
Essential Elements:
- Ultra-bright highlighter yellow polish
- Squoval or square nail shapes
- Minimalist black geometric lines
- A bright white base coat to make the neon pop
How to Prepare:
- Always start with a white base coat; it makes the yellow look ten times brighter.
- Apply two thin layers of neon yellow for full opacity.
- Use a thin striping brush to add a single black line across the middle of each nail.
- Apply a UV-resistant top coat to prevent the neon from fading in the sun.
Budget Range
- Orly ‘Glowstick’ Neon Yellow ($15)
- Cirque Colors ‘Carpe Diem’ White ($12)
- Seche Vite Dry Fast Top Coat ($10)
Glazed Sunset Chrome
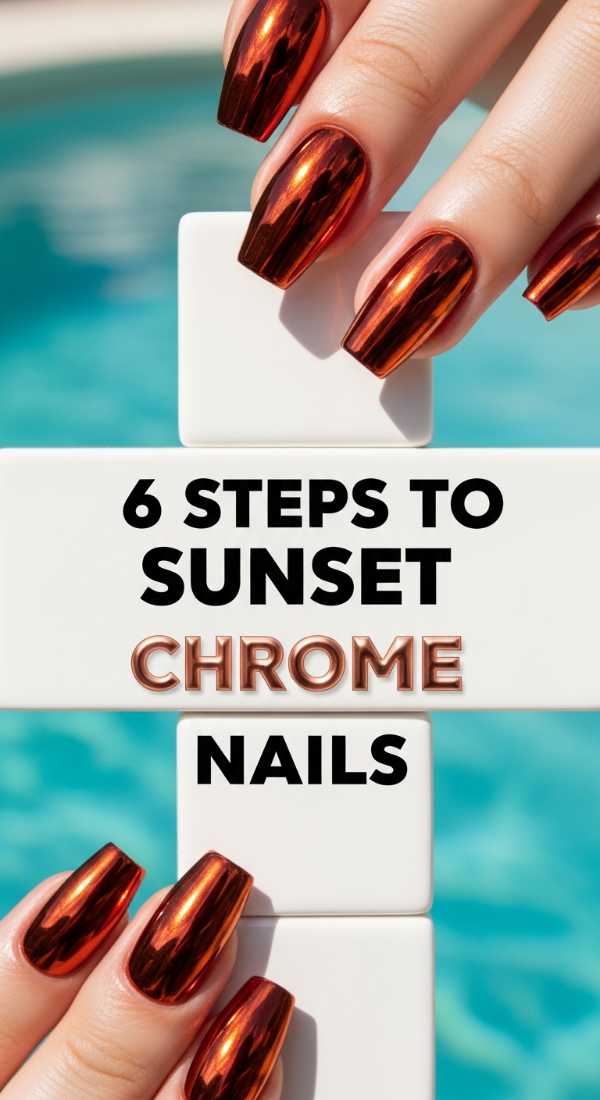
Why to love this Design:
If you loved the ‘glazed donut’ trend, this is her summer sister. It’s the same ethereal shimmer but infused with the warm, golden hues of a 2026 sunset. It’s sophisticated yet so trendy.
Essential Elements:
- Peach or coral base polish
- Iridescent chrome powder (sunset/gold shift)
- Silicone applicator tool
- No-wipe gel top coat
How to Prepare:
- Apply your base color (a soft peach works best).
- Apply a no-wipe top coat and cure/dry until ‘tacky’.
- Rub the chrome powder onto the nail using the silicone tool.
- Buff until the surface looks like a mirror.
- Gently brush away any excess powder.
- Seal with a second layer of top coat.
Budget Range
- Daily Charme ‘Sunset’ Chrome Powder ($18)
- Kiara Sky Gelly Tip Starter Kit ($50 – investment)
- Essie ‘Check In To Check Out’ ($10)
Zesty Lemon Squeeze
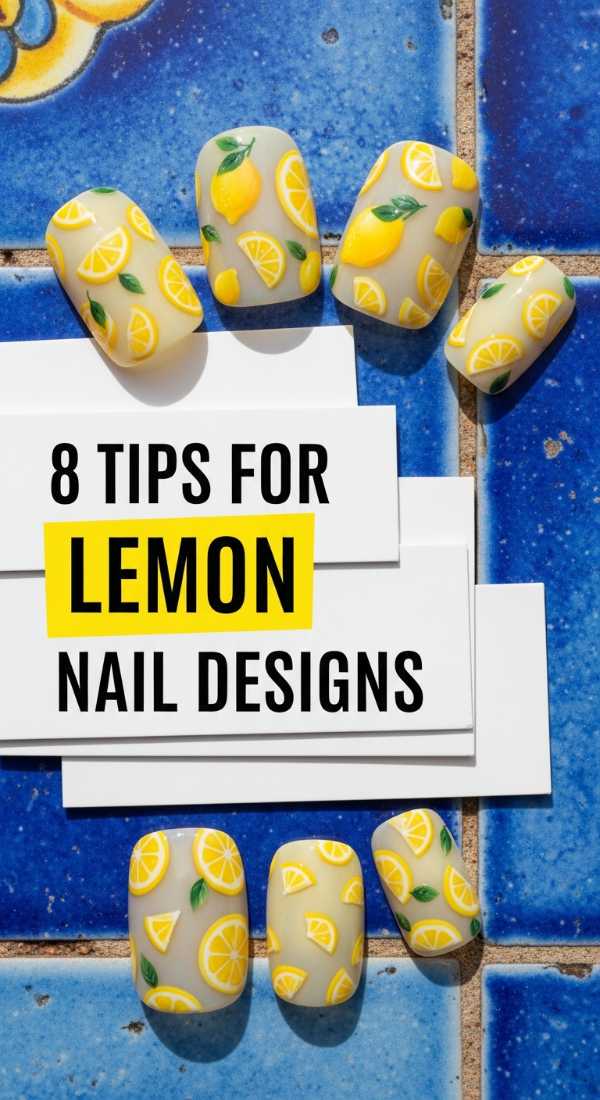
Why to love this Design:
There is nothing more refreshing than a cold lemonade on a hot day, and these nails capture that exact vibe. It’s whimsical, fresh, and slightly retro.
Essential Elements:
- Lemon yellow and white polish
- Tiny green leaf details
- Clear 3D gel droplets for a ‘dewy’ look
- Short, natural nail shapes
How to Prepare:
- Start with a clean, short manicure.
- Paint the thumb and ring finger a soft white.
- Paint the other fingers a bright lemon yellow.
- On the white nails, paint small yellow circles.
- Add tiny white lines inside the circles to look like lemon slices.
- Use a fine brush to add two tiny green leaves to each slice.
- Apply your top coat.
- Once dry, use a thick building gel to add ‘water droplets’ over the lemons.
Budget Range
- Sally Hansen Xtreme Wear in ‘Mellow Yellow’ ($4)
- Lights Lacquer ‘Paper Snow’ ($13)
- Nail art brush set from Amazon ($8)
Pucci Print Perfection
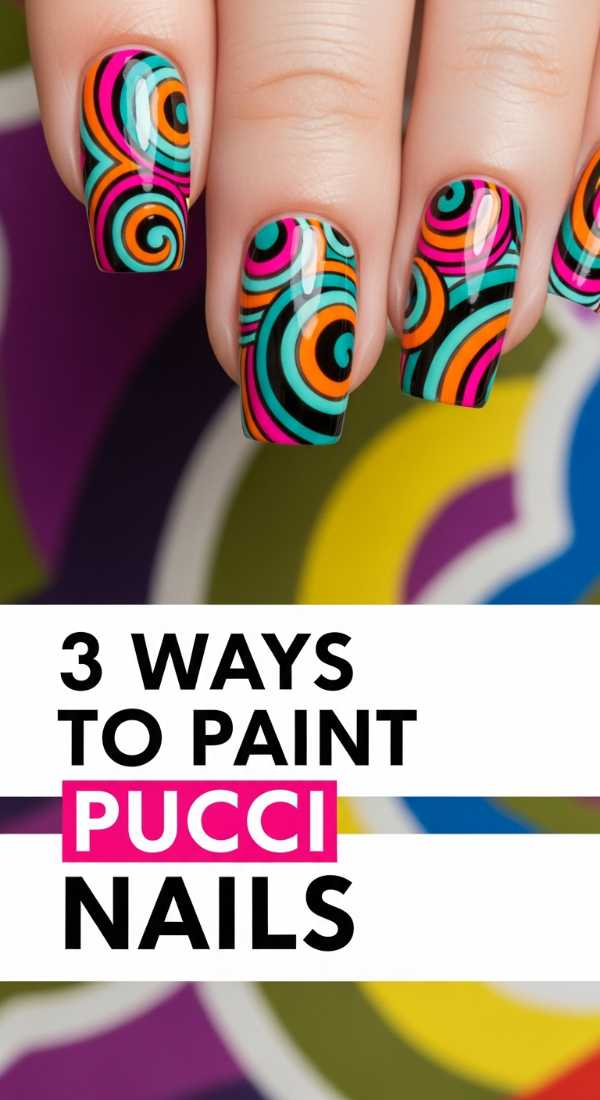
Why to love this Design:
Bringing back that 1960s Italian glamour! Pucci-inspired swirls are sophisticated and artistic. It’s for the girl who treats every sidewalk like a runway.
Essential Elements:
- A palette of pink, turquoise, and orange
- Bold black or white outlines
- Intricate, swirling patterns
How to Prepare:
- Choose three contrasting summer colors.
- Paint random, flowing shapes across each nail.
- Use a very thin brush to outline the shapes in black to create that signature ‘print’ look.
Budget Range
- Chanel Le Vernis (Luxury pick – $32)
- Dior Vernis in ‘Riviera’ ($30)
- Art Deco Nail Art Pens ($6)
Dark Summer Goth
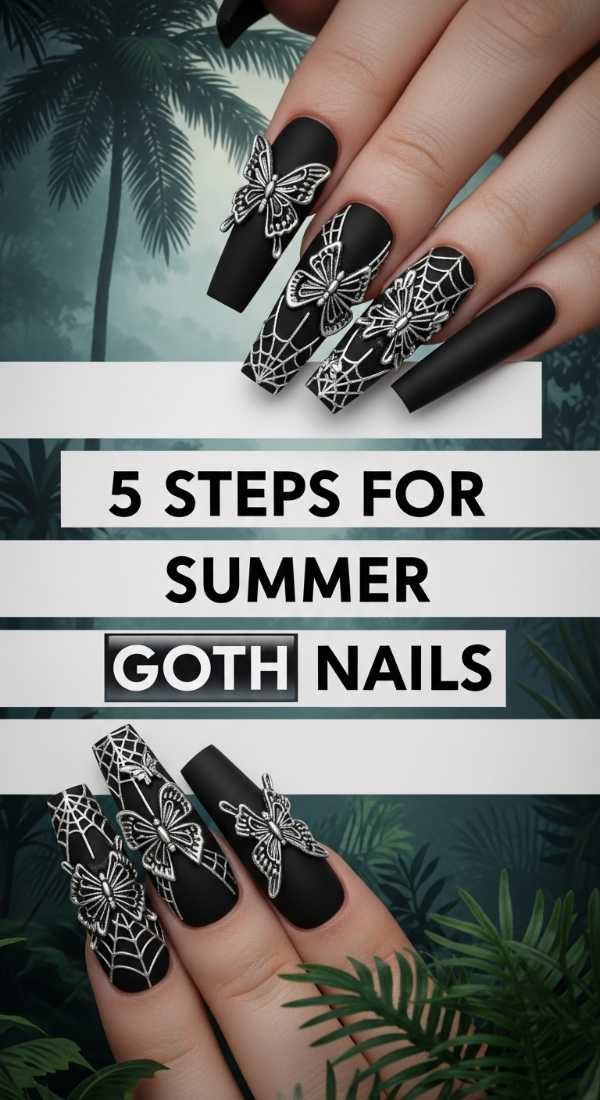
Why to love this Design:
Who says summer has to be all brights? For my moody darlings, summer goth is a major 2026 trend. It’s edgy, mysterious, and surprisingly cool against a tan.
Essential Elements:
- Sheer black ‘jelly’ polish
- Silver moon and star charms
- Deep plum accents
- Short stiletto shape
How to Prepare:
- Apply two coats of sheer black jelly polish for a ‘smoke’ effect.
- Use a deep plum to create a subtle French tip.
- Place a tiny silver moon charm on the ring finger.
- Apply a high-gloss top coat to give it a ‘vinyl’ look.
- Hydrate your cuticles with a dark berry scented oil.
Budget Range
- Mooncat ‘Emo For Life’ ($15)
- ILNP ‘Eclipse’ ($12)
- Maniology Nail Charms ($7)
Classic Coral Bliss
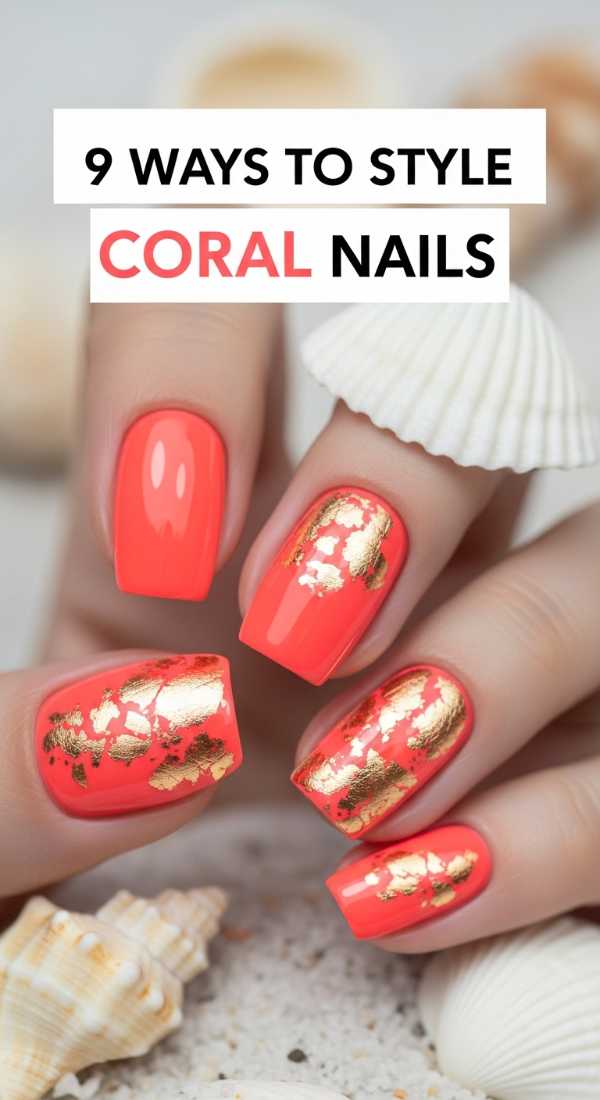
Why to love this Design:
Coral is the heartbeat of summer. It’s universally flattering and feels like a vacation in a bottle. This design is for the loves who want a timeless, effortless summer glow.
Essential Elements:
- Warm coral-pink polish
- Gold foil accents
- Tan-enhancing undertones
- Glossy finish
How to Prepare:
- Apply two coats of a rich coral polish.
- While the second coat is slightly wet, press tiny pieces of gold foil onto the nail.
- Vary the placement of the foil for a natural look.
- Seal with a thick top coat to smooth out the texture of the foil.
- Mix and match with a soft nude on the pointer finger.
- Add a gold stripe to the nude nail.
- Try a matte top coat on just one finger for a ‘velvet’ coral look.
- Use a dotting tool to add coral dots to a white base on the thumb.
- Always finish with cuticle oil to keep the skin around the coral looking fresh.
Budget Range
- Olive & June ‘Larchmont’ ($9)
- Nails.INC ‘Coral Street’ ($15)
- Gold Foil Flakes from Amazon ($6)
The Ultimate Matching Set
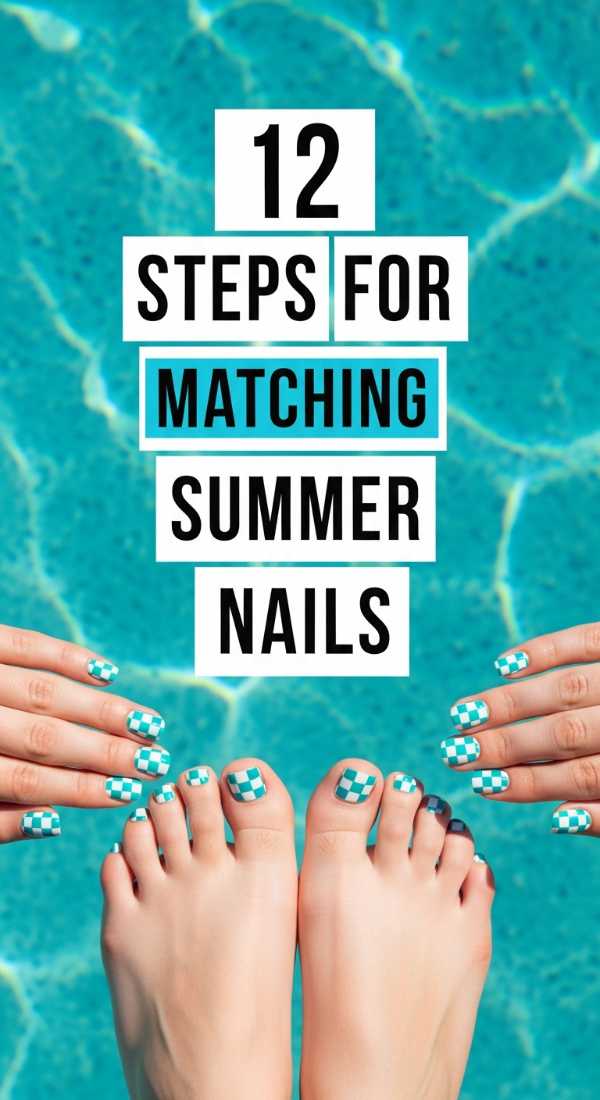
Why to love this Design:
There is something so incredibly ‘put together’ about a perfectly coordinated mani-pedi set. It’s the ultimate form of self-care before a big summer trip or your graduation ceremony.
Essential Elements:
- Complementary color palettes (e.g., Lavender and Mint)
- Gradient transitions across fingers
- Consistent finishes (all matte or all gloss)
- Healthy, buffed nail beds
How to Prepare:
- Start with a full soak for both hands and feet.
- Exfoliate your hands and feet with a sugar scrub.
- Trim and shape your fingernails into a soft almond shape.
- Trim toenails straight across to prevent ingrowns.
- Apply a base coat to all 20 nails.
- Paint your fingernails in a gradient from dark blue to light blue.
- Paint your toenails the darkest blue from the gradient for a grounded look.
- On the big toe and thumb, add a tiny white wave detail.
- Use a cleanup brush dipped in acetone for perfect edges.
- Apply a fast-dry top coat to everything.
- Wait at least 20 minutes before putting on shoes.
- Finish with a hydrating mist over your hands and feet.
Budget Range
- Manucurist Green Flash Starter Kit ($70)
- Deborah Lippmann ‘Bed of Roses’ Set ($36)
- Dr. Teal’s Sugar Scrub ($6)
A Warm Farewell to Your Old Self
As you look down at your freshly painted nails, I want you to remember that they are a reflection of the light you carry inside. Whether you chose the bold neon or the soft graduation glow, you are ready to face this summer with grace and power. Congratulations to my graduates, and happy summer to all my loves. Shine bright, stay kind, and don’t forget to moisturize those cuticles! I’ll see you in the next post, sweet souls.
Frequently Asked Questions
Q: How can I make my graduation nails last through multiple parties?
A: The secret is in the prep! Make sure to dehydrate your nail plate with a little bit of rubbing alcohol before applying your base coat. Also, remember to ‘cap’ your tips by running the polish brush along the very edge of your nail.
Q: What nail shape is trending most for Summer 2026?
A: We are seeing a huge return to ‘Soft Almond’ and ‘Short Square.’ These shapes are practical for summer activities like swimming and hiking while still looking incredibly chic.
Q: Can I achieve the aura effect without an airbrush?
A: Absolutely! A simple eyeshadow applicator or a small makeup sponge works wonders. Just dab the color on in layers and blend the edges while the polish is still slightly tacky.