
Hello, my loves. Can you feel that? The air is shifting, turning into that honey-thick, golden warmth that only the height of summer 2026 can bring. It’s a season of long afternoons, salt-crusted skin, and the kind of laughter that echoes across a shoreline. As we step into this beautiful light together, I wanted to share something that has been making my heart flutter lately—the way we can carry the very essence of summer right at our fingertips.
Our hands tell the story of our season; they hold the iced coffees, they brush the sand off our favorite towels, and they reach for the people we love. This year, nail art isn’t just about color; it’s about a feeling. It’s about capturing that sun-drenched glow and wearing it like a soft, cloud-like embrace. I’ve curated these tutorials just for you, to help you find that perfect shade of joy for your summer adventures.
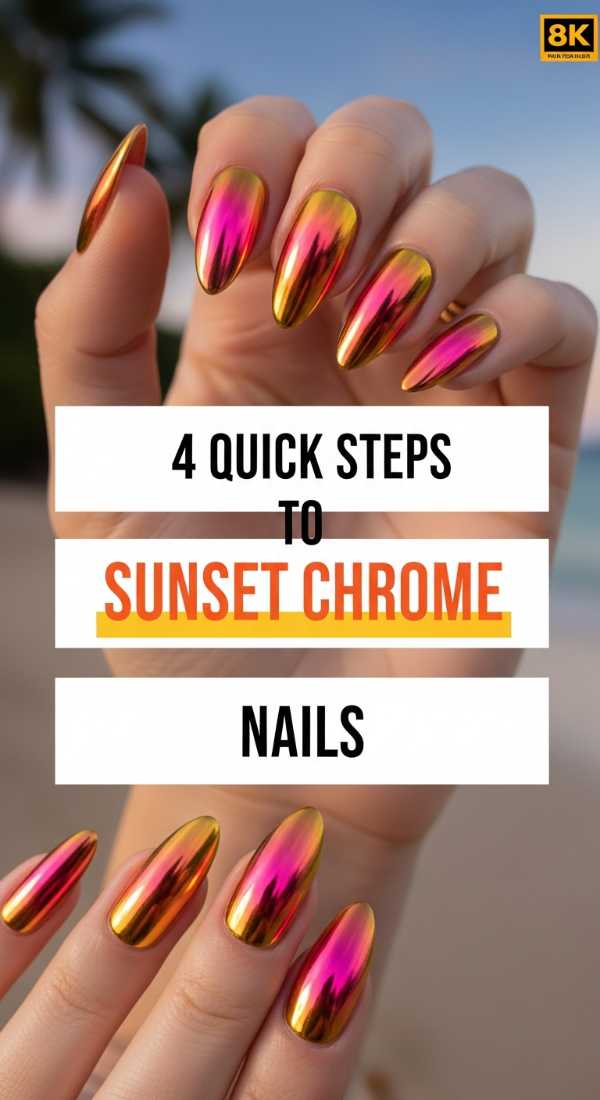
Sunkissed Glow: 4 Steps to Sunset Chrome Nails
Why to love this Design:
My loves, imagine the sky’s final golden bow captured right on your fingertips. This look is all about that ethereal, high-shine glow that makes every movement look like a flicker of candlelight. It’s sophisticated, radiant, and perfectly mimics the horizon as the sun dips below the waves.
Essential Elements:
- Warm amber base polish
- Iridescent gold chrome powder
- High-gloss top coat
- Soft sponge applicator
How to Prepare:
- Apply two thin coats of a warm amber or burnt orange gel polish and cure.
- While the nail is still slightly warm, use a sponge to buff in the gold chrome powder until a mirror finish appears.
- Gently brush away excess dust with a soft fan brush.
- Seal the magic with a no-wipe top coat for maximum brilliance.
Budget Range
- OPI Infinite Shine in ‘Sun, Sea, and Sand in My Pants’ ($14)
- Artdone Holographic Chrome Powder Kit ($9)
- Essie Gel Setter Top Coat ($12)
Honor the Journey: 5 Simple Ways to Style Graduation Nails

Why to love this Design:
The milestone of a lifetime deserves a set that speaks of both your hard work and your bright future. These designs are sophisticated yet celebratory, leaning into the ‘Class of 26’ energy while remaining timeless enough for those precious family photos.
Essential Elements:
- Sheer ‘your nails but better’ nude
- Micro-fine silver glitter
- Ultra-thin detailing brush
- Small ‘2026’ decals or stamps
- Matte and gloss contrast
How to Prepare:
- Start with a clean, buffed canvas and a sheer pink base.
- Add a delicate ‘French’ tip using silver glitter for a touch of sparkle.
- Apply a ‘2026’ decal on the ring finger for a subtle nod to your achievement.
- Use a matte top coat on the thumb and pinky for a modern, velvety texture.
- Finish the middle fingers with a high-shine gloss to create a multidimensional look.
Budget Range
- Zoya Naked Manicure Perfector ($12)
- Amazon Nail Art Letter Stickers ($7)
- Holler and Glow Glitter Polish ($5)
Zesty & Bright: 3 Easy Ways to Master Lemon Nails

Why to love this Design:
There is nothing quite as refreshing as a cold glass of lemonade on a humid July day, and these nails bring that exact zest to your aesthetic. They are playful, punchy, and instantly brighten your mood every time you look down at your hands.
Essential Elements:
- Primary yellow cream polish
- White striper pen
- Clear 3D building gel for ‘juice drops’
How to Prepare:
- Paint a soft yellow semi-circle at the base or tip of the nail to represent a lemon slice.
- Detail the white ‘pith’ lines using a very fine brush to create sections.
- Dot tiny clear beads of 3D gel on top to look like refreshing dew drops.
Budget Range
- Sally Hansen Insta-Dri in ‘Walking on Sunshine’ ($6)
- Modelones 3D Sculpture Gel ($10)
- Beetles White Liner Gel ($8)
Midnight Heat: 6 Steps to Achieve Summer Goth Nails

Why to love this Design:
Who says dark colors are only for winter? Summer goth is all about high-contrast drama—think sheer black lace, deep plums, and silver charms that glint in the bright sun. It’s for my loves who find beauty in the shadows even during the brightest months.
Essential Elements:
- Sheer ‘jelly’ black polish
- Deep oxblood accent color
- Tiny silver star or moon charms
- Pointed ‘stiletto’ or ‘almond’ shape
- Nail glue
- Tweezers
How to Prepare:
- Shape your nails into a sharp almond to lean into the edgy aesthetic.
- Apply two coats of black jelly polish for a translucent, smoky finish.
- Add a deep oxblood ombré starting from the cuticle.
- Place a silver moon charm on the accent nail using a tiny drop of glue.
- Seal the charm edges with a thick top coat to prevent snagging.
- Finish with a cuticle oil that smells like sandalwood to complete the vibe.
Budget Range
- Cirque Colors ‘Jade Jelly’ or ‘Marsala Jelly’ ($13)
- Silver Nail Charms Variety Pack ($8)
- Makartt Rhinestone Glue ($9)
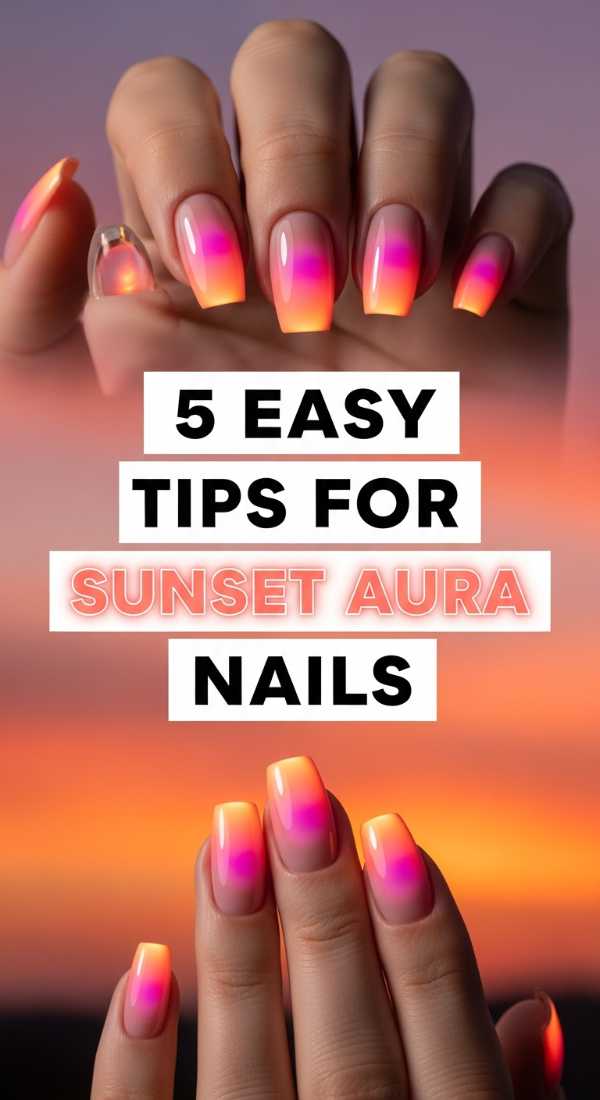
Dreamy Horizons: 5 Easy Tips for Sunset Aura Nails
Why to love this Design:
Aura nails are like a soft, glowing blush for your fingertips. By blending sunset hues from the center outward, you create a look that feels deeply spiritual and incredibly trendy. It’s like carrying a personal piece of the sky’s energy with you.
Essential Elements:
- Peach base color
- Hot pink pigment powder or eyeshadow
- Fluffy blending brush
- Shielding tape or liquid latex
- Glossy top coat
How to Prepare:
- Prep the skin around the nail with liquid latex to keep things clean.
- Apply a solid peach base and let it dry completely.
- Dip a fluffy brush into pink pigment and gently tap it into the center of the nail.
- Buff the edges of the pigment outward in circular motions to create a soft ‘glow’ effect.
- Top with a generous layer of gloss to melt the colors together seamlessly.
Budget Range
- Essie ‘Check In to Check Out’ ($10)
- Saviland Nail Pigment Powder ($12)
- Pueen Liquid Latex ($9)
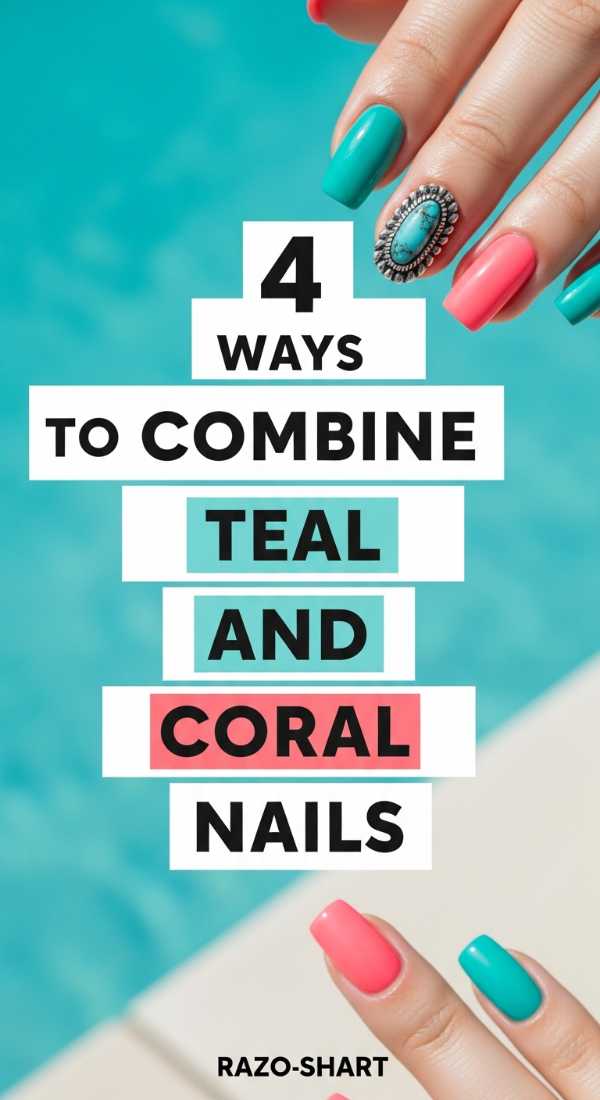
Tropical Fusion: 4 Ways to Combine Teal and Coral Nails
Why to love this Design:
Teal and coral are the ultimate summer soulmates. They represent the meeting of the deep ocean and the vibrant reef. This combination is energetic, flattering on every skin tone, and feels like an instant vacation in a bottle.
Essential Elements:
- Vibrant teal cream polish
- Punchy coral pink polish
- Sponge for gradient blending
- Thin striping tape
How to Prepare:
- Paint half the nail teal and the other half coral for a bold split look.
- Use a sponge to create a vertical gradient where the two colors meet in the middle.
- Apply thin gold striping tape over the seam for a ‘jewelry’ effect.
- For the pinky, use teal as a base with tiny coral dots for a playful pattern.
Budget Range
- Orly ‘Far Out’ Teal ($15)
- Revlon Enamel in ‘Coral Reef’ ($7)
- Line Art Striping Tape ($5)
Vintage Riviera: 7 Steps to Create Vibrant Pucci Nails
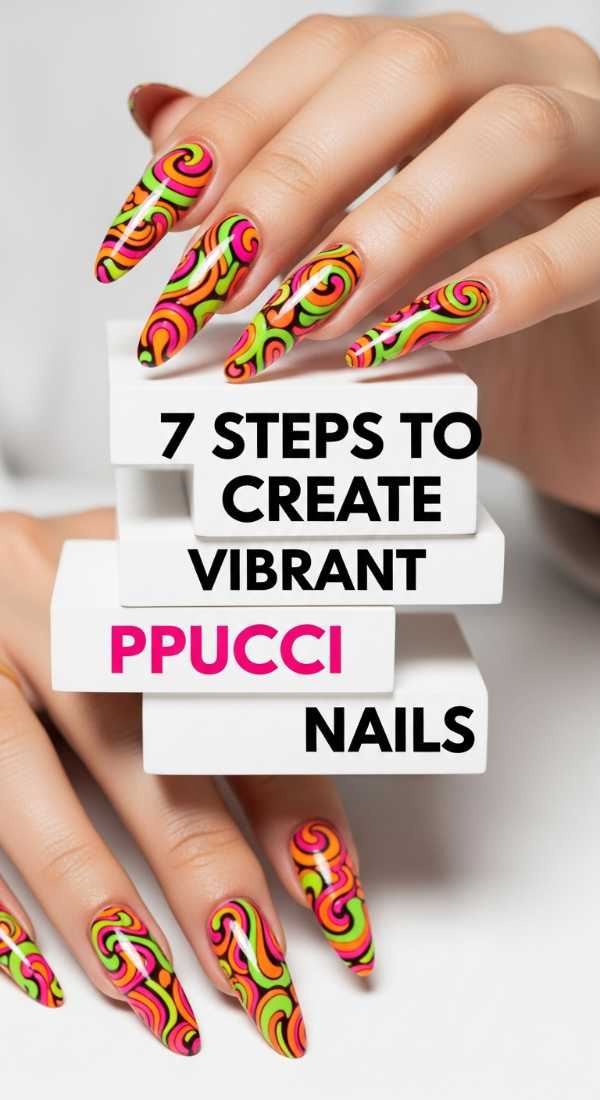
Why to love this Design:
Inspired by the iconic Italian fashion house, these nails are a swirl of retro glamour. They feel like driving a vintage convertible along the Amalfi Coast. It’s a sophisticated way to wear multiple bright colors without looking cluttered.
Essential Elements:
- Selection of 4 pastels and 1 bright (Pink, Blue, Lavender, Lime)
- Fine detail liner brush
- Black or white ‘border’ polish
- Patience and a steady hand
How to Prepare:
- Start with a clean white base to make the colors pop.
- Using your liner brush, paint irregular, wavy ‘puddle’ shapes in the first color.
- Add the second color nested right against the first, following the curve.
- Repeat until the nail is covered in a mosaic of organic shapes.
- Outline a few of the shapes with a very thin white line to define the sections.
- Add tiny dots within some shapes for that authentic 60s print feel.
- Seal with a high-shine top coat to even out the layers.
Budget Range
- Beetles Pastel Gel Polish Set ($20 for 6 colors)
- Winstonia Berry Wine Fine Detail Brushes ($10)
- Seche Vite Dry Fast Top Coat ($10)
Emerald Fields: 5 Lucky Designs for May Birthday Nails

Why to love this Design:
For my May babies, this is your time to shine! Inspired by the emerald birthstone and the blooming Lily of the Valley, these designs celebrate the lushness of spring turning into summer. It’s earthy, regal, and deeply personal.
Essential Elements:
- Deep emerald green polish
- Gold leaf flakes
- Small floral stickers (Lily of the Valley)
- Milky white base polish
How to Prepare:
- Create a ‘marbled emerald’ look by swirling green and clear polish together.
- Press gold leaf flakes into the tacky layer for a royal touch.
- Use a milky white base on the ring finger and apply a delicate floral sticker.
- Apply a matte top coat to the green nails for a ‘velvet stone’ appearance.
- Keep the floral nail glossy to emphasize the ‘dewy’ garden feel.
Budget Range
- ILNP ‘傳說’ (Legend) Emerald ($12.50)
- Gold Leaf Flakes for Nails ($6)
- DecalGirl Floral Nail Wraps ($8)
Electric Jungle: 6 Fun Steps for Neon Cheetah Nails
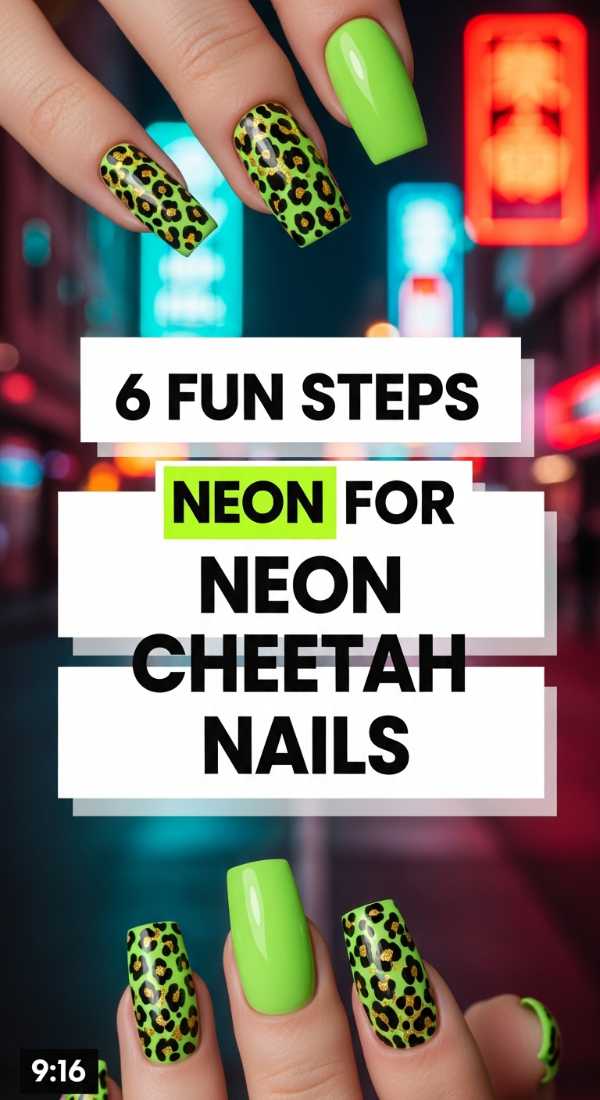
Why to love this Design:
Sometimes, we just want to be a little wild! Neon cheetah print is the ultimate party mani. It takes a classic pattern and turns up the volume with electric greens and hot pinks. It’s loud, it’s proud, and it’s incredibly fun to DIY.
Essential Elements:
- Neon lime or pink base
- Black acrylic paint or polish
- Dotting tool
- Small detailing brush
How to Prepare:
- Apply two coats of your brightest neon base color.
- Use a dotting tool to create irregular ‘blobs’ of a slightly different neon shade.
- Take your thin brush and black polish to ‘bracket’ the blobs with two or three C-curves.
- Add a few random black dots in the empty spaces to fill the ‘fur’ pattern.
- Let the black dry completely so it doesn’t smear.
- Finish with a super-glossy top coat to make the neons neon-er.
Budget Range
- Kiara Sky Neon Collection ($15 per bottle)
- Nail Art Dotting Tool Set ($6)
- Apple Barrel Black Acrylic Paint ($2)
The Perfect Pair: 3 Rules to Match Hands and Toes Nails
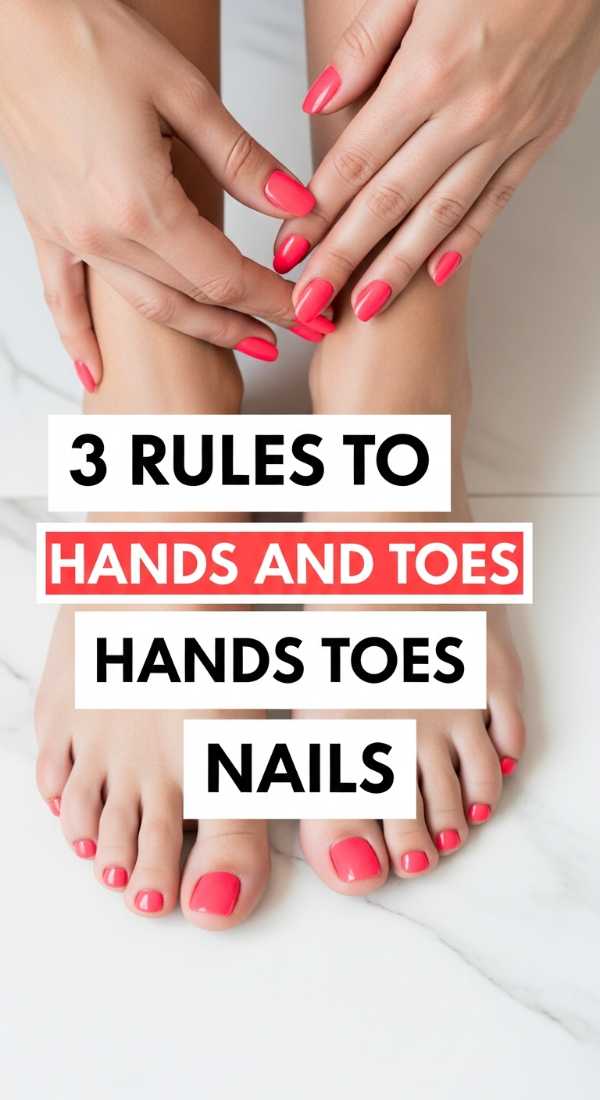
Why to love this Design:
There is a certain ‘togetherness’ that comes with a perfectly coordinated mani-pedi. You don’t want them to be identical (too matchy-matchy!), but you want them to tell the same story. It’s the ultimate finishing touch for your summer sandal game.
Essential Elements:
- Complementary color wheel knowledge
- Consistent finish (both matte or both gloss)
- Shared accent detail
How to Prepare:
- Rule 1: Use the same color family but different shades (e.g., navy toes, sky blue fingers).
- Rule 2: Match the texture—if your hands have chrome, add a chrome stripe to your big toe.
- Rule 3: If one is busy with patterns, keep the other a solid ‘anchor’ color from that pattern.
Budget Range
- Olive & June ‘The Mani System’ ($50)
- Butter London Patent Shine 10X ($18)
- Dashing Diva Gloss Gel Strips ($8)
Embrace Your Summer Glow
My beautiful loves, I hope these tutorials inspire you to take a little moment for yourself this week. Whether you’re celebrating a graduation, a birthday, or simply the fact that the sun is shining, remember that your self-care is a ritual of self-love. These nails are just a small way to express the radiant light you already carry inside. Go forth, be bold, and stay sunkissed!