
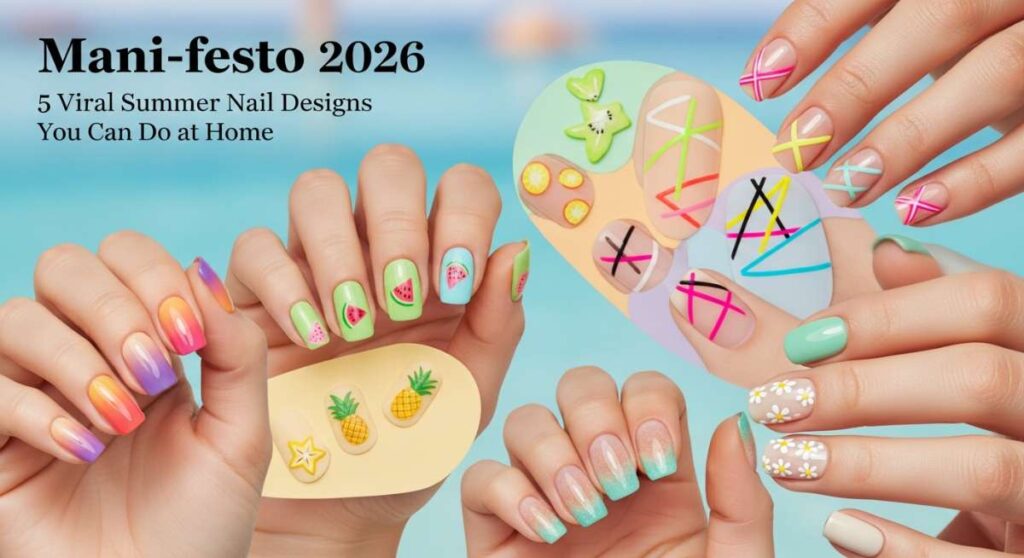
Mani-festo 2026: 5 Viral Summer Nail Designs You Can Do at Home
Hey there, loves! Can you feel it? That first whisper of a warm breeze, the way the sunlight dances on the kitchen floor a little longer each evening—Summer 2026 is finally whispering its arrival. I’ve been spending my mornings on the porch with a lavender latte, just soaking in the quiet before the season of pool parties and sunset drives truly begins. There’s something so transformative about this time of year, isn’t there? It’s like we’re all blooming right along with the peonies.
One of my favorite ways to welcome a new season is by treating my hands to a little extra magic. There’s a certain kind of soft, cloud-like peace that comes with sitting down, putting on your favorite playlist, and painting your nails. It’s not just about the color; it’s about that quiet moment of self-love where you get to create something beautiful just for you. This summer, the trends are all about expression—from earthy birthday vibes to the high-energy glow of neon.
I’ve curated a little guide for us today, a ‘mani-festo’ if you will, of the looks that are currently taking over my feed and my heart. Whether you’re celebrating a milestone or just want your fingertips to match your summer mood, I’ve got you covered. So, grab your favorite file, find a cozy spot with good light, and let’s dive into these dreamy designs together.
7 Steps to Get Perfect Taurus Birthday Nails

Why to love this Design:
Oh, my sweet Taurus loves, this one is for you. This design is like a walk through a sun-dappled forest; it’s grounded, luxurious, and feels incredibly expensive without trying too hard. It captures that reliable yet decadent energy that makes every Taurus soul so special.
Essential Elements:
- Deep forest green polish
- Gold leaf or foil flakes
- Matte top coat
- Tiny botanical decals
How to Prepare:
- Shape nails into a soft, natural almond.
- Apply a nourishing base coat to protect the natural nail.
- Paint two thin layers of your chosen moss or forest green.
- While the second coat is tacky, gently press gold flakes onto the ring finger.
- Apply a botanical decal on the thumb for an earthy touch.
- Seal the gold and decals with a clear gloss.
- Finish the rest of the nails with a velvety matte top coat for that soft-touch finish.
Budget Range
- Essie ‘Off Tropic’ Green – $10
- Nail Art Gold Foil Flakes – $6
- Sally Hansen Miracle Gel Matte Top Coat – $8
4 Simple Ways to Style Graduation Nails

Why to love this Design:
Graduation is such a tender, whirlwind moment of ‘goodbyes’ and ‘hellos.’ You want a manicure that looks timeless in photos but still carries a spark of the excitement you’re feeling as you walk across that stage. It’s about celebrating your hard work with a touch of elegance.
Essential Elements:
- Sheer milky white polish
- Fine silver glitter
- Micro-pearl accents
- High-gloss top coat
How to Prepare:
- Opt for a ‘clean girl’ aesthetic with a sheer milky base for a timeless look.
- Add a ‘glitter gradient’ starting from the cuticle for a subtle celebration vibe.
- Place a single micro-pearl at the base of each nail for a sophisticated pearl-core finish.
- Try a classic French tip but swap the white for a soft silver metallic.
Budget Range
- OPI ‘Funny Bunny’ – $11
- Holo Taco ‘Silver Flake’ – $13
- Nail Art Pearl Studs Kit – $7
3 Easy Techniques for Sunset Chrome Nails
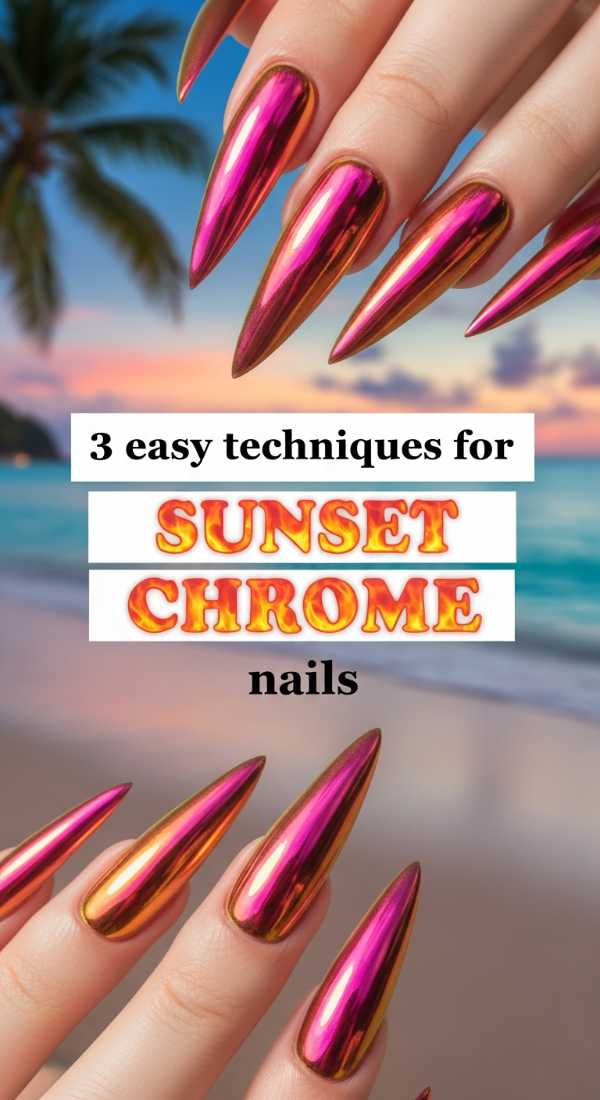
Why to love this Design:
Imagine the sky right at 8:42 PM—that fleeting, magical moment where the oranges melt into purples. That is exactly what this mani feels like. It’s high-shine, ethereal, and catches the light in the most mesmerizing way whenever you move your hands.
Essential Elements:
- Peach or Coral base color
- Purple/Blue shifting chrome powder
- Sponge applicator
- Non-wipe gel top coat
How to Prepare:
- The Rub-In Method: Apply your base color, top coat, then rub the powder in with a sponge until it glows.
- The Ombre Blend: Sponge two different chrome powders onto the nail for a multi-tonal shift.
- The Glazed Finish: Use a very sparse amount of powder over a sheer base for a ‘donut’ effect that mimics a hazy sunset.
Budget Range
- Chrome Powder Palette – $12
- Gelish No-Wipe Top Coat – $15
- Beetles Peach Gel Polish – $8
5 Quick Steps for Lemon Nails Designs
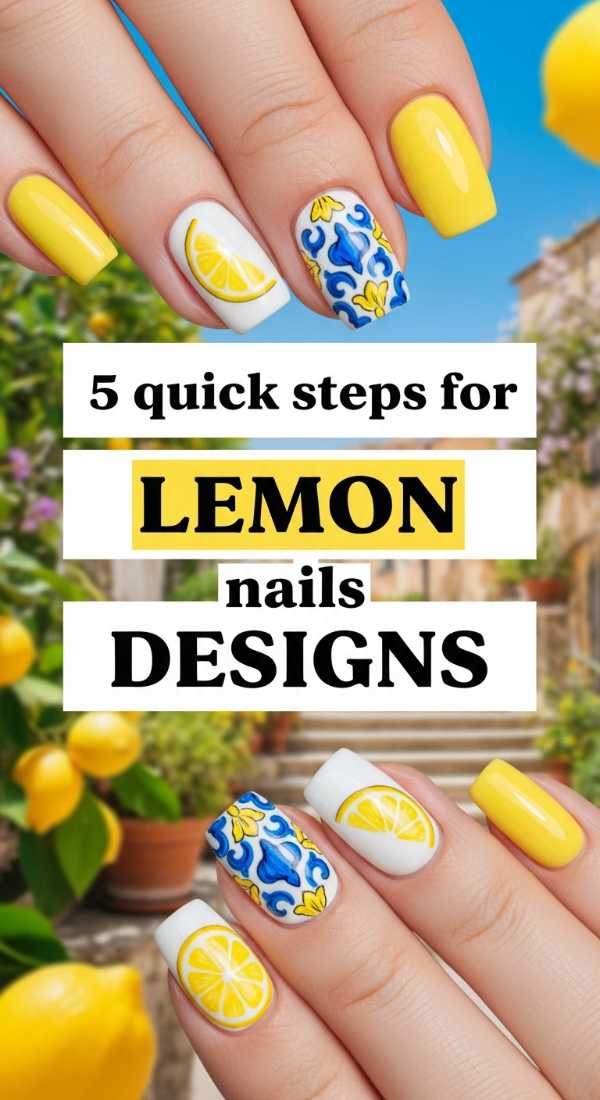
Why to love this Design:
Is there anything more synonymous with summer than a cold glass of lemonade? This design is pure joy. It’s bright, zesty, and guaranteed to make you smile every time you look down at your keyboard. It’s like a little burst of sunshine for your fingertips.
Essential Elements:
- Bright yellow polish
- White nail art pen
- Dotting tool
- Clear yellow ‘jelly’ polish
How to Prepare:
- Paint a base of soft white to make the yellow pop.
- Use a dotting tool to create two yellow circles side-by-side.
- Take a fine brush or nail pen to draw tiny white ‘slices’ inside the yellow circles.
- Add a tiny green leaf at the top with a toothpick.
- Layer a jelly yellow over the lemon for a 3D, juicy effect.
Budget Range
- Orly ‘Lemonade’ Polish – $12
- Nail Art Liner Brushes – $5
- Zoya ‘Honey’ Jelly – $10
6 Tips to Master Summer Goth Nails
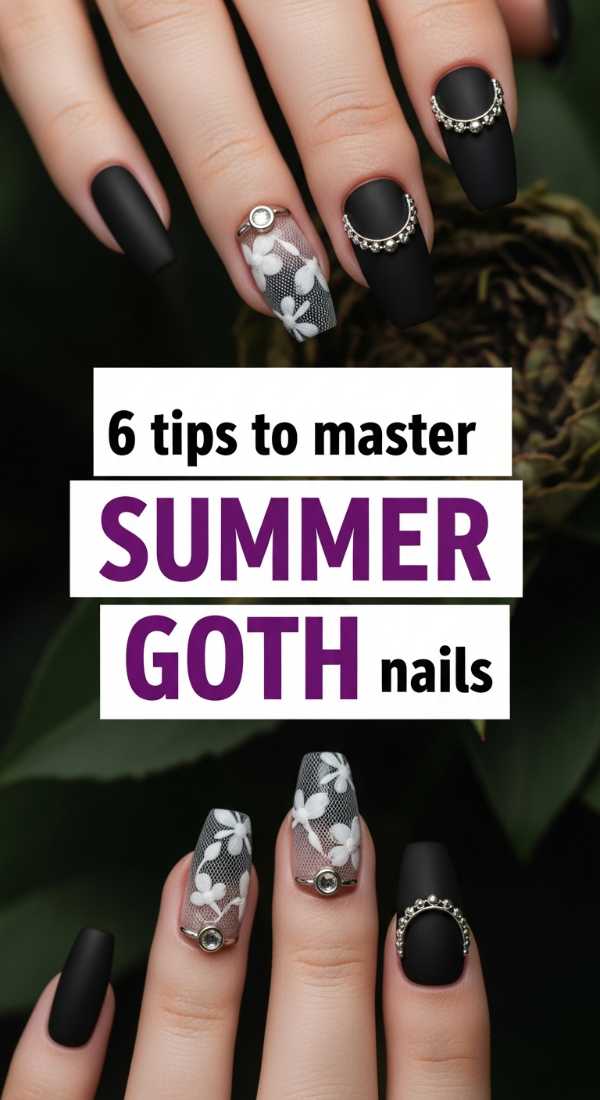
Why to love this Design:
Who says dark colors are only for winter? Summer Goth is all about that moody, romantic edge filtered through the heat. It’s black lace, iced americanos, and shadows on the sand. It’s sophisticated, slightly rebellious, and incredibly chic.
Essential Elements:
- Sheer black ‘jelly’ polish
- Silver star decals
- Pointed stiletto shape
- Ultra-glossy finish
How to Prepare:
- Use a sheer black instead of opaque to keep the look ‘light’ and airy.
- Mix matte and glossy textures—try a glossy tip on a matte black nail.
- Add silver celestial elements like moons or stars to break up the dark color.
- Negative space is your friend; leave a small crescent at the base unpainted.
- Keep the nail shape sharp—stiletto or long coffin works best for this vibe.
- Finish with a cuticle oil that smells like sandalwood to complete the aesthetic.
Budget Range
- Cirque Colors ‘Spotted’ Black Jelly – $14
- Silver Star Nail Stickers – $4
- Nail Tek Strengthening Base – $9
5 Ways to Rock Teal Western Nails
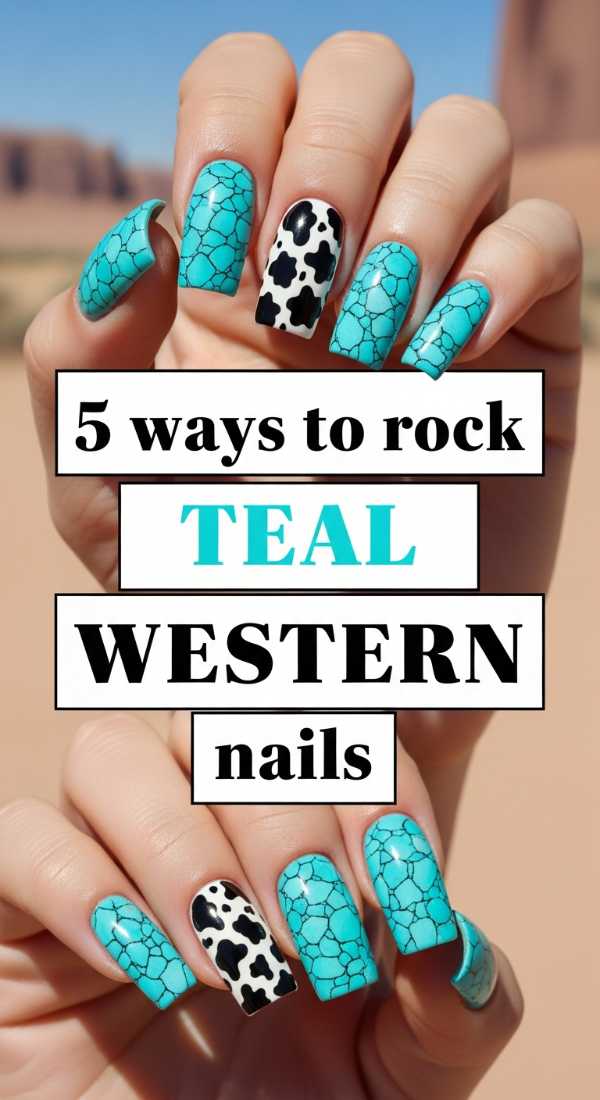
Why to love this Design:
This is for my desert-loving souls. It’s inspired by vintage turquoise jewelry, dusty trails, and the wild, free spirit of the West. It feels adventurous and artistic, like something you’d wear to a music festival under the stars.
Essential Elements:
- Teal or Turquoise polish
- Copper metallic polish
- Cow print stamps or decals
- Turquoise stone embellishments
How to Prepare:
- The Turquoise Stone: Swirl teal and white together while wet for a marbled stone effect.
- The Copper Accent: Use a metallic copper to create ‘tooled leather’ patterns or simple lines.
- The Cowgirl Chic: Pair a solid teal nail with a black-and-white cow print accent nail.
- The Studded Look: Add tiny silver or copper studs vertically down the center of the nail.
- The Matte Desert: Use a matte top coat over the teal to give it a sun-baked, clay-like feel.
Budget Range
- Lights Lacquer ‘Turquoise’ – $13
- Copper Stamping Polish – $7
- Nail Art Studs – $6
4 Steps to Paint Neon Cheetah Print Nails
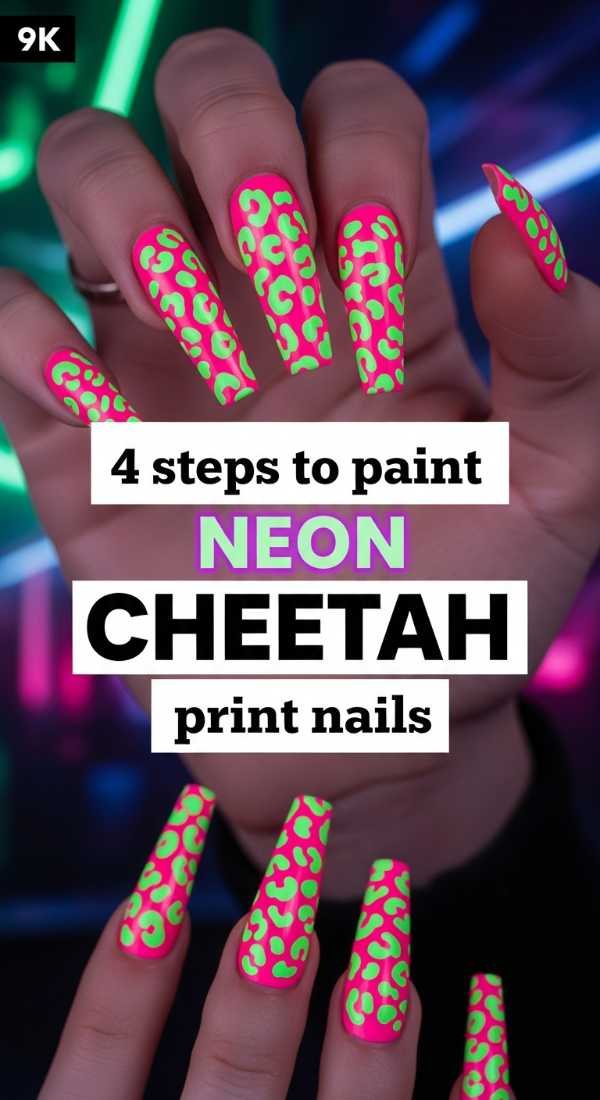
Why to love this Design:
Sometimes you just need to turn the volume up! Neon cheetah is the ultimate ‘party’ mani. It’s high-energy, nostalgic for the early 2000s, and looks absolutely incredible against a summer tan. It’s bold, brave, and unapologetically fun.
Essential Elements:
- Neon pink or lime green base
- Black nail art pen
- Gold glitter centers
- Neon orange accents
How to Prepare:
- Apply two coats of your brightest neon base.
- Use a dotting tool to place irregular ‘blobs’ of a secondary neon color or gold.
- Take your black pen and draw ‘C’ shapes or brackets around the blobs—don’t be too perfect!
- Add a few tiny black dots in the empty spaces to fill out the pattern.
Budget Range
- China Glaze ‘Flip Flop Fantasy’ – $9
- Black Nail Art Detailer – $6
- Kiara Sky Neon Collection – $15
3 Secrets to Blending Sunset Aura Nails
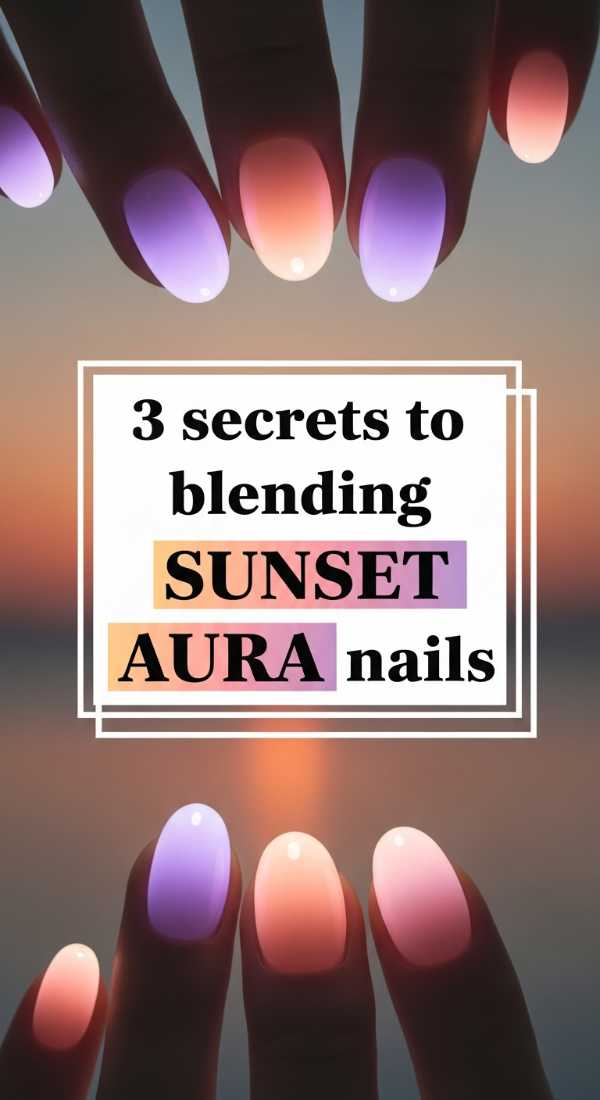
Why to love this Design:
Aura nails are like a visual representation of your energy. The sunset version uses warm tones that radiate from the center, creating a soft, blurred effect that looks like light glowing from within. It’s incredibly soothing and artistic.
Essential Elements:
- Makeup sponge wedges
- Peach, Pink, and Violet polishes
- White base coat
- Patience!
How to Prepare:
- The Sponge Secret: Apply the colors in a circle on the sponge (violet outside, peach inside) and dab lightly.
- The White Base: Always start with a solid white base to make the ‘aura’ glow rather than looking muddy.
- The Top Coat Blur: Apply your top coat while the colors are still slightly damp to help the edges bleed together naturally.
Budget Range
- Cosmetic Sponges – $3
- OPI ‘Pink Flamenco’ – $11
- DND Gel Polish Set – $14
8 Ways to Design Hot Pink Nails with Flowers

Why to love this Design:
Hot pink is the color of summer vitality, and adding flowers makes it feel like a tropical vacation. It’s feminine, vibrant, and has a classic ‘Barbiecore’ meets ‘Island Girl’ energy that never goes out of style.
Essential Elements:
- Hot pink cream polish
- White and yellow acrylic paint (for flowers)
- Fine liner brush
- Iridescent top coat
How to Prepare:
- The Hibiscus: Draw large 5-petal flowers with a yellow center.
- The Dainty Daisy: Use a dotting tool for simple white petals.
- The French Floral: Paint pink tips and trail tiny flowers along the smile line.
- The Bouquet: Cover the ring finger entirely in different sized blooms.
- The 3D Flower: Use a thick builder gel to create raised petals.
- The Glitter Garden: Add a holographic glitter over the pink before painting flowers.
- The Negative Space Bloom: Paint flowers only on the ‘naked’ part of the nail.
- The Ombre Petal: Blend pink into white at the tips of the petals for depth.
Budget Range
- Essie ‘Cactus Jelly’ – $10
- Nail Art Brush Set – $8
- Seche Vite Dry Fast Top Coat – $9
5 Rules for Matching Hands and Toes Nails

Why to love this Design:
There is a quiet confidence that comes from a perfectly coordinated mani-pedi. It makes you feel ‘put together’ even if you’re just wearing flip-flops and a cover-up. It’s the ultimate finishing touch for any summer look.
Essential Elements:
- Coordinating (not identical) shades
- High-quality top coat for toes
- Consistent texture (all matte or all glossy)
- Nourishing cuticle oil
How to Prepare:
- Rule 1: If the hands are loud (patterns), keep the toes a solid color from that pattern.
- Rule 2: Match the ‘temperature’—cool tones with cool tones, warm with warm.
- Rule 3: Use the same top coat finish for both to create visual unity.
- Rule 4: Metallic toes always look chic with a cream-finish manicure.
- Rule 5: When in doubt, a darker version of your fingernail color on your toes is a foolproof win.
Budget Range
- Sally Hansen Complete Salon Manicure – $9
- Flowery Foot File – $5
- SolarOil Cuticle Care – $12
Embrace Your Summer Glow
As we wrap up our little mani-session, I hope you’re feeling inspired to play with color and let your creativity shine. Remember, loves, these nails are just an extension of the beautiful light you already carry. Whether you choose the earthy Taurus greens or the vibrant neon cheetah, the most important thing is that they make you feel like the best version of yourself. Summer is a time for joy, for exploration, and for being kind to yourself. So, take these designs, make them your own, and go out there and make some memories. I can’t wait to see what you create!