

Nailed It! Your Ultimate Guide to the Hottest 2026 Spring & Summer Looks
Hello, my beautiful loves. I can almost feel the soft, warm breeze of the coming 2026 spring season dancing against my skin, and I hope you can too. There is something so incredibly magical about the transition from the quiet hushing of winter to the vibrant, blooming energy of the sunnier months. It’s like the world is finally taking a deep breath and waking up, and I want us to celebrate that awakening right down to our fingertips.
I’ve spent the last few weeks dreaming in color, inspired by the softest linens, the glow of a setting sun, and the zesty joy of a summer citrus grove. This season, our nails aren’t just an accessory; they are a soft embrace, a way to tell our story without saying a word. Whether you’re walking across a graduation stage or dancing in the sand, I’ve curated these looks just for you, my sweet souls. Let’s dive into the magic together.
7 Easy Steps to Perfect Graduation Nails

Why to love this Design:
Graduation is such a profound milestone, a moment where all your hard work meets the horizon of your future. You want a nail design that feels as sophisticated as your cap and gown but sparkles with the excitement of what’s next. It’s about elegance, resilience, and that subtle shimmer that catches the light as you reach for your diploma.
Essential Elements:
- Soft pearl base polish
- Micro-fine silver or gold glitter
- Precision striping brush
- High-gloss top coat
How to Prepare:
- Cleanse nails thoroughly with alcohol to remove any oils.
- Apply a nourishing base coat to protect the natural nail.
- Paint two thin layers of a sheer, milky pearl polish.
- Use a detail brush to add a thin ‘smile line’ of glitter at the tips.
- Gently fade the glitter downward toward the cuticle for an ombré effect.
- Seal with a long-wear top coat for maximum shine.
- Finish with a drop of lavender cuticle oil for a calming scent.
Budget Range
- OPI Bubble Bath Polish: $11.00
- Holo Taco Silver Flake: $13.00
- Sally Hansen Top Coat: $7.00
Follow These 5 Tips for May Nail Designs
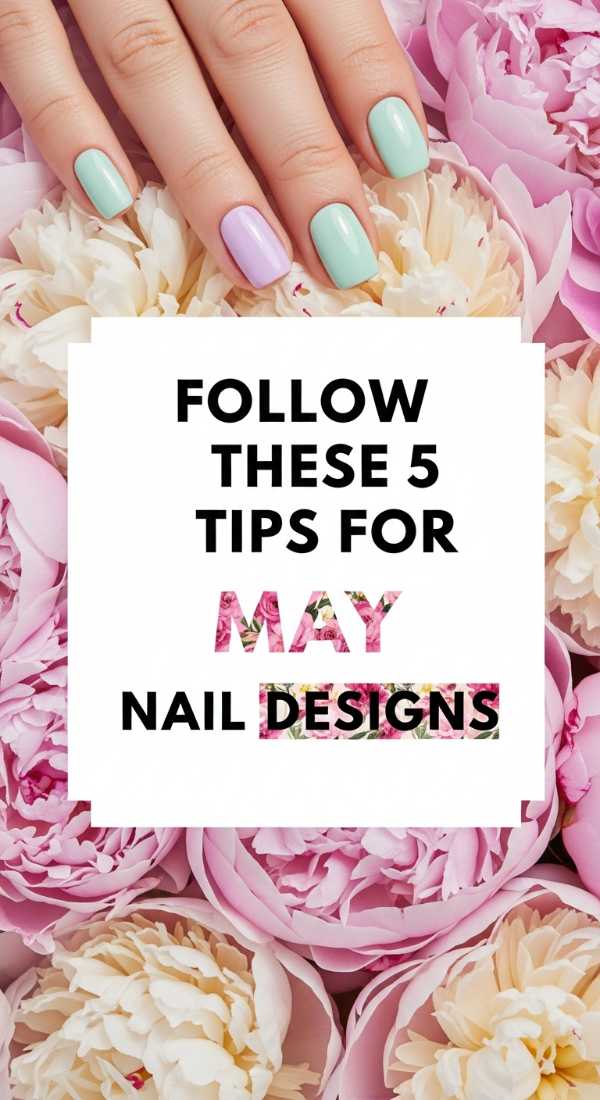
Why to love this Design:
May is the heart of the floral season, a time when everything feels lush and alive. These designs are all about capturing the essence of a wildflower meadow—soft, unstructured, and breathtakingly natural. It’s the perfect way to carry a little bit of the garden with you wherever you go.
Essential Elements:
- Pastel lilac and sage green shades
- Dotting tool for floral centers
- Matte top coat for a velvet finish
- Real dried flower accents
How to Prepare:
- Start with a clean, buffed nail surface for better adhesion.
- Apply your pastel base color in two even, thin coats.
- Use the dotting tool to create tiny ‘petals’ around a central point.
- Incorporate negative space to keep the look light and airy.
- Finish with a matte top coat to give the florals a soft, ‘pressed-flower’ look.
Budget Range
- Essie ‘Sage You Love Me’: $10.00
- Nail Art Dotting Tool Set: $6.00
- Manucurist Dried Flowers: $12.00
Apply Sunset Chrome Nails in 4 Simple Stages
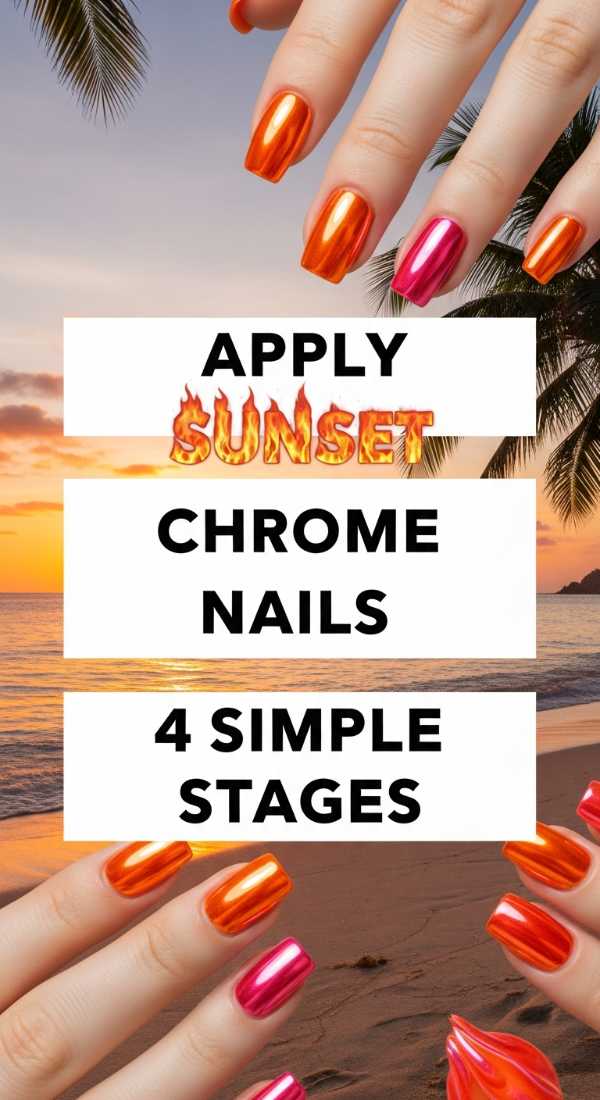
Why to love this Design:
There is nothing quite like that golden hour glow, is there? Sunset chrome nails capture the ephemeral beauty of the sky turning from orange to pink to deep violet. They have a futuristic yet warm vibe that makes your hands look absolutely radiant under the summer sun.
Essential Elements:
- Neon orange and pink gel polish
- Mirror-finish chrome powder
- Sponge applicator
- Non-wipe top coat (essential for chrome)
How to Prepare:
- Apply a vibrant orange-to-pink gradient using a makeup sponge.
- Apply a non-wipe gel top coat and cure it for exactly 30 seconds.
- Burnish the chrome powder into the surface using a sponge applicator until it shines.
- Seal with a second layer of top coat to lock in the metallic brilliance.
Budget Range
- Born Pretty Chrome Powder: $8.00
- Gelish Mini Neon Set: $15.00
- LED Nail Lamp: $25.00
Create Lemon Nails Designs in 6 Quick Steps
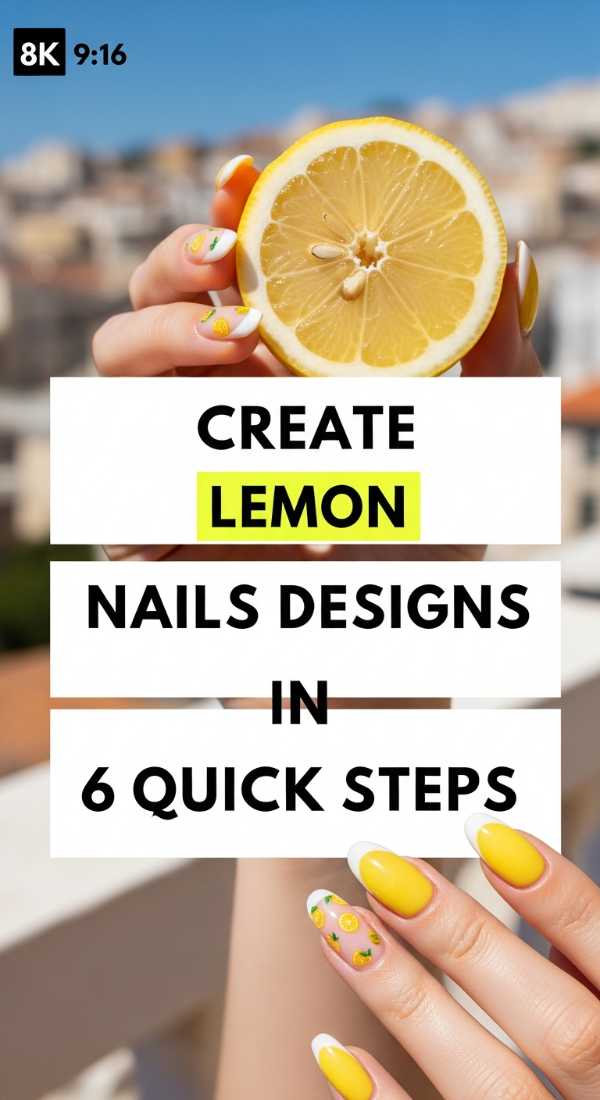
Why to love this Design:
When life gives you lemons, put them on your nails! This design is pure sunshine and zest. It’s playful, kitschy, and instantly boosts your mood. It’s the ultimate look for a backyard BBQ or a day at the farmer’s market, reminding us to squeeze every bit of joy out of the summer.
Essential Elements:
- Bright canary yellow polish
- White acrylic paint for detailing
- Fine liner brush
- Glossy top coat
How to Prepare:
- Shape nails into a soft almond or oval to mimic the fruit shape.
- Apply a clear or nude base to make the yellow pop.
- Paint small yellow ovals or ‘half-moons’ on the tips or sides.
- Use white paint to add the internal ‘segments’ of the lemon.
- Add a tiny dot of green for a leaf or stem detail.
- Protect the hand-painted art with a thick, protective top coat.
Budget Range
- Zoya ‘Darcy’ Yellow: $12.00
- Winstonia Detail Brushes: $9.00
- Seche Vite Top Coat: $9.00
Master Neon Cheetah Print Nails with 8 Tricks

Why to love this Design:
Sometimes, we need to let our wild side breathe! Neon cheetah print is for the bold, the adventurous, and the fiercely feminine. By mixing bright neon hues with classic animal patterns, you create a look that is both nostalgic for the 90s and perfectly modern for 2026.
Essential Elements:
- Neon pink, lime, and orange polishes
- Black striper polish or gel
- Fine-point dotting tool
- Steady hand support
How to Prepare:
- Apply a different neon shade to each nail for a mismatched vibe.
- Allow the base to dry completely to prevent bleeding.
- Use a dotting tool to create irregular ‘blobs’ of a contrasting neon.
- Outline the blobs with black polish, but leave the circles incomplete.
- Add small black dots in the empty spaces to fill the ‘fur’ pattern.
- Keep the black lines thin to let the neon shine through.
- Clean your brush frequently with acetone for crisp lines.
- Apply two coats of top coat to level out the texture of the spots.
Budget Range
- Modelones Neon Gel Kit: $20.00
- Beetles Black Gel Liner: $8.00
- Lint-free wipes: $5.00
Style Summer Goth Nails in 6 Edgy Ways
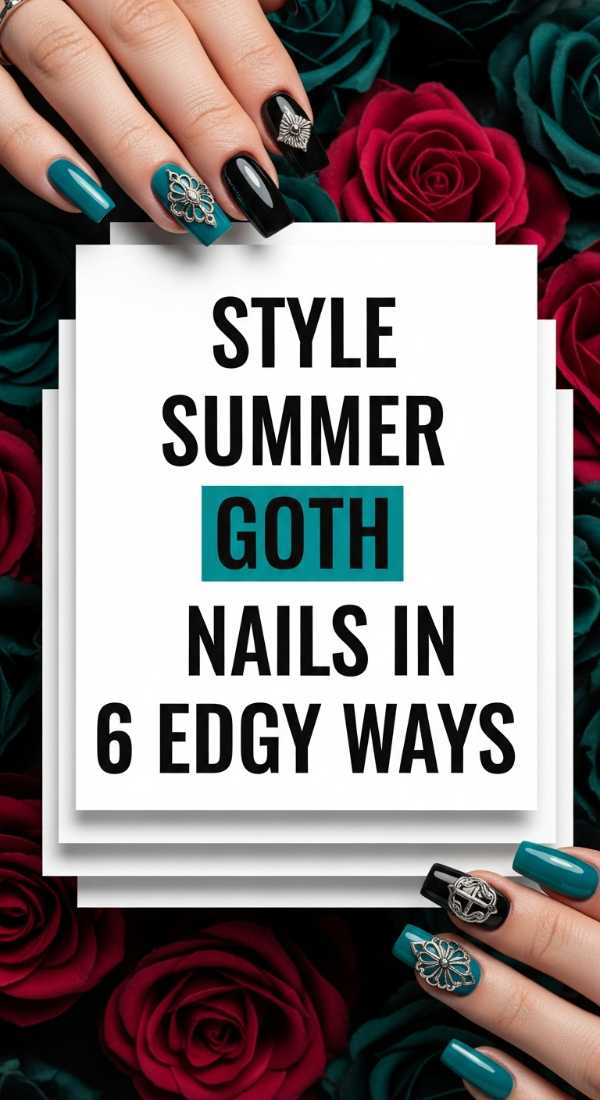
Why to love this Design:
Who says dark colors are only for winter? Summer goth is all about that moody, romantic edge—think black lace on the beach. It’s a sophisticated way to stay true to your dark aesthetic while keeping things light enough for the heat of July. It’s mysterious, edgy, and deeply chic.
Essential Elements:
- Sheer black ‘tights’ polish
- Silver 3D charms (crosses, hearts)
- Smoky grey accents
- High-shine finish
How to Prepare:
- Apply one coat of sheer black to create a ‘smoke’ effect.
- Use a darker black to paint thin, gothic French tips.
- Place a single silver charm on the ring finger for a focal point.
- Use a sponge to dab smoky grey at the cuticles for depth.
- Keep nails long and stiletto-shaped for maximum drama.
- Seal everything with a thick gel-builder top coat to secure charms.
Budget Range
- Cirque Colors ‘Spotted’: $14.00
- Amazon Nail Charm Bulk Pack: $10.00
- Ibd Building Gel: $14.00
Recreate Pucci Nails in 5 Easy Sequences
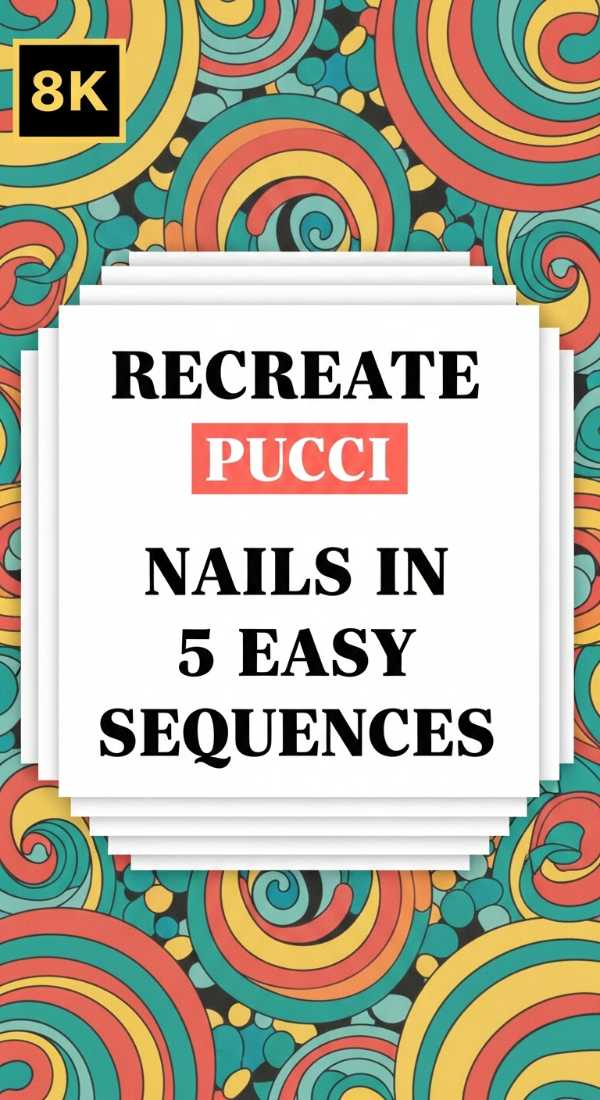
Why to love this Design:
Named after the iconic fashion house, Pucci nails are a swirl of retro-glamour. These psychedelic, colorful patterns feel like a vintage scarf blowing in the wind on the Italian Riviera. They are artistic, high-fashion, and make every movement of your hands look like a piece of art.
Essential Elements:
- Teal, coral, and cream polishes
- Long-haired striping brush
- Mixing palette
- Patience for layering
How to Prepare:
- Prime nails with a solid cream base color.
- Paint organic, flowing ‘S’ shapes in teal across the nail.
- Nestle a coral swirl right next to the teal line.
- Use a very thin black or white line to separate the colors for definition.
- Ensure each color ‘layer’ is thin to avoid a bulky nail surface.
Budget Range
- Revlon ColorStay Polish: $8.00
- Stainless Steel Mixing Palette: $7.00
- Artistic Nail Design Striper: $12.00
Craft Teal Western Nails in 4 Rustic Steps
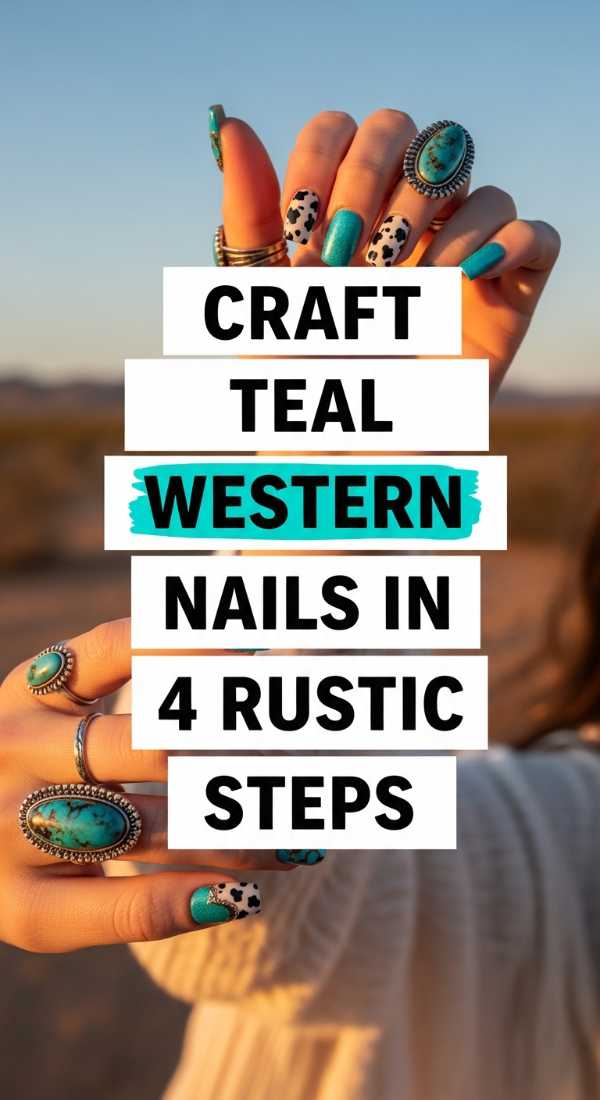
Why to love this Design:
The spirit of the desert is calling! Teal western nails blend the ruggedness of turquoise stones with the soft warmth of a desert sunset. It’s a look that feels grounded, rustic, and incredibly stylish when paired with your favorite denim or a flowy white sundress.
Essential Elements:
- Turquoise or teal cream polish
- Gold leaf or metallic studs
- Marble-effect blooming gel
- Tan or ‘suede’ accent color
How to Prepare:
- Apply the teal base and use a ‘blooming gel’ to create a stone-like marble effect.
- Gently press small flakes of gold leaf into the tacky layer of the polish.
- Apply small gold studs near the cuticle for a ‘belt buckle’ inspired detail.
- Seal with a satin-finish top coat to mimic the texture of natural stone.
Budget Range
- Lights Lacquer ‘Turquoise’: $13.00
- Gold Leaf Foil Sheets: $5.00
- Nail Glue: $4.00
Match Hands and Toes Nails in 3 Pro Steps
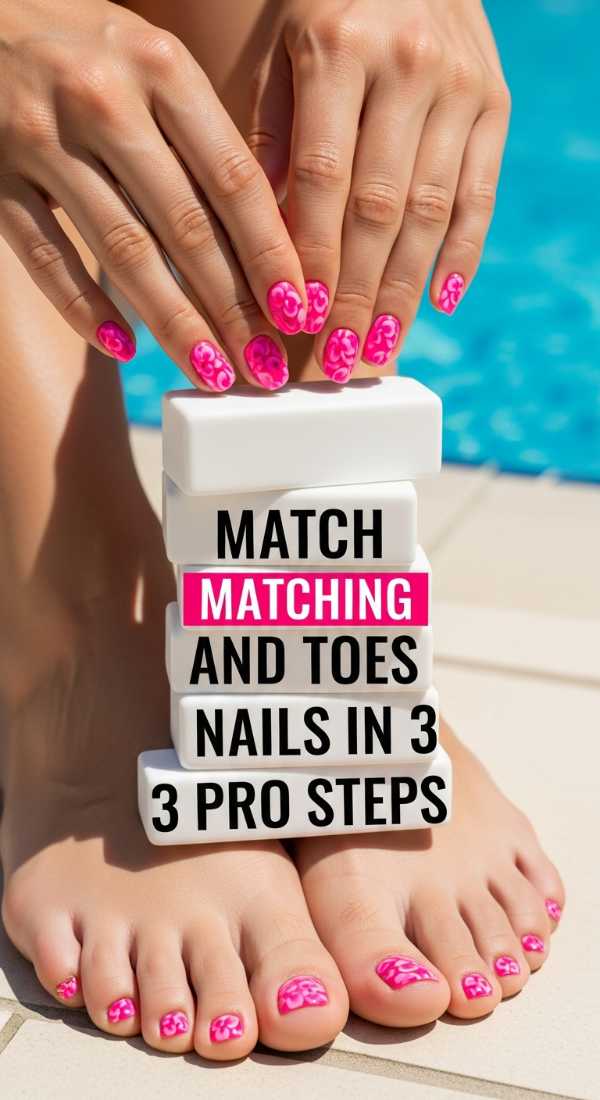
Why to love this Design:
There is a quiet confidence in being perfectly coordinated. Matching your mani and pedi creates a cohesive, polished look that screams ‘luxury lifestyle.’ It’s the ultimate self-care ritual that makes you feel put together from head to toe, literally!
Essential Elements:
- A versatile ‘hero’ color (like soft coral)
- Matching toe separators
- Uniform top coat
How to Prepare:
- Choose a color that complements your skin tone and works for both small toe nails and larger finger nails.
- Apply the color to fingers and toes simultaneously to ensure the layers dry at the same rate.
- Use the same brand of top coat for both to ensure the light reflects with the same intensity on both surfaces.
Budget Range
- Olive & June Mani/Pedi System: $40.00
- Soft Foam Toe Separators: $3.00
- Dashing Diva Gloss Strips: $8.00
Get Sunset Aura Nails Using 5 Blending Modes
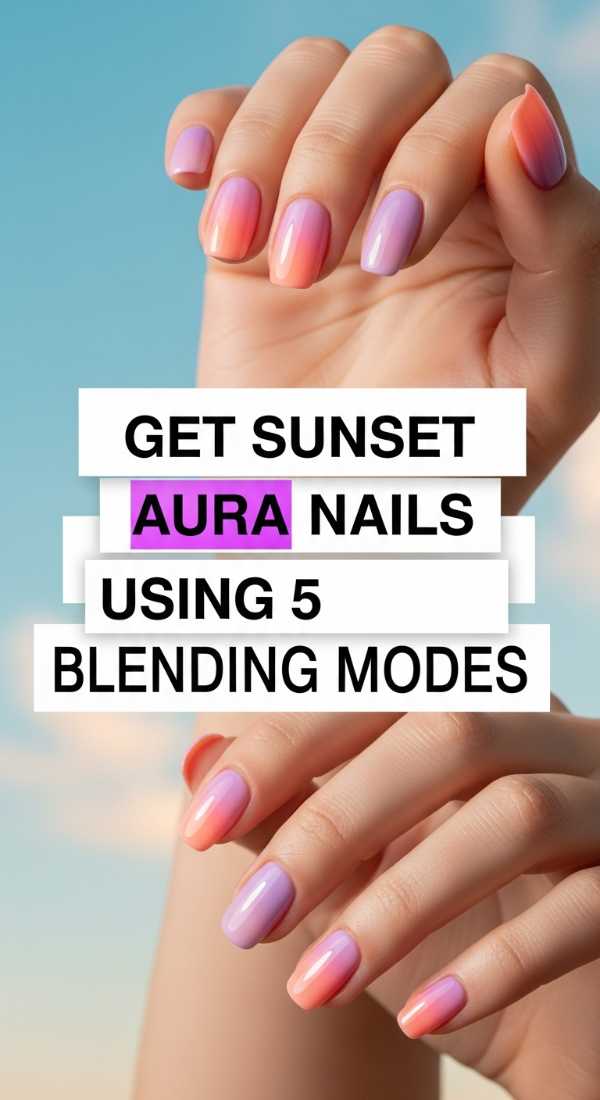
Why to love this Design:
Aura nails are all about energy. This sunset version uses soft, diffused circles of color to represent your inner glow. It’s ethereal, dreamy, and looks like a soft-focus photograph of a beautiful evening sky. It’s the trend of the future, and it’s here to stay for 2026.
Essential Elements:
- Airbrush tool or small makeup sponge
- Red, orange, and soft yellow polishes
- Clear ‘blender’ polish
- Matte-to-glossy transition
How to Prepare:
- Start with a neutral base to act as your ‘canvas’.
- Apply a small dot of red in the center of the nail.
- Dab orange around the red, blending outward using a tapping motion.
- Add a final ring of soft yellow to the very edges.
- Use a ‘blender’ clear coat to soften the harsh lines between the colors for a true ‘aura’ effect.
Budget Range
- Portable Airbrush Kit: $35.00
- Kupa Divinity Polish Set: $22.00
- Beauty Blender Sponges: $5.00
Your Most Radiant Summer Awaits
I hope these designs inspire you to take a little moment for yourself this season. Whether you are painting your nails on a quiet Sunday morning or getting ready for a big adventure, remember that these small rituals are a way of honoring the light within you. You are beautiful, you are capable, and you deserve to feel absolutely stunning. Wear these colors with pride, my loves, and let your spirit shine as bright as the 2026 sun. I can’t wait to see which look you choose!