
2026 Trend Alert: Must-Try DIY Manicure Tutorials for Every Season
Hello, my beautiful loves! As we gently drift into the vibrant energy of 2026, I’ve been spending my quiet mornings with a warm cup of jasmine tea, thinking about how our hands tell the story of our lives. They hold the ones we love, type out our dreams, and deserves to be adorned in colors that reflect the magic of each passing season. There’s something so incredibly grounding about taking thirty minutes for ourselves, isn’t there? It’s like a soft hug for the soul, right at your fingertips.
This year is all about textures that dance in the light and colors that evoke a feeling of nostalgia mixed with futuristic hope. Whether you’re celebrating a major life milestone or just want to feel a little more ‘you’ while you’re picking up your morning latte, these tutorials are designed to be your companion. Let’s dive into our 2026 nail journey together, one brushstroke at a time.
7 Easy Steps for College Graduation Nails

Why to love this Design:
Graduation is such a breathtaking threshold, my loves. This design is about capturing that ‘light at the end of the tunnel’ glow. It’s sophisticated enough for your diploma photos but has a touch of celebratory shimmer that says, ‘I did it, and I’m ready for the world.’
Essential Elements:
- Sheer ‘Milk Bath’ base polish
- Ultra-fine gold leaf flakes
- High-gloss top coat
- Precision tweezers
How to Prepare:
- Gently push back cuticles and shape nails into a soft almond or square.
- Apply a nourishing base coat to protect your natural nail.
- Swipe on two thin layers of your sheer milky white polish.
- While the second coat is slightly tacky, use tweezers to place tiny gold flakes near the cuticle.
- Seal the flakes with a thick layer of top coat.
- Add a second layer of top coat for a ‘glass-like’ finish.
- Massage a drop of lavender cuticle oil for that camera-ready glow.
Budget Range
- Essie Marshmallow Polish ($10)
- Moyra Gold Leaf Flakes ($5)
- Seche Vite Dry Fast Top Coat ($9)
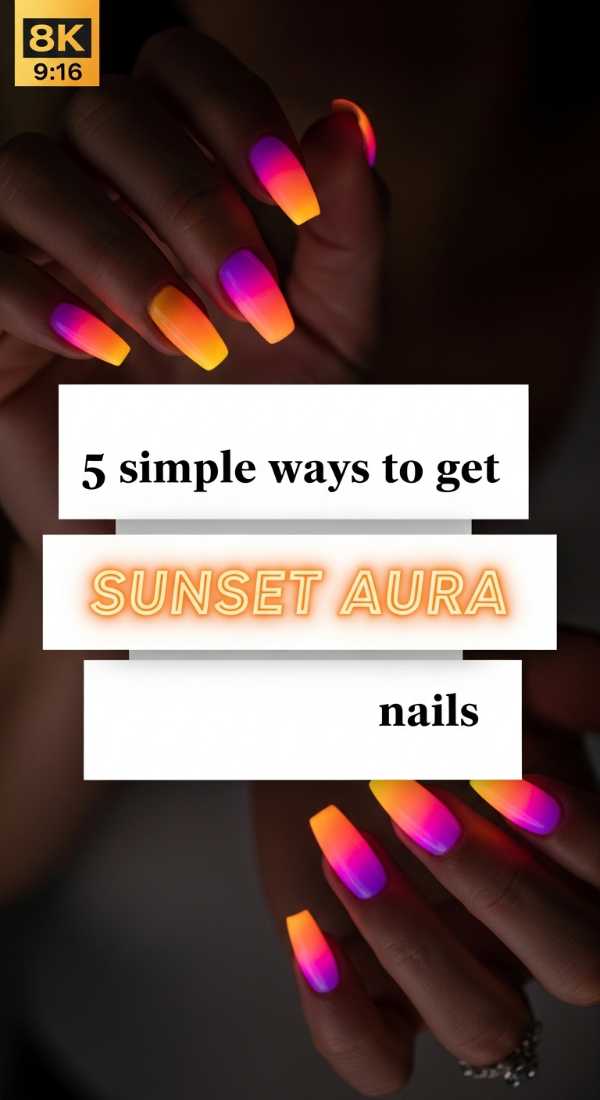
5 Simple Ways to Get Sunset Aura Nails
Why to love this Design:
Imagine the sky at 8:00 PM on a July evening—that’s what this design feels like. Aura nails are a 2026 staple because they represent our inner energy radiating outward. It’s soft, blurred, and incredibly dreamy, like a watercolor painting on your nails.
Essential Elements:
- Peach and soft purple polishes
- Small makeup sponge (wedge shape)
- Liquid latex or painter’s tape for skin protection
- Matte or glossy top coat
How to Prepare:
- Apply a neutral nude base color and let it dry completely.
- Protect the skin around your nails with liquid latex.
- Dab a small circle of peach polish onto the center of a makeup sponge, then a ring of purple around it.
- Lightly press the sponge onto the center of the nail, repeating until the gradient is soft and diffused.
- Remove the latex and finish with your choice of top coat to blend the colors.
Budget Range
- Zoya ‘Abby’ and ‘Cora’ shades ($12 each)
- Beauty Blender mini wedges ($8)
- Glisten & Glow Liquid Latex ($7)
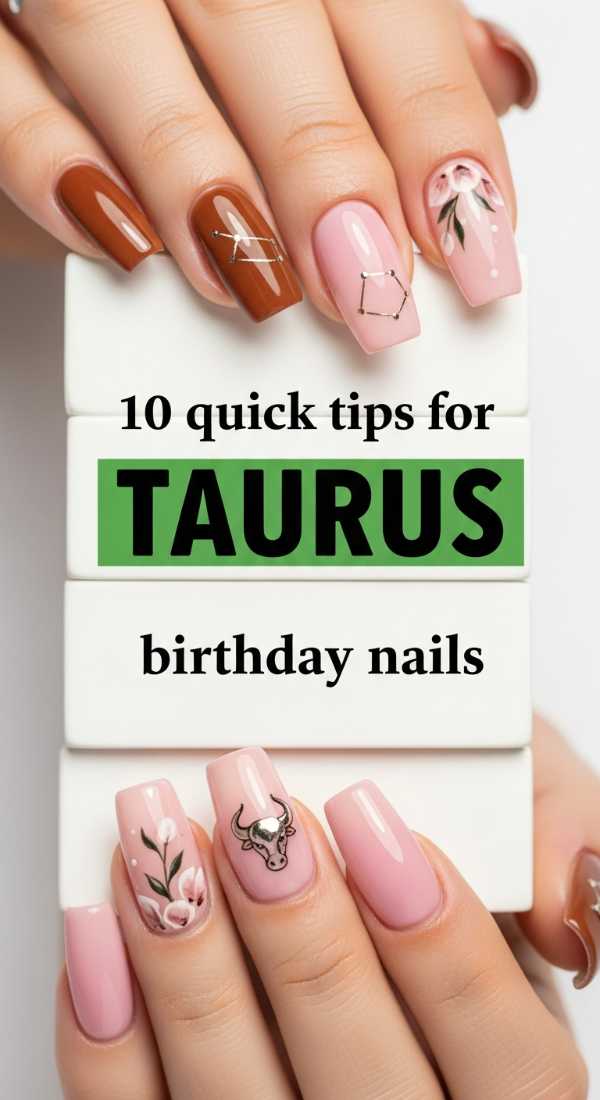
10 Quick Tips for Taurus Birthday Nails
Why to love this Design:
For my grounded, luxury-loving Taurus queens, this look is all about emerald greens and earthy textures. It feels expensive and stable, reflecting your steadfast nature and love for the finer things in life. It’s the ultimate birthday gift to yourself.
Essential Elements:
- Deep emerald cream polish
- Gold striping tape
- Emerald rhinestones
- Nail glue
How to Prepare:
- Start with a clean, buffed nail surface.
- Apply a base coat.
- Paint two coats of deep emerald.
- Apply gold striping tape vertically down the middle.
- Add a tiny drop of glue at the base.
- Place an emerald stone on the glue.
- Seal the edges of the tape with top coat.
- Use a matte top coat on the ring finger for contrast.
- Clean any excess with a brush dipped in acetone.
- Hydrate with a heavy hand cream.
Budget Range
- OPI ‘Stay Off the Lawn!!’ ($11)
- Amazon Nail Art Tape & Rhinestone Kit ($12)
- Sally Hansen Hard as Nails Base ($6)
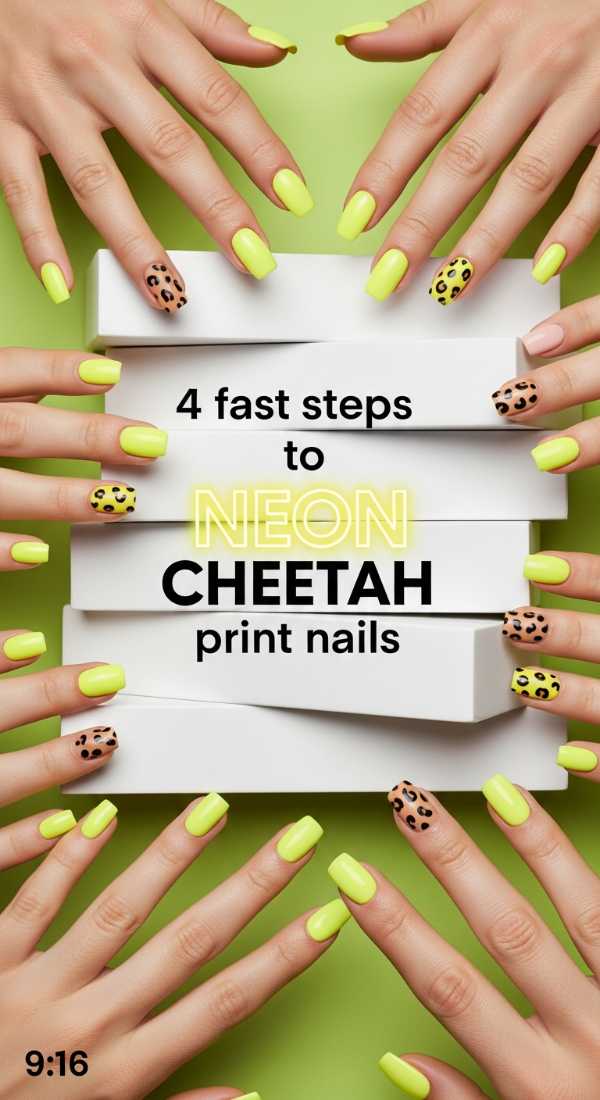
4 Fast Steps to Neon Cheetah Print Nails
Why to love this Design:
Sometimes we just need to let our wild side out! This 2026 twist on a classic animal print uses neon liners against a crisp white background. It’s high-energy, fun, and perfect for those weekend festivals where you want your hands to do the talking.
Essential Elements:
- Bright white base polish
- Neon pink and lime green liner polishes
- Black fine-tip nail pen
How to Prepare:
- Paint all nails with two coats of solid white.
- Dab irregular blobs of neon pink and green across the nail.
- Use the black pen to roughly ‘bracket’ the neon blobs with two or three small curved lines.
- Finish with a quick-dry top coat to prevent smudging.
Budget Range
- Holo Taco ‘Not Milky White’ ($11)
- Beetles Neon Liner Gel Set ($15)
- Sally Hansen Insta-Dri Top Coat ($7)
6 Easy Steps to Master Summer Goth Nails
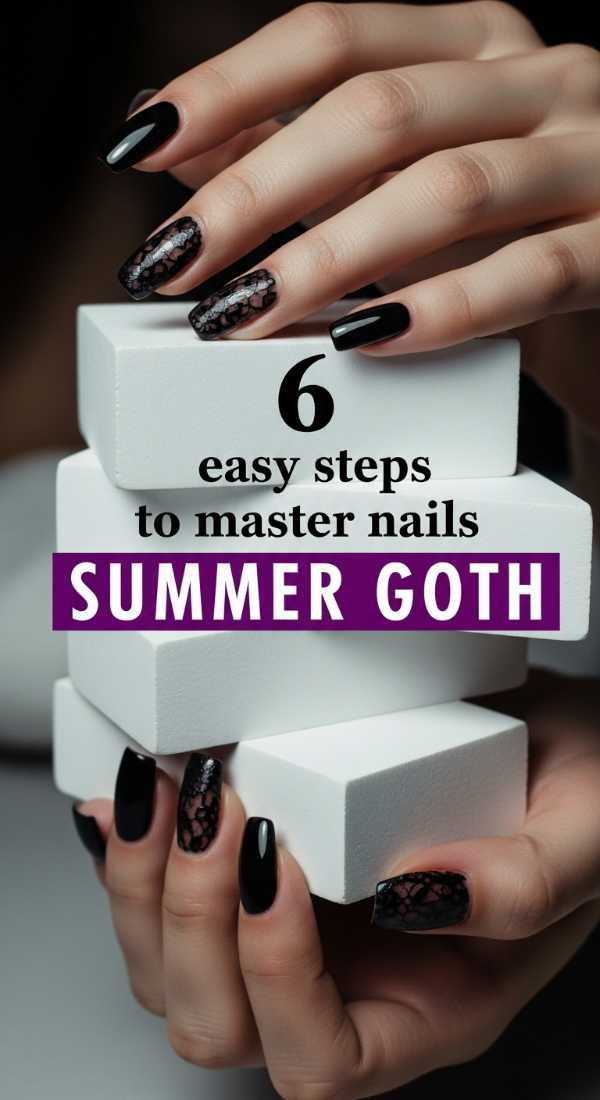
Why to love this Design:
Who says dark colors are only for winter? Summer Goth is the 2026 trend for my loves who embrace the shadows even in the sunshine. It’s edgy but breathable, using sheer black ‘stocking’ effects and delicate silver accents.
Essential Elements:
- Sheer black (jelly) polish
- Solid black polish
- Silver metallic nail stickers
- Fine detailing brush
How to Prepare:
- Apply one coat of the sheer black jelly polish.
- Use the solid black polish to paint a thin French tip.
- Add a second coat of the jelly polish over the whole nail to mute the tip.
- Place a tiny silver star or moon sticker on the accent nail.
- Apply a high-shine top coat.
- Apply a cooling mint-infused cuticle oil.
Budget Range
- Cirque Colors ‘Haze’ Jelly ($12)
- Lights Lacquer ‘Tuxedo Mask’ ($13)
- Decal Girl Silver Stars ($4)
5 Simple Ways to Paint Lemon Nails Designs
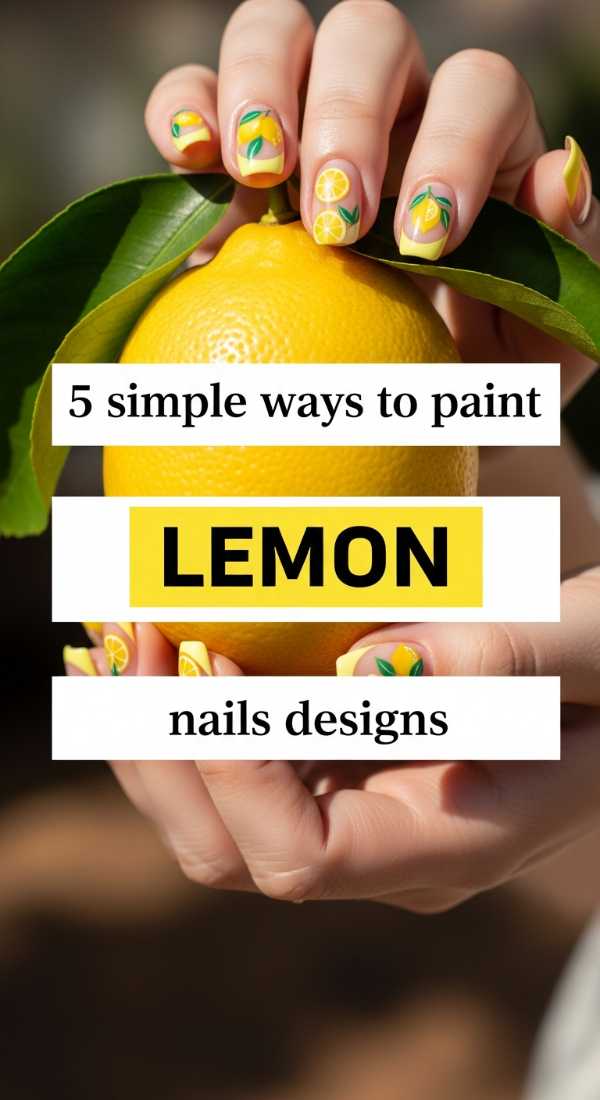
Why to love this Design:
Fresh, zesty, and so full of joy! Lemon nails are like a cold glass of lemonade on a scorching afternoon. They bring an instant smile to your face and add a pop of color to any summer outfit. It’s the definition of ‘main character’ energy.
Essential Elements:
- Bright yellow polish
- White and leaf green polishes
- Dotting tool
How to Prepare:
- Paint nails a soft pastel yellow or clear base.
- Use a dotting tool to create two yellow circles side-by-side (the lemons).
- Use a toothpick to add a tiny white ‘highlight’ on each lemon.
- Add two small green leaves at the top with your fine brush.
- Seal with a UV-protectant top coat to keep the yellow bright.
Budget Range
- Orly ‘Lemonade’ ($10)
- Nail Art Dotting Tool Set ($6)
- Olive & June Top Coat ($9)
8 Easy Steps to Create Pucci Nails
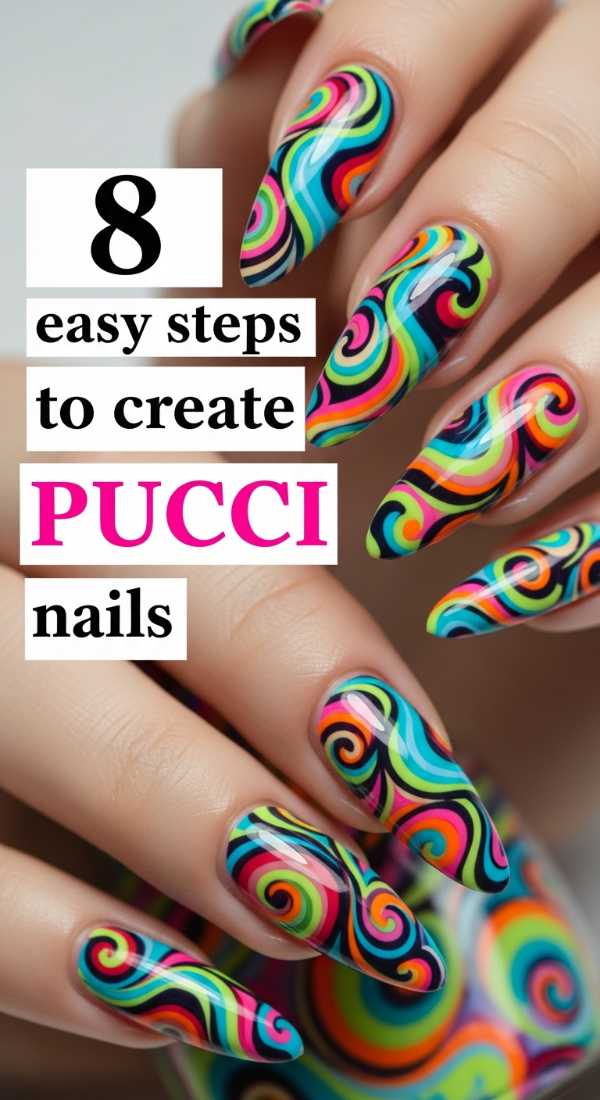
Why to love this Design:
Inspired by the iconic 60s prints, Pucci nails are all about psychedelic swirls and bold color blocking. It’s a sophisticated way to wear multiple colors at once and looks incredibly high-end. It’s like wearing a vintage designer scarf on your hands.
Essential Elements:
- Lavender, teal, and orange polishes
- Black detailing polish
- Long-haired striper brush
How to Prepare:
- Choose three contrasting colors.
- Paint organic, wavy shapes in lavender on one side.
- Fill the opposite side with teal waves.
- Add orange accents in the remaining gaps.
- Use the striper brush and black polish to outline the shapes.
- Add a few small black dots for texture.
- Wait 5 minutes for the art to set.
- Carefully float a thick top coat over the design.
Budget Range
- Manucurist Paris Green Polish Set ($14/each)
- Winstonia Striper Brush ($7)
- Seche Vive Gel Effect Top Coat ($10)
3 Quick Steps for Teal and Coral Nails
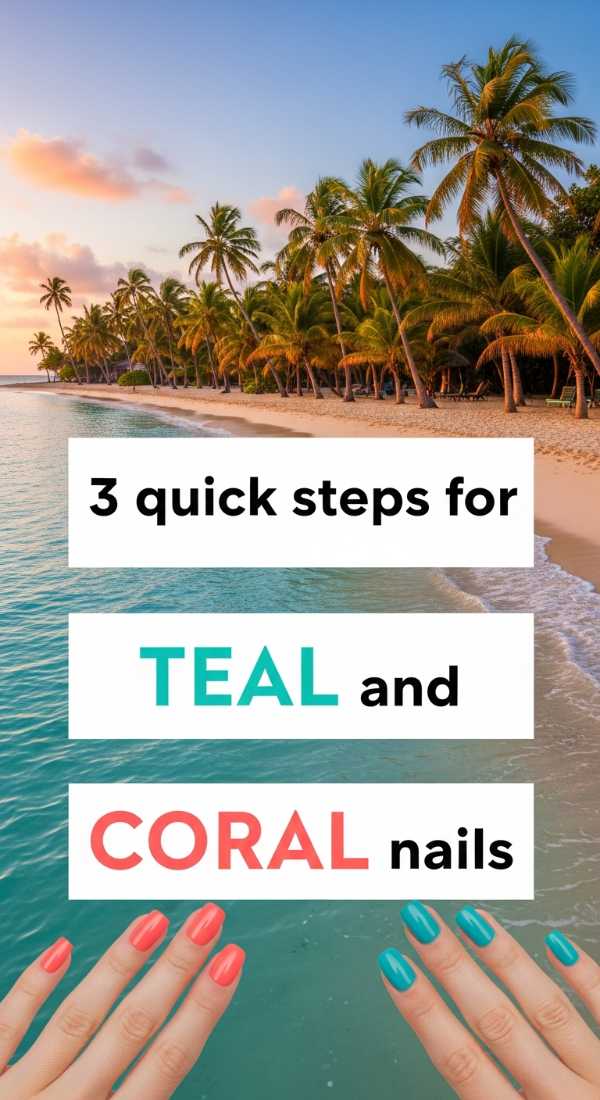
Why to love this Design:
This is the ultimate ‘vacation mode’ pairing. The cool depth of teal perfectly balances the warm vibrance of coral. It’s simple, striking, and requires absolutely no artistic skill—just beautiful color placement.
Essential Elements:
- Vibrant teal cream polish
- Bright coral cream polish
How to Prepare:
- Paint your thumb, index, and pinky in Teal.
- Paint your middle and ring finger in Coral.
- Apply two coats of each and finish with a high-gloss top coat.
Budget Range
- Essie ‘In the Cab-ana’ & ‘Peach Side Babe’ ($10 each)
- Wet n Wild Fast Dry Top Coat ($3)
9 Easy Ways to Style Sunset Chrome Nails
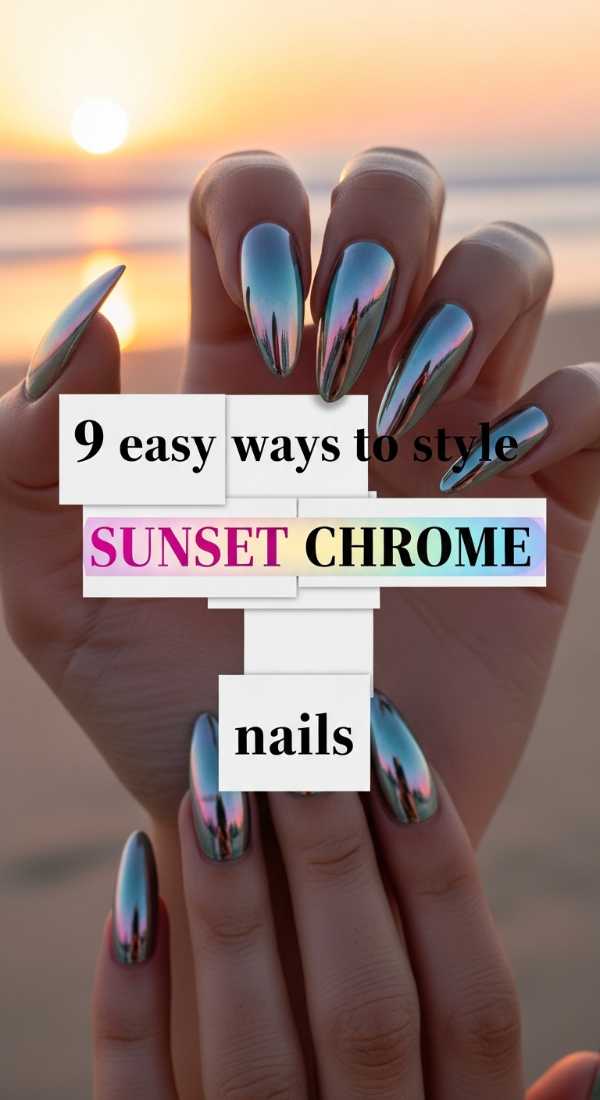
Why to love this Design:
Chrome is staying huge in 2026, but we’re making it warmer. This look mimics the reflection of a sunset on the ocean. It’s iridescent, magical, and looks different every time you move your hands in the light.
Essential Elements:
- Pink-to-gold duochrome powder
- No-wipe gel top coat (requires UV lamp)
- Sponge applicator
How to Prepare:
- Apply a base color (black for intensity, pink for softness).
- Apply no-wipe top coat and cure for 30 seconds.
- Dip the sponge into the chrome powder.
- Rub the powder onto the nail until it’s a mirror finish.
- Use a soft brush to dust off excess powder.
- Apply another layer of no-wipe top coat.
- Cure for 60 seconds.
- Wipe with alcohol to remove any stray sparkles.
- Finish with oil to restore skin moisture.
Budget Range
- Artdone Chrome Powder Palette ($15)
- SUNUV LED Nail Lamp ($25)
- Born Pretty No-Wipe Top Coat ($8)
2 Simple Steps for Hands and Toes Matching
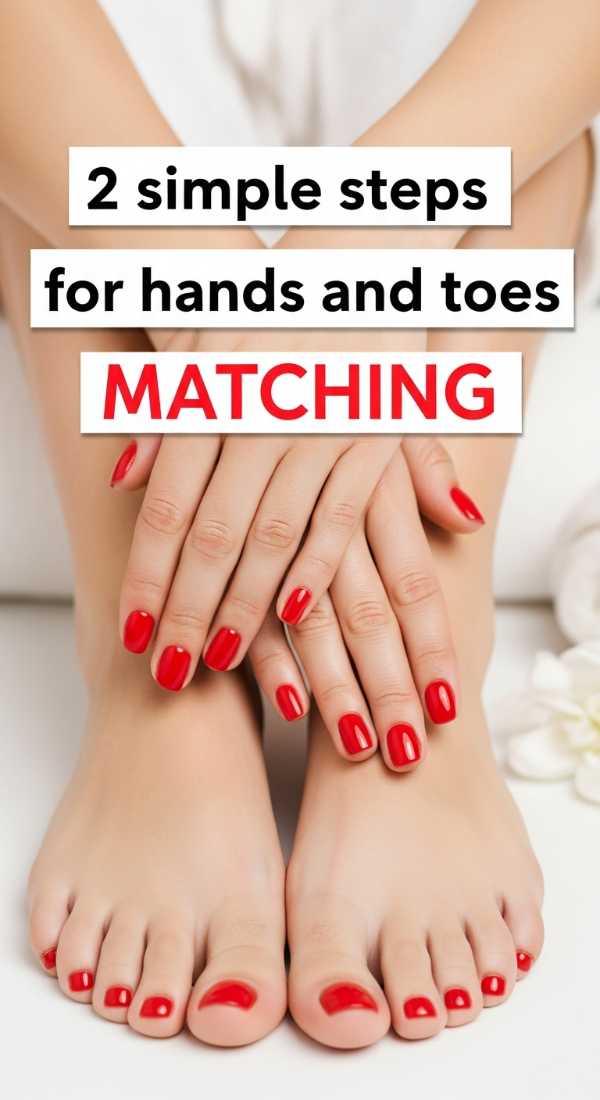
Why to love this Design:
There is a quiet confidence in a perfectly matched mani-pedi. For 2026, the ‘Clean Girl’ aesthetic evolves into using rich, sheer nudes that look like your nails but better. It’s the ultimate ‘quiet luxury’ statement.
Essential Elements:
- Sheer ‘Your Nails But Better’ nude polish
- Buffer block
How to Prepare:
- Gently buff both fingernails and toenails to a smooth surface.
- Apply two coats of the same sheer nude to both, ensuring a clean edge.
Budget Range
- Londontown Kur Illuminating Nail Concealer ($20)
- Flowery Sani-Block Buffer ($2)
Embrace Your Inner Artist
My loves, I hope these tutorials inspire you to carve out a little pocket of peace for yourself this week. Remember, it doesn’t have to be perfect to be beautiful. The slight wobble in a line or a stray flake of gold is just a reminder that these were made by your own two hands, with love and intention. Wear these colors as a celebration of the season you’re in, both outside in the world and inside your heart. Until next time, stay glowing!