
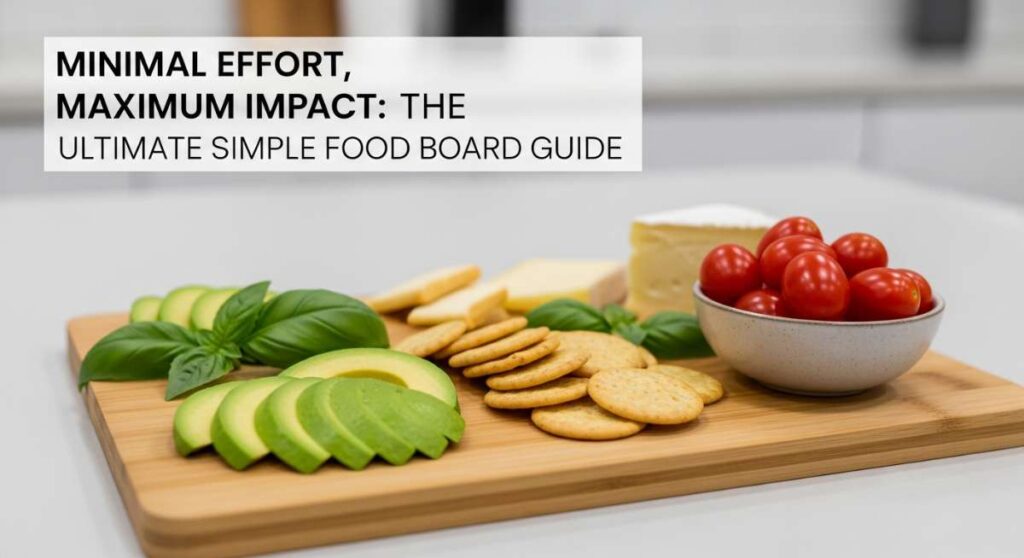
We’ve all been there—the sun is setting beautifully, the playlist is perfect, and friends are about to walk through the door, but you’re stuck in the kitchen, covered in flour and stressed to the max. I used to think hosting meant five-course meals and elaborate table settings, but I’ve learned that the true magic happens when you step away from the stove and join the conversation. That’s where the ‘Simple Food Board’ lifestyle comes in, turning chaotic hosting into a relaxed, beautiful experience that feels effortless yet totally curated.
There is something inherently communal and comforting about a board filled with vibrant colors and diverse textures. It invites people to graze, to try new flavor combinations, and most importantly, to linger. It’s not just about the food; it’s about the atmosphere you create when you aren’t frantically checking a timer. This guide is my love letter to the slow summer evenings and the easy weekend gatherings where the food is delicious, the prep is minimal, and the impact is absolutely massive.
How to make summer salads?

Why we love this
There is nothing quite like the refreshing crunch of a perfectly chilled summer salad when the humidity hits. We love this because it balances the sweetness of seasonal fruit with the savory punch of artisanal cheeses, creating a symphony of flavors that dance on the tongue. Imagine the aroma of freshly torn mint leaves mingling with the tart scent of lime zest, all while you enjoy the cooling sensation of a juicy watermelon cube hitting your palate. It is the ultimate palate cleanser and a vibrant centerpiece that looks like a work of art on any board.
Ingredients
- 4 cups cubed seedless watermelon
- 1/2 cup crumbled feta cheese
- 1/4 cup fresh mint leaves, torn
- 1 lime, zested and juiced
- 2 tablespoons balsamic glaze
- A pinch of flaky sea salt
How to make it
- Begin by selecting a heavy, ripe watermelon; give it a thud to ensure it sounds hollow and sweet. Slice away the rind and cut the flesh into uniform 1-inch cubes to ensure every bite is consistent.
- Place the watermelon cubes into a large chilled glass bowl. This keeps the fruit crisp while you work. Squeeze the fresh lime juice over the top, tossing gently with your hands or a silicone spatula to avoid bruising the fruit.
- Sprinkle the crumbled feta cheese evenly across the top. High-quality sheep’s milk feta adds a creamy, tangy richness that contrasts beautifully with the fruit’s water content.
- Scatter the torn mint leaves over the mixture. Tearing the leaves by hand instead of chopping them prevents the edges from bruising and releases more of those essential aromatic oils.
- Just before serving, drizzle the thick balsamic glaze in a decorative zigzag pattern and finish with a tiny pinch of flaky sea salt to elevate the natural sugars.
How to cook crockpot meals?
Why we love this
Crockpot meals are the unsung heroes of the ‘minimal effort’ philosophy, offering a depth of flavor that usually takes hours of active monitoring. We love the way a tough cut of meat transforms into a tender, melt-in-your-mouth masterpiece while you go about your day. The kitchen fills with a warm, savory aroma of slow-cooked spices and slow-rendered fats that builds anticipation for hours. It’s the ultimate comfort food—rich, succulent, and deeply satisfying, providing a hearty anchor for a food board that needs a warm element.
Ingredients
- 3 lbs pork shoulder (Boston butt)
- 1/4 cup brown sugar
- 1 tbsp smoked paprika
- 2 tsp garlic powder
- 1 cup low-sodium chicken broth
- 1/2 cup apple cider vinegar
How to make it
- Pat the pork shoulder completely dry with paper towels. This is crucial for the rub to adhere properly. In a small bowl, whisk together the brown sugar, paprika, garlic powder, salt, and pepper until uniform.
- Massage the dry rub into every crevice of the meat, pressing firmly so it forms a crust. For an extra layer of flavor, you can sear the meat in a hot pan for 2 minutes per side until browned, though this is optional for a truly ‘minimal effort’ approach.
- Place the seasoned pork into the slow cooker. Pour the chicken broth and apple cider vinegar around the base of the meat, being careful not to wash off the spice rub on top.
- Set the crockpot to ‘Low’ and cook for 8 to 10 hours. Resisting the urge to lift the lid is key, as every peek releases steam and adds 15 minutes to the cooking time. The meat is done when it shreds effortlessly with a fork.
- Once finished, remove the pork to a cutting board, shred using two forks, and toss with a splash of the remaining cooking liquid to keep it moist before piling it onto your serving board.
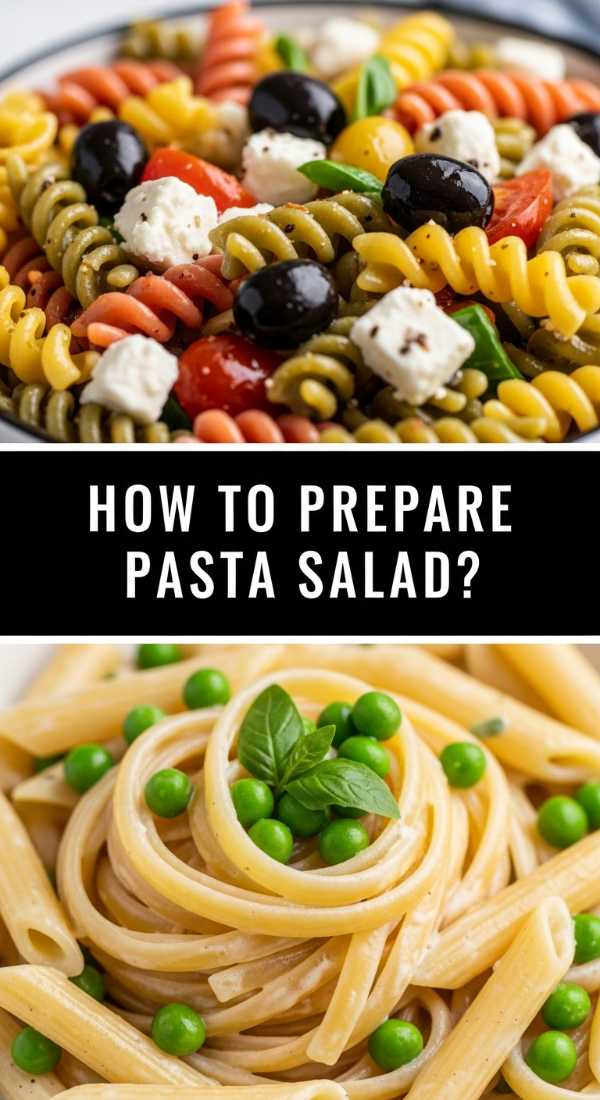
How to prepare pasta salad?

Why we love this
Pasta salad is the versatile queen of the picnic table, offering a satisfying bite that holds up beautifully even after hours of sitting out. We love the way the rotini spirals trap the zesty Italian dressing, ensuring every forkful is a burst of vinegar-forward brightness. The medley of crunchy bell peppers, salty olives, and spicy pepperoni provides a kaleidoscope of textures that keeps your palate engaged. It feels like a celebration of Mediterranean flavors, light enough for a hot day but filling enough to stand as a meal on its own.
Ingredients
- 1 lb rotini or fusilli pasta
- 1 cup halved cherry tomatoes
- 1/2 cup diced green bell peppers
- 1/2 cup sliced black olives
- 1/4 cup red onion, finely minced
- 1 cup zesty Italian dressing
- 1/2 cup grated parmesan cheese
How to make it
- Bring a large pot of heavily salted water to a rolling boil. Add the pasta and cook for exactly one minute less than the package directions for ‘al dente.’ You want the pasta to have a firm bite so it doesn’t get mushy after absorbing the dressing.
- Drain the pasta and immediately rinse it under cold running water. This stops the cooking process instantly and removes excess starch, preventing the noodles from sticking together.
- In a massive mixing bowl, combine the cooled pasta with the cherry tomatoes, peppers, olives, and red onion. Using a large wooden spoon, toss the ingredients until the colors are evenly distributed.
- Pour the Italian dressing over the salad and toss thoroughly. The pasta will act like a sponge, so don’t be afraid if it looks slightly ‘wet’ at first; it will soak up the flavors as it chills.
- Cover and refrigerate for at least two hours. Right before serving, give it one final toss and sprinkle with the parmesan cheese for a salty, savory finish.
How to grill summer kabobs?

Why we love this
There is a primal joy in food cooked over an open flame, and summer kabobs are the pinnacle of that experience. We love the visual appeal of charred, caramelized edges on pineapple and bell peppers, contrasting with juicy, marinated chicken. The aroma of woodsmoke and honey-garlic glaze wafting through the backyard is the literal scent of summer. Each skewer is a self-contained party, offering a variety of flavors and textures—from the snap of a pepper to the sweetness of grilled fruit—all in one convenient, handheld package.
Ingredients
- 1.5 lbs chicken breast, cut into 1-inch cubes
- 1 red bell pepper, cut into chunks
- 1 red onion, cut into wedges
- 1 cup fresh pineapple chunks
- 1/2 cup honey garlic marinade
- Wooden or metal skewers
How to make it
- If using wooden skewers, submerge them in water for at least 30 minutes. This prevents them from igniting on the grill and ensures they remain structurally sound while holding the weight of the ingredients.
- Thread the ingredients onto the skewers in a repeating pattern: chicken, pepper, onion, pineapple. Leave a small gap between each item to allow the hot air to circulate, which ensures the chicken cooks through without the vegetables becoming overly charred.
- Preheat your grill to medium-high heat (about 400°F). Lightly oil the grates using a folded paper towel dipped in vegetable oil to create a non-stick surface.
- Place the skewers on the grill and close the lid. Sear for 5-6 minutes on one side until the chicken releases easily from the grate. Flip and brush generously with the honey garlic marinade.
- Continue cooking for another 5-7 minutes, turning occasionally, until the chicken reaches an internal temperature of 165°F. The sugars in the marinade should create a beautiful, dark lacquer on the meat and fruit.
How to make rotel dip?

Why we love this
Rotel dip is the ultimate nostalgia food—creamy, cheesy, and just spicy enough to keep you coming back for ‘just one more’ dip. We love how the velvety melted cheese wraps around the savory, seasoned ground beef, creating a rich base for the zesty tomatoes and green chilies to shine. It’s the kind of dish that disappears in minutes because it hits every craving: salty, spicy, and creamy. It’s warm, inviting, and serves as the perfect centerpiece for a board surrounded by crunchy tortilla chips and cool veggie sticks.
Ingredients
- 1 lb ground beef or sausage
- 16 oz Velveeta cheese, cubed
- 1 can (10 oz) Ro*Tel Original Diced Tomatoes and Green Chilies
- 1/2 tsp chili powder
- Tortilla chips for serving
How to make it
- In a large skillet over medium heat, brown the ground beef or sausage. Use a spatula to break the meat into very small crumbles; you want a consistent texture throughout the dip so every bite is balanced.
- Once the meat is fully cooked and no pink remains, drain the excess fat thoroughly. This prevents the dip from becoming oily or separating as it sits on the board.
- Lower the heat to low and add the cubed Velveeta cheese. Using cubes rather than a whole block ensures the cheese melts evenly and quickly without scorching on the bottom of the pan.
- Pour in the can of Ro*Tel (do not drain the liquid—that juice is packed with flavor and helps achieve the perfect dipping consistency). Stir continuously with a wooden spoon until the cheese is smooth and glossy.
- Stir in the chili powder for an extra kick of warmth. Transfer the dip to a small slow cooker or a heavy ceramic bowl to retain heat, and serve immediately while it is bubbling and fluid.
How to mix summer drinks?

Why we love this
A great summer drink is more than just a beverage; it’s an experience that cools you from the inside out. We love the effervescence of sparkling water paired with the sun-drenched sweetness of fresh peaches and the sharp tang of lemon. The aroma of muddled mint and citrus is incredibly uplifting, making every sip feel like a vacation. These drinks add a sophisticated, bubbly element to your board, looking stunning in tall glasses filled with clinking ice and colorful garnishes that catch the afternoon light.
Ingredients
- 2 ripe peaches, sliced
- 1/2 cup fresh lemon juice
- 1/4 cup honey or agave syrup
- 1 liter sparkling water or club soda
- Fresh mint sprigs for garnish
- Ice cubes
How to make it
- Start by making a quick peach base. Place half of your peach slices in a pitcher and add the honey. Use a muddler or the back of a large spoon to crush the peaches until they release their juices and combine with the sweetener.
- Pour the fresh lemon juice into the pitcher and stir vigorously to dissolve the honey into the citrus. This creates a concentrated, flavorful syrup that will flavor the entire batch.
- Fill the pitcher halfway with ice. Using large, solid ice cubes is better than crushed ice, as they melt slower and won’t dilute your drink as quickly in the summer heat.
- Slowly pour the sparkling water down the side of the pitcher to preserve as many bubbles as possible. Give it one very gentle stir from the bottom to distribute the peach syrup.
- Pour into individual glasses and garnish with the remaining fresh peach slices and a sprig of mint. Slap the mint against your hand before adding it to wake up the aromatic oils.
How to bake summer desserts?

Why we love this
There is something wonderfully rustic and soulful about a summer berry galette. We love the flaky, buttery crust that shatters upon impact, revealing a molten center of bubbling, jammy berries. The aroma of toasted pastry and caramelized sugar is intoxicating, drawing everyone to the table. It’s less fussy than a traditional pie, allowing the natural beauty of the fruit to shine through its ‘perfectly imperfect’ folded edges. Served warm with a scoop of melting vanilla ice cream, it’s the ultimate ending to a sun-soaked day.
Ingredients
- 1 pre-made pie crust (refrigerated)
- 3 cups mixed berries (blueberries, raspberries, blackberries)
- 1/4 cup granulated sugar
- 1 tbsp cornstarch
- 1 egg (for egg wash)
- 1 tbsp coarse sanding sugar
How to make it
- Preheat your oven to 400°F (200°C) and line a large baking sheet with parchment paper. This ensures the galette doesn’t stick and makes clean-up a breeze when the berry juices inevitably bubble over.
- In a medium bowl, gently toss the mixed berries with the granulated sugar and cornstarch. The cornstarch is vital—it binds with the fruit juices to create a thick, glossy sauce rather than a watery mess.
- Unroll the pie crust onto the parchment paper. Pile the berry mixture into the very center of the dough, leaving a 2-inch border all the way around the edge.
- Fold the edges of the dough up and over the berries, pleating the crust as you go. The center should remain open, exposing the fruit. Brush the folded dough with a beaten egg and sprinkle with the coarse sanding sugar for a professional, glittering crunch.
- Bake for 25-30 minutes until the crust is a deep golden brown and the fruit is bubbling vigorously. Allow it to cool for at least 15 minutes on the pan to let the filling set before slicing.
How to eat healthy meals?

Why we love this
Healthy eating doesn’t have to feel like a sacrifice, especially when it’s presented as a vibrant Greek Quinoa Bowl. We love the textural contrast between the fluffy, protein-packed quinoa and the crisp, watery snap of fresh cucumbers and cherry tomatoes. The creamy hummus and salty kalamata olives provide a satisfying richness that leaves you feeling energized rather than weighed down. It’s a clean, bright, and colorful addition to any food board that proves ‘nutritious’ can also be incredibly ‘delicious’ and visually stunning.
Ingredients
- 2 cups cooked quinoa, chilled
- 1 cup diced cucumber
- 1/2 cup halved cherry tomatoes
- 1/4 cup sliced kalamata olives
- 1/2 cup store-bought or homemade hummus
- 1 tbsp extra virgin olive oil
- 1 tsp dried oregano
How to make it
- Ensure your quinoa is cooked and completely cooled. To get perfectly fluffy quinoa, use a 1:2 ratio of quinoa to water, simmer for 15 minutes, then let it sit covered for 5 minutes before fluffing with a fork and spreading on a tray to cool.
- In a large bowl, combine the cooled quinoa with the diced cucumber, tomatoes, and olives. The variety of colors here—green, red, and deep purple—is what makes this dish pop on a board.
- Whisk together the olive oil and dried oregano in a small ramekin. Drizzle this over the quinoa mixture and toss well. The oil helps the oregano adhere to the grains, ensuring every bite is seasoned.
- When assembling your board, place the quinoa mixture in a large shallow bowl. Create a small well in the center and dollop the creamy hummus right in the middle.
- Finish with a final crack of black pepper and a sprig of fresh parsley. This dish serves as a fantastic ‘base’ that guests can scoop up with pita bread or enjoy as a refreshing side salad.
How to make side dishes?

Why we love this
Roasted Garlic Corn is the side dish that steals the spotlight every single time. We love the way the high heat of the oven (or grill) intensifies the natural sugars in the corn, creating charred, caramelized kernels that pop with sweetness. The addition of savory garlic butter and fresh parsley adds a layer of sophistication to a humble summer staple. The aroma of roasting garlic is absolutely magnetic, and the golden-yellow hue of the corn provides a bright, cheerful energy to your food board layout.
Ingredients
- 4 ears of corn, shucked
- 3 tbsp unsalted butter, softened
- 2 cloves garlic, minced
- 1 tbsp fresh parsley, chopped
- 1/2 tsp smoked paprika
- Salt to taste
How to make it
- Preheat your oven to 425°F or prepare your grill for medium-high heat. Shuck the corn completely, removing all the silk. Pat the ears dry so the garlic butter can cling to the kernels.
- In a small bowl, mash together the softened butter, minced garlic, parsley, and smoked paprika. Use a fork to ensure the garlic is evenly distributed throughout the butter so no one gets a massive chunk of raw garlic.
- Tear off four squares of aluminum foil. Place an ear of corn on each square and rub generously with the garlic butter mixture, coating all sides. Sprinkle with a generous pinch of salt.
- Wrap the foil tightly around each ear of corn to create a sealed pouch. This allows the corn to steam in the butter while the high heat browns the bottom, creating a dual texture of tender and charred.
- Roast in the oven for 20-25 minutes, turning the pouches halfway through. Carefully open the foil (watch out for steam!) and serve the ears whole or cut into smaller ‘ribs’ for easier grazing on your board.
How to prep picnic snacks?
[IMAGE_10]
Why we love this
Turkey Pesto Pinwheels are the quintessential picnic snack because they are compact, mess-free, and incredibly flavorful. We love the way the herby, aromatic pesto cuts through the creamy richness of the cream cheese, all wrapped up in a soft, flour tortilla. The layers of thinly sliced turkey and fresh spinach provide a lean protein hit and a vibrant green crunch. These little spirals look beautiful when stacked on a board, showing off their colorful internal rings, and they are the perfect size for picking up with one hand while you enjoy a drink.
Ingredients
- 2 large flour tortillas
- 4 oz cream cheese, softened
- 2 tbsp basil pesto
- 1/2 lb deli turkey, thinly sliced
- 1 cup fresh baby spinach
How to make it
- In a small bowl, blend the softened cream cheese and basil pesto until the mixture is a uniform pale green. Using softened cream cheese is the secret to a smooth spread that won’t tear your tortillas.
- Lay the tortillas flat on a clean cutting board. Use an offset spatula to spread a thin, even layer of the pesto-cream cheese mixture across the entire surface, leaving only a tiny 1/4-inch margin at the very edge.
- Layer the turkey slices over the cream cheese, slightly overlapping them so there are no gaps. Top with a single, flat layer of baby spinach leaves. Avoid overstuffing, as this will make the pinwheels difficult to roll tightly.
- Starting from the bottom edge, roll the tortilla up as tightly as possible. A tight roll is essential for the pinwheels to hold their shape once sliced. Wrap each log tightly in plastic wrap.
- Chill the logs in the refrigerator for at least one hour. This ‘sets’ the cream cheese, acting as a glue. Before serving, use a sharp serrated knife to slice the logs into 1-inch rounds, discarding the uneven ends (or eating them as a ‘cook’s treat’!).
The Art of the Effortless Gathering
Building a ‘Simple Food Board’ is about more than just the recipes; it’s about reclaiming your time and focusing on the people around you. By choosing dishes that can be prepped in advance or that cook themselves in a crockpot, you shift the energy of your home from frantic to festive. These ten ideas are just the beginning—mix and match them, add your favorite local cheeses, or throw on some seasonal nuts and dried fruits. Remember, the ‘maximum impact’ comes from the love and relaxation you bring to the table. Happy hosting!