
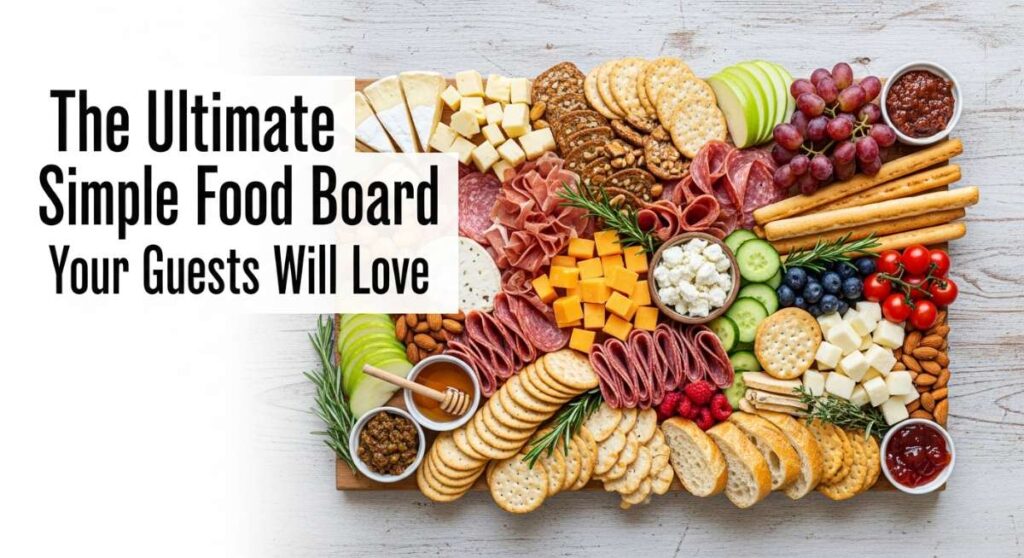
Imagine the sun dipping just below the horizon, casting a warm, golden glow over your backyard while the gentle hum of cicadas fills the air. There is a specific kind of magic in hosting friends and family during these long, breezy evenings, where the goal isn’t just to eat, but to connect over a table overflowing with color and flavor. I’ve always believed that the best memories are made when the host is relaxed, and that’s exactly why the ‘Simple Food Board’ concept has become my absolute favorite way to entertain—it’s approachable, beautiful, and encourages everyone to dig in together.
Creating the ultimate food board is about more than just laying out snacks; it’s about curate a sensory experience that feels abundant without requiring you to spend the entire day in the kitchen. In this guide, I’m sharing my most-loved secrets for building a viral-worthy spread that transitions seamlessly from a lazy afternoon lunch to a vibrant evening dinner party. We’re diving into everything from the crunchiest salads to the zestiest dips, ensuring your guests leave with full bellies and happy hearts.
7 Easy Ways to Prep Summer Meals (Step-by-Step Guide)

Why we love this
Prepping summer meals ahead of time is the ultimate gift to your future self, allowing you to reclaim those precious hours of daylight. Imagine opening your fridge to find crisp, pre-cut vegetables and perfectly marinated proteins ready to hit the grill at a moment’s notice. The aroma of fresh herbs like cilantro and mint stays vibrant when stored correctly, and there’s a tactile satisfaction in seeing neat rows of colorful glass containers. It transforms the daily ‘what’s for dinner’ stress into a smooth, rhythmic process that feels intentional and nourishing rather than rushed.
Ingredients
- Assorted seasonal bell peppers and red onions
- Boneless, skinless chicken thighs or firm tofu blocks
- Olive oil, lemon juice, and minced garlic
- Fresh herbs (basil, parsley, cilantro)
- Pre-cooked grains like quinoa or farro
- Honey or maple syrup for marinades
- Salt and cracked black pepper
How to make it
- Begin by dedicating a 60-minute block on a Sunday afternoon to ‘batch chopping.’ Use a sharp chef’s knife to slice peppers, onions, and zucchini into uniform strips. This consistency ensures they cook evenly whether you’re sautéing or grilling.
- Whisk together a universal marinade: combine 1/2 cup olive oil, the juice of two large lemons, three cloves of smashed garlic, and a pinch of salt. Divide this into three separate reusable silicone bags.
- Place your proteins (chicken or tofu) into the marinade bags. Massage the liquid into the food through the bag to ensure every inch is coated, then seal tightly, removing as much air as possible to prevent oxidation.
- Cook your grains in a large pot using vegetable broth instead of water for extra depth. Once the liquid is absorbed, spread the grains out on a baking sheet to cool rapidly; this prevents them from becoming mushy and keeps the texture light and fluffy.
- Portion the cooled grains into individual airtight containers, topping them with a handful of the pre-chopped raw veggies. Store these in the middle shelf of your refrigerator where the temperature is most consistent.
- Label every container with the date and contents. When it’s time to eat, simply sear your marinated protein for 6-8 minutes per side over medium-high heat until the internal temperature reaches 165°F for chicken, then toss with your prepped grains.
- Finish each meal with a fresh squeeze of lemon and a handful of torn herbs right before serving to wake up the flavors after their time in the fridge.
5 Easy Ways to Make Rotel Dip (Step-by-Step Guide)

Why we love this
Rotel dip is the undisputed king of comfort food, offering a velvety, molten texture that clings perfectly to a salty tortilla chip. There is something deeply nostalgic about that rich, orange glow and the spicy kick of diced tomatoes and green chilies cutting through the creamy cheese. As it melts, the aroma of cumin and savory peppers fills the kitchen, signaling to everyone that the party has officially started. It’s a communal dish that invites guests to gather around the bowl, sharing stories and laughter with every cheesy, gooey bite.
Ingredients
- 1 block (16 oz) of high-quality melting cheese (like Velveeta or Sharp White Cheddar)
- 1 can (10 oz) Ro*Tel Diced Tomatoes and Green Chilies
- 1/2 lb ground spicy sausage or chorizo
- 4 oz cream cheese, cubed
- 1 tsp smoked paprika
- Fresh cilantro for garnish
- Sturdy corn tortilla chips
How to make it
- In a large skillet over medium-high heat, brown your ground sausage or chorizo. Use a wooden spoon to break it into very small, uniform crumbles so you get meat in every bite of dip. Drain the excess fat thoroughly to ensure the dip isn’t greasy.
- Cut your melting cheese block into 1-inch cubes. Cutting the cheese into smaller pieces ensures it melts evenly and prevents the bottom from scorching while the top remains solid.
- Lower the heat to low-medium and add the cheese cubes and the cubed cream cheese to the skillet with the meat. Stir constantly in a figure-eight motion to encourage a smooth emulsification.
- Pour in the entire can of Ro*Tel, including the juice. The acidity in the tomato juice helps stabilize the cheese sauce and prevents it from becoming too thick or ‘broken.’
- Sprinkle in the smoked paprika and continue to stir until the mixture is glossy and completely liquid. Look for the ‘slow bubble’—you don’t want a rolling boil, as high heat can make cheese grainy.
- If the dip feels too thick, whisk in 2 tablespoons of whole milk or heavy cream until you reach a pourable yet hearty consistency.
- Transfer the dip immediately to a small slow cooker on the ‘warm’ setting to maintain that perfect molten texture. Garnish with a heavy handful of chopped cilantro for a pop of freshness against the rich cheese.
3 Best Ways to Make Hummingbird Nectar (Step-by-Step Guide)

Why we love this
Making your own hummingbird nectar is a beautiful way to invite nature’s most energetic jewels into your garden. Watching these tiny, iridescent creatures hover with precision while they sip the sweet liquid you’ve prepared is a meditative experience that connects you to the rhythm of the seasons. The nectar itself is clear and pure, mirroring the natural floral sugars found in the wild. There’s a quiet joy in the routine of cleaning the feeders and knowing you are providing a vital energy source for their incredible journeys.
Ingredients
- Refined white sugar (pure cane sugar is best)
- Filtered water
- A small saucepan
- A clean glass pitcher for storage
How to make it
- Maintain a strict 4:1 ratio: four parts water to one part sugar. This ratio most closely mimics the natural nectar found in flowers; any stronger can be hard on a hummingbird’s kidneys, and any weaker won’t provide enough energy.
- Pour 1 cup of filtered water into a small saucepan and bring it to a gentle boil. Boiling helps dissolve the sugar completely and kills any bacteria or mold spores that might be present in the water.
- Measure out 1/4 cup of white granulated sugar. Do not use honey, brown sugar, or artificial sweeteners, as these can be fatal to hummingbirds. Add the sugar to the boiling water.
- Stir the mixture continuously until the sugar crystals have completely disappeared and the liquid is crystal clear. This usually takes about 1-2 minutes of active stirring.
- Remove the pan from the heat immediately. Allow the nectar to cool completely to room temperature. Never put hot nectar into a feeder, as it can warp plastic and harm the birds’ delicate tongues.
- While the nectar cools, deep-clean your feeder using a solution of hot water and white vinegar. Avoid dish soaps with heavy fragrances. Rinse thoroughly until no vinegar smell remains.
- Fill the feeder with the cooled nectar and store any leftovers in a sealed glass pitcher in the refrigerator for up to one week. Change the nectar in the feeder every 2-3 days, or daily in extreme heat, to prevent fermentation.
10 Quick Ways to Cook Summer Pasta (Step-by-Step Guide)

Why we love this
Summer pasta is the antithesis of heavy, winter comfort food; it’s light, vibrant, and celebrates the peak of the harvest. Think of silk-like strands of linguine tossed with bursting cherry tomatoes that release their sweet, jammy juices to form a natural sauce. The scent of torn basil hitting the warm noodles is intoxicating, and the brightness of lemon zest makes every forkful feel refreshing. It’s the kind of meal that can be thrown together in the time it takes for the water to boil, yet it feels sophisticated enough for a candlelit dinner on the porch.
Ingredients
- 1 lb thin pasta (Angel hair or Spaghetti)
- 2 pints cherry tomatoes, halved
- 4 cloves garlic, thinly sliced
- 1/2 cup extra virgin olive oil
- 1 cup fresh basil leaves, torn
- 1/2 cup grated Pecorino Romano
- Red pepper flakes and sea salt
How to make it
- Bring a massive pot of water to a rolling boil. Add at least two tablespoons of sea salt; the water should ‘taste like the sea’ to properly season the pasta from the inside out.
- While the water heats, add the olive oil and sliced garlic to a cold, wide skillet. Turn the heat to medium-low. This ‘cold start’ allows the garlic to infuse the oil gradually without burning or becoming bitter.
- Once the garlic is fragrant and barely golden, add the halved cherry tomatoes and a pinch of red pepper flakes. Increase the heat to medium and cook for 8-10 minutes, pressing down on the tomatoes with a spatula until they burst and soften.
- Drop your pasta into the boiling water. Cook it for exactly 2 minutes less than the package directions specify. This ‘al dente’ texture is crucial as the pasta will finish cooking in the sauce.
- Before draining, reserve 1 full cup of the starchy pasta water. This liquid gold is the secret to a silky, restaurant-quality sauce that clings to every strand.
- Transfer the pasta directly into the skillet with the tomatoes. Add 1/2 cup of the reserved pasta water and a handful of the grated cheese. Toss vigorously with tongs over medium heat for 60-90 seconds.
- The starch and cheese will emulsify into a creamy coating. Remove from heat, fold in the torn basil and the remaining cheese, and serve immediately with a final drizzle of high-quality olive oil.
5 Simple Ways to Make Cucumber Salad (Step-by-Step Guide)

Why we love this
A crisp cucumber salad is the ultimate palate cleanser, offering a cool, watery crunch that balances out grilled meats and spicy dips. The sound of a fresh cucumber being sliced is the very essence of summer, and when paired with thin slivers of red onion and a tangy vinegar dressing, it becomes addictive. The aroma is clean and green, often highlighted by the earthy scent of fresh dill. It’s a dish that actually improves as it sits, making it a stress-free addition to any food board as the flavors meld and the cucumbers slightly soften while maintaining their snap.
Ingredients
- 3 Large English cucumbers (seedless)
- 1/2 small red onion, paper-thinly sliced
- 1/2 cup white wine vinegar or apple cider vinegar
- 2 tbsp sugar (to balance acidity)
- 1/4 cup fresh dill, chopped
- 1 tsp sea salt and cracked black pepper
How to make it
- Wash the cucumbers thoroughly. You can peel them in stripes for a decorative look or leave the skin on for maximum nutrients and color. Use a mandoline or a very sharp knife to slice them into uniform rounds about 1/8 inch thick.
- Place the sliced cucumbers in a colander set over a bowl. Sprinkle with a teaspoon of salt and toss gently. Let them sit for 15 minutes; this draws out excess moisture so your salad doesn’t end up watery.
- In a small glass bowl, whisk together the vinegar, sugar, salt, and pepper until the sugar is completely dissolved. This creates a quick pickle brine that will ‘cure’ the vegetables.
- Rinse the sliced red onions under cold water for 30 seconds. This ‘shocks’ the onions, removing their harsh bite while keeping them perfectly crunchy.
- Pat the cucumbers dry with a clean kitchen towel and place them in a large mixing bowl. Add the rinsed red onions and the chopped fresh dill.
- Pour the vinegar dressing over the vegetables. Use clean hands or tongs to toss everything together, ensuring every slice of cucumber is submerged or coated.
- Cover the bowl and refrigerate for at least 30 minutes before serving. This chilling time is essential for the flavors to penetrate the cucumber walls. Give it one final toss before plating on your board.
12 Best Ways to Serve Cookout Sides (Step-by-Step Guide)

Why we love this
Cookout sides are often the unsung heroes of the table, providing the textural variety that makes a meal feel complete. From the smoky depth of baked beans to the creamy, cooling embrace of a classic potato salad, these dishes offer a sense of abundance and tradition. There’s something so satisfying about a plate piled high with different colors—the bright yellow of corn on the cob, the deep green of a slaw, and the golden brown of jalapeño cornbread. They are the ultimate comfort foods that remind us of family reunions and sun-drenched afternoons in the park.
Ingredients
- Sweet corn on the cob (husks removed)
- Red potatoes (for skin-on potato salad)
- Cabbage and carrot mix (for slaw)
- Canned navy beans and molasses (for baked beans)
- Fresh jalapeños and cheddar cheese
- Mayonnaise, Dijon mustard, and honey
How to make it
- For the corn, instead of boiling, wrap each ear in foil with a pat of butter and a pinch of salt. Roast them on the upper rack of the grill for 20 minutes, turning occasionally for a steamed, buttery finish.
- Boil your red potatoes starting in cold water. Bring to a simmer and cook until fork-tender. Drain and immediately toss with 2 tablespoons of apple cider vinegar while hot; this allows the acidity to soak into the potato itself.
- Make the slaw dressing: whisk 1/2 cup mayo with 1 tablespoon of honey and a splash of lime juice. Toss with the cabbage mix at least an hour before serving to let the cabbage wilt slightly.
- For the baked beans, sauté diced bacon and onions in a cast iron pot before adding the beans and molasses. Let them simmer on low heat on the edge of the grill to pick up a hint of natural wood smoke.
- Prepare a quick cornbread batter and stir in diced jalapeños and shredded cheddar. Bake in a preheated cast iron skillet to get those coveted crispy, buttery edges that everyone loves.
- Organize your sides on the food board using small, mismatched ceramic bowls. This creates visual interest and keeps the ‘saucy’ sides from running into the crispier elements.
- Always include a ‘fresh’ element like a bowl of chilled watermelon wedges or grapes to act as a sweet counterpoint to the savory, salty cookout sides.
8 Tasty Ways to Grill Kabobs (Step-by-Step Guide)

Why we love this
Kabobs are the jewelry of the grill—sparkling with charred edges, vibrant vegetables, and succulent pieces of meat. The experience of eating off a stick is inherently fun and casual, making them a perfect addition to a communal food board. As they sizzle over the open flame, the aroma of caramelizing onions and seared beef or chicken creates an irresistible invitation to the table. We love the versatility they offer; you can customize every skewer to suit different tastes, ensuring that every guest finds a combination that makes their taste buds sing.
Ingredients
- Sirloin steak or chicken breast, cut into 1.5-inch cubes
- Bell peppers, red onions, and zucchini
- Whole button mushrooms
- Wooden or stainless steel skewers
- Balsamic glaze and olive oil
- Dried oregano and garlic powder
How to make it
- If using wooden skewers, submerge them in water for at least 30 minutes. This prevents them from igniting and burning away while on the high heat of the grill.
- Cut all your meat and vegetables into uniform sizes. This is the golden rule of kabobs; if the pieces are different sizes, the small ones will burn before the large ones are cooked through.
- In a large bowl, toss your meat cubes with olive oil, garlic powder, oregano, and salt. Let this sit for 20 minutes to lightly cure the meat and build a flavor base.
- Thread the skewers: start and end with a sturdy vegetable like a piece of onion or a thick pepper slice. This acts as an ‘anchor’ to keep the rest of the ingredients from sliding off.
- Leave a tiny bit of space between each item on the skewer. If you pack them too tightly, the heat can’t circulate, and the food will steam rather than sear and develop those beautiful char marks.
- Preheat your grill to medium-high (about 400°F). Lightly oil the grates using a folded paper towel dipped in oil and held with tongs.
- Grill the kabobs for 8-10 minutes total, turning a quarter-turn every 2 minutes. For beef, look for an internal temp of 135°F for medium-rare; for chicken, aim for 165°F. Brush with balsamic glaze during the last 60 seconds for a sticky, sweet finish.
10 Easy Ways to Make Summer Dips (Step-by-Step Guide)

Why we love this
Summer dips are the glue that holds a food board together, providing the creamy, zesty, or spicy foundations for everything else to dip into. Whether it’s a whipped feta topped with honey and pistachios or a bright, chunky mango salsa, these dips offer a burst of freshness that can’t be beaten. The textures range from velvety smooth to excitingly chunky, and the colors—vibrant greens, deep reds, and bright whites—make the board look like a work of art. They are low-effort but high-impact, often tasting better the longer they sit and the flavors have time to mingle.
Ingredients
- 8 oz Feta cheese and 1/2 cup Greek yogurt
- Ripe avocados and limes
- Fresh mango, red onion, and jalapeño
- Chickpeas, tahini, and lemon juice
- Honey, nuts, and dried herbs
- Extra virgin olive oil
How to make it
- For a Whipped Feta: Place the feta and yogurt in a food processor. Blitz until completely smooth. While the motor is running, drizzle in 2 tablespoons of olive oil. Transfer to a bowl and top with a drizzle of honey and crushed pistachios.
- For Mango Salsa: Finely dice one ripe mango, half a red onion, and one de-seeded jalapeño. Toss with the juice of one lime and a pinch of salt. Let it sit for 10 minutes to allow the juices to pool.
- For Classic Hummus: Drain one can of chickpeas, but reserve the liquid (aquafaba). Blend the chickpeas with 1/4 cup tahini, the juice of one lemon, and one garlic clove. Add the reserved liquid one tablespoon at a time until the texture is light and airy.
- Always chill your yogurt-based or avocado-based dips for at least 20 minutes before serving. This firms them up slightly so they don’t run all over the board.
- To prevent avocado dip (guacamole) from browning, press a piece of plastic wrap directly onto the surface of the dip so no air can touch it before it’s time to eat.
- Create ‘wells’ in the top of your smooth dips using the back of a spoon. Pour a little olive oil or sprinkle spices into these wells for a professional, gourmet presentation.
- Serve each dip with a dedicated utensil to prevent ‘cross-contamination’ of flavors on the board, and surround them with various vessels like pita bread, crackers, and raw veggie sticks.
6 Fun Ways to Mix Summer Drinks (Step-by-Step Guide)

Why we love this
Nothing says ‘welcome’ quite like a beautifully crafted summer drink handed to a guest as they arrive. These beverages are a celebration of hydration and flavor, utilizing the best of the season’s fruits and herbs. The sound of ice clinking against glass and the sight of condensation forming on a cold pitcher are the ultimate symbols of refreshment. Whether it’s a sparkling mocktail with muddled berries or a sophisticated herb-infused lemonade, these drinks add a layer of thoughtfulness to your gathering that makes every guest feel truly cared for.
Ingredients
- Fresh strawberries, blueberries, or raspberries
- Fresh mint, basil, or rosemary sprigs
- Freshly squeezed lemon or lime juice
- Sparkling water or ginger ale
- Simple syrup (equal parts sugar and water)
- Plenty of clear ice cubes
How to make it
- Start by making a batch of herb-infused simple syrup. Combine 1 cup sugar and 1 cup water in a pan with a handful of fresh basil or mint. Simmer until sugar dissolves, then let it steep until cool. Strain into a bottle.
- For a Berry Sparkler: Place 3-4 berries in the bottom of a glass and add 1 tablespoon of your herb syrup. Use a muddler or the back of a spoon to crush the berries, releasing their juices and aromas.
- Fill the glass to the brim with ice. Using large, solid ice cubes is better than crushed ice, as they melt slower and won’t dilute your drink as quickly.
- Pour in your base—this could be freshly squeezed lemonade or just plain sparkling water. Stir gently with a long spoon to pull the muddled fruit from the bottom up through the drink.
- To garnish like a pro: Slap the fresh herb sprigs against your palm before placing them in the drink. This ‘wakes up’ the essential oils so the guest gets a waft of fragrance with every sip.
- Rim your glasses if you want to be extra: Dip the edge of the glass in lime juice, then into a mixture of sugar and zest for a sweet drink, or salt and chili powder for something savory.
- Prepare a ‘hydration station’ on your board with a large glass dispenser filled with water, cucumber slices, and lemon rounds so guests can help themselves throughout the evening.
9 Healthy Ways to Make Summer Dinner (Step-by-Step Guide)
[IMAGE_10]
Why we love this
Summer dinners should feel like a renewal—light, nutrient-dense, and bursting with the vitality of fresh produce. We love focusing on ‘clean’ flavors where the ingredients speak for themselves, like a piece of wild-caught salmon grilled on a cedar plank or a massive bowl of greens tossed with toasted nuts and berries. The feeling after a healthy summer dinner is one of energy rather than lethargy, leaving you with enough pep in your step for an evening walk or a game of backyard lawn darts. It’s about nourishing your body while savoring the peak flavors of the warmest months.
Ingredients
- Lean proteins like salmon, shrimp, or turkey breast
- Massive quantities of leafy greens (kale, arugula, spinach)
- Healthy fats (avocado, walnuts, pumpkin seeds)
- Fresh fruit like peaches or strawberries for salads
- Apple cider vinegar and avocado oil
- Sea salt and fresh cracked pepper
How to make it
- Focus on the ‘Grill and Chill’ method. Grill your protein (like salmon) over medium heat for 4-5 minutes per side until it flakes easily with a fork. Let it rest for 5 minutes so the juices redistribute.
- While the meat rests, prepare a ‘Power Green’ base. If using kale, massage the leaves with a teaspoon of olive oil and a pinch of salt for 2 minutes. This breaks down the tough fibers, making it tender and sweet.
- Slice fresh peaches or nectarines and give them a quick 60-second sear on the grill. The heat caramelizes the natural sugars, adding a smoky sweetness to your salad that is purely addictive.
- Assemble the dinner in a wide, shallow bowl. Layer the massaged greens, then the grilled fruit, then the rested protein. This presentation highlights the variety of ingredients.
- Whisk together a simple ‘Clean Dressing’: 3 parts avocado oil to 1 part apple cider vinegar, a teaspoon of Dijon mustard, and a tiny bit of honey. Drizzle sparingly; you want to enhance the food, not drown it.
- Add texture with a handful of raw walnuts or toasted pumpkin seeds. The crunch provides a satisfying contrast to the soft fruit and tender protein.
- Finish with a sprinkle of hemp seeds or microgreens for an extra boost of vitamins. Serve this at the center of your board so everyone can portion out exactly what they need.
Conclusion
Building the ultimate simple food board is truly an act of love—for the ingredients, for the process, and most importantly, for the people you share it with. By focusing on fresh, seasonal components and using these simple step-by-step methods, you can create a viral-worthy spread that looks like a masterpiece but feels like home. Remember, the best boards are those that aren’t too ‘perfect’—let the dips overflow slightly, pile the kabobs high, and encourage everyone to use their hands. Here’s to a summer filled with slow afternoons, golden sunsets, and the very best food shared with the very best people.