

There is something truly magical about the moment your friends walk through the front door and their eyes immediately light up at the sight of a sprawling, delicious spread. We’ve all been there—trying to balance the desire to be the ‘host with the most’ while secretly wishing we weren’t stuck in the kitchen missing all the laughter and stories. That’s exactly why the viral food board trend has become my absolute favorite way to entertain; it turns mealtime into an interactive, visual masterpiece that invites everyone to dig in together.
These boards aren’t just about snacks anymore. We are talking about full, hearty, soul-warming meals served with style. Whether you are craving the smoky aroma of an outdoor fire or the gooey, comforting pull of a cheesy slider, these ideas are designed to be low-stress and high-impact. Let’s dive into these ten viral board concepts that will make your next gathering the talk of the neighborhood, all while keeping that warm, homey vibe we all crave.
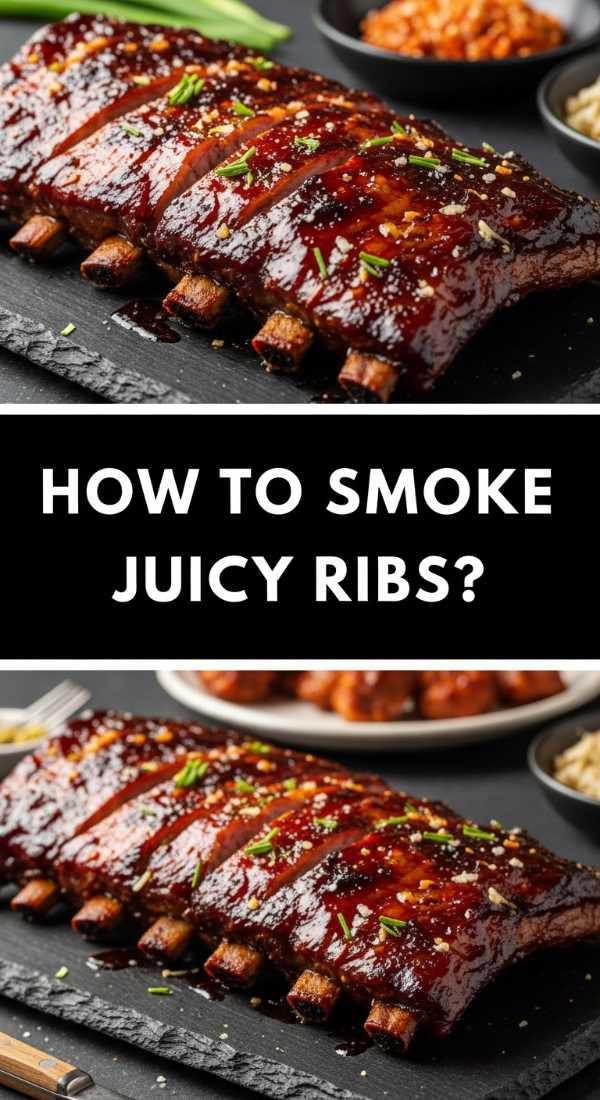
The Smokehouse Ribs Board
Why we love this
There is nothing quite like the primal, intoxicating scent of hickory smoke drifting through the backyard as juicy ribs slowly transform into tender perfection. When you lay these out on a massive wooden board, the glistening, caramelized bark of the meat contrasts beautifully with bright pickles and tangy slaw. Each bite offers a satisfying tug-off-the-bone texture followed by a burst of smoky, sweet, and savory juices that make your taste buds dance with joy. It’s a rustic, hands-on experience that brings everyone closer, messy fingers and all.
Ingredients
- 2 racks of St. Louis style pork ribs
- Sweet and spicy dry rub (paprika, brown sugar, garlic powder, onion powder, cayenne)
- Apple juice for spritzing
- Hickory or Oak wood chunks
- BBQ sauce of choice
- Pickled red onions and jalapeños for garnish
How to make it
- Begin by removing the silver skin from the back of the ribs using a paper towel for grip to ensure maximum tenderness.
- Apply a generous coating of your dry rub on all sides, pressing it firmly into the meat; let the ribs sit at room temperature for 30 minutes to develop a ‘sweat.’
- Prepare your outdoor fire or smoker to a steady 225°F (107°C) using indirect heat, adding your wood chunks once the coals are glowing orange.
- Place the ribs bone-side down on the grate and smoke for 3 hours, spritzing with apple juice every 45 minutes to maintain moisture and build a deep mahogany color.
- Wrap the ribs tightly in heavy-duty aluminum foil with a splash of apple juice and return to the heat for another 2 hours until the internal temperature reaches approximately 195°F.
- Carefully unwrap, brush with a thin layer of BBQ sauce, and place back on the fire for 15-20 minutes to allow the sauce to tack up and caramelize into a sticky glaze.
The Creamy Pasta Dinner Board

Why we love this
Imagine a sea of silky, velvet-like sauce clinging to every curve of perfectly al dente pasta, served family-style on a grand board. The aroma of roasted garlic and aged parmesan fills the room, creating an atmosphere of pure Italian comfort. It’s the kind of dish that feels like a warm hug, where the creamy texture of the sauce is broken up by the crunch of toasted breadcrumbs or a sprinkle of fresh, zesty herbs. It’s elegant yet incredibly approachable, making it the perfect centerpiece for a cozy indoor gathering.
Ingredients
- 1 lb Fettuccine or Penne pasta
- 2 cups heavy cream
- 1 cup freshly grated Parmesan cheese
- 4 cloves garlic, minced
- 2 tbsp unsalted butter
- Fresh parsley and cracked black pepper
- Optional: Sliced grilled chicken or sautéed mushrooms
How to make it
- Bring a large pot of heavily salted water to a rolling boil; cook the pasta for 1-2 minutes less than the package instructions to achieve a true al dente bite.
- In a wide skillet over medium heat, melt the butter until it begins to foam, then add the minced garlic and sauté for 60 seconds until fragrant but not browned.
- Slowly pour in the heavy cream, stirring constantly, and bring to a gentle simmer for 3-5 minutes until the liquid reduces slightly and begins to thicken.
- Whisk in the grated Parmesan cheese one handful at a time, ensuring each batch is fully melted and incorporated before adding the next to prevent clumping.
- Reserve one cup of starchy pasta water before draining the noodles, then toss the pasta directly into the cream sauce, adding splashes of the reserved water to achieve a glossy, coating consistency.
- Season aggressively with freshly cracked black pepper and chopped parsley before swirling onto your presentation board.
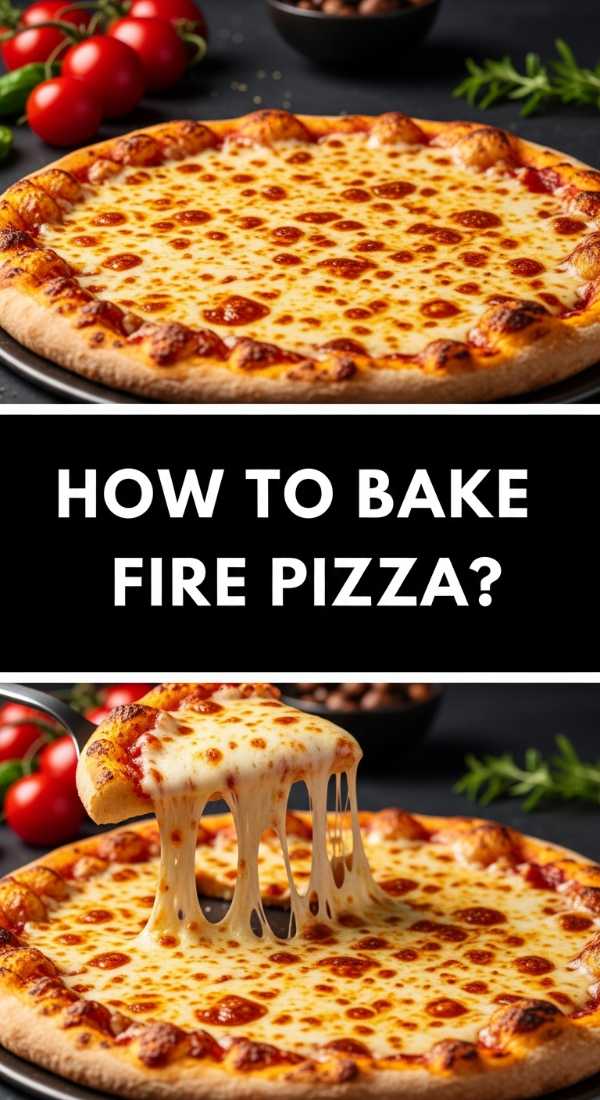
Backyard Fire Pizza Board
Why we love this
There’s a specific, undeniable magic in the charred, bubbly crust of an authentic fire-baked pizza. The high heat of a backyard oven creates those gorgeous ‘leopard spots’ on the dough while the cheese melts into a molten, golden pool of deliciousness. The scent of wood smoke mingling with toasted flour and bubbling tomato sauce is enough to make anyone’s mouth water. Serving various slices on a board allows guests to sample different toppings, from spicy salami to fresh basil, making it a truly interactive feast.
Ingredients
- 00 Flour pizza dough balls (room temperature)
- San Marzano tomato sauce
- Fresh mozzarella pearls
- Fresh basil leaves
- Extra virgin olive oil
- Cornmeal for dusting the peel
How to make it
- Preheat your wood-fired oven or pizza stone-equipped grill for at least 30 minutes until it reaches a blistering 750°F to 800°F (400°C+).
- On a lightly floured surface, gently stretch the dough by hand, starting from the center and moving outward to create a thin base with a slightly thicker rim.
- Dust your pizza peel with cornmeal to ensure the dough slides easily, then spread a thin layer of tomato sauce, leaving an inch for the crust.
- Add your fresh mozzarella and any desired toppings sparingly; too many toppings will prevent the crust from crisping properly in the high heat.
- Launch the pizza into the back of the oven and rotate it 90 degrees every 20-30 seconds using a turning peel to ensure an even char and prevent burning.
- Remove once the crust is puffed and blackened in spots (usually 60-90 seconds) and the cheese is vigorously bubbling.
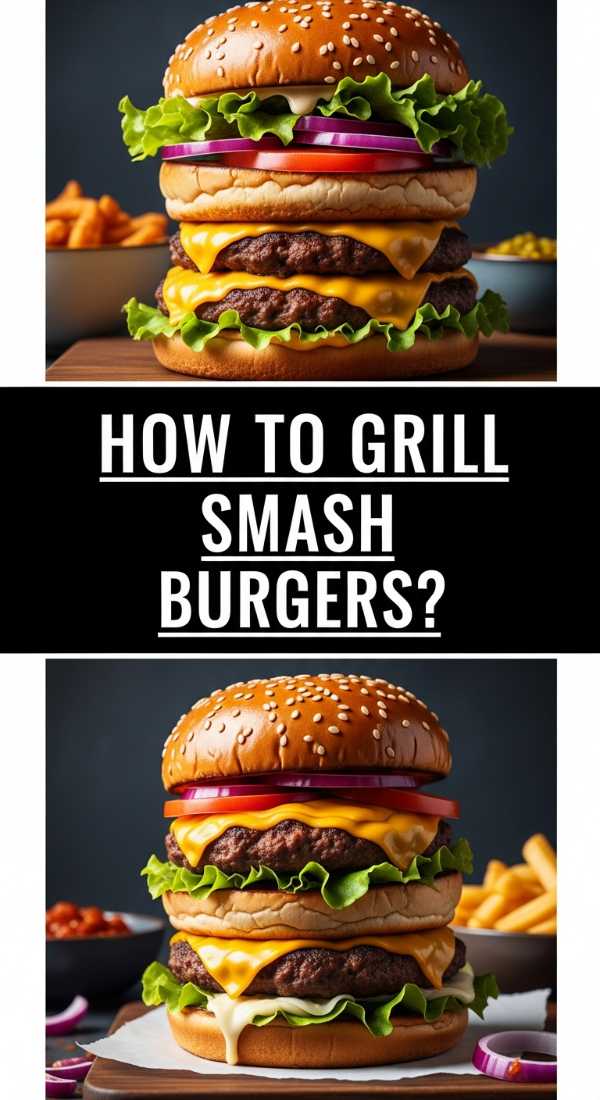
The Ultimate Smash Burger Board
Why we love this
The smash burger is the king of textures—the lacy, ultra-crispy edges of the beef patty provide a salty crunch that contrasts perfectly with the soft, pillowy brioche bun. As you bite through, the hidden pockets of melted American cheese and tangy secret sauce create a flavor explosion that is both nostalgic and sophisticated. Serving these on a board with heaps of pickles and caramelized onions makes the meal feel like a gourmet backyard diner experience that no one can resist.
Ingredients
- 80/20 ground chuck (rolled into 2-oz balls)
- Brioche buns, buttered
- American cheese slices
- Thinly sliced yellow onions
- Kosher salt and coarse black pepper
- Classic burger sauce (mayo, mustard, relish)
How to make it
- Heat a heavy cast-iron griddle or skillet over high heat until it is wisps of smoke begin to rise; do not add oil, as the fat from the beef will suffice.
- Place two beef balls onto the hot surface and immediately use a heavy press or spatula to smash them flat until they are less than a quarter-inch thick.
- Season the patties generously with salt and pepper while they are searing; the high heat will create a Maillard reaction, forming that iconic brown crust.
- After about 2 minutes, when the edges look dark brown and crispy, use a sharp metal spatula to scrape under the patty and flip it over.
- Immediately place a slice of cheese on each patty and cover with a dome for 30 seconds to facilitate a perfect melt.
- Toast the buttered buns on the edge of the griddle until golden, then stack the double patties, add your toppings, and arrange them in rows on your board.
Extra Crispy Fries Pro Board

Why we love this
A board piled high with golden, shimmering fries is the ultimate crowd-pleaser. We love the audible ‘crunch’ of a perfectly fried potato that gives way to a light, fluffy, and cloud-like interior. The warmth radiating from the pile, combined with the salty, earthy aroma of potato and herbs, creates an irresistible snack station. When paired with an array of colorful dipping sauces, it becomes a gourmet tasting experience that elevates the humble spud to legendary status.
Ingredients
- Russet potatoes (peeled and cut into matchsticks)
- Vegetable or Peanut oil for frying
- Sea salt and rosemary
- Dips: Truffle mayo, spicy ketchup, garlic aioli
How to make it
- Soak the cut potatoes in cold water for at least 2 hours to remove excess starch, which is the secret to preventing them from becoming limp.
- Pat the potatoes completely dry with a lint-free towel; any moisture will cause the oil to splatter and steam the fries instead of crisping them.
- Heat your oil to 325°F (160°C) and perform a ‘blanch’ fry for 5 minutes until the fries are pale and soft; remove and let them drain on a wire rack.
- Increase the oil temperature to 375°F (190°C) and fry the potatoes a second time for 2-3 minutes until they turn a deep, golden brown and feel stiff to the touch.
- Immediately toss the hot fries in a large bowl with sea salt and finely chopped rosemary so the seasoning sticks to the residual oil.
- Arrange the fries in artistic mounds on the board, surrounding them with small ceramic bowls of your signature dips.
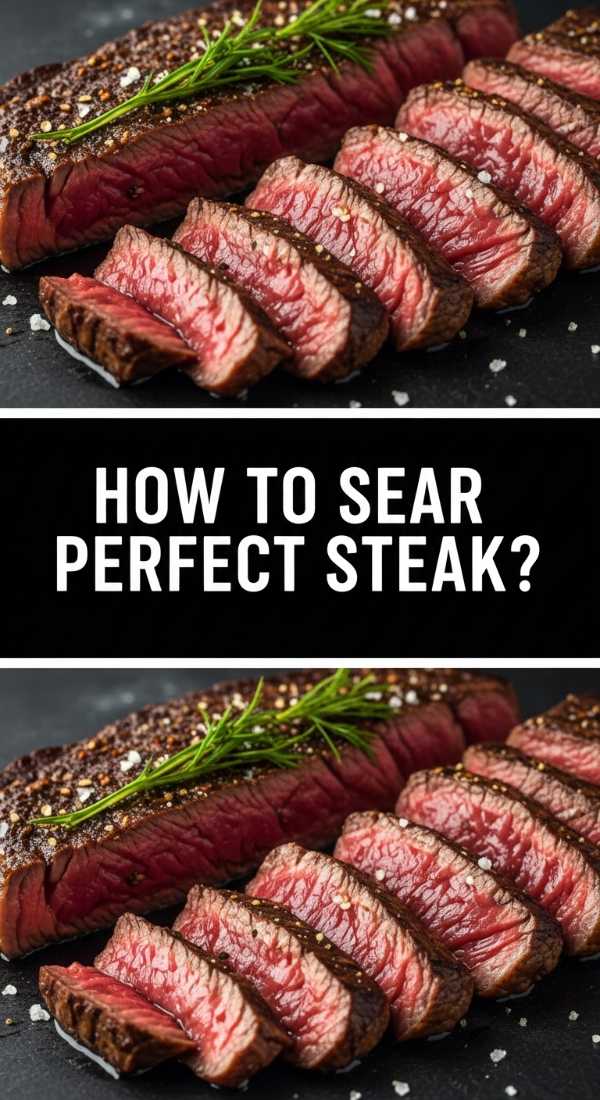
The Searing Steakhouse Board
Why we love this
There is an understated elegance to a perfectly seared steak, sliced thin and fanned across a dark wood board. The sight of the warm, pink center against the dark, salty crust is enough to stop any guest in their tracks. You get the rich, buttery aroma of browning fat mixed with the herbaceous scent of fresh thyme and garlic butter. It’s a sophisticated way to serve steak, allowing everyone to grab a few slices and enjoy that melt-in-the-mouth tenderness without the formality of a sit-down dinner.
Ingredients
- 2 Thick-cut Ribeye or New York Strip steaks
- Kosher salt and cracked peppercorns
- 4 tbsp unsalted butter
- 3 cloves garlic, smashed
- Fresh thyme and rosemary sprigs
How to make it
- Temper your steaks by letting them sit at room temperature for 45 minutes, then pat them extremely dry with paper towels to ensure a superior crust.
- Season aggressively with salt and pepper on all sides, including the edges where the fat cap is located.
- Heat a cast-iron skillet over medium-high heat until it is scorching hot; add a tablespoon of high-smoke-point oil.
- Place the steaks in the pan and sear for 3-4 minutes per side without moving them, allowing a thick, dark crust to develop.
- Reduce the heat slightly, add the butter, garlic, and herbs to the pan; once the butter foams, use a spoon to continuously baste the steaks with the flavored fat for another 2 minutes.
- Remove the steaks when the internal temperature hits 130°F (54°C) for medium-rare, and—most importantly—let them rest for a full 10 minutes before slicing against the grain.
Cheesy Party Sliders Board
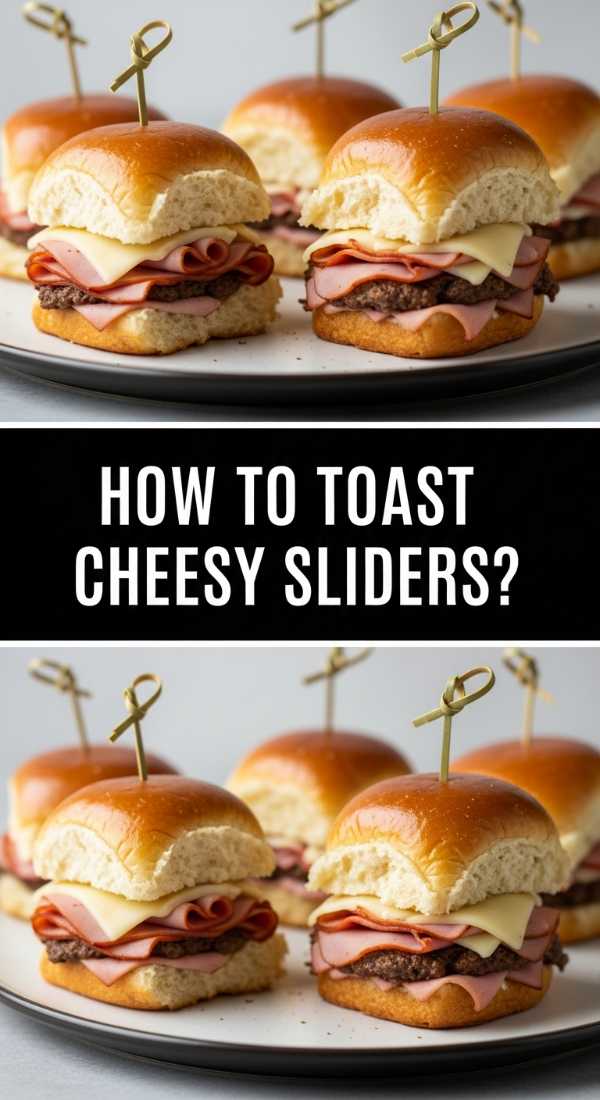
Why we love this
Sliders are the ultimate party food because they pack all the flavors of a full sandwich into a cute, manageable bite. We love the way the melted cheese acts as a delicious glue, binding the savory meats to the sweet, buttery rolls. When you pull them apart, the sight of stretching cheese and the aroma of toasted garlic butter is pure viral gold. They are soft, savory, and incredibly satisfying, making them the first thing to disappear from any food board.
Ingredients
- 1 pack Hawaiian sweet rolls
- Sliced deli ham or roast beef
- Provolone or Swiss cheese slices
- Melted butter mixed with Dijon mustard and poppy seeds
- Pickle chips
How to make it
- Keep the entire slab of rolls intact and use a long serrated knife to slice them in half horizontally, creating one large top and one large bottom piece.
- Place the bottom half on a baking sheet and layer it thickly with your choice of deli meat and plenty of cheese, ensuring the cheese reaches the very edges.
- Place the top half of the rolls back on, then use a pastry brush to coat the tops generously with the mustard-butter and poppy seed mixture.
- Cover the pan loosely with foil and bake at 350°F (175°C) for 10 minutes to melt the cheese without over-browning the bread.
- Remove the foil and bake for an additional 5 minutes until the tops are golden brown and slightly crisp to the touch.
- Transfer the entire slab to your board and slice through the pre-marked lines so guests can easily pull their own sliders away from the pack.
Woodfire Whole Chicken Board

Why we love this
A whole roasted chicken is the centerpiece of a traditional Sunday dinner, but bringing it outdoors to the fire takes it to a whole new level. The skin becomes incredibly thin and crackly, like parchment paper, while the meat stays exceptionally moist and infused with a light touch of smoke. The rustic presentation of a carved chicken surrounded by fire-roasted vegetables on a board feels communal and hearty. It’s the kind of meal that smells like woodsmoke and rosemary, evoking feelings of comfort and heritage.
Ingredients
- 1 whole roasting chicken (4-5 lbs)
- Olive oil and lemon zest
- Dry brine (salt, sugar, smoked paprika)
- Fresh herbs (rosemary, sage, thyme)
- Whole heads of garlic, halved
How to make it
- Spatchcock the chicken by removing the backbone with kitchen shears and pressing down on the breastbone to flatten it; this ensures even cooking and maximum skin crispiness.
- Rub the skin with olive oil and apply your dry brine at least 4 hours (or overnight) in advance, leaving it uncovered in the fridge to dry out the skin.
- Prepare your grill for two-zone cooking with a medium-hot fire (about 375°F) on one side and no coals on the other.
- Place the chicken skin-side up on the cool side of the grill and toss a few herb sprigs onto the coals for aromatic smoke.
- Close the lid and roast for 45-60 minutes until the breast meat reaches 160°F and the thighs reach 175°F.
- For the finale, move the chicken to the hot side for 2 minutes to blister the skin, then rest for 15 minutes before carving and arranging on the board with the roasted garlic.
Authentic Street Taco Board

Why we love this
Street tacos are a celebration of vibrant colors and bold, contrasting flavors. We love the smell of charred corn tortillas and the sizzle of marinated meat hitting a hot surface. On a board, the arrangement of bright green cilantro, neon-pink pickled onions, and creamy white crumbles of cotija cheese looks like a piece of edible art. Each taco is a perfect balance of smoky, spicy, and acidic—a tiny, handheld party that encourages everyone to customize their own perfect bite.
Ingredients
- Carne asada or Al pastor marinated meat
- Small corn tortillas
- Fresh white onion, finely diced
- Fresh cilantro, chopped
- Radishes, thinly sliced
- Limes and various salsas
How to make it
- Heat a heavy flat-top griddle or large cast-iron skillet over high heat until it is smoking slightly.
- Sear your marinated meat in small batches to ensure it browns and crisps rather than steaming; you want those charred, ‘burnt ends’ for authentic flavor.
- While the meat rests, lightly dip each corn tortilla in a tiny bit of water or oil and flash-fry them on the griddle for 30 seconds per side until they are soft and slightly blistered.
- Stack the tortillas in a clean kitchen towel to keep them warm and pliable while you finish the rest.
- Assemble the tacos by doubling up the tortillas (the street-style way), adding a small heap of meat, and topping with the onion and cilantro.
- Arrange the tacos in a circular pattern on the board, placing the limes and salsas in the center for easy access.
Skillet Cookie Dessert Board

Why we love this
Nothing ends a night better than a giant, warm, gooey chocolate chip cookie served straight from the skillet. We love the way the edges are crisp and chewy while the center remains slightly underbaked and molten. The smell of browning butter and melting chocolate is universal bliss. When you place that hot skillet on a board surrounded by scoops of cold vanilla bean ice cream and extra toppings, it becomes a decadent ‘dip’ style dessert that brings everyone together for one final, sweet memory.
Ingredients
- 1 cup unsalted butter (browned)
- 3/4 cup brown sugar and 1/2 cup white sugar
- 1 egg + 1 egg yolk
- 2 cups all-purpose flour
- 1 tsp baking soda
- 1.5 cups semi-sweet chocolate chunks
- Sea salt for topping
How to make it
- Start by browning your butter in a pan over medium heat until it smells nutty and has golden specks; let it cool slightly before whisking in the sugars.
- Add the egg and egg yolk, whisking vigorously until the mixture becomes pale and thick, which creates that signature crinkly top.
- Gently fold in the dry ingredients (flour and baking soda) using a spatula until just combined; do not overmix, or the cookie will be tough.
- Fold in the chocolate chunks and press the dough into a well-seasoned 10-inch cast-iron skillet.
- Bake at 350°F (175°C) for 20-25 minutes; you are looking for the edges to be set and golden, but the center should still have a slight ‘jiggle’ when moved.
- Sprinkle with flaky sea salt immediately upon removal and place the skillet directly onto your board, allowing it to cool for only 5 minutes before adding the ice cream.
Wrapping Up Your Viral Board Success
Creating a viral-worthy food board is all about the balance between incredible flavors and effortless presentation. By taking these classic, well-loved dishes and serving them family-style, you turn a standard dinner into an unforgettable event. Remember, the best boards are the ones that look lived-in and inviting—so don’t worry about perfection. Just focus on the aromas, the textures, and the joy of sharing a great meal with the people you love. Now, go grab your biggest wooden board and start creating!