

Hosting Made Easy: The Simple Food Board Trend You Need to Try
There is something inherently magical about the golden hour of a summer evening, where the air is thick with the scent of jasmine and the laughter of friends resonates against the backdrop of a setting sun. As a host, I used to find myself tethered to the kitchen, missing out on the very memories I was trying to facilitate. But then, I discovered the beauty of the ‘Viral Food Board’—a trend that prioritizes connection over complicated plating and allows everyone to graze at their own pace.
Today, hosting has evolved into an art of curation rather than just cooking. By leaning into simple, seasonal ingredients and presenting them with intentionality, we can create an atmosphere that feels both luxurious and lived-in. Whether you are gathering for a backyard BBQ or an intimate evening on the patio, these ideas are designed to help you reclaim your time while serving dishes that your guests will be talking about long after the final firework has faded.
10 Best Summer Crockpot Recipes for Easy Dinners
Why we love this
Imagine coming home from a long day at the beach to the intoxicating, sweet, and smoky aroma of Slow Cooker BBQ Pulled Pork wafting through your hallways. The meat becomes so incredibly tender that it practically melts under the weight of a fork, soaking up every drop of tangy sauce until it reaches a succulent, velvety consistency. It is the ultimate low-effort, high-reward meal that keeps your kitchen cool while delivering a hearty, soul-warming flavor profile that screams summer comfort.
Ingredients
- 4-5 lb Pork Shoulder (Boston Butt)
- 2 cups high-quality BBQ sauce
- 1/4 cup apple cider vinegar
- 1/2 cup brown sugar
- 1 tbsp smoked paprika
- 1 tbsp garlic powder
- 1 tsp cayenne pepper
- Salt and cracked black pepper to taste
- Brioche buns for serving
How to make it
- Begin by patting the pork shoulder completely dry with paper towels to ensure the spice rub adheres properly. In a small bowl, whisk together the brown sugar, paprika, garlic powder, cayenne, salt, and pepper until well combined.
- Massage the dry rub vigorously into all sides of the pork, pressing firmly so the spices form a crust. Place the seasoned meat into the bottom of your slow cooker.
- Whisk together the apple cider vinegar and half of the BBQ sauce, then pour it around the sides of the pork (not directly over the top, to keep the crust intact).
- Cover and cook on LOW for 8 to 10 hours. Do not open the lid during the process; maintaining a consistent internal temperature is key for breaking down the tough connective tissues into a buttery texture.
- Once the pork is fork-tender, remove it to a large cutting board and shred using two forks. Discard any excess fat.
- Return the shredded meat to the crockpot, toss with the remaining BBQ sauce, and let it sit on the WARM setting for 20 minutes to allow the flavors to marry before piling high on toasted brioche buns.
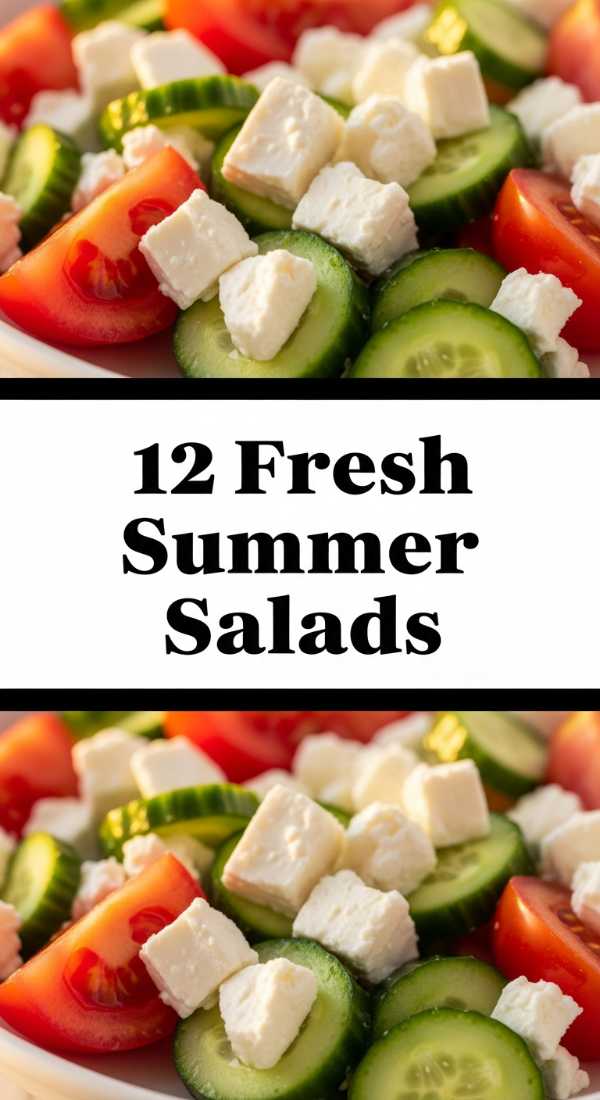
12 Refreshing Summer Salad Recipes You’ll Actually Crave
Why we love this
The Watermelon and Feta Salad is a sensory masterpiece that defies the traditional notion of what a salad can be. The explosive crunch of ice-cold, ruby-red watermelon provides a hydrating sweetness that is instantly countered by the creamy, salty tang of high-quality sheep’s milk feta. A drizzle of balsamic glaze adds a syrupy depth, while fresh mint leaves release a cool, herbaceous aroma that lingers on the palate, making every bite feel like a refreshing dip in a pool on a sweltering July afternoon.
Ingredients
- 1 medium seedless watermelon, cubed
- 8 oz block of Greek feta, crumbled
- 1/2 red onion, thinly mandoline-sliced
- 1/2 cup fresh mint leaves, torn
- 1/4 cup extra virgin olive oil
- 2 tbsp balsamic glaze
- Flaky sea salt
How to make it
- Chill your watermelon in the refrigerator for at least 4 hours prior to preparation. A cold base is essential for the refreshing crispness this dish is known for.
- Using a sharp chef’s knife, remove the rind and cut the watermelon into uniform 1-inch cubes. Transfer them to a wide, shallow serving platter rather than a deep bowl to prevent the fruit from crushing under its own weight.
- Soak the thinly sliced red onions in a small bowl of ice water for 10 minutes. This technique removes the harsh ‘bite’ of the onion, leaving behind a mild, sweet crunch. Drain and pat dry.
- Scatter the chilled watermelon cubes, soaked onions, and crumbled feta across the platter.
- Drizzle the extra virgin olive oil in a steady stream, followed by the thick balsamic glaze.
- Garnish with hand-torn mint leaves and a generous sprinkle of flaky sea salt. Serve immediately to prevent the salt from drawing too much moisture out of the melon.
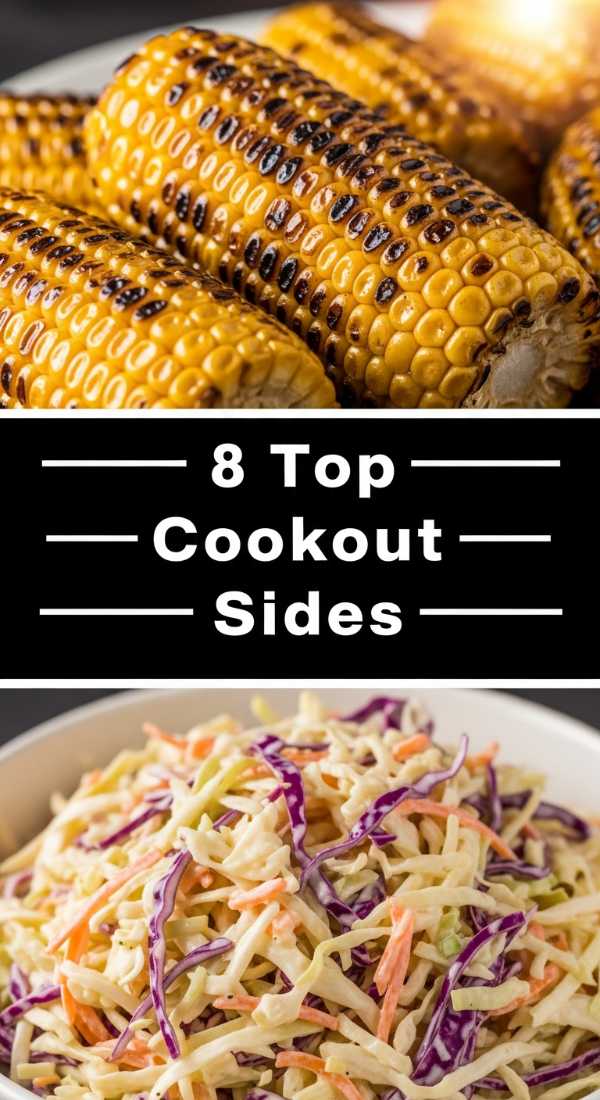
8 Best Cookout Side Dishes for Your Next BBQ
Why we love this
Nothing captures the essence of a summer cookout quite like Mexican Street Corn, or Elote. The kernels are charred over an open flame until they are slightly blistered and nutty, offering a smoky contrast to the rich, velvety layer of crema and crumbled cotija cheese. Every bite is an incredible symphony of textures—from the firm snap of the corn to the silky sauce—finished with a sharp zesty kick of lime and a dusting of chili powder that dances across your tongue with a subtle, lingering heat.
Ingredients
- 6 ears of fresh sweet corn, husks removed
- 1/2 cup Mexican crema or sour cream
- 1/2 cup mayonnaise
- 1/2 cup Cotija cheese, finely crumbled
- 1/4 cup fresh cilantro, chopped
- 1 tsp ancho chili powder
- 2 limes, cut into wedges
How to make it
- Preheat your grill to medium-high heat (about 400°F). Lightly oil the grates to prevent sticking.
- Place the shucked corn directly onto the grates. Grill for 10-12 minutes, turning every 2-3 minutes. You are looking for even charring—blackened spots should appear on all sides while the kernels remain plump and juicy.
- While the corn is grilling, whisk together the crema, mayonnaise, and a squeeze of lime juice in a small bowl until smooth and spreadable.
- Once the corn is charred to perfection, remove it from the grill and immediately brush each ear generously with the crema mixture. The residual heat will help the sauce adhere.
- Roll the coated corn in the crumbled Cotija cheese until fully encrusted.
- Dust with ancho chili powder and sprinkle with chopped cilantro. Serve warm with extra lime wedges on the side for guests to customize the acidity.
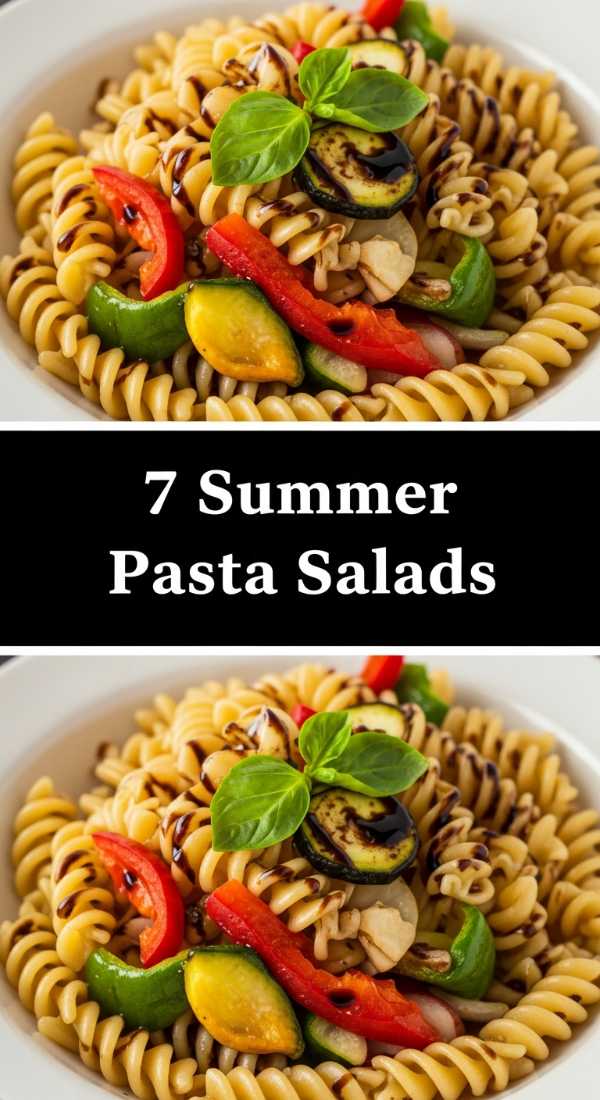
7 Easy Summer Pasta Salads for Party Crowds

Why we love this
A classic Caprese Pasta Salad is the epitome of effortless Italian elegance, bringing the vibrant colors of the Mediterranean to your picnic table. The al dente rotini spirals act as perfect vessels for capturing the herbaceous basil pesto and the silken pools of olive oil. With every forkful, you encounter the burst of sun-ripened cherry tomatoes and the soft, milky luxury of fresh mozzarella pearls, creating a dish that is light yet satisfying, with a fragrance that evokes a stroll through a Tuscan garden in mid-July.
Ingredients
- 1 lb rotini or fusilli pasta
- 1 pint cherry tomatoes, halved
- 8 oz fresh mozzarella pearls
- 1 cup fresh basil leaves, julienned
- 1/2 cup high-quality basil pesto
- 2 tbsp balsamic vinegar
- 1/3 cup pine nuts, toasted
How to make it
- Bring a large pot of heavily salted water to a rolling boil. Cook the pasta until it is ‘al dente’—firm to the bite. Overcooking the pasta will result in a mushy salad once the dressing is added.
- Drain the pasta and immediately rinse it under cold running water. This stops the cooking process and removes excess starch, ensuring the spirals don’t stick together.
- In a large mixing bowl, toss the cooled pasta with the basil pesto until every piece is evenly coated. If the mixture seems too thick, add a tablespoon of olive oil to loosen it.
- Gently fold in the halved cherry tomatoes and the mozzarella pearls. Using a silicone spatula will prevent bruising the delicate cheese.
- Add the julienned basil and toasted pine nuts, which provide a necessary crunch and earthy depth.
- Drizzle with balsamic vinegar just before serving. For the best flavor, let the salad sit at room temperature for 15 minutes to allow the ingredients to meld.
9 Viral Summer Dips Everyone Will Ask For

Why we love this
The Whipped Feta with Honey and Pistachios is the undisputed queen of the snack board, offering a sophisticated balance of savory, sweet, and nutty notes. The texture is cloud-like and airy, achieved by whipping the salty cheese until it loses its graininess and becomes a luxurious spread. When topped with a generous swirl of golden, floral honey and the crunch of roasted pistachios, it creates a flavor profile that is addictive and deeply complex, making it nearly impossible to stop at just one dip of a warm pita wedge.
Ingredients
- 8 oz block of Greek Feta (in brine)
- 1/2 cup Greek yogurt (full fat)
- 1 clove garlic, minced
- 2 tbsp extra virgin olive oil
- 3 tbsp honey
- 1/4 cup roasted pistachios, crushed
- 1 tsp lemon zest
- Fresh thyme for garnish
How to make it
- Drain the feta and crumble it into a food processor. Add the Greek yogurt and minced garlic.
- Process on high for 2-3 minutes. While the motor is running, slowly drizzle in the olive oil. The mixture will transition from crumbly to grainy, and finally to a smooth, mousse-like consistency. Stop and scrape the sides as needed.
- Transfer the whipped feta to a shallow serving bowl. Use the back of a spoon to create deep swirls and ‘wells’ in the surface of the dip.
- Warm the honey slightly in the microwave for 10 seconds so it becomes extra runny, then drizzle it generously into the swirls of the feta.
- Top with the crushed pistachios, lemon zest, and a few sprigs of fresh thyme.
- Serve at room temperature alongside toasted pita bread, cucumber slices, or vibrant rainbow carrots for the ultimate dipping experience.
10 Healthy Summer Dinner Recipes for Busy Families

Why we love this
Sheet Pan Lemon Herb Salmon is the answer to the ‘what’s for dinner’ dilemma when you want something that feels light but is packed with nutrition. The salmon fillets emerge from the oven with a buttery, flaky interior and a beautifully caramelized exterior, infused with the bright, zesty notes of charred lemon slices and fresh dill. It is a visually stunning meal that requires minimal cleanup, leaving your kitchen smelling of citrus and roasted herbs rather than heavy oils, perfect for a nourishing family meal after an active day outdoors.
Ingredients
- 4 (6 oz) salmon fillets
- 1 lb asparagus, woody ends trimmed
- 1 pint heirloom cherry tomatoes
- 2 lemons (one sliced, one juiced)
- 3 tbsp olive oil
- 3 cloves garlic, minced
- 2 tbsp fresh dill, chopped
- Salt and pepper to taste
How to make it
- Preheat your oven to 400°F (200°C) and line a large rimmed baking sheet with parchment paper for easy cleanup.
- Place the salmon fillets in the center of the pan and arrange the asparagus and cherry tomatoes around the edges in a single layer.
- In a small jar, whisk together the olive oil, lemon juice, minced garlic, and half of the fresh dill. Season generously with salt and pepper.
- Drizzle the herb oil over the salmon and the vegetables, using a pastry brush or your hands to ensure everything is evenly coated.
- Tuck the lemon slices under and around the salmon fillets. The juice from the lemons will steam the fish as it roasts, keeping it incredibly moist.
- Roast for 12-15 minutes. You’ll know the salmon is done when it flakes easily with a fork and reaches an internal temperature of 145°F. The tomatoes should be just beginning to burst their skins.
8 Sweet Summer Dessert Recipes You Must Try

Why we love this
Grilled Peaches with Vanilla Bean Mascarpone are a masterclass in summer simplicity, elevating humble stone fruit into a decadent, gourmet experience. The heat of the grill intensifies the natural sugars in the peaches, creating caramelized grill marks and a soft, jammy texture that is warm and inviting. Topped with a dollop of cold, velvety mascarpone infused with real vanilla bean specks, this dessert offers a stunning contrast of temperatures and a floral sweetness that feels like a sophisticated sunset in a bowl.
Ingredients
- 4 large, ripe peaches (halved and pitted)
- 1 cup mascarpone cheese
- 2 tbsp honey
- 1 tsp vanilla bean paste
- 1/4 cup sliced almonds, toasted
- Fresh mint for garnish
- Neutral oil (like grapeseed) for the grill
How to make it
- Preheat your grill or grill pan to medium-high heat. Ensure the grates are very clean to prevent sticking and to get those perfect, distinct char lines.
- In a small bowl, whip the mascarpone, honey, and vanilla bean paste together until smooth and fluffy. Keep this chilled until ready to serve.
- Lightly brush the cut side of the peaches with a neutral oil. Avoid using butter, as it can burn too quickly at high temperatures.
- Place the peaches cut-side down on the grill. Grill undisturbed for 4-5 minutes until the fruit releases naturally from the grates and deep golden char marks appear.
- Flip the peaches and cook for another 2 minutes to soften the skins slightly.
- Remove from heat and immediately top each warm peach half with a generous dollop of the vanilla mascarpone. The cheese will begin to melt slightly, creating a creamy sauce. Sprinkle with toasted almonds and mint.
10 Starbucks Summer Drink Ideas to Stay Cool

Why we love this
The DIY Mango Dragonfruit Refresher is a vibrant, neon-pink celebration of summer that is as beautiful to look at as it is to drink. It offers a tropical escape in a glass, with the sweet, exotic flavor of mango melding perfectly with the subtle, earthy notes of dragonfruit. The addition of freeze-dried fruit pieces creates a stunning visual mosaic, while the caffeine-free base makes it an ideal thirst-quencher for all ages. It is crisp, light, and incredibly revitalizing, providing that much-needed icy burst during a humid afternoon.
Ingredients
- 1 cup white grape juice
- 1/2 cup mango juice or nectar
- 1/2 cup water
- 1 tbsp freeze-dried dragonfruit powder
- 1/2 cup freeze-dried dragonfruit pieces
- Ice cubes
- Optional: Green coffee extract for a caffeine boost
How to make it
- In a large pitcher or cocktail shaker, combine the white grape juice, mango juice, and water. The grape juice provides the classic ‘refresher’ base sweetness without overpowering the tropical flavors.
- Add the dragonfruit powder and whisk vigorously until completely dissolved. This powder is what gives the drink its iconic, electric pink hue.
- If you want the Starbucks energy boost, stir in 1/2 teaspoon of green coffee extract (this has no coffee flavor but contains natural caffeine).
- Fill a tall glass to the brim with ice. Pour the mixture over the ice, leaving about an inch of space at the top.
- Stir in the freeze-dried dragonfruit pieces. These will slowly rehydrate, turning the drink even darker and adding a fun, chewy texture.
- Give it one final stir and serve with a straw for the ultimate poolside accessory.
7 Best Emergency Food Prep Ideas for Summer

Why we love this
When the power goes out or the summer heat makes the stove unbearable, the Deconstructed No-Cook Grain Bowl is a lifesaver that doesn’t compromise on flavor or nutrition. By utilizing shelf-stable grains and canned proteins, you can assemble a meal that feels fresh and vibrant even in ’emergency’ conditions. The combination of hearty chickpeas, briny olives, and crisp canned corn creates a satisfying medley of textures, all tied together with a simple vinaigrette that brightens the palate and provides a sense of normalcy and comfort during a storm or heatwave.
Ingredients
- 1 pouch pre-cooked quinoa or farro (shelf-stable)
- 1 can chickpeas, drained and rinsed
- 1 jar roasted red peppers, sliced
- 1/2 cup kalamata olives
- 1 can corn kernels
- 2 tbsp olive oil
- 1 tbsp lemon juice (or bottled)
- Dried oregano and garlic powder
How to make it
- Since this is a ‘no-cook’ emergency prep, start by opening your shelf-stable grain pouch. If the grains are clumped, massage the bag before opening to break them apart into a light, fluffy texture.
- In a large bowl (or even the grain bag if you’re truly in an emergency), combine the grains with the drained chickpeas and corn.
- Add the sliced roasted red peppers and olives. These jarred items provide the ‘fresh’ flavor and acidity that is often missing from emergency meals.
- Prepare the dressing by shaking the olive oil, lemon juice, oregano, and garlic powder in a small jar or mixing it directly into the bowl.
- Toss everything thoroughly so the grains absorb the oil and lemon juice. This will help soften the grains further if they are slightly dry from the pouch.
- Serve immediately. This meal is high in fiber and protein, ensuring you stay full and energized without needing a single heat source.
12 Fun Fourth of July Party Food Ideas
[IMAGE_10]
Why we love this
Berry-White Chocolate Dipped Strawberries are the quintessential patriotic treat, bringing a splash of red, white, and blue to your dessert table with minimal effort. The snap of the high-quality white chocolate coating gives way to the juicy, tart explosion of a perfectly ripe strawberry, while the blue sanding sugar or sprinkles provide a festive, shimmering finish. They are bite-sized bursts of Americana that look sophisticated when lined up on a platter, offering a light and fruity alternative to heavy cakes that keeps guests coming back for ‘just one more.’
Ingredients
- 1 lb large fresh strawberries with stems
- 8 oz white chocolate melting wafers
- 1/2 cup blue sanding sugar or blue sprinkles
- 1 tsp coconut oil (for a smoother melt)
How to make it
- Wash the strawberries and—this is the most critical step—pat them completely dry with paper towels. Any moisture on the surface of the fruit will cause the white chocolate to ‘seize’ and become clumpy.
- In a microwave-safe bowl, melt the white chocolate wafers and coconut oil in 30-second intervals, stirring thoroughly between each session until the chocolate is silky and flows easily off a spoon.
- Prepare a baking sheet with parchment paper and place your blue sugar in a shallow dish.
- Hold a strawberry by the green stem and dip it two-thirds of the way into the white chocolate. Lift it out and let the excess drip off.
- Immediately dip the bottom third of the white-chocolate-covered strawberry into the blue sanding sugar to create a ‘triple layer’ look (red fruit, white chocolate, blue sugar).
- Place the finished strawberry on the parchment paper and repeat with the remaining fruit. Refrigerate for 15 minutes to set the chocolate firmly before serving.
Final Thoughts on Summer Hosting
Hosting doesn’t have to be a source of stress. By embracing the ‘food board’ mentality and leaning into these viral summer favorites, you can create a spread that is as beautiful as it is delicious. Remember, the best part of any gathering isn’t just the food on the table—it’s the people sitting around it. Happy hosting!