

The Ultimate Simple Food Board Guide for Your Next Party
There is something truly magical about the way a gathering comes alive when the food is as beautiful as it is delicious. I remember my first summer party where I spent the entire afternoon trapped in the kitchen, missing out on the laughter and the stories, only to emerge exhausted when everyone was already leaving. That was the day I realized that hosting shouldn’t feel like a chore; it should feel like a celebration of the people we love.
Enter the viral simple food board—a concept that has completely transformed the way I entertain. Instead of individual plated meals, we are embracing the abundance and ease of a curated board that allows guests to graze and mingle. It’s about creating a visual feast that smells of fresh herbs and sun-ripened fruit, where the textures range from the snap of a fresh cucumber to the buttery melt of grilled steak. Let’s dive into how you can build the ultimate board for your next sun-drenched afternoon.
HOW TO MAKE CAESAR WRAPS?

Why we love this
There is nothing quite like the satisfying crunch of a perfectly dressed Caesar wrap on a warm afternoon. The aroma of toasted garlic and savory parmesan cheese immediately awakens the senses, while the cool, crisp bite of romaine lettuce provides a refreshing contrast to the creamy, tangy dressing. Every mouthful is a symphony of textures—the soft, pliable tortilla giving way to crunchy croutons and tender, juicy chicken. It’s a classic flavor profile that everyone recognizes and loves, making it the perfect approachable addition to any shared food board.
Ingredients
- Large flour tortillas
- Grilled chicken breast strips
- Romaine lettuce, chopped
- Creamy Caesar dressing
- Shredded parmesan cheese
- Garlic croutons, crushed
- Freshly cracked black pepper
How to make it
- Begin by preparing your romaine lettuce; wash it thoroughly in cold water to ensure maximum crispness and pat it completely dry with a paper towel.
- In a large mixing bowl, toss the chopped romaine with a generous amount of Caesar dressing and shredded parmesan until every leaf is evenly coated and glistening.
- Lay your flour tortillas flat on a clean surface and lightly warm them in a dry skillet for 10 seconds per side to make them more pliable and prevent tearing.
- Place a handful of the dressed salad in the center of the tortilla, followed by a layer of sliced chicken strips and a sprinkle of crushed croutons for that essential crunch.
- Fold the sides of the tortilla inward, then roll from the bottom up tightly, maintaining firm pressure to ensure a compact wrap.
- Slice the wraps diagonally to reveal the beautiful green and white layers, and secure them with a toothpick if needed before placing them on your board.
HOW TO MIX REFRESHING COCKTAILS?

Why we love this
A truly refreshing cocktail is the heartbeat of a summer party, offering a bright, zesty escape from the heat. Imagine the scent of freshly slapped mint leaves mingling with the sharp, acidic burst of lime and the sweet, floral notes of a watermelon base. The sound of ice clinking against glass is the universal signal that the party has started, and the vibrant colors of the drink make it an instant centerpiece. It feels like a cooling breeze in liquid form, leaving a lingering sweetness on the palate that makes you reach for another sip.
Ingredients
- Fresh watermelon juice
- Fresh mint leaves
- Lime juice
- Light rum or vodka (optional for mocktail)
- Simple syrup or agave
- Club soda
- Ice cubes
How to make it
- Start by placing 6-8 fresh mint leaves and a half-ounce of simple syrup in a sturdy glass or cocktail shaker.
- Use a muddler to gently press the mint—avoid shredding it; you just want to release the aromatic oils until the room smells like a fresh garden.
- Add two ounces of your chosen spirit (if using) and one ounce of fresh lime juice to the shaker, followed by three ounces of fresh watermelon juice.
- Fill the shaker with ice and shake vigorously for about 15 seconds until the outside of the metal feels frosty to the touch, ensuring the drink is ice-cold.
- Strain the mixture into a glass filled with fresh ice cubes, leaving about an inch of space at the top.
- Top with a splash of chilled club soda for effervescence and garnish with a sprig of mint and a small wedge of lime for a professional finish.
HOW TO PREP PASTA SALAD?
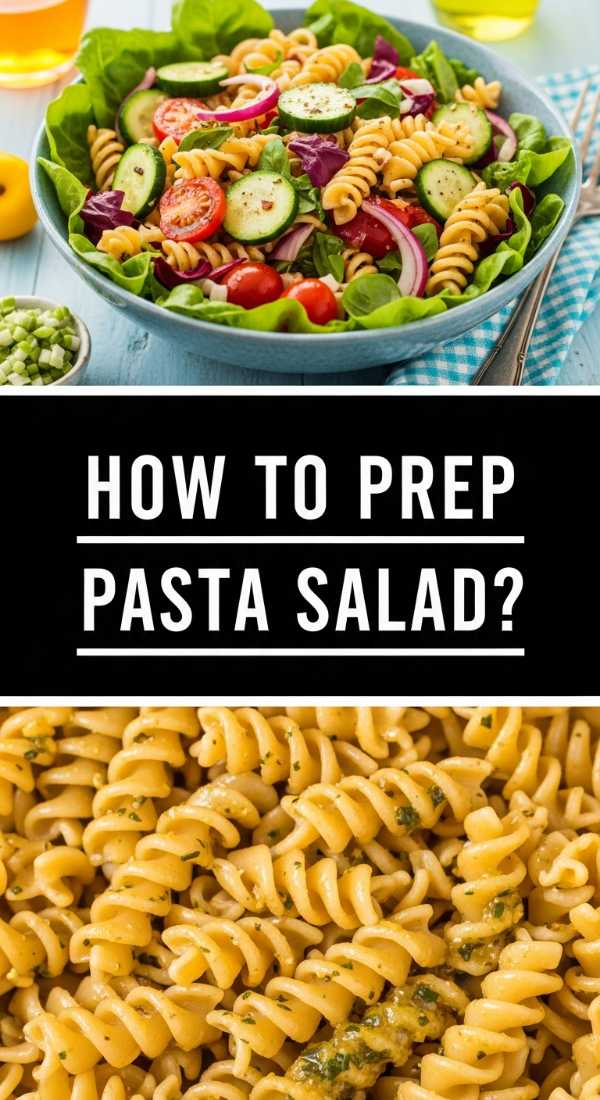
Why we love this
A Mediterranean pasta salad is a riot of color and flavor that brings a rustic, coastal vibe to your board. We love the way the al dente pasta ridges catch the herb-infused vinaigrette, ensuring every bite is bursting with the briny saltiness of Kalamata olives and the creamy tang of crumbled feta. The scent of dried oregano and fresh parsley transports you to a seaside terrace, while the vibrant reds of cherry tomatoes and greens of cucumbers make it look as good as it tastes. It’s a hearty, satisfying dish that holds up beautifully even after hours on the table.
Ingredients
- Rotini or Fusilli pasta
- Cherry tomatoes, halved
- English cucumber, diced
- Kalamata olives, pitted
- Red onion, thinly sliced
- Crumbled feta cheese
- Red wine vinaigrette (olive oil, red wine vinegar, dried oregano, garlic)
How to make it
- Bring a large pot of heavily salted water to a rolling boil and cook the pasta for exactly the time indicated for ‘al dente’—usually 8 to 10 minutes.
- Drain the pasta and immediately rinse it under cold running water to stop the cooking process and remove excess starch, which prevents sticking.
- In a large bowl, whisk together 1/2 cup of extra virgin olive oil, 1/4 cup of red wine vinegar, a minced garlic clove, and a tablespoon of dried oregano until emulsified.
- Add the cooled pasta to the dressing along with the halved tomatoes, diced cucumbers, olives, and onions, tossing thoroughly to ensure even distribution.
- Gently fold in the crumbled feta cheese at the very end to keep the chunks intact and prevent the salad from becoming cloudy.
- Let the salad sit in the refrigerator for at least 30 minutes before serving; this allows the pasta to absorb the flavors of the vinaigrette and the vegetables to marinate.
HOW TO GRILL STEAK KABOBS?

Why we love this
The smell of steak kabobs hitting a hot grill is the ultimate siren song of summer cooking. There is something primal and satisfying about the charred edges of the meat contrasting with its tender, pink interior, seasoned perfectly with garlic and balsamic. The smoke adds a layer of depth to the sweetness of grilled bell peppers and red onions, creating a savory aroma that drifts through the air. These skewers are the perfect finger food for a board, offering a high-protein, smoky bite that feels indulgent yet light enough for a social afternoon.
Ingredients
- Sirloin steak, cut into 1-inch cubes
- Bell peppers (red, yellow, green), cut into chunks
- Red onion, cut into wedges
- Olive oil
- Balsamic vinegar
- Minced garlic
- Salt and black pepper
How to make it
- In a bowl, create a marinade by whisking together 1/4 cup olive oil, 2 tablespoons balsamic vinegar, 3 cloves of minced garlic, salt, and pepper.
- Toss the steak cubes in the marinade and let them sit for at least 30 minutes in the fridge to tenderize the muscle fibers and infuse deep flavor.
- If using wooden skewers, soak them in water for at least 20 minutes to prevent them from catching fire on the grill.
- Thread the skewers, alternating between a piece of steak, a bell pepper chunk, and a red onion wedge to ensure heat circulates evenly around the meat.
- Preheat your grill to medium-high heat (about 400°F) and lightly oil the grates to prevent sticking.
- Grill the kabobs for 8-10 minutes, turning every 2-3 minutes, until the steak reaches an internal temperature of 135°F for medium-rare and the vegetables have beautiful char marks.
HOW TO BAKE SUMMER DESSERTS?

Why we love this
A rustic berry galette is the epitome of effortless summer elegance. We love the way the buttery, flaky crust shatters upon impact, revealing a bubbling, jammy center of seasonal berries that have softened and sweetened in the oven heat. The aroma of baking pastry mixed with warm sugar and lemon zest is intoxicating, filling the home with a sense of comfort and celebration. It’s less fussy than a traditional pie, with its pleated edges giving it a charming, homemade look that invites everyone to tear off a piece and enjoy the harvest.
Ingredients
- Store-bought or homemade pie crust
- Mixed berries (strawberries, blueberries, raspberries)
- Granulated sugar
- Cornstarch
- Lemon zest
- Egg wash (1 egg beaten with 1 tsp water)
- Coarse sanding sugar
How to make it
- Preheat your oven to 400°F (200°C) and line a large baking sheet with parchment paper to prevent the fruit juices from sticking.
- In a medium bowl, gently toss 3 cups of mixed berries with 1/4 cup of sugar, 1 tablespoon of cornstarch (to thicken the juices), and the zest of one lemon.
- Roll out your chilled pie dough on the parchment paper until it forms a rough 12-inch circle.
- Mound the fruit mixture in the center of the dough, leaving a 2-inch border all the way around the edge.
- Fold the edges of the dough over the fruit, pleating as you go to create a rustic crust that holds the berries in place.
- Brush the crust with the egg wash and sprinkle with coarse sugar, then bake for 25-30 minutes until the crust is golden brown and the fruit filling is bubbling thick.
HOW TO TOSS FRESH SALADS?
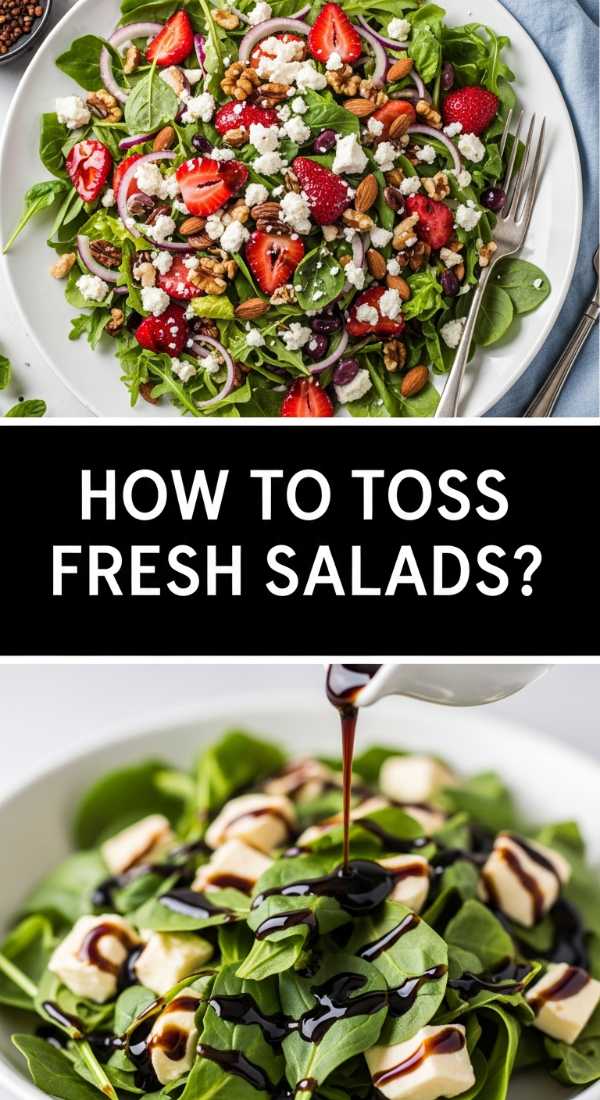
Why we love this
A peach and burrata salad is a masterclass in balance, combining the sun-drenched sweetness of stone fruit with the rich, milky indulgence of Italian cheese. We love the way the creamy center of the burrata spills out over the peppery arugula, creating a natural dressing that is enhanced by a drizzle of thick balsamic glaze. The visual of bright orange peach slices against vibrant green leaves and snowy white cheese is stunning. Each forkful provides a cooling sensation followed by a burst of basil fragrance, making it the most sophisticated salad your board could offer.
Ingredients
- Fresh peaches, sliced
- Burrata cheese balls
- Baby arugula
- Fresh basil leaves
- Extra virgin olive oil
- Balsamic glaze
- Flaky sea salt
How to make it
- Create a bed of baby arugula on a large platter, ensuring the leaves are dry so the dressing doesn’t become watery.
- Slice fresh, ripe peaches into thick wedges and nestle them into the arugula; for extra flavor, you can quickly sear the peaches on a grill for 1 minute per side.
- Place the burrata balls in the center of the salad and use a knife to gently tear the outer skin, allowing the creamy stracciatella interior to flow out.
- Scatter fresh basil leaves over the top—tear them by hand rather than chopping with a knife to prevent bruising and preserve their bright aroma.
- Drizzle the entire salad with high-quality extra virgin olive oil and a zig-zag of thick, syrupy balsamic glaze.
- Finish with a generous pinch of flaky sea salt and cracked black pepper to highlight the sweetness of the peaches and the richness of the cheese.
HOW TO COOK SUMMER DINNER?

Why we love this
Grilled salmon with lemon and dill is the quintessential summer dinner, offering a light yet deeply flavorful main course that feels fancy without being fussy. The scent of the fish searing over the flames, combined with the zingy aroma of citrus and fresh herbs, is instantly appetizing. We love the texture of the crispy, salty skin paired with the tender, pink flakes of the fish that melt in your mouth. It’s a dish that feels healthy and vibrant, perfectly reflecting the brightness of a long summer evening spent outdoors with friends.
Ingredients
- Salmon fillets (center-cut)
- Fresh lemon slices
- Fresh dill sprigs
- Melted butter or olive oil
- Garlic powder
- Kosher salt and black pepper
How to make it
- Pat the salmon fillets completely dry with paper towels; this is the secret to getting a good sear and preventing the fish from steaming.
- Brush both sides of the salmon with melted butter or olive oil and season generously with salt, pepper, and a hint of garlic powder.
- Preheat your grill to medium-high heat and ensure the grates are very clean and well-oiled to prevent the delicate skin from sticking.
- Place the salmon skin-side down on the grill and leave it undisturbed for about 5-6 minutes; you will see the color of the fish change as it cooks upward.
- Carefully flip the fillets using a wide spatula and cook for another 2-3 minutes, or until the internal temperature reaches 145°F and the meat flakes easily with a fork.
- Remove from the heat and immediately top with fresh dill and a squeeze of charred lemon juice to brighten the fats of the fish.
HOW TO PREPARE POOL SNACKS?
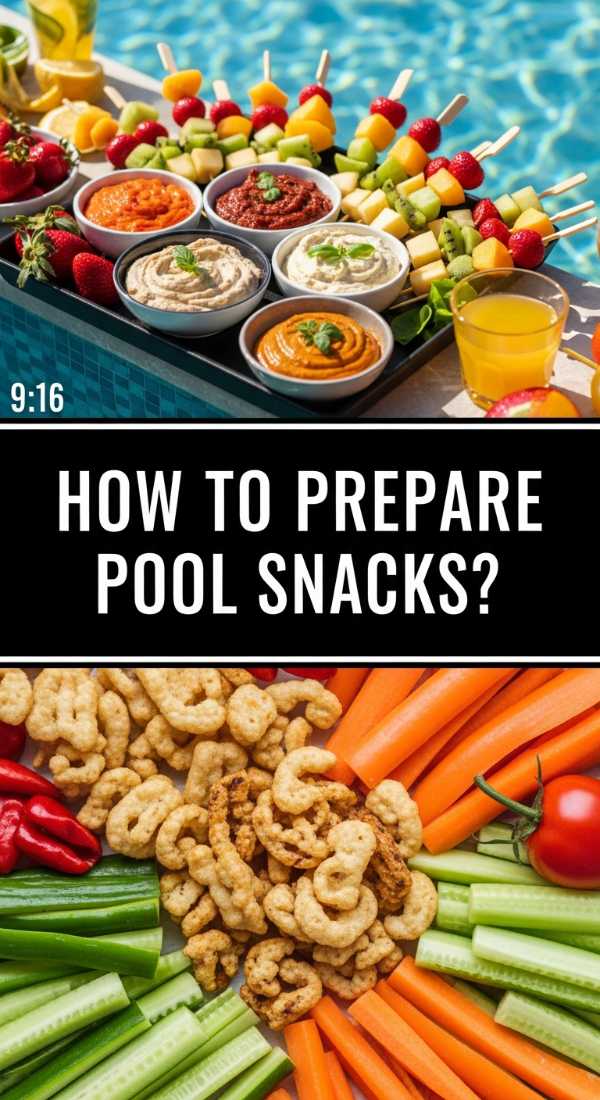
Why we love this
Fruit skewers with a honey-yogurt dip are the ultimate refreshing pool snack, offering a burst of hydration and natural sweetness. There is something so playful and convenient about eating fruit off a stick while lounging by the water. The cold, crisp textures of melon and pineapple provide an instant cooling effect, while the creamy, honey-kissed dip adds a touch of decadence. We love the rainbow of colors they add to the board, making them a hit with both kids and adults who want something light and energizing between swims.
Ingredients
- Watermelon cubes
- Pineapple chunks
- Green and red grapes
- Fresh strawberries
- Greek yogurt
- Honey
- Vanilla extract
How to make it
- Cut your melons and pineapple into uniform 1-inch cubes to ensure the skewers look organized and professional.
- Thread the fruit onto bamboo skewers in a repeating color pattern—for example: strawberry, grape, pineapple, watermelon—until the skewer is full.
- Chill the skewers in the refrigerator for at least an hour before serving to ensure they are ice-cold and refreshing.
- In a small serving bowl, whisk together 1 cup of plain Greek yogurt, 2 tablespoons of honey, and a half-teaspoon of vanilla extract until smooth.
- If the dip is too thick, add a teaspoon of milk or water to reach a dippable consistency.
- Place the bowl of dip in the center of the board and fan the fruit skewers around it for an easy, grab-and-go presentation.
HOW TO MAKE PICNIC SIDES?

Why we love this
Mexican Street Corn Salad (Esquites) is a picnic side dish that packs a punch of flavor in every spoonful. It takes the smoky, charred goodness of corn on the cob and turns it into an easy-to-eat salad that smells of lime and chili. We love the creamy, salty coating of cotija cheese and the herbal freshness of cilantro that cuts through the sweetness of the corn. It’s a side dish that travels well and only gets better as the flavors meld together, making it a must-have for any outdoor food board.
Ingredients
- Corn kernels (fresh, frozen, or canned)
- Mayonnaise or Greek yogurt
- Lime juice
- Chili powder or smoked paprika
- Cilantro, chopped
- Cotija cheese, crumbled
How to make it
- If using fresh corn, grill the cobs until charred and then cut off the kernels; if using frozen or canned, sear them in a hot cast-iron skillet with a little oil until they turn golden and slightly blackened.
- Transfer the warm corn to a large bowl and allow it to cool slightly so the dressing doesn’t melt completely.
- Stir in 2 tablespoons of mayonnaise, the juice of one lime, and a teaspoon of chili powder, coating the corn thoroughly.
- Add a handful of freshly chopped cilantro and 1/4 cup of crumbled cotija cheese, tossing gently to combine.
- Taste and adjust the seasoning with extra salt or lime juice as needed to ensure the flavors are bright and bold.
- Serve at room temperature or chilled, garnished with a sprinkle of extra chili powder for a pop of color.
HOW TO PREP SUMMER MEALS?

Why we love this
Zesty shrimp tacos are the ultimate quick summer meal that brings a beachside vibe to your backyard. The smell of spiced shrimp hitting a hot pan is mouthwatering, and when paired with a crunchy, vinegar-based slaw, it creates a perfect balance of heat and acidity. We love the tactile experience of assembling these tacos—the soft, warm tortillas and the cool, creamy avocado. They are light enough that you don’t feel weighed down in the summer heat, yet flavorful enough to be the star of any gathering.
Ingredients
- Medium shrimp, peeled and deveined
- Taco seasoning (cumin, chili powder, garlic)
- Shredded cabbage slaw mix
- Small corn or flour tortillas
- Avocado slices
- Lime wedges
How to make it
- Toss the shrimp in a bowl with a tablespoon of olive oil and your favorite taco seasoning, ensuring each shrimp is well-coated.
- Heat a large skillet over high heat and cook the shrimp for about 2 minutes per side until they turn opaque and slightly curled; do not overcook or they will become rubbery.
- Prepare a simple slaw by tossing shredded cabbage with lime juice, a splash of apple cider vinegar, and salt to provide a crunchy, acidic base.
- Warm your tortillas directly over a low gas flame for 10 seconds or in a dry pan until they are soft and slightly charred.
- Assemble the tacos by placing a spoonful of slaw on the bottom, followed by 3-4 shrimp and a slice of creamy avocado.
- Serve immediately with extra lime wedges on the side so guests can add a final burst of citrus right before eating.
Conclusion
Hosting a party shouldn’t be a source of stress—it should be a source of joy. By focusing on these simple, viral-worthy food board components, you can spend less time in the kitchen and more time making memories under the sun. Whether it’s the crunch of a Caesar wrap or the sweet drip of a berry galette, these dishes are designed to be shared, enjoyed, and celebrated. Happy hosting!