

There is a special kind of magic that happens when you set a giant, colorful board in the middle of the table and tell everyone to just dive in. It’s more than just food; it’s an invitation to linger, to talk, and to share a moment without the stiffness of a formal three-course meal. I remember the first time I ditched the individual plates for a sprawling snack board on a Friday night—the energy in the room shifted instantly from ‘dinner time’ to ‘connection time.’
We live in such a fast-paced world that the simplicity of grazing feels like a rebellious act of self-care. Whether you’re hosting a backyard bash or just trying to survive a Tuesday with the kids, these simple snack boards and viral food trends are the secret to keeping your cool while still serving something that looks (and tastes) absolutely incredible. Let’s dive into my favorite ways to fill those boards with love!
How to make chicken wraps?

Why we love this
There is something incredibly satisfying about the contrast between a warm, toasted tortilla and the crisp, cool bite of fresh romaine lettuce tucked inside. As you take that first bite, the juicy, seasoned chicken melds perfectly with the creamy, tangy drizzle of ranch, creating a flavor explosion that feels both indulgent and light. The aroma of grilled poultry mixed with the subtle scent of flour tortillas makes it impossible to wait for dinner. It’s the ultimate handheld comfort food that brings a sense of effortless joy to any afternoon gathering.
Ingredients
- Large flour tortillas
- Grilled chicken breast strips
- Shredded romaine lettuce
- Diced roma tomatoes
- Shredded sharp cheddar cheese
- Creamy ranch or chipotle mayo
How to make it
- Prepare the chicken by slicing it into thin, uniform strips to ensure even cooking; season generously with smoked paprika, garlic powder, and a pinch of sea salt.
- Heat a cast-iron skillet over medium-high heat until it just begins to shimmer, then add a tablespoon of avocado oil for a high-smoke-point sear.
- Place the chicken in the pan, allowing it to develop a golden-brown crust for about 4-5 minutes per side, ensuring the internal temperature reaches 165°F.
- While the chicken rests for 3 minutes to lock in the juices, lay out your large flour tortillas and lightly steam them over the pan for 10 seconds to make them pliable.
- Layer the center of each tortilla with a bed of shredded greens, sliced cherry tomatoes, and the warm chicken, then finish with a heavy drizzle of your chosen sauce.
- Fold the sides in tightly first, then roll from the bottom up, tucking as you go to create a secure, mess-free wrap that’s ready for the board.
How to make pasta salad?
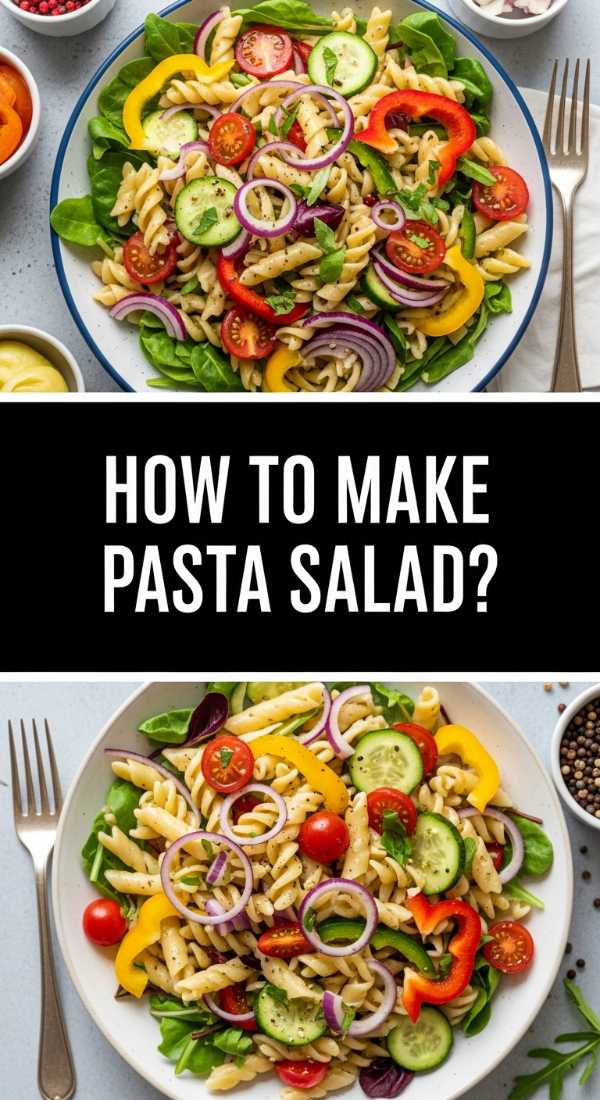
Why we love this
A great pasta salad is like a symphony of textures—the springy chew of al dente rotini, the crunch of fresh bell peppers, and the creamy crumble of feta cheese all dancing in a zesty vinaigrette. It’s the kind of dish that actually tastes better as it sits, making it the hero of any make-ahead snack board. The bright, herbaceous aroma of dried oregano and fresh parsley transports you to a Mediterranean seaside, while the vinegar’s tang keeps your palate refreshed and ready for more. It is cooling, vibrant, and effortlessly chic.
Ingredients
- 1 lb Rotini or Fusilli pasta
- Red and yellow bell peppers, diced
- Cucumber, sliced and quartered
- Kalamata olives, pitted
- Crumbled feta cheese
- Italian vinaigrette dressing
How to make it
- Bring a large pot of heavily salted water to a rolling boil; use about one tablespoon of salt per gallon of water to season the pasta from the inside out.
- Cook the pasta until it is just past al dente—about 1 minute longer than the box instructions—because pasta tends to firm up slightly when chilled.
- Drain the pasta and immediately rinse it under cold running water to stop the cooking process and remove excess starch, preventing the noodles from sticking together.
- In a large mixing bowl, toss the cooled pasta with half of the dressing, then add your chopped vegetables, olives, and feta cheese to the mix.
- Cover and refrigerate for at least two hours; this allows the pasta to absorb the flavors of the vinaigrette while the vegetables release their natural juices.
- Just before serving, add the remaining dressing and give it a final toss to ensure every bite is glistening and well-coated for a professional presentation.
How to mix summer drinks?

Why we love this
There is nothing quite like the sound of ice clinking against glass on a humid afternoon to signal that it’s time to relax. These summer drinks are all about effervescence and the bright, sharp zing of muddled citrus and fresh herbs. The fragrance of slapped mint leaves is instantly energizing, while the visual of swirling colorful berries in a sparkling base makes anyone feel like a master mixologist. It’s a sensory experience that cools you from the inside out, offering a bubbly, refreshing escape from the heat.
Ingredients
- Sparkling mineral water or club soda
- Fresh mint leaves
- Sliced limes and lemons
- Mixed berries (strawberries, blueberries)
- Simple syrup or agave nectar
- Plenty of crushed ice
How to make it
- Start by placing 5-6 fresh mint leaves and a wedge of lime in the bottom of a sturdy glass; use a muddler or the back of a spoon to gently press them to release essential oils.
- Fill the glass three-quarters full with crushed ice—the smaller surface area of crushed ice helps chill the drink much faster than large cubes.
- Pour in 1 tablespoon of simple syrup, or adjust to your preferred sweetness level, ensuring it settles at the bottom for a layered effect.
- Slowly pour the sparkling mineral water over the ice, watching the bubbles rise and carry the mint and lime fragments throughout the glass.
- Stir gently with a long spoon to incorporate the flavors without losing the carbonation, then top with a handful of fresh berries for a pop of color.
- Garnish with a fresh sprig of mint and a straw, and serve immediately while the glass is still frosted with condensation.
How to grill perfect kabobs?

Why we love this
Grilling kabobs is as much about the process as it is about the flavor—the sizzle of meat hitting the hot grates and the smoky aroma that wafts through the backyard is pure summer bliss. Each skewer is a curated bite of charred, caramelized vegetables and tender, juicy protein that has been infused with fire. The sight of those perfectly etched grill marks and the vibrant colors of red onion and green peppers makes them the centerpiece of any board. It’s rustic, charred perfection that tastes like a weekend getaway.
Ingredients
- Sirloin steak or chicken thigh chunks
- Red bell peppers, cut into 1-inch squares
- Red onion, cut into wedges
- Zucchini rounds
- Olive oil, garlic, and rosemary marinade
- Wooden or metal skewers
How to make it
- If using wooden skewers, soak them in water for at least 30 minutes prior to use to prevent them from catching fire on the grill.
- Cut your meat and vegetables into uniform 1-inch pieces; consistency is key here so that everything finishes cooking at the exact same time.
- Whisk together olive oil, minced garlic, dried rosemary, and black pepper, then toss the meat chunks in the marinade for at least 1 hour in the fridge.
- Thread the skewers by alternating meat, pepper, onion, and zucchini, making sure not to pack them too tightly so the heat can circulate around each piece.
- Preheat your grill to medium-high heat (about 400°F) and lightly oil the grates to ensure the kabobs don’t stick when you try to flip them.
- Grill for 8-10 minutes total, turning a quarter-turn every 2-3 minutes until the meat is cooked through and the vegetables have beautiful charred edges.
How to bake summer desserts?

Why we love this
Summer baking is all about letting the natural sweetness of ripe fruit take center stage, nestled within a buttery, flaky crust that shatters upon impact. The smell of bubbling peaches and cinnamon wafting from the oven is enough to make anyone’s mouth water, creating a warm, nostalgic atmosphere. These desserts are rustic and unpretentious, often served straight from the pan with a dollop of melting cream. It’s the cozy, golden-brown finish to a day spent in the sun, offering a soft, sweet hug in every bite.
Ingredients
- Fresh peaches or mixed berries
- Puff pastry or pie crust
- Granulated sugar
- Ground cinnamon and nutmeg
- Egg wash (one egg beaten with a splash of water)
- Vanilla bean ice cream for serving
How to make it
- Preheat your oven to 400°F and line a baking sheet with parchment paper to prevent the fruit sugars from sticking to the pan.
- Toss your sliced fruit in a bowl with sugar and spices, letting it sit for 10 minutes so the juices begin to release and form a natural syrup.
- Roll out your pastry dough on a lightly floured surface until it’s about 1/4 inch thick, then cut into circles or rectangles for individual servings.
- Mound the fruit in the center of the dough, leaving a 1-inch border, then gently fold the edges over the fruit to create a rustic galette shape.
- Brush the edges of the pastry with the egg wash and sprinkle with a little extra sugar to achieve that professional, sparkling golden-brown finish.
- Bake for 20-25 minutes until the pastry is puffed and golden and the fruit filling is thick and bubbling; let it cool slightly before serving so the juices set.
How to make creamy corn?

Why we love this
Creamy corn is the ultimate comfort side, offering a velvety texture that contrasts beautifully with the ‘pop’ of fresh kernels. There is a deep, savory sweetness here that feels like a warm embrace, especially when seasoned with a hint of salt and cracked black pepper. The aroma is rich and buttery, filling the kitchen with a scent that reminds me of family potlucks and slow Sunday afternoons. It is the kind of dish that disappears in minutes because it manages to be both simple and incredibly decadent at the same time.
Ingredients
- 4 cups fresh or frozen sweet corn
- 1/2 cup heavy cream
- 2 tablespoons unsalted butter
- 1 teaspoon sugar
- Salt and black pepper to taste
- Chives for garnish
How to make it
- Melt the butter in a large skillet over medium heat until it begins to foam, being careful not to let it brown so the flavor remains sweet and light.
- Add the corn to the skillet and sauté for about 3-5 minutes, stirring occasionally until the kernels are tender and slightly brightened in color.
- Lower the heat to medium-low and pour in the heavy cream and sugar, stirring constantly to ensure the cream doesn’t scald or separate.
- Simmer the mixture gently for 5-7 minutes; as the moisture evaporates, the cream will naturally thicken into a rich, luscious sauce that coats the corn.
- Season generously with salt and pepper, tasting as you go to find the perfect balance between the corn’s natural sweetness and the savory cream.
- Remove from heat and garnish with finely chopped fresh chives for a pop of color and a mild onion bite before transferring to your board.
How to prep healthy meals?

Why we love this
Prepping healthy meals for a snack board is like creating a painter’s palette of nutrition—vibrant greens, deep purples, and earthy grains that look as good as they feel. There is a profound sense of peace that comes from knowing your body is about to be fueled by whole, crisp ingredients that haven’t been over-processed. The textures are varied, from the hearty chew of quinoa to the snap of raw carrots, providing a satisfying crunch that keeps you engaged. It’s clean eating that feels like a luxury rather than a chore.
Ingredients
- Cooked quinoa or farro
- Roasted sweet potato cubes
- Massaged kale or baby spinach
- Canned chickpeas, rinsed and dried
- Lemon-tahini dressing
- Pumpkin seeds or sliced almonds
How to make it
- Start by roasting your sweet potato cubes at 400°F with a drizzle of olive oil for 20 minutes until the edges are caramelized and the centers are soft.
- While the potatoes roast, boil your grains in vegetable broth instead of water to infuse them with extra depth of flavor, then fluff with a fork.
- Place your kale in a large bowl with a tiny bit of olive oil and salt, and ‘massage’ it with your hands for 2 minutes until it becomes dark green and tender.
- For the chickpeas, toss them in a dry pan over medium heat with some cumin and garlic powder for 5 minutes until they are slightly crispy.
- Assemble the components in separate sections of your board or in small bowls to keep the textures distinct and the colors vibrant.
- Drizzle the lemon-tahini dressing over the kale and grains just before serving, and sprinkle the seeds on top for an added layer of healthy fats and crunch.
How to cook crockpot dinners?

Why we love this
The beauty of a crockpot dinner lies in the slow transformation of simple ingredients into a tender, falling-apart masterpiece while you go about your day. By the time you’re ready to assemble your board, the house is filled with a rich, savory aroma that promises a meal cooked with patience and care. There’s something so comforting about the deep, concentrated flavors that only hours of low heat can produce. It’s the ultimate ‘set it and forget it’ hack that results in meat so succulent it barely needs a knife.
Ingredients
- 3 lb Beef chuck roast or pork shoulder
- 1 cup beef or vegetable broth
- Baby carrots and halved potatoes
- One sliced yellow onion
- 3 cloves minced garlic
- Dried thyme and bay leaves
How to make it
- For the best flavor, sear the meat in a hot pan with a splash of oil for 3 minutes per side until a dark brown crust forms before placing it in the crockpot.
- Layer the sliced onions and minced garlic at the bottom of the slow cooker to create a flavor base that will infuse the meat from underneath.
- Place the seared meat on top of the onions, then surround it with the baby carrots and potatoes, ensuring they are tucked in tightly.
- Pour the broth over the ingredients and add your dried herbs; the liquid should only come up about halfway to prevent the meat from boiling rather than braising.
- Set the crockpot to ‘Low’ and cook for 8 hours; avoiding the ‘High’ setting ensures the connective tissues in the meat break down slowly for maximum tenderness.
- Once finished, remove the meat and shred it with two forks, then serve it in a bowl on your board alongside the tender vegetables and a drizzle of the cooking juices.
How to make refreshing salads?
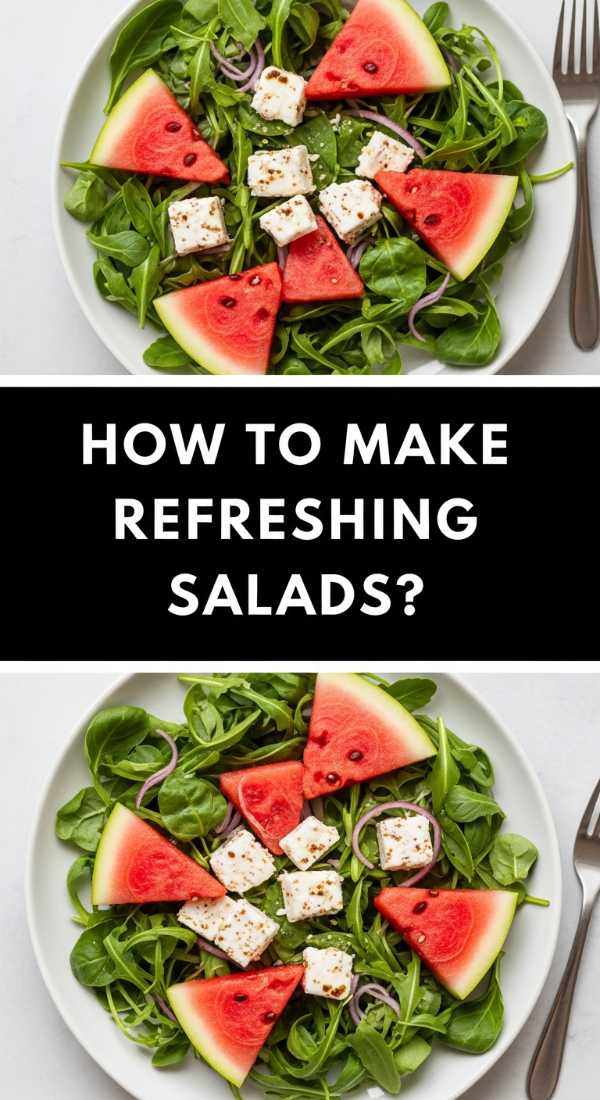
Why we love this
A refreshing summer salad is the ultimate palate cleanser, especially when it features the unexpected pairing of juicy watermelon and salty feta. The first bite is an explosion of cold, sweet juice that is immediately balanced by the creamy, briny notes of the cheese and the cooling scent of fresh mint. It looks like a jewel box on your board, with bright pinks and deep greens that scream sunshine and relaxation. It’s light, hydrating, and exactly what you crave when the temperature starts to climb.
Ingredients
- Seedless watermelon, cubed
- Crumbled feta cheese
- Fresh mint leaves, torn
- Balsamic glaze
- Extra virgin olive oil
- A pinch of flaky sea salt
How to make it
- Ensure your watermelon is thoroughly chilled before starting; a cold watermelon is essential for the ‘refreshing’ factor of this dish.
- Cube the watermelon into uniform 1-inch squares, discarding any excess rind, and place them in a large, shallow serving bowl.
- Sprinkle the crumbled feta evenly over the top; the saltiness of the feta will actually draw out the sweetness of the watermelon as it sits.
- Tear the fresh mint leaves by hand just before serving to prevent the edges from bruising and turning brown, scattering them over the fruit.
- Drizzle a very light amount of extra virgin olive oil over the top to add a silky mouthfeel, followed by a decorative swirl of thick balsamic glaze.
- Finish with a tiny pinch of flaky sea salt to sharpen the flavors, and serve immediately with toothpicks for easy grazing from the board.
How to pack picnic sides?

Why we love this
Picnic sides are all about portability without sacrificing that ‘wow’ factor, often featuring vinegary slaws that stay crisp even after a commute to the park. There is a rustic charm to opening a mason jar to find a perfectly layered salad or a crunchy, seed-flecked slaw that smells of apple cider vinegar and honey. The texture is key here—you want things that maintain their integrity and offer a loud, satisfying crunch. It’s the taste of an adventure, designed to be enjoyed under a shady tree with good company.
Ingredients
- Shredded cabbage and carrots
- Apple cider vinegar
- Honey or maple syrup
- Celery seeds and mustard powder
- Sliced green onions
- Small mason jars for packing
How to make it
- In a small bowl, whisk together the apple cider vinegar, honey, celery seeds, and mustard powder until the honey is fully dissolved into the acid.
- Place your shredded cabbage and carrots in a large bowl and pour the dressing over them, tossing thoroughly with tongs to ensure every strand is coated.
- Allow the slaw to sit for at least 20 minutes before packing; this ‘macerating’ process softens the cabbage slightly while keeping its signature crunch.
- When packing for your board or picnic, use individual glass jars; place the extra dressing at the bottom and the slaw on top to keep it from getting soggy.
- Seal the lids tightly to prevent leaks and keep the sides chilled in a cooler bag with ice packs until you are ready to set up your spread.
- Before serving, give the jars a good shake to redistribute the dressing, and garnish with fresh green onions for a bright, sharp finish.
Conclusion
At the end of the day, the best part of the snack board trend isn’t just the food—it’s the way it simplifies our lives. By focusing on these easy-to-make, flavorful components, you take the stress out of hosting and put the focus back where it belongs: on the people you love. So, grab a board, pick a few of these recipes, and start your own viral food tradition this week!