
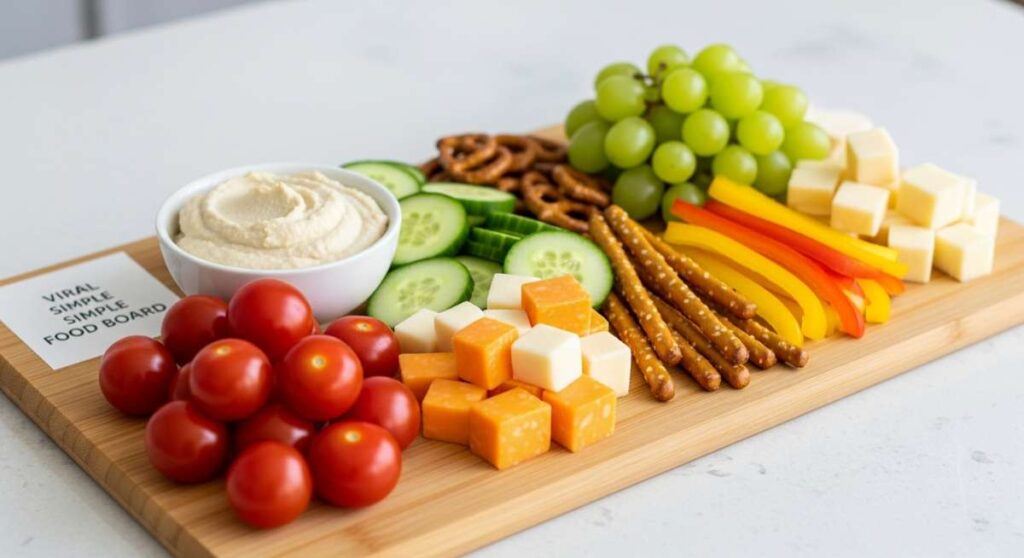
Why This Simple Food Board Is Going Viral (And How to Make It)
There is something inherently magical about a meal that brings everyone together without the stress of a five-course production. Lately, my social media feed has been exploding with these ‘simple food boards’—curated spreads that prioritize fresh ingredients, vibrant colors, and that effortless ‘come as you are’ vibe. It’s not just about the food; it’s about the feeling of a long, sun-drenched afternoon where the only thing on the agenda is good conversation and even better snacks.
I remember the first time I set one of these out on my patio; the way the light caught the dew on the fresh greens and the aroma of grilled lemon filled the air. It felt like I’d finally cracked the code to summer entertaining. Instead of being stuck in the kitchen, I was right there with my friends, sharing stories over a board filled with everything from crispy wraps to zesty pasta salads. It’s a lifestyle shift toward simplicity and connection, and honestly, I’m never going back.
7 Best Chicken Caesar Wraps (Step-by-Step Guide)
Why we love this
The Chicken Caesar wrap is the ultimate handheld masterpiece, offering a satisfying crunch that echoes through every bite. Imagine the contrast of warm, flame-grilled chicken breast against the ice-cold snap of romaine lettuce, all swaddled in a soft, garlic-scented flour tortilla. The dressing provides a rich, umami-heavy creaminess that binds the salty parmesan and the sharp tang of lemon together, creating a symphony of textures that feel both indulgent and refreshing on a warm day. It is the perfect balance of savory comfort and garden-fresh lightness.
Ingredients
- Large flour tortillas (plain or spinach)
- Grilled chicken breast strips (seasoned with garlic and black pepper)
- Crisp Romaine lettuce, chopped
- Shaved Parmesan cheese
- Creamy Caesar dressing
- Crunchy croutons (crushed slightly)
- Fresh lemon wedges
How to make it
- Begin by warming your tortillas in a dry skillet over medium heat for about 15 seconds per side; this makes them pliable and prevents tearing when folding.
- In a large mixing bowl, toss your chopped romaine with just enough Caesar dressing to coat the leaves without making them soggy—look for a light glistening sheen.
- Layer the dressed lettuce in the center of the tortilla, leaving about two inches of space at the bottom and sides to ensure a tight seal.
- Place the warm grilled chicken strips directly on top of the greens, followed by a generous sprinkle of shaved parmesan and the crushed croutons for that essential ‘crunch’ factor.
- Squeeze a tiny bit of fresh lemon juice over the filling to brighten the flavors, then fold the bottom of the tortilla up and tuck the sides in tightly as you roll forward.
- To achieve that professional finish, place the finished wrap seam-side down on a hot grill pan for 30 seconds to ‘glue’ the wrap shut and add beautiful charred lines.
- Slice diagonally with a sharp serrated knife to reveal the beautiful internal layers before serving on your viral food board.
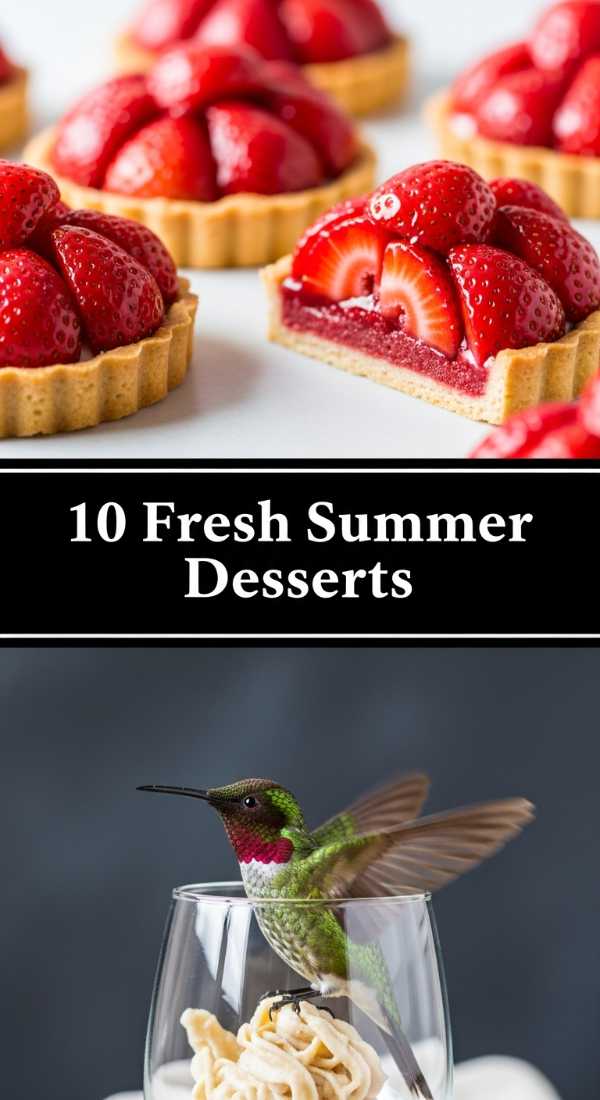
10 Fresh Summer Dessert Ideas (Step-by-Step Guide)
Why we love this
Summer desserts are all about celebrating the bounty of the season, where fruit takes center stage and heavy batters are replaced by whipped clouds of cream. There is a specific joy in the scent of macerated strawberries mixing with the herbal notes of fresh mint or basil. The texture is key here—think of the silky smoothness of a panna cotta or the delicate, sugary shatter of a fruit-topped pavlova. These treats are designed to cool you down from the inside out, leaving a lingering sweetness that feels like sunshine on a plate.
Ingredients
- Fresh mixed berries (strawberries, blueberries, raspberries)
- Heavy whipping cream or coconut cream
- Granulated sugar or honey
- Fresh mint leaves
- Shortcake biscuits or meringue nests
- Lemon zest
- Vanilla bean paste
How to make it
- Start by preparing your fruit: wash and slice berries, then toss them in a bowl with a tablespoon of sugar and a splash of lemon juice to let the natural juices syrupy.
- Chill your metal mixing bowl and whisk attachment in the freezer for 10 minutes; cold equipment is the secret to achieving stiff, voluminous peaks in your whipped cream.
- Pour the heavy cream into the chilled bowl, adding vanilla bean paste and a touch of powdered sugar, then whip on medium-high speed until the cream holds its shape when the whisk is lifted.
- For a layered dessert, break your shortcake or meringue into bite-sized chunks to create various textures within the serving glass or on the board.
- Assemble by placing a dollop of the whipped cream at the base, followed by a spoonful of the macerated fruit and its juices.
- Top with another layer of cream and a final flourish of whole berries, ensuring the colors are vibrant and inviting.
- Garnish with micro-planed lemon zest and a sprig of fresh mint just before serving to provide an aromatic burst that hits the nose before the first bite.
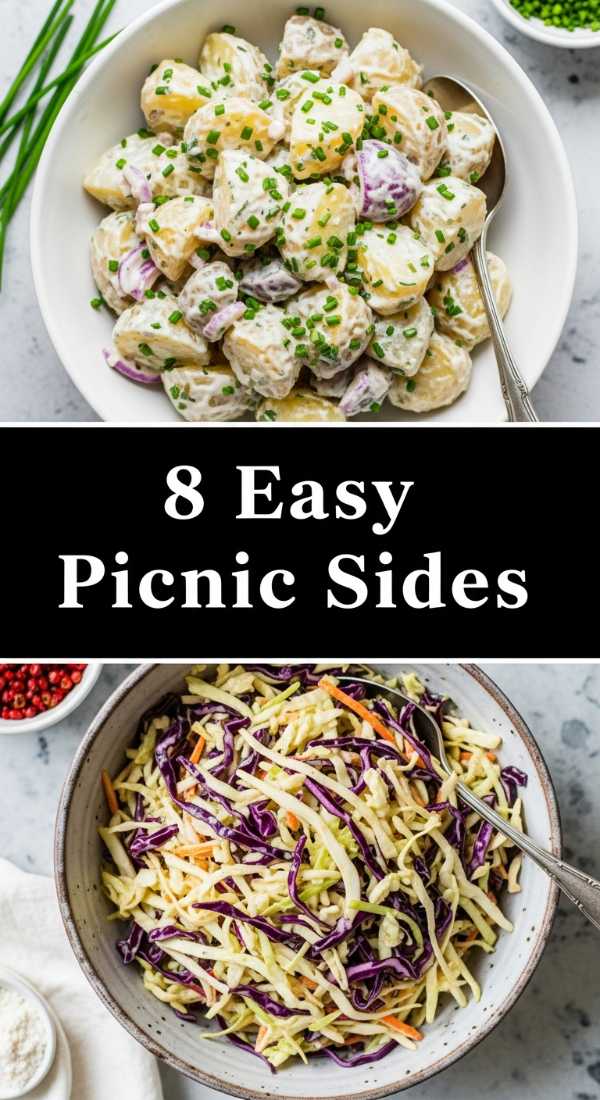
8 Easy Picnic Side Dishes (Step-by-Step Guide)

Why we love this
A picnic side dish needs to be durable, vibrant, and packed with enough flavor to stand up to the outdoor elements. We love the way a zesty vinegar-based slaw or a herb-loaded bean salad looks when nestled into a wooden bowl under the dappled shade of a tree. The aroma of chopped parsley, dill, and cilantro wafting from a fresh salad is instantly energizing. These sides offer a refreshing acidity that cuts through the richness of grilled meats, providing a crisp, clean finish that keeps you reaching for ‘just one more’ spoonful.
Ingredients
- Canned chickpeas or cannellini beans, rinsed
- Cucumber, diced small
- Red bell pepper, finely chopped
- Red onion, minced
- Feta cheese, crumbled
- Extra virgin olive oil and Apple cider vinegar
- Dried oregano and sea salt
How to make it
- Rinse your beans thoroughly under cold water until the water runs clear; this removes excess sodium and starch, ensuring a clean flavor profile.
- Dice all your vegetables to a uniform size (roughly the size of a chickpea) to ensure that every bite contains a perfect harmony of all ingredients.
- In a small mason jar, combine three parts olive oil to one part apple cider vinegar, adding salt, pepper, and dried oregano; shake vigorously until the dressing is emulsified.
- Combine the beans and vegetables in a large bowl, pouring the dressing over the top while the vegetables are still freshly cut so they absorb the flavors.
- Fold in the crumbled feta cheese gently; you want to keep the cheese chunks intact rather than stirring them into a paste.
- Allow the salad to marinate in the refrigerator for at least 30 minutes; this ‘resting’ period is crucial as the acid softens the raw onion and seasons the beans deeply.
- Before packing for the picnic, give the dish one final toss and add a handful of fresh herbs to keep the appearance bright and the scent intoxicatingly fresh.
5 Best Summer Crockpot Recipes (Step-by-Step Guide)
Why we love this
The summer crockpot recipe is the ultimate ‘kitchen hack’ for those who want a hot, gourmet meal without heating up the entire house. There is something incredibly comforting about walking into a home filled with the slow-roasted aroma of citrus-marinated pork or honey-garlic chicken after a long day at the beach. The meat becomes so tender it practically melts into a buttery silk on your tongue, infused with the concentrated flavors of aromatics that have melded over hours. It is a ‘set it and forget it’ luxury that defines the easy-going spirit of the season.
Ingredients
- Pork shoulder or chicken thighs
- Pineapple juice or orange juice
- Soy sauce and honey
- Fresh ginger, grated
- Garlic cloves, smashed
- Sliced bell peppers and onions
- Sesame seeds for garnish
How to make it
- Pat your meat dry with paper towels; this is a vital step because excess moisture can lead to steaming rather than the rich flavor development we want.
- Sear the meat in a hot skillet for 2-3 minutes per side until a golden-brown crust forms; this ‘Maillard reaction’ adds a depth of flavor that a slow cooker alone cannot achieve.
- Place the sliced onions and peppers at the bottom of the crockpot to act as a natural ‘rack’ for the meat, preventing it from sitting directly in the rendering fats.
- Whisk together your juice, soy sauce, honey, ginger, and garlic in a separate bowl before pouring the mixture over the meat.
- Set the crockpot to ‘Low’ for 6-8 hours; cooking on a lower heat for a longer time ensures the connective tissues break down into a gelatinous, tender texture.
- Once the meat is fork-tender, remove it from the pot and shred it using two forks, then return it to the liquid for 15 minutes to soak up all the concentrated juices.
- Serve the meat piled high on your food board alongside slider buns or lettuce cups, garnished with toasted sesame seeds and fresh scallions for a pop of color.
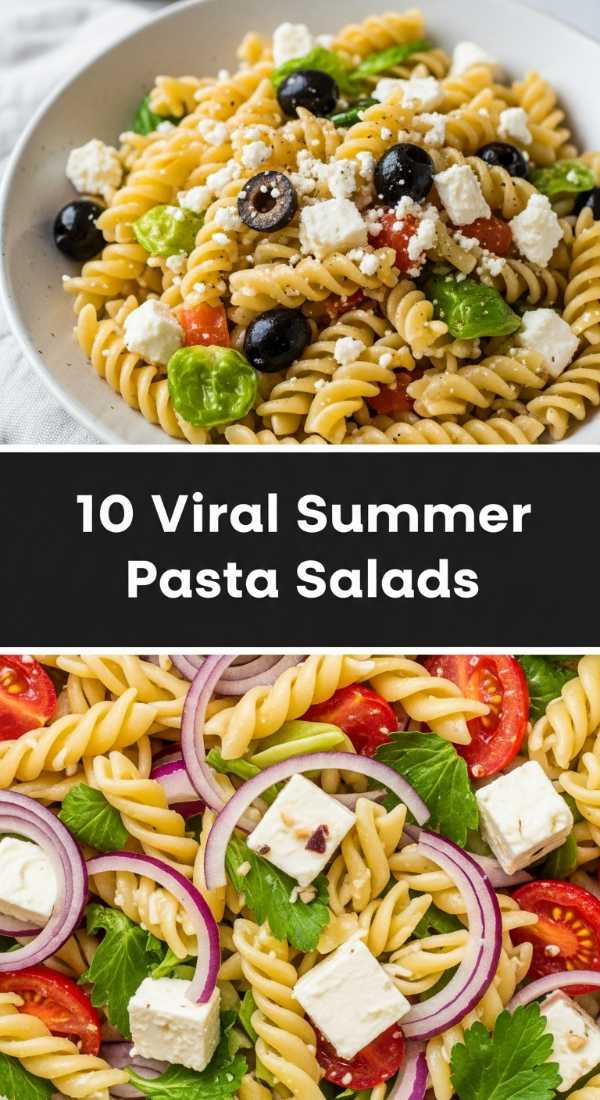
10 Viral Summer Pasta Salads (Step-by-Step Guide)

Why we love this
Pasta salad has undergone a viral transformation, moving away from heavy mayo-laden bowls to bright, Mediterranean-inspired masterpieces that sparkle on the plate. We adore the textural playground of al dente rotini catching pockets of zesty vinaigrette, paired with the juicy burst of cherry tomatoes and the creamy saltiness of fresh mozzarella pearls. The aroma is dominated by toasted pine nuts and fresh basil, creating a sensory experience that feels like a trip to the Italian coastline. It’s light, vibrant, and the perfect canvas for seasonal produce.
Ingredients
- Fusilli or Rotini pasta
- Cherry tomatoes, halved
- Fresh mozzarella pearls (Bocconcini)
- English cucumber, sliced into half-moons
- Kalamata olives, pitted
- Red wine vinaigrette
- Fresh basil leaves, chiffonade
How to make it
- Boil your pasta in heavily salted water (it should taste like the sea) until it is just slightly firmer than al dente; the pasta will soften further as it absorbs the dressing.
- Drain the pasta and immediately rinse it under cold running water to stop the cooking process and remove excess starch, which prevents the pasta from sticking together.
- While the pasta cools, whisk together red wine vinegar, olive oil, Dijon mustard, and a pinch of sugar to create a sharp, balanced vinaigrette.
- In a massive bowl, combine the cooled pasta with the tomatoes, cucumbers, olives, and mozzarella, ensuring an even distribution of colors.
- Pour the dressing over the salad and toss thoroughly; ensure every spiral of pasta is coated to prevent the dish from drying out.
- Let the salad sit in the fridge for at least an hour; as it chills, the pasta acts like a sponge, pulling the herbaceous flavors of the dressing into its core.
- Just before serving on your viral board, tear fresh basil leaves over the top to keep them from bruising and to provide an intense aromatic finish.
7 Refreshing Summer Cocktail Recipes (Step-by-Step Guide)
Why we love this
A summer cocktail is more than a drink; it is an accessory to the perfect afternoon. The visual appeal of condensation beaded on a highball glass, filled with crushed ice and vibrant garnishes like dragonfruit or cucumber ribbons, is instantly cooling. We love the way the scent of muddled mint and slapped basil fills the air, signaling the start of a relaxed gathering. The taste is a delicate balance of tart citrus, subtle sweetness, and the botanical notes of your favorite spirit, providing a crisp effervescence that cleanses the palate between bites of savory board snacks.
Ingredients
- Fresh lime and lemon juice
- Simple syrup or agave nectar
- Club soda or sparkling mineral water
- Fresh herbs (mint, basil, rosemary)
- Seasonal fruit (watermelon, berries, or peach)
- Premium gin, vodka, or tequila
- Large ice cubes or crushed ice
How to make it
- Chill your glassware in the freezer for at least 15 minutes prior to assembly to ensure your drink stays ice-cold from the first sip to the last.
- Place your fresh fruit and herbs in the bottom of a cocktail shaker and ‘muddle’ them gently with a wooden muddler; you want to release the oils and juices without pulverizing the leaves into bitter bits.
- Add 2 ounces of your chosen spirit, 1 ounce of fresh citrus juice, and half an ounce of simple syrup to the shaker.
- Fill the shaker with large ice cubes and shake vigorously for 15-20 seconds; you’ll know it’s ready when the outside of the metal shaker feels frosty to the touch.
- Double strain the mixture into your chilled glass filled with fresh ice to ensure a smooth texture free of fruit pulp or herb fragments.
- Top with a splash of sparkling water for a refreshing fizz that lifts the heavier fruit flavors.
- Garnish with a ‘slapped’ mint sprig (slapping it against your hand releases the aromatic oils) and a slice of fresh fruit to create a beautiful, Instagram-worthy presentation.
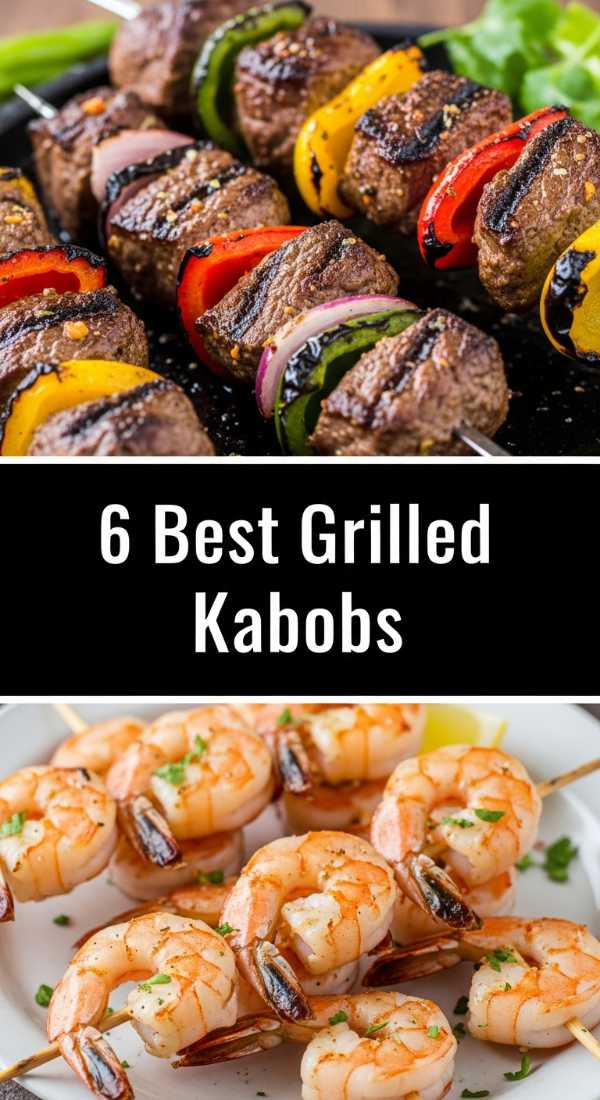
6 Best Grilled Kabob Recipes (Step-by-Step Guide)

Why we love this
Kabobs are the jewelry of the grill, featuring glistening jewels of marinated meat and charred vegetables threaded onto skewers. The smell of smoke mixing with caramelized onions and peppers is the quintessential scent of a summer cookout. We love the interactive nature of kabobs—each person can pick their favorite combination, and the bite-sized portions make them perfect for a casual food board. The texture offers a delightful contrast between the smoky, slightly charred exterior and the tender, juicy center of the meat, creating a robust flavor profile that feels deeply satisfying.
Ingredients
- Sirloin steak or chicken thighs, cubed
- Zucchini, thick rounds
- Red and yellow bell peppers, cut into squares
- Red onion, wedged
- Marinade (Olive oil, balsamic vinegar, garlic, oregano)
- Wooden or metal skewers
- Sea salt and cracked black pepper
How to make it
- If using wooden skewers, soak them in water for at least 30 minutes before grilling to prevent them from catching fire or splintering.
- Cut all meat and vegetables into uniform 1.5-inch pieces; uniformity is the secret to ensuring everything on the skewer cooks at the same rate.
- Marinate the meat for at least 2 hours in a mixture of oil, acid (like vinegar or lemon), and herbs; the acid helps tenderize the fibers while the oil carries the flavor deep inside.
- Thread the skewers by alternating meat with different vegetables; don’t pack them too tightly, as the heat needs to circulate around each piece to ensure even browning.
- Preheat your grill to medium-high heat (about 400°F) and lightly oil the grates to prevent the meat from sticking and tearing.
- Place the kabobs on the grill and cook for 8-12 minutes, turning every 3 minutes; look for clear grill marks and an internal temperature of 145°F for beef or 165°F for chicken.
- Rest the kabobs for 5 minutes before placing them on the board; this allows the juices to redistribute, ensuring every bite is moist and flavorful.
10 Healthy Summer Meal Ideas (Step-by-Step Guide)
Why we love this
Healthy summer meals are defined by their vibrancy and the way they leave you feeling energized rather than weighed down. We love a bowl that looks like a rainbow, filled with quinoa, massaged kale, and roasted sweet potatoes. The texture is a delightful mix of grainy, crunchy, and creamy, often topped with a dollop of hummus or a drizzle of tahini. The aroma is earthy and clean, highlighting the natural sweetness of peak-season produce. These meals are a celebration of health that doesn’t sacrifice flavor, making them a staple for any viral-worthy food spread.
Ingredients
- Quinoa or farro
- Massaged kale or baby spinach
- Roasted chickpeas (for protein and crunch)
- Avocado, sliced
- Radishes, thinly shaved
- Lemon-tahini dressing
- Toasted pumpkin seeds (pepitas)
How to make it
- Rinse your grains under cold water to remove the bitter coating (saponin) and boil in vegetable broth instead of water to infuse more flavor from the start.
- Prepare the kale by removing the ribs and ‘massaging’ the leaves with a bit of olive oil and salt for 2 minutes; this breaks down the tough fibers, making it tender and sweet.
- Roast your chickpeas in a 400°F oven with a sprinkle of cumin and paprika for 20 minutes until they are golden and make a ‘clinking’ sound when shaken.
- Create a ‘base’ on your board or in a bowl with the grains and massaged greens, keeping them separate or lightly tossed depending on your visual preference.
- Arrange the roasted chickpeas, sliced avocado, and shaved radishes in neat sections to create that beautiful, structured ‘Buddha bowl’ look that goes viral.
- Whisk together tahini, lemon juice, a clove of minced garlic, and a splash of warm water until you achieve a pourable, creamy consistency.
- Drizzle the dressing in a zig-zag pattern across the ingredients and finish with a handful of toasted pumpkin seeds for an extra layer of nutty crunch.
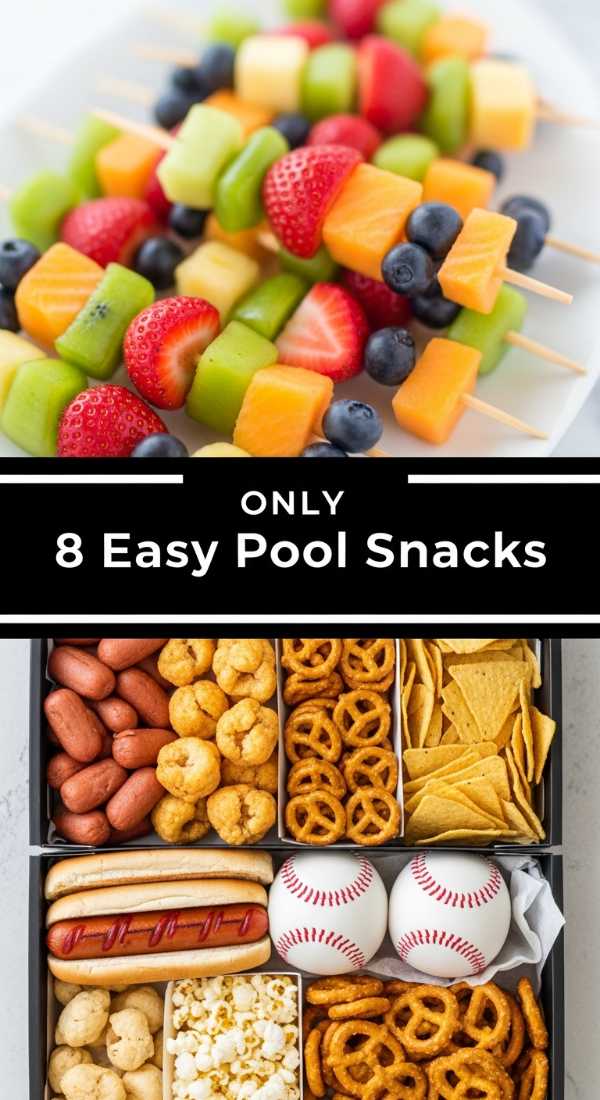
8 Easy Kids Pool Snacks (Step-by-Step Guide)
Why we love this
Poolside snacking needs to be two things: mess-free and incredibly hydrating. We love snacks that come in bright, fun shapes—like watermelon stars or frozen grape ‘jewelry.’ The feeling of a cold, juicy piece of fruit after splashing in the sun is pure childhood nostalgia. These snacks are designed to be grabbed with one hand, offering a burst of natural sugar and electrolytes to keep the energy levels high. The aroma is sweet and tropical, and the textures range from the icy snap of frozen treats to the satisfying pop of blueberries, making them a hit with kids and adults alike.
Ingredients
- Watermelon, sliced into thick rounds
- Grapes (green and red)
- String cheese or mild cheddar cubes
- Pretzel sticks
- Greek yogurt (for dipping)
- Honey and cinnamon
- Star-shaped cookie cutters
How to make it
- Use your star-shaped cookie cutter to punch out shapes from the thick watermelon rounds; this makes the fruit much more appealing and easier for small hands to manage.
- Place your grapes in a single layer on a baking sheet and freeze for at least 4 hours; they turn into tiny, healthy ‘sorbet’ bites that stay cold even in the sun.
- Skewer cheese cubes and whole grapes onto pretzel sticks; this eliminates the need for plastic toothpicks and makes the entire snack edible and fun.
- Prepare a simple ‘dip’ by mixing Greek yogurt with a drizzle of honey and a dash of cinnamon, providing a protein-rich accompaniment to the fruit.
- Set up a dedicated ‘Kids Zone’ on your food board, using small silicone muffin liners to hold individual portions of blueberries or pretzels.
- Keep the board in a shaded area or place it on top of a larger tray filled with ice to keep the fruit and cheese at a safe, refreshing temperature.
- Finish the display with a few colorful paper straws or umbrellas to lean into the fun, poolside aesthetic that makes these snacks a viral sensation.
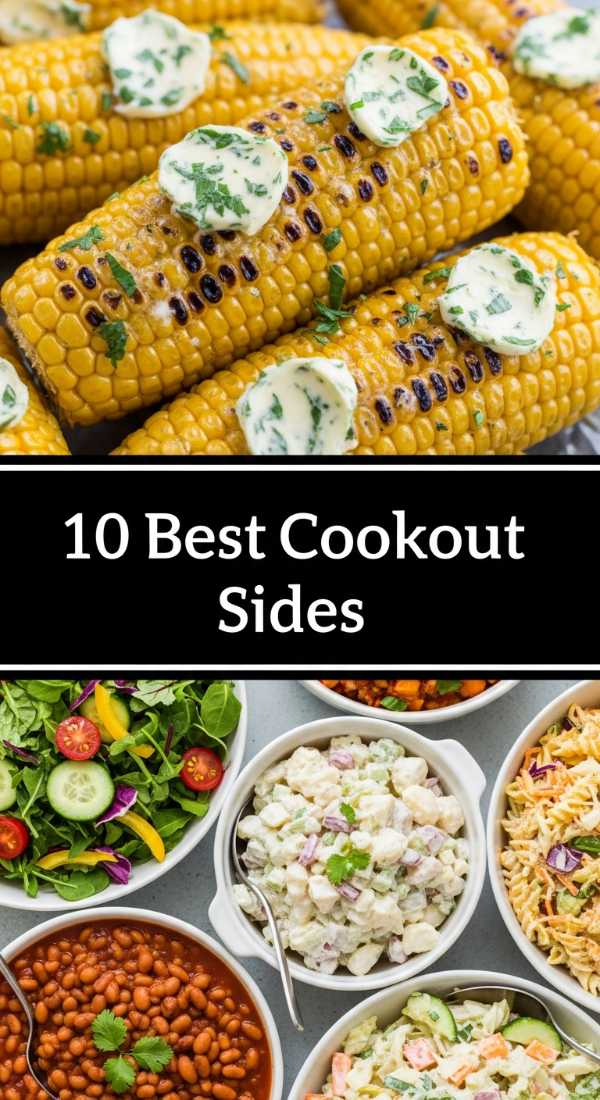
10 Must-Have Cookout Side Dishes (Step-by-Step Guide)
[IMAGE_10]
Why we love this
No food board is complete without the heavy hitters of the American cookout. We love the creamy, tangy comfort of a well-made potato salad and the smoky, charred sweetness of corn on the cob slathered in herb butter. The aroma of these dishes is a thick, delicious blend of grilled corn, vinegar, and sweet paprika. The textures are diverse—from the soft, pillowy potatoes to the juicy ‘pop’ of corn kernels. These sides are the ‘soul’ of the board, providing the nostalgic flavors that make a summer gathering feel complete and heart-warmingly familiar.
Ingredients
- Sweet corn on the cob
- Red potatoes, boiled and cubed
- Hard-boiled eggs, chopped
- Mayonnaise and yellow mustard
- Sweet pickle relish
- Smoked paprika and fresh chives
- Compound butter (butter mixed with parsley and garlic)
How to make it
- For the potato salad, boil your potatoes until fork-tender but not mushy; drain and splash them with a tablespoon of pickle juice while they are still hot to lock in flavor.
- Once the potatoes have cooled slightly, fold in the mayo, mustard, relish, and chopped eggs, stirring gently to maintain some texture in the potatoes.
- Let the potato salad chill for at least 4 hours—this allows the starches to meld with the dressing, creating that iconic creamy consistency.
- Prepare the corn by peeling back the husks but leaving them attached to use as a ‘handle,’ then remove the silk and rub the kernels with olive oil.
- Grill the corn over direct medium heat for 10-12 minutes, turning frequently until the kernels are bright yellow with charred spots throughout.
- Immediately after removing the corn from the grill, slather it in the compound butter so it melts into every crevice, then sprinkle with smoked paprika.
- Arrange the corn and bowls of potato salad on the board, garnishing everything with a heavy dusting of fresh chives to add a sharp, green contrast to the rich colors.
Conclusion
Building a viral-worthy food board is about more than just following a recipe; it’s about curate-ing an experience that delights all the senses. By mixing textures, colors, and temperatures, you create a centerpiece that encourages slow grazing and deep connection. Whether you’re serving up zesty wraps or sweet summer desserts, the key is to keep it simple, fresh, and shared with the people you love. Now, grab a board and start creating your own summer masterpiece!