

How to Master the Viral Simple Food Board Trend in Minutes
There is something truly magical about a beautifully laid out food board. It’s more than just a meal; it’s an invitation to gather, talk, and savor flavors at your own pace. I remember the first time I set one out for a Sunday brunch—the way the colors popped against the wood and the collective ‘ooh’ from my friends made all the prep feel like art. This viral trend has taken over social media for a reason: it’s the ultimate low-stress way to host while looking like a total pro.
The beauty of the ‘Simple Food Board’ is that it doesn’t require a culinary degree or hours in the kitchen. It’s all about the assembly and choosing a few star components that shine. Whether you’re leaning into savory grilled meats, crisp summer salads, or a sweet finish with a classic pie, the key is variety and texture. Let’s dive into the essential recipes and techniques you need to create a board that will have your followers—and your dinner guests—begging for your secrets.
How to make the perfect grilled chicken marinade

Why we love this
This marinade is a total game-changer because it transforms a standard protein into a succulent, flavor-packed centerpiece. As the chicken hits the hot grates, the aroma of fresh rosemary, bright lemon zest, and pungent garlic begins to waft through the air, promising a meal that is both comforting and sophisticated. The texture is what truly wins people over; the acid in the lemon tenderizes the meat so every bite is juicy, while the natural sugars in the herbs create those beautiful, slightly charred caramelized edges that we all crave during grilling season.
Ingredients
- 1/2 cup extra virgin olive oil
- 1/4 cup fresh lemon juice
- 4 cloves garlic, minced
- 1 tablespoon fresh rosemary, chopped
- 1 teaspoon smoked paprika
- Salt and freshly cracked black pepper to taste
- 1.5 lbs chicken breasts or thighs
How to make it
- Begin by preparing your aromatic base: in a medium glass bowl, whisk together the olive oil and fresh lemon juice until slightly emulsified. The oil provides the moisture barrier while the lemon acts as the tenderizer.
- Add in your minced garlic, chopped rosemary, and smoked paprika. Use a small whisk to ensure the spices are evenly distributed throughout the oil so every inch of the chicken gets equal flavor coverage.
- Place your chicken pieces into a large, sealable freezer bag or a shallow glass dish. Pour the marinade over the meat, ensuring that you massage the liquid into the crevices of the chicken.
- Seal the bag or cover the dish and refrigerate for at least 30 minutes, though 2 to 4 hours is the sweet spot for maximum flavor penetration without the lemon juice ‘cooking’ the meat texture.
- Preheat your grill to medium-high heat (about 400°F). Lightly oil the grates to prevent sticking.
- Place the chicken on the grill and cook for 6-7 minutes per side. Look for the meat to release easily from the grates; if it sticks, it’s not ready to flip. The internal temperature should reach 165°F.
- Remove the chicken from the heat and let it rest for 5 minutes before slicing. This allows the juices to redistribute, ensuring a moist result on your food board.
How to prep easy chicken caesar wraps

Why we love this
There is something incredibly satisfying about the crunch of a Caesar wrap nestled on a platter. It’s the perfect handheld addition to a food board, offering a cooling contrast to warmer dishes. We love the way the creamy, briny dressing coats the crisp romaine lettuce, creating a symphony of textures—from the soft flour tortilla to the snap of the greens and the savory bite of seasoned chicken. It’s a classic flavor profile that everyone recognizes and loves, making it the ultimate crowd-pleaser that looks elegant when sliced on a bias.
Ingredients
- 2 large flour tortillas
- 1 cup cooked chicken breast, sliced into strips
- 2 cups romaine lettuce, chopped into bite-sized pieces
- 1/4 cup Caesar dressing (high-quality or homemade)
- 1/4 cup shredded parmesan cheese
- 1/2 cup croutons, lightly crushed
How to make it
- Start by prepping your greens: wash and thoroughly dry the romaine lettuce. Using a salad spinner is best, as excess moisture will make the wrap soggy and ruin the structural integrity of your board display.
- In a large mixing bowl, toss the chopped romaine with the Caesar dressing. Use tongs to ensure every leaf is lightly coated but not swimming in liquid.
- Slightly warm your flour tortillas in a dry skillet over low heat for about 10 seconds per side. This makes them pliable and prevents them from cracking when you roll them up.
- Lay the tortilla flat and place a generous portion of the dressed romaine in the center, leaving a 2-inch border around the edges.
- Layer the sliced chicken strips on top of the lettuce, followed by a sprinkle of shredded parmesan and the crushed croutons for that essential ‘crunch’ factor.
- To fold, tuck the sides of the tortilla inward towards the center, then tightly roll from the bottom up, keeping the tension firm to ensure a dense, neat wrap.
- Slice the wraps diagonally (on a bias) using a sharp serrated knife. This reveals the beautiful internal layers and makes them easier for guests to grab and enjoy.
How to make refreshing tomato cucumber salad

Why we love this
This salad is the epitome of summer in a bowl and adds a much-needed pop of vibrant red and green to any food board. The scent of vine-ripened tomatoes mixed with the clean, watery aroma of fresh cucumbers is instantly refreshing. We love how the acidity of the vinegar cuts through the richness of other board components, acting as a palate cleanser. The texture is a delightful mix of the soft, yielding tomatoes and the sharp, cooling snap of the cucumbers, all tied together by the subtle bite of thinly sliced red onions.
Ingredients
- 3 large Roma tomatoes, chopped
- 1 English cucumber, sliced and halved
- 1/4 red onion, thinly sliced
- 2 tablespoons extra virgin olive oil
- 1 tablespoon red wine vinegar
- 1/2 teaspoon dried oregano
- Salt and pepper to taste
How to make it
- Core and chop your tomatoes into uniform 1-inch chunks. Try to use tomatoes that are firm but ripe to ensure they hold their shape in the salad bowl.
- Slice the English cucumber into rounds, then cut those rounds in half. Using an English cucumber is preferred because the skin is thin and the seeds are minimal, providing a better crunch.
- Thinly slice the red onion into half-moons. Pro tip: soak the onion slices in cold water for 5 minutes before adding them to the salad to remove the harsh ‘bite’ while retaining the flavor.
- In a small jar or bowl, whisk together the olive oil, red wine vinegar, dried oregano, salt, and pepper until the vinaigrette is well combined.
- Combine the tomatoes, cucumbers, and onions in a large bowl. Pour the dressing over the vegetables and toss gently with a large spoon.
- Let the salad sit at room temperature for at least 15 minutes before serving. This allows the salt to draw out a little juice from the tomatoes, which mingles with the dressing to create a delicious ‘pot liquor’ at the bottom of the bowl.
- Give it one final toss before plating it on your food board to ensure everything is glistening and well-seasoned.
How to bake a crunchy top pound cake

Why we love this
Every food board needs a sweet corner, and this crunchy top pound cake is the absolute star of the show. The smell of browning butter and sweet vanilla filling the kitchen is pure bliss. We love the contrast between the dense, velvety, buttery crumb of the interior and the distinct, sugary crust that forms on top. It’s the kind of cake that doesn’t need frosting because the texture itself is the attraction—shattering slightly under the fork to reveal a rich, golden center that melts in your mouth.
Ingredients
- 1 cup unsalted butter, softened
- 1.5 cups granulated sugar
- 3 large eggs, room temperature
- 1.5 cups all-purpose flour
- 1/2 cup whole milk
- 1 teaspoon vanilla extract
- 1/4 teaspoon salt
How to make it
- Preheat your oven to 325°F (165°C). It is crucial to use a lower temperature for pound cake to ensure the middle cooks through without burning the exterior. Grease and flour a loaf pan thoroughly.
- In a large bowl, cream the softened butter and granulated sugar together using a hand mixer or stand mixer. Beat on medium-high for at least 5 minutes until the mixture is pale, light, and fluffy—this air incorporation is what gives the cake lift.
- Add the eggs one at a time, beating well after each addition. Ensure each egg is fully incorporated before adding the next to maintain the emulsion.
- Stir in the vanilla extract. Then, alternate adding the flour (mixed with salt) and the milk, starting and ending with the flour. Mix only until just combined; overmixing at this stage will make the cake tough.
- Pour the batter into the prepared loaf pan and smooth the top with a spatula. Sprinkle a light, extra dusting of sugar over the top to enhance that signature crunch.
- Bake for 60 to 75 minutes. You’ll know it’s done when a wooden skewer inserted into the center comes out clean and the top is a deep golden brown with a slight crack down the middle.
- Allow the cake to cool in the pan for 10 minutes before transferring it to a wire rack. This cooling period is essential for the structure to set so it doesn’t crumble when sliced.
How to mix a tropical pina colada
Why we love this
Adding a beverage element to your food board presentation elevates the entire experience. This tropical pina colada is like a vacation in a glass, featuring a luscious, creamy texture that feels incredibly indulgent. We love the balance of the naturally sweet pineapple juice against the rich, nutty notes of coconut cream. It’s frosty, refreshing, and serves as the perfect ‘dessert drink’ to round out a board, especially when garnished with a bright cherry or a wedge of fresh fruit to tie the visual aesthetic together.
Ingredients
- 2 oz white rum
- 2 oz cream of coconut (like Coco Lopez)
- 4 oz pineapple juice
- 1/2 cup frozen pineapple chunks
- 1 cup ice
- Garnish: Pineapple wedge and maraschino cherry
How to make it
- Start with a high-powered blender. Pour in the white rum and the pineapple juice. Using high-quality juice makes a significant difference in the final brightness of the cocktail.
- Add the cream of coconut. Note that cream of coconut is much thicker and sweeter than coconut milk; ensure you shake the can well before measuring as the fats often separate.
- Toss in the frozen pineapple chunks and the ice. The frozen fruit helps create a thicker, smoother ‘frappe’ consistency without diluting the flavor too much with excess ice.
- Blend on high speed for 30-45 seconds. You are looking for a completely smooth, velvety texture with no visible ice crystals remaining.
- Taste the mixture. If it’s too sweet, add a squeeze of fresh lime juice; if it’s too thick, add a splash more pineapple juice and pulse briefly.
- Pour into a chilled hurricane glass or a tall glass. The contrast of the white drink against a colorful food board is stunning.
- Garnish with a fresh pineapple wedge on the rim and a maraschino cherry on top for that classic, retro-viral look.
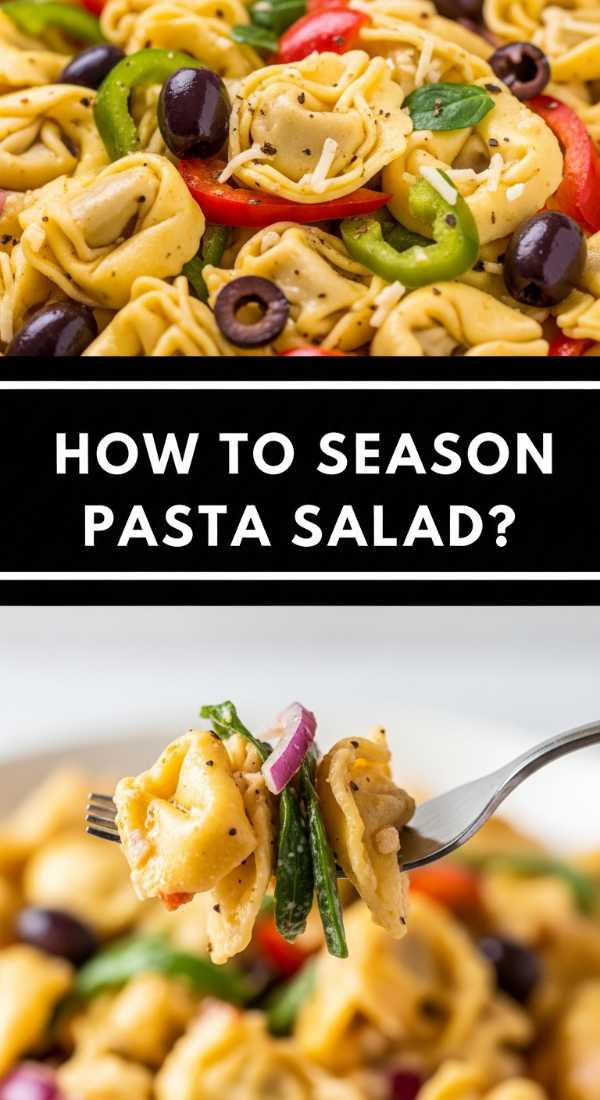
How to season tortellini pasta salad

Why we love this
Tortellini pasta salad is the savory, chewy heart of a great food board. Unlike standard pasta, the cheese-filled pockets of the tortellini provide a hidden burst of richness in every bite. We love how the ridges of the pasta catch the zesty herb dressing, ensuring that every mouthful is perfectly seasoned. It’s a hearty, colorful addition that brings together earthy dried herbs, salty cheese, and crisp vegetables, making it a versatile side that tastes even better as it sits and the flavors meld together.
Ingredients
- 1 package (20 oz) cheese tortellini
- 1/2 cup Italian vinaigrette dressing
- 1/4 cup sundried tomatoes, chopped
- 1/4 cup black olives, sliced
- 1/4 cup fresh parsley, chopped
- 1/2 teaspoon red pepper flakes (optional)
- 1/4 cup grated parmesan
How to make it
- Bring a large pot of salted water to a rolling boil. Cook the tortellini according to the package instructions, but aim for ‘al dente’—usually 2 minutes less than the max time. Overcooked tortellini will fall apart when tossed.
- Immediately drain the pasta and rinse it under cold running water. This stops the cooking process and removes the excess starch, preventing the pasta from becoming a sticky clump.
- In a large mixing bowl, combine the cooled tortellini with the Italian vinaigrette. It is important to dress the pasta while it is still slightly damp so it absorbs the flavors better.
- Fold in the chopped sundried tomatoes, sliced black olives, and fresh parsley. The red and green colors will make the dish pop visually on your board.
- Add the grated parmesan and red pepper flakes. The cheese helps thicken the dressing so it clings to the pasta rather than pooling at the bottom of the bowl.
- Cover and refrigerate for at least one hour. This ‘resting’ period is critical for the pasta to fully soak up the herb-infused oil and vinegar.
- Before serving, give the salad a quick toss. If it looks dry, add one more tablespoon of dressing to revive the sheen.
How to cook on a blackstone grill
Why we love this
Cooking on a Blackstone (flat-top griddle) is a theatrical and efficient way to prepare multiple components of your food board at once. We love the massive surface area that allows you to sear chicken on one side while sautéing peppers and toasting bread on the other. The smell of searing protein on a seasoned steel plate is intoxicating, and the high heat creates a superior ‘Maillard reaction,’ resulting in a deep, savory crust on everything it touches. It turns cooking into a social event, which fits the spirit of the food board perfectly.
Ingredients
- High smoke point oil (like avocado or canola oil)
- Your choice of proteins (shrimp, steak strips, or chicken)
- Assorted sliced vegetables (bell peppers, onions, asparagus)
- Coarse sea salt and cracked black pepper
How to make it
- Start by cleaning your Blackstone surface. Turn the burners to medium-high and let the griddle heat up for about 10 minutes. You want the surface to be hot enough that a drop of water dances and evaporates instantly.
- Apply a thin layer of high smoke point oil across the surface using a squeeze bottle. Use a griddle spatula to spread the oil evenly. Avoid olive oil here as it will smoke and turn bitter at these temperatures.
- Lay your proteins down on the hottest zone of the griddle. Leave them undisturbed for 2-3 minutes to develop a golden-brown crust. Use a heavy press if you want an even flatter, crispier sear.
- On a separate zone (or a lower heat setting), toss your vegetables. Move them frequently with two spatulas, mimicking a stir-fry motion, until they are tender-crisp and charred at the edges.
- Season everything generously with salt and pepper while it’s on the heat. The direct contact with the steel helps the seasoning ‘stick’ to the food.
- Once cooked, use your long spatula to scrape the food into a pile and transfer it directly to a serving platter.
- Immediately scrape the griddle clean while it’s still hot, apply a very light coat of oil to maintain the seasoning, and turn off the burners.
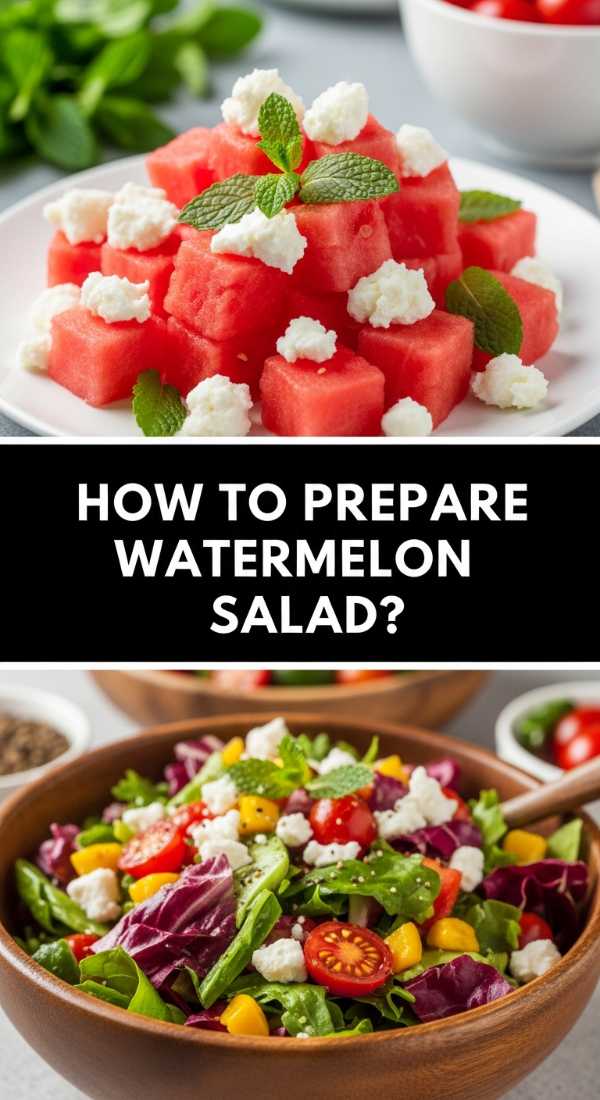
How to make homemade watermelon salad

Why we love this
This salad is a masterclass in flavor contrast and is a staple for any viral food board. The ice-cold, sweet crunch of the watermelon paired with the salty, creamy crumbles of feta cheese creates a sensory experience that is both unexpected and addictive. We love the visual of the deep red fruit against the snowy white cheese and bright green mint leaves. It’s incredibly light and hydrating, making it the perfect antidote to richer, grilled items on your platter.
Ingredients
- 4 cups seedless watermelon, cubed
- 1/2 cup feta cheese, crumbled
- 1/4 cup fresh mint leaves, torn
- 1 tablespoon lime juice
- A drizzle of balsamic glaze (optional)
How to make it
- Start with a cold watermelon that has been refrigerated for at least 4 hours. Cutting a cold melon ensures the cubes stay firm and juicy rather than turning mushy.
- Slice the watermelon into uniform 1-inch cubes. Remove any stray white seeds to keep the presentation clean and professional.
- Place the cubes in a large, shallow bowl. Drizzle the fresh lime juice over the top and toss gently. The lime juice acts as a flavor enhancer, making the sweetness of the melon more intense.
- Sprinkle the crumbled feta cheese evenly over the top. Do not toss too vigorously after adding the cheese, or the white cheese will turn pink from the watermelon juice.
- Tear the fresh mint leaves by hand just before serving. Tearing rather than chopping prevents the edges of the mint from bruising and turning black, keeping the salad looking fresh.
- For a ‘viral’ aesthetic touch, drizzle a small amount of thick balsamic glaze in a zig-zag pattern across the salad just before placing it on the board.
- Serve immediately; this salad is best enjoyed within 30 minutes of assembly to prevent the watermelon from losing its structural integrity.
How to bake shoney’s strawberry pie
Why we love this
This pie is pure nostalgia, famous for its towering pile of glistening, ruby-red strawberries. We love the dramatic look it adds to a food board—it’s a showstopper. The texture is a delightful combination of a flaky, buttery pastry crust and the thick, sweet-tart glaze that envelopes the whole berries. It feels light and fresh because the berries aren’t cooked, maintaining their natural snap and juiciness while being hugged by a velvety strawberry-flavored gel that melts on the tongue.
Ingredients
- 1 pre-baked 9-inch pie crust
- 1.5 lbs fresh strawberries, hulled
- 1 cup granulated sugar
- 3 tablespoons cornstarch
- 1 cup water
- 3 tablespoons strawberry-flavored gelatin powder (like Jell-O)
- Whipped cream for serving
How to make it
- Prepare your pie crust in advance. Whether homemade or store-bought, it must be fully baked and completely cooled before you add the fruit to prevent the bottom from becoming soggy.
- Wash and hull your strawberries. Leave the small ones whole and slice the very large ones in half. Pat them completely dry with paper towels; any excess water will prevent the glaze from sticking.
- Arrange the strawberries in the cooled pie crust. Start from the outside and work your way in, pointing the tips of the berries upward for that classic Shoney’s ‘mountain’ look.
- In a small saucepan, whisk together the sugar and cornstarch. Slowly stir in the water until smooth.
- Bring the mixture to a boil over medium heat, stirring constantly. Cook for about 2 minutes until the glaze becomes thick and clear.
- Remove from heat and stir in the dry strawberry gelatin powder until it is fully dissolved and the glaze is a vibrant, translucent red.
- Let the glaze cool for about 10-15 minutes (it should be thick but still pourable). Carefully pour the glaze over the strawberries, ensuring every berry is fully coated.
- Refrigerate the pie for at least 3-4 hours to allow the gelatin to set firmly. Slice and serve with a massive dollop of whipped cream.
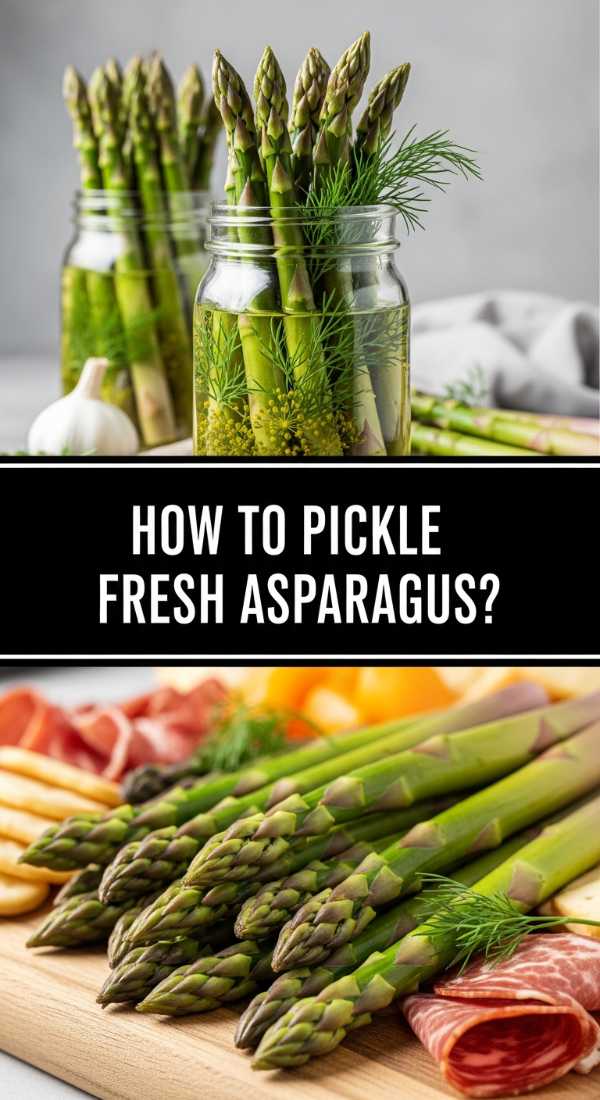
How to pickle fresh asparagus
[IMAGE_10]
Why we love this
Pickled asparagus adds a sophisticated, tangy ‘snap’ to your food board that balances out soft cheeses and fatty meats. We love the earthy, green flavor of the asparagus combined with the sharp, acidic punch of the pickling brine. It’s an elegant alternative to traditional cucumbers, offering a sleek, elongated shape that looks beautiful tucked into the corners of a platter. The texture is the highlight—tender yet firm, with a refreshing crunch that releases a burst of garlicky, vinegary goodness.
Ingredients
- 1 lb fresh asparagus, woody ends trimmed
- 1 cup white vinegar
- 1 cup water
- 1 tablespoon kosher salt
- 1 tablespoon sugar
- 2 cloves garlic, smashed
- 1 teaspoon red pepper flakes
- 1 teaspoon dill seeds
How to make it
- Prepare the asparagus by trimming the spears so they fit vertically into a wide-mouth pint jar, leaving about half an inch of headspace at the top.
- Blanch the asparagus: drop the spears into boiling water for exactly 60 seconds, then immediately plunge them into an ice bath. This locks in the vibrant green color and ensures they aren’t too tough.
- In a small saucepan, combine the white vinegar, water, salt, and sugar. Bring to a simmer over medium heat, stirring until the salt and sugar are completely dissolved.
- Pack the blanched asparagus spears into the jar tightly. Slide the smashed garlic cloves, red pepper flakes, and dill seeds into the gaps between the spears.
- Carefully pour the hot brine over the asparagus until they are completely submerged.
- Tap the jar gently on the counter to release any trapped air bubbles. Wipe the rim of the jar and screw on the lid.
- Let the jar cool to room temperature on the counter, then move it to the refrigerator. While you can eat them after 24 hours, the flavor is best after 3 to 5 days of ‘curing’ in the fridge.
Conclusion
Mastering the viral food board trend is all about the balance of flavors and the joy of presentation. By incorporating a mix of fresh salads, perfectly grilled proteins, and sweet finishes like that crunchy pound cake, you create a dining experience that is as beautiful as it is delicious. Remember, there are no strict rules—just follow your palate and have fun with the layout!
Frequently Asked Questions
Find answers to common questions about building the perfect viral food board.