

We have all seen the overly complicated aesthetic boards—the ones that take three hours to assemble and look too pretty to eat. But lately, there is a new trend taking over my feed, and honestly, it’s a breath of fresh air. It’s the ‘Simple Food Board,’ and it is exactly what it sounds like: a collection of real, hearty, and incredibly delicious dishes laid out for everyone to grab, share, and enjoy without the fuss of individual plating. It’s about the joy of a shared meal that feels as good as it looks.
There is something so deeply comforting about gathering around a table where the food does the talking. I started making these boards for my family on Sunday afternoons, and it quickly became the highlight of our week. It turns a regular lunch into an event, inviting everyone to linger over a second helping of salad or a slice of warm bread. This viral trend is all about reclaiming the joy of eating together, focusing on vibrant colors, fresh ingredients, and flavors that remind us of home.
How to make chicken caesar wraps?
Why we love this
There is nothing quite like the crunch of crisp Romaine lettuce against a warm, flour tortilla, all bound together by the silken, savory richness of a classic Caesar dressing. When you bite into one of these wraps, you get the smokiness of the grilled chicken followed by the salty punch of Parmesan cheese and the brightness of freshly squeezed lemon. It is the ultimate handheld comfort food that manages to feel light and indulgent all at once, making it a staple for any viral food board.
Ingredients
- Large flour tortillas
- Grilled chicken breast strips
- Romaine lettuce, chopped
- Shaved Parmesan cheese
- Creamy Caesar dressing
- Croutons, crushed
- Fresh cracked black pepper
- Lemon wedges
How to make it
- Warm your tortillas in a dry skillet over medium heat for about 30 seconds per side until they are pliable and soft; this prevents them from tearing during the rolling process.
- In a large mixing bowl, toss the chopped Romaine lettuce with a generous amount of Caesar dressing, ensuring every leaf is coated, then add the crushed croutons for an internal crunch that mimics the classic salad experience.
- Lay the tortilla flat on a clean surface and spread a thin layer of dressing down the center to act as a glue for the other ingredients.
- Layer a handful of the dressed lettuce, followed by several strips of seasoned grilled chicken, and a healthy sprinkle of shaved Parmesan cheese.
- Fold the sides of the tortilla inward toward the center, then tightly roll from the bottom up, tucking the filling as you go to ensure a compact wrap.
- Slice the wrap diagonally with a sharp serrated knife to reveal the beautiful layers and serve immediately with an extra lemon wedge on the side.
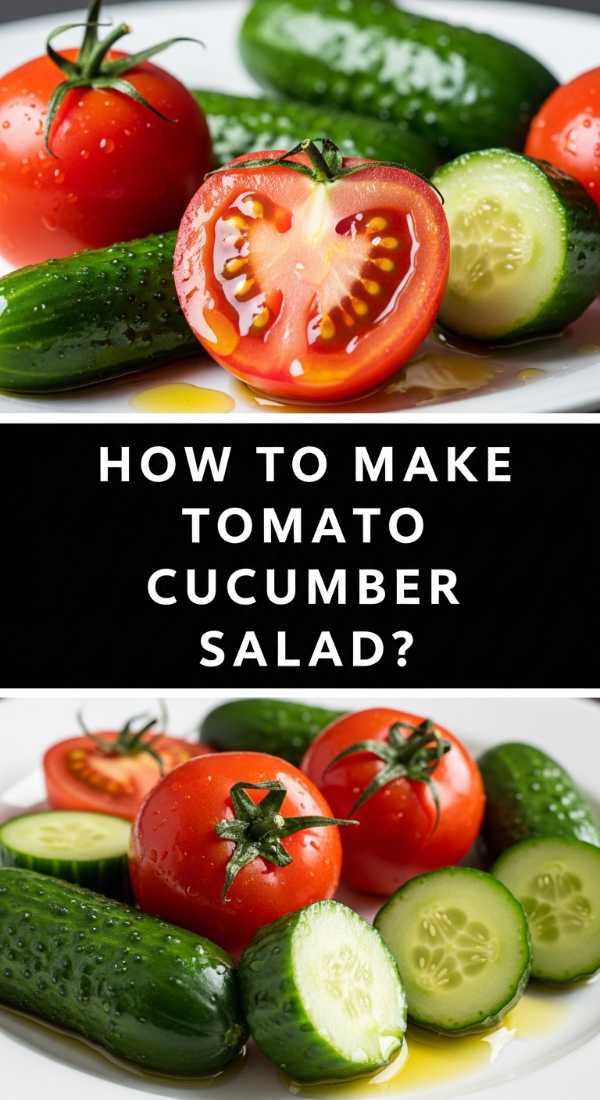
How to make tomato cucumber salad?

Why we love this
This salad is like summer in a bowl; it’s bright, cooling, and incredibly refreshing on a hot afternoon. The acidity of the vinegar draws out the sweet juices of the vine-ripened tomatoes, creating a natural vinaigrette that coats the crisp, hydrating slices of cucumber. As the salad sits, the red onion mellows out, and the fresh herbs release their oils, creating a fragrant and colorful dish that provides a sharp, clean contrast to heavier grilled meats or rich cheeses.
Ingredients
- English cucumbers, sliced
- Cherry tomatoes, halved
- Red onion, thinly sliced
- Extra virgin olive oil
- Red wine vinegar
- Fresh dill or parsley
- Dried oregano
- Salt and pepper to taste
- Optional: Feta cheese crumbles
How to make it
- Begin by slicing the English cucumbers into thin rounds or half-moons; keeping the skin on adds a lovely texture and a vibrant green color to the board.
- Halve the cherry tomatoes and slice the red onion into paper-thin ribbons to ensure the onion flavor is present but not overwhelming in any single bite.
- In a small glass jar or bowl, whisk together three parts olive oil to one part red wine vinegar, adding a pinch of dried oregano, salt, and cracked pepper to create a balanced emulsion.
- Place the vegetables in a large glass bowl and pour the dressing over them, tossing gently with wooden spoons to ensure the tomatoes don’t bruise.
- Allow the salad to marinate in the refrigerator for at least 20 minutes before serving; this allows the flavors to meld and the vegetables to slightly soften while remaining crisp.
- Just before serving, garnish with a handful of fresh chopped dill or parsley and a sprinkle of salty feta cheese if you want that extra Mediterranean flare.
How to make grilled chicken marinade?

Why we love this
A great marinade is the secret soul of any food board, transforming a simple protein into a tender, juice-filled masterpiece. This specific blend balances the zing of citrus with the earthy depth of garlic and the sweetness of honey, creating a caramelized crust when it hits the hot grates of the grill. The aroma of the herbs burning slightly over the coals is enough to bring anyone to the kitchen, promising a meal that is infused with flavor from the inside out.
Ingredients
- 1/2 cup olive oil
- 1/4 cup soy sauce
- 1/4 cup fresh lemon juice
- 2 tablespoons honey
- 3 cloves garlic, minced
- 1 teaspoon dried thyme
- 1/2 teaspoon smoked paprika
- Salt and black pepper
How to make it
- In a medium-sized bowl, whisk the olive oil and soy sauce together until combined; the soy sauce provides the essential salt and umami base for the chicken.
- Add the lemon juice and honey, whisking vigorously to dissolve the honey so the sugars are evenly distributed for consistent caramelization.
- Stir in the minced garlic, thyme, and smoked paprika, which will give the chicken a beautiful golden-red hue and a subtle hint of smokiness even before it touches the grill.
- Place your chicken breasts or thighs into a heavy-duty gallon-sized freezer bag and pour the marinade over the meat, squeezing out as much air as possible before sealing.
- Massage the bag to ensure every inch of the chicken is coated, then let it rest in the refrigerator for at least 2 hours, though overnight is ideal for the deepest flavor penetration.
- Remove the chicken from the fridge 15 minutes before grilling to take the chill off, which ensures even cooking and prevents the meat from tightening up and becoming tough.
How to bake crunchy pound cake?

Why we love this
There is a specific kind of magic in a pound cake that has a thick, sugary, golden-brown crust that yields to a dense, buttery crumb. The texture is the star here—the exterior provides a satisfying crunch that shatters slightly with each bite, while the interior remains velvety and rich. It’s the kind of cake that smells like pure vanilla and toasted sugar, filling the entire house with a warmth that feels like a big, culinary hug.
Ingredients
- 1 cup unsalted butter, softened
- 1.5 cups granulated sugar
- 3 large eggs, room temperature
- 1.5 cups all-purpose flour
- 1/2 cup heavy cream
- 1 teaspoon vanilla extract
- 1/2 teaspoon almond extract
- 1/4 teaspoon salt
- Turbinado sugar for topping
How to make it
- Preheat your oven to 325°F (165°C); a lower temperature is crucial for pound cake to allow the dense batter to rise slowly and cook through without burning the edges.
- Cream the softened butter and granulated sugar in a stand mixer on medium-high speed for at least 5 minutes until the mixture is pale, fluffy, and looks almost like whipped cream.
- Add the eggs one at a time, beating well after each addition to ensure the emulsion stays stable and the cake has a uniform structure.
- Alternate adding the flour and the heavy cream, starting and ending with the flour; mix only until the white streaks disappear to avoid overdeveloping the gluten.
- Grease a loaf pan heavily with butter and dust with flour, then pour the batter in and smooth the top with a spatula.
- Sprinkle a generous layer of Turbinado sugar over the top of the batter; this is the secret to that viral “crunchy” top.
- Bake for 60 to 75 minutes, or until a wooden skewer inserted into the center comes out clean with just a few moist crumbs attached.
How to brew perfect sun tea?
Why we love this
Sun tea is more than just a beverage; it’s a slow-living ritual that uses the gentle heat of the afternoon sun to extract the most delicate notes from the tea leaves. Unlike boiled tea, which can sometimes turn bitter, sun tea is exceptionally smooth and mellow. Watching the clear water slowly transform into a deep amber hue inside a glass jar on the porch is one of life’s simplest pleasures, evoking memories of lazy summer days and backyard picnics.
Ingredients
- 1 gallon cold filtered water
- 8 to 10 black tea bags (or green tea)
- Fresh mint sprigs
- Lemon slices
- Honey or simple syrup
- Ice cubes
How to make it
- Clean a one-gallon glass jar thoroughly to ensure there are no residues; glass is essential as it allows the UV rays to penetrate the water effectively.
- Fill the jar with cold, filtered water and drop in the tea bags, leaving the strings hanging over the edge for easy removal later.
- Place the jar in a spot that receives direct, unobstructed sunlight for 3 to 5 hours; do not exceed 5 hours to maintain the best flavor profile.
- Once the tea has reached a rich, dark color, bring the jar inside and immediately remove the tea bags, squeezing them gently to release the concentrated tea held within.
- Stir in your sweetener of choice while the tea is still slightly warm from the sun, then add fresh mint sprigs and lemon slices to infuse for another 30 minutes.
- Pour over large glasses filled with ice and serve immediately, or store in the refrigerator for up to 24 hours for the freshest taste.
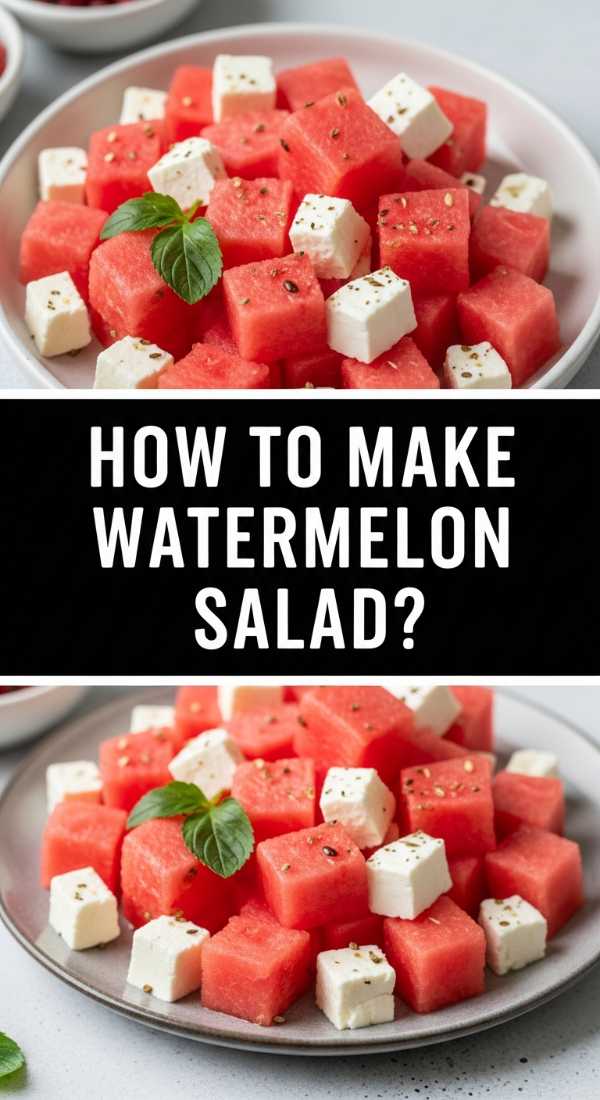
How to make watermelon salad?

Why we love this
This dish is the ultimate study in flavor contrasts: the icy sweetness of the watermelon meets the salty, creamy bite of feta cheese. Every forkful is a surprise, with the heat of thin radish slices or the cooling aroma of fresh mint leaves keeping your palate guessing. It’s incredibly hydrating and visually stunning on a food board, with the vibrant pinks and deep greens providing an instant aesthetic boost that screams “viral summer recipe.”
Ingredients
- 6 cups cubed seedless watermelon
- 1/2 cup crumbled feta cheese
- 1/4 cup fresh mint leaves, torn
- 1/2 red onion, thinly sliced
- Balsamic glaze
- Lime juice
- Flaky sea salt
How to make it
- Select a heavy, ripe watermelon and cube it into uniform 1-inch pieces, removing any stray seeds as you go to ensure a seamless eating experience.
- Place the watermelon cubes in a large chilled bowl; keeping the fruit cold is essential for the structure of the salad.
- Soak the sliced red onions in a bowl of ice water for 10 minutes before adding them to the salad; this removes the harsh “bite” and keeps them extra crunchy.
- Scatter the torn mint leaves and crumbled feta over the watermelon, being careful not to over-mix, as the feta can easily break down and turn the salad cloudy.
- Just before serving, drizzle with a squeeze of fresh lime juice to brighten the flavors and a decorative zig-zag of thick balsamic glaze for sweetness and acidity.
- Finish with a light sprinkle of flaky sea salt, which draws out the natural sugars of the melon and makes the fruit taste even sweeter.
How to cook summer pasta?

Why we love this
Summer pasta is all about celebrating the harvest without slaving over a hot stove for hours. It’s a light, oil-based dish that relies on the residual heat of the pasta to gently soften cherry tomatoes and wilt fresh spinach into a silky sauce. The garlic-infused oil coats every strand of noodle, while the burst tomatoes provide little explosions of sweet-tart flavor. It is elegant enough for a dinner party but simple enough for a Tuesday night on the patio.
Ingredients
- 1 lb linguine or spaghetti
- 2 cups cherry tomatoes, halved
- 4 cloves garlic, thinly sliced
- 1/2 cup extra virgin olive oil
- 1/2 teaspoon red pepper flakes
- 2 cups fresh baby spinach
- 1/2 cup grated Pecorino Romano
- Fresh basil leaves
How to make it
- Bring a large pot of heavily salted water to a rolling boil and cook your pasta until it is just shy of al dente; it will finish cooking in the sauce later.
- While the pasta cooks, heat the olive oil in a large skillet over medium-low heat and add the sliced garlic and red pepper flakes.
- Cook the garlic slowly until it is fragrant and pale golden; be very careful not to let it brown or turn bitter, as this is the base of your entire flavor profile.
- Increase the heat to medium and add the halved cherry tomatoes, cooking them for 3-4 minutes until they begin to soften and release their juices into the oil.
- Ladle about 1/2 cup of the starchy pasta water into the skillet, then drain the pasta and add it directly into the tomato mixture.
- Toss vigorously with tongs for 2 minutes to create a light emulsion, then fold in the baby spinach until it just wilts, and serve topped with fresh basil and plenty of cheese.
How to bake banana bread?

Why we love this
The scent of banana bread baking in the oven is the universal language of home. This isn’t just a snack; it’s a moist, cake-like loaf that transforms over-ripe, spotted bananas into something sophisticated and deeply satisfying. The edges get slightly chewy and caramelized while the center remains incredibly soft and tender. It’s the perfect addition to a food board because it pairs beautifully with both savory cheeses and fresh fruit, making it a versatile crowd-pleaser.
Ingredients
- 3 very ripe bananas, mashed
- 1/2 cup melted unsalted butter
- 3/4 cup brown sugar
- 1 large egg, beaten
- 1 teaspoon vanilla extract
- 1.5 cups all-purpose flour
- 1 teaspoon baking soda
- 1/2 teaspoon cinnamon
- Pinch of salt
How to make it
- Preheat your oven to 350°F (175°C) and grease a standard loaf pan with butter or non-stick spray, lining the bottom with parchment paper for easy removal.
- In a large mixing bowl, mash the bananas with a fork until they are mostly smooth with just a few small lumps left for texture.
- Stir the melted butter into the mashed bananas using a wooden spoon, followed by the brown sugar, beaten egg, and vanilla extract until the mixture is glossy.
- Sift the flour, baking soda, salt, and cinnamon directly over the wet ingredients to ensure there are no clumps of soda in the finished loaf.
- Fold the dry ingredients into the wet very gently; the goal is to stop the moment the flour is incorporated to keep the bread light and airy rather than tough.
- Pour the batter into the prepared pan and bake for 50 to 60 minutes, testing with a toothpick in the center until it comes out clean. Let it cool in the pan for 10 minutes before transferring to a wire rack.
How to cook blackstone dinners?
Why we love this
Cooking on a Blackstone griddle is all about the theater of the meal—the high heat, the rhythmic clink of the spatulas, and the incredible sear that you can only get on a flat-top surface. It allows you to cook an entire meal—protein, starch, and veg—all at once, infused with a smoky, hibachi-style flavor. The result is food that is perfectly charred on the outside while remaining incredibly succulent on the inside, making it a centerpiece for any outdoor gathering.
Ingredients
- 1 lb flank steak or chicken thighs, sliced thin
- 2 cups bell peppers, julienned
- 1 large onion, sliced
- 3 cups cooked, chilled white rice
- 3 tablespoons vegetable oil
- 2 tablespoons butter
- Soy sauce and garlic butter for finishing
How to make it
- Preheat your Blackstone griddle to medium-high heat and ensure the surface is well-seasoned and clean; a hot surface is vital for preventing the food from sticking.
- Apply a thin layer of vegetable oil across the griddle and start by placing the onions and peppers on one side, tossing them frequently with your spatulas until they are soft and slightly charred.
- Move the vegetables to a lower-heat zone of the griddle and place your sliced meat on the hottest section, spreading it out in a single layer to get a deep, brown sear.
- Once the meat is browned, toss it with the vegetables and move the whole pile to the side. Add a pat of butter to the empty hot space and dump the chilled rice onto it.
- Press the rice down into the butter and let it sit for 2 minutes to develop a crispy “crust” before breaking it up and tossing it with soy sauce and the meat/veg mixture.
- Finish the entire meal with a dollop of garlic butter and a final quick toss before scraping everything onto a large platter to serve family-style.
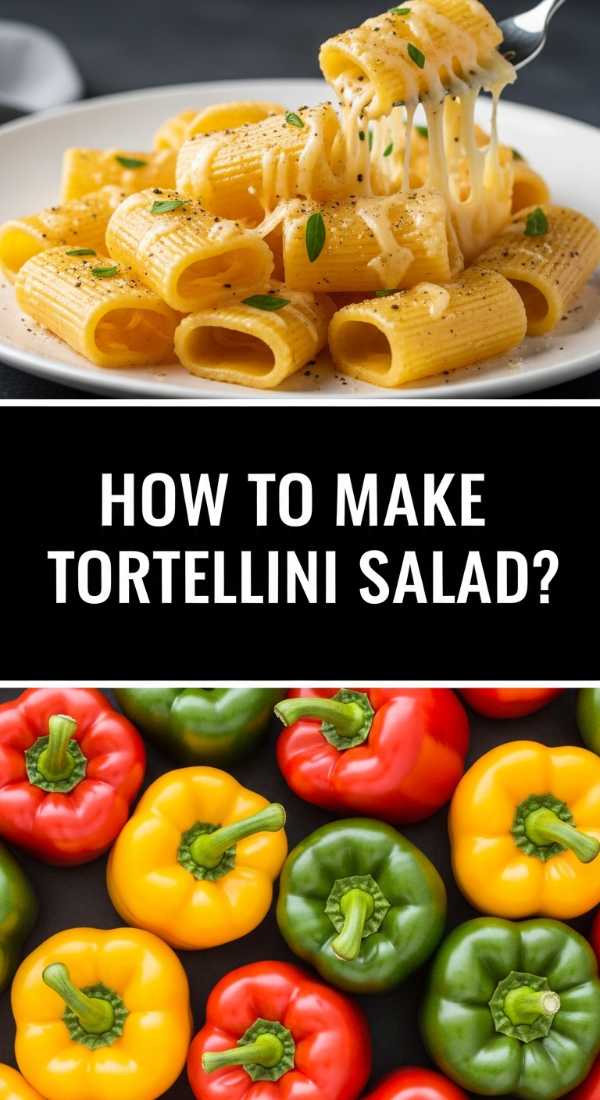
How to make tortellini salad?
[IMAGE_10]
Why we love this
Tortellini salad takes everything you love about a pasta salad and elevates it with the addition of cheesy, pillowy pasta. It’s a hearty, multicolored dish that feels substantial and gourmet. The crevices of the tortellini act as little pockets that catch the zesty Italian dressing, while the mix of olives, salami, and cheese pearls provides a variety of textures in every spoonful. It’s the kind of dish that actually tastes better the next day, making it perfect for prep-ahead boards.
Ingredients
- 1 lb cheese tortellini (fresh or frozen)
- 1/2 cup cubed hard salami
- 1 cup fresh mozzarella pearls
- 1/2 cup sliced black olives
- 1/2 cup roasted red peppers, chopped
- 1 cup Italian vinaigrette dressing
- 1/4 cup freshly grated Parmesan
How to make it
- Cook the tortellini in a large pot of salted boiling water according to the package directions, but remove them exactly one minute early to ensure they stay firm and don’t fall apart in the salad.
- Drain the pasta and immediately rinse it under cold running water to stop the cooking process and wash away the excess starch that can make the salad gummy.
- In a very large mixing bowl, combine the cooled tortellini with the mozzarella pearls, salami, olives, and roasted red peppers.
- Pour the Italian dressing over the mixture and toss gently with a large silicone spatula to prevent breaking the delicate pasta shells.
- Cover the bowl and refrigerate for at least one hour; the tortellini will absorb some of the dressing, so you may want to add a splash more just before serving to keep it moist.
- Garnish with a final dusting of grated Parmesan and some fresh cracked pepper before piling it onto your food board.
Conclusion
The beauty of the viral simple food board isn’t just in the recipes themselves, but in the way they invite us to slow down and enjoy the process of eating. Whether you’re folding a perfect Caesar wrap or watching the sun brew your tea, these dishes are designed to be shared and celebrated. I hope these recipes inspire you to clear off your biggest platter, gather your favorite people, and create a meal that is as joyful as it is delicious. Happy hosting!