

There is something undeniably magical about the moment you set a massive, colorful food board in the center of a table. It is more than just a meal; it is an invitation to linger, to laugh, and to share stories over bites of savory cheese and crisp, garden-fresh produce. I remember the first time I hosted a summer gathering where I ditched the formal plates for a giant wooden board—the tension in the room instantly melted away. Everyone felt at ease, reaching for their favorites and discovering new flavor combinations in a way that felt organic and deeply human.
We live in such a fast-paced world that these moments of slow, intentional eating are a true luxury. This ‘viral food board’ isn’t just about the aesthetics (though it is definitely Instagram-ready!); it’s about reclaiming the joy of simple hosting. You don’t need to spend hours at the stove to create something that feels spectacular. With a few key elements and a bit of styling, you can transform ordinary ingredients into a feast for the senses that your guests will be talking about for weeks.
How to make the cheesiest dip?

Why we love this
There is nothing quite like the sight of a golden, bubbling cheese dip straight from the oven to make your heart skip a beat. The aroma of roasted garlic and melted fontina wafting through the kitchen creates an immediate sense of comfort and warmth. Every scoop reveals a rich, gooey texture that stretches and pulls, offering a luxurious mouthfeel that is both salty and creamy. It is the ultimate crowd-pleaser, providing that decadent, indulgent center that anchors the entire food board with its irresistible, savory charm.
Ingredients
- 8 oz Cream Cheese, softened
- 1 cup Shredded Mozzarella
- 1 cup Shredded Fontina
- 1/2 cup Grated Parmesan
- 2 cloves Garlic, minced
- 1 tsp Dried Oregano
- Red Pepper Flakes (optional)
- Fresh Parsley for garnish
How to make it
- Preheat your oven to 375°F (190°C) and lightly grease a small cast-iron skillet or oven-safe ceramic dish to prevent sticking.
- In a medium mixing bowl, combine the softened cream cheese and minced garlic, beating them together until smooth to ensure even flavor distribution.
- Gently fold in the mozzarella, fontina, and half of the parmesan, stirring until the cheeses are thoroughly incorporated.
- Transfer the mixture to your prepared dish, smoothing the top with a spatula and sprinkling the remaining parmesan and red pepper flakes over the surface.
- Bake for 15-20 minutes, or until the edges are vigorously bubbling and the top has developed a beautiful, golden-brown crust.
- Remove from the oven and let it sit for 2 minutes to set slightly, then garnish with fresh parsley and serve immediately while the cheese is at peak elasticity.
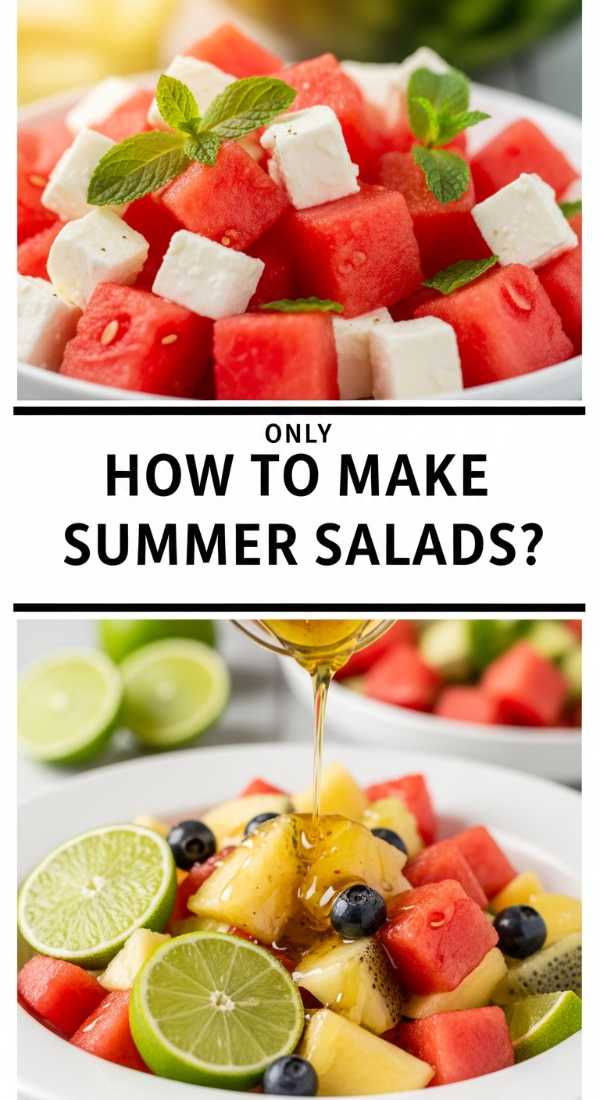
How to make fresh salad?
Why we love this
A fresh salad acts as the vibrant, cooling counterbalance to the richer elements of your board, providing a necessary crunch and a burst of acidity. We love the way the crisp greens snap between your teeth, releasing a bright, earthy flavor that feels incredibly rejuvenating. The colors alone—deep emeralds, ruby reds, and sunny yellows—make the board pop with life. It’s the kind of dish that makes you feel good about what you’re eating, offering a garden-fresh aroma that reminds us of sunny afternoons and wholesome, nourishing ingredients.
Ingredients
- 4 cups Spring Mix or Arugula
- 1 cup Cherry Tomatoes, halved
- 1 Cucumber, thinly sliced
- 1/4 Red Onion, shaved
- 1/4 cup Feta Cheese crumbles
- 3 tbsp Extra Virgin Olive Oil
- 1 tbsp Lemon Juice
- Salt and Pepper to taste
How to make it
- Start by washing your greens in ice-cold water and drying them thoroughly using a salad spinner; moisture is the enemy of a crisp salad.
- In a small jar or bowl, whisk together the olive oil, fresh lemon juice, salt, and pepper until the dressing is emulsified and slightly thickened.
- Place the dried greens in a large wooden bowl and toss them lightly with half of the dressing to ensure every leaf is kissed with flavor.
- Layer the halved cherry tomatoes, cucumber slices, and shaved red onions over the top of the greens rather than mixing them in to maintain a beautiful presentation.
- Sprinkle the feta cheese crumbles evenly across the top, providing little pockets of salty creaminess.
- Just before serving on the board, drizzle the remaining dressing over the top to keep the vegetables looking glossy and vibrant.
How to grill perfect chicken?

Why we love this
Perfectly grilled chicken is the protein powerhouse of any great food board, offering a smoky charred exterior and a succulent, tender interior. The sound of the sizzle as the meat hits the grates is pure music, and the resulting aroma of caramelized spices is enough to draw anyone into the kitchen. We love how the heat of the grill transforms simple poultry into something deeply savory, with juices that run clear and a texture that is firm yet forgiving. It provides a satisfying heartiness that balances the lighter fruits and vegetables on the board.
Ingredients
- 1.5 lbs Chicken Breasts or Thighs
- 2 tbsp Olive Oil
- 1 tsp Smoked Paprika
- 1 tsp Garlic Powder
- 1/2 tsp Onion Powder
- Salt and Black Pepper
- Fresh Lemon Wedges
How to make it
- Ensure your chicken is at room temperature and pat it completely dry with paper towels to achieve the best sear and prevent steaming.
- Rub the chicken pieces thoroughly with olive oil, then coat evenly with the paprika, garlic powder, onion powder, salt, and pepper.
- Preheat your grill to medium-high heat (about 400°F) and clean the grates well to prevent sticking and ensure clean grill marks.
- Place the chicken on the grill and cook undisturbed for 5-7 minutes per side; look for the meat to release naturally from the grates when it’s ready to flip.
- Use a meat thermometer to check for an internal temperature of 165°F (74°C), ensuring the meat is cooked through but still exceptionally juicy.
- Remove the chicken from the grill and let it rest on a cutting board for at least 5 minutes to allow the juices to redistribute before slicing it into strips.
How to make easy wraps?

Why we love this
Wraps are the ultimate versatile handheld, allowing you to bundle all the flavors of the board into one perfect, portable bite. We love the contrast between the soft, pillowy flour tortilla and the crunchy, fresh fillings tucked inside. There is a tactile joy in rolling up a wrap, feeling the weight of the ingredients come together in a neat, satisfying package. They are endlessly customizable, making them a hit for guests who love to experiment with different textures and flavor profiles while keeping their hands relatively clean.
Ingredients
- Large Flour Tortillas
- Hummus or Herbed Mayo
- Sliced Deli Turkey or Grilled Chicken
- Shredded Lettuce
- Thinly sliced Bell Peppers
- Sprouts or Microgreens
How to make it
- Warm each tortilla briefly in a dry pan or microwave for 10 seconds to make them pliable and prevent them from cracking during the rolling process.
- Spread a thin, even layer of hummus or herbed mayo across the center of the tortilla, leaving about an inch of space around the edges.
- Layer your protein (turkey or chicken) in the lower third of the tortilla, followed by a handful of shredded lettuce and bell pepper strips.
- Top with a pinch of sprouts for a delicate crunch and a boost of nutrition.
- Fold the sides of the tortilla inward toward the center, then tightly roll from the bottom up, tucking the ingredients in as you go to create a firm cylinder.
- Slice the wraps on a sharp diagonal to showcase the colorful cross-section of ingredients before placing them on the food board.
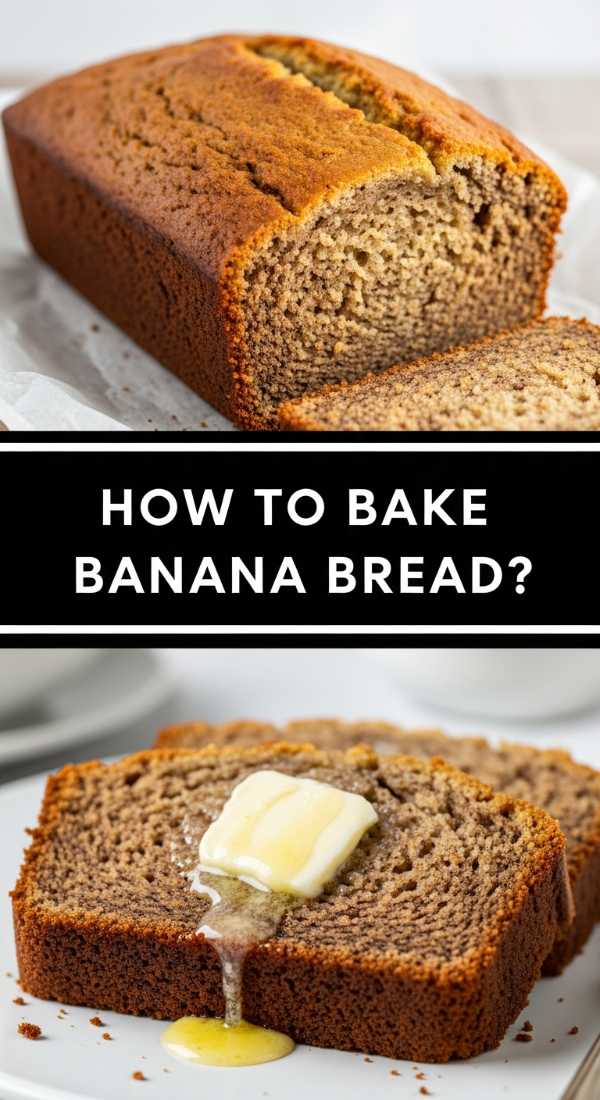
How to bake moist bread?
Why we love this
There is nothing quite as soul-warming as the scent of fresh bread baking in the oven; it fills the entire home with a sense of peace and abundance. We love the tactile experience of breaking into a loaf that has a crackly, golden crust and a soft, airy interior that practically melts on the tongue. The warmth of the bread is the perfect vehicle for cold dips or a simple smear of salted butter. It’s a sensory masterpiece that provides a rustic, artisanal feel to your viral food board, making everything feel a little more handmade and special.
Ingredients
- 3 cups All-Purpose Flour
- 1.5 cups Warm Water (110°F)
- 1 packet (2.25 tsp) Active Dry Yeast
- 1 tsp Salt
- 1 tbsp Honey or Sugar
- 2 tbsp Melted Butter (for brushing)
How to make it
- In a large bowl, combine warm water, honey, and yeast; let it sit for about 5-10 minutes until it becomes frothy, which indicates the yeast is active.
- Gradually stir in the flour and salt until a shaggy dough forms, then turn it onto a floured surface and knead for 8-10 minutes until smooth and elastic.
- Place the dough in a lightly oiled bowl, cover with a damp cloth, and let it rise in a warm, draft-free spot for 1 hour or until doubled in size.
- Gently punch down the dough to release air bubbles, shape it into a round loaf or baguette, and place it on a parchment-lined baking sheet for a second rise of 30 minutes.
- Preheat your oven to 400°F (200°C) and bake the bread for 25-30 minutes; the loaf should sound hollow when tapped on the bottom.
- Immediately brush the hot crust with melted butter for a soft finish and let it cool on a wire rack for at least 15 minutes before slicing.
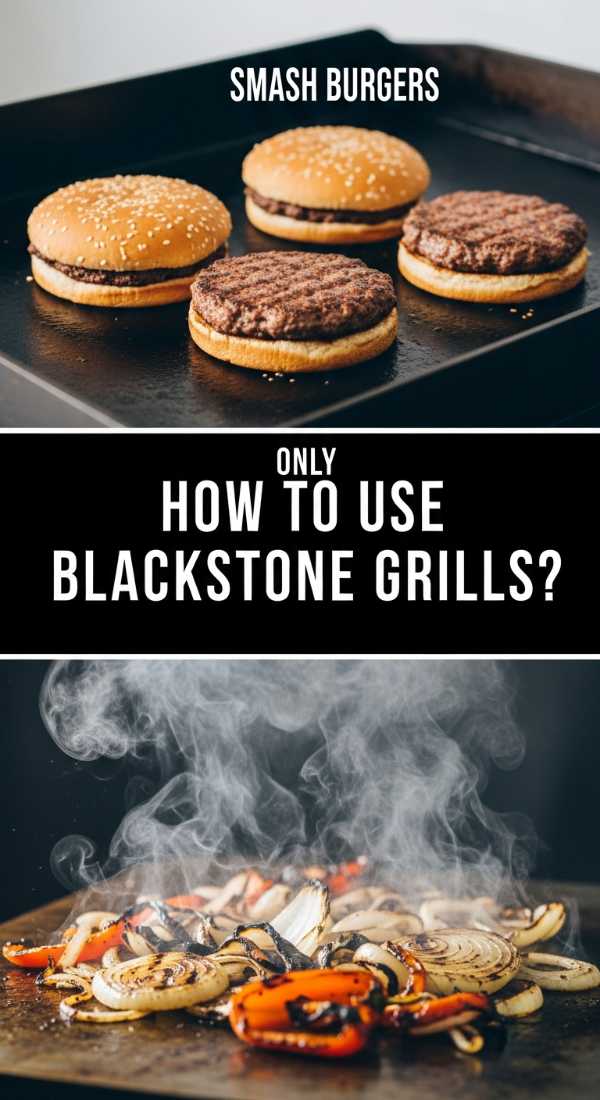
How to grill on blackstone?
Why we love this
Grilling on a Blackstone griddle is an outdoor cooking experience like no other, offering a massive surface area that allows you to cook multiple components of your board at once. We love the intense, even heat that creates a perfect ‘smash’ sear on meats and a beautiful caramelization on vegetables. The sound of the spatulas clinking against the cold steel and the sight of steam rising as you deglaze the surface is theatrical and exciting. It turns meal prep into an event, producing flavors that are bold, charred, and quintessentially summer.
Ingredients
- Assorted Vegetables (Zucchini, Onions, Peppers)
- Vegetable Oil or Butter
- Coarse Salt and Cracked Pepper
- Soy Sauce or Balsamic Glaze for finishing
How to make it
- Season your Blackstone griddle by heating it to high and applying a thin layer of oil, wiping it down until the surface is dark and non-stick.
- Turn the burners to medium-high heat and apply a generous swirl of oil or a pat of butter once the surface is shimmering.
- Spread your sliced vegetables across the griddle in a single layer, ensuring they have enough space to sear rather than steam.
- Use a long metal spatula to toss the vegetables every 2-3 minutes, looking for deep brown edges and a tender-crisp texture.
- Deglaze the cooking surface by splashing a bit of water or soy sauce near the vegetables and using the steam to finish the cooking process quickly.
- Scrape the finished food into a serving tray and immediately use a bench scraper to clean the griddle while it’s still hot, preparing it for the next round of cooking.
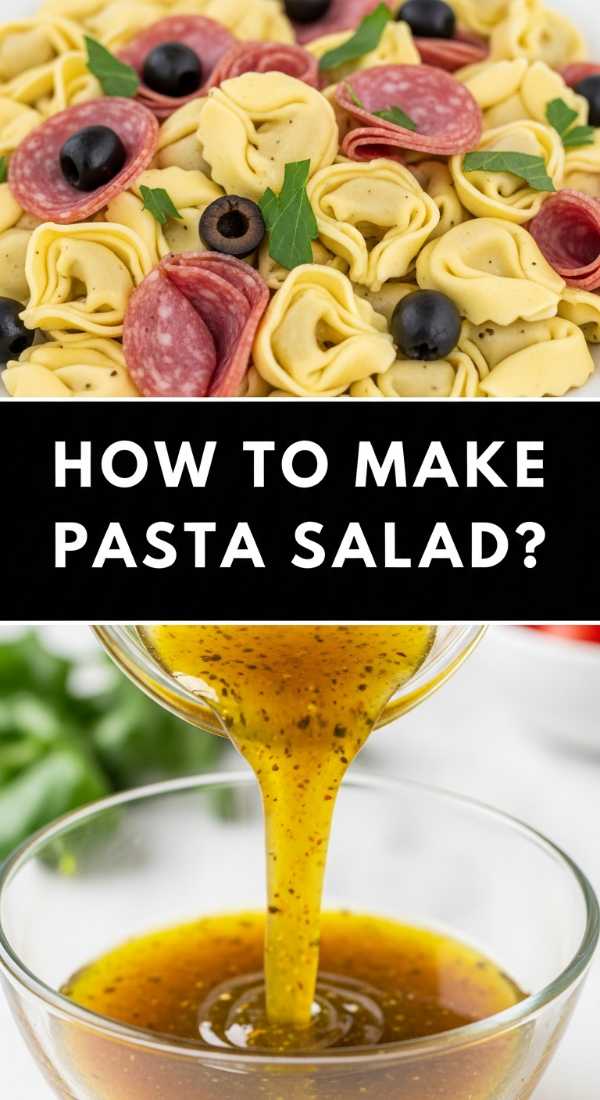
How to make pasta salad?
Why we love this
Pasta salad is the colorful, tangy workhorse of the food board, offering a satisfying bite that holds up beautifully over several hours. We love the way the rotini or bowties trap the zesty dressing in every nook and cranny, ensuring a burst of flavor in every forkful. The combination of al dente pasta, crunchy vegetables, and salty olives creates a wonderful symphony of textures. It’s a nostalgic dish that feels like a picnic in a bowl, providing a bright acidity that cuts through the richer meats and cheeses on your display.
Ingredients
- 1 lb Rotini or Tri-color Pasta
- 1/2 cup Italian Dressing
- 1 cup Diced Bell Peppers
- 1/2 cup Sliced Black Olives
- 1 cup Sliced Pepperoni or Salami
- 1/2 cup Cubed Provolone
How to make it
- Boil a large pot of heavily salted water and cook the pasta until it is just slightly past al dente; this ensures it stays tender after chilling.
- Drain the pasta and immediately rinse it under cold running water to stop the cooking process and remove excess starch.
- In a large mixing bowl, toss the cooled pasta with half of the Italian dressing to prevent the noodles from sticking together.
- Add the diced peppers, olives, pepperoni, and provolone cubes, stirring gently to distribute the ingredients evenly throughout the bowl.
- Cover and refrigerate for at least 2 hours; this allows the pasta to absorb the flavors of the dressing and the vegetables to marinate.
- Just before serving, add the remaining dressing and a quick stir to refresh the moisture and give the salad a beautiful, glossy sheen.
How to brew sun tea?

Why we love this
Sun tea is the ultimate slow-living beverage, harnessing the gentle power of the sun to create a drink that is smooth, mellow, and incredibly refreshing. We love the sight of the glass jar sitting on the porch, the water slowly turning a deep, amber hue as the tea leaves steep. Unlike boiled tea, sun tea lacks any bitterness, resulting in a clean, crisp flavor that captures the essence of a summer day. It is a visual and sensory reminder to slow down and let nature do the work, producing a drink that is as beautiful as it is delicious.
Ingredients
- 1 Gallon Filtered Water
- 8-10 Black or Green Tea Bags
- Fresh Mint Sprigs
- Lemon Slices
- Honey or Agave (optional)
How to make it
- Fill a large, clean glass gallon jar with filtered water, ensuring there is about an inch of headspace at the top.
- Place the tea bags into the water, hanging the strings over the side of the jar and securing them with the lid to keep them from submerged completely.
- Place the jar in a spot that receives direct, intense sunlight for 3 to 5 hours; you will see the tea slowly diffuse through the water in beautiful ribbons.
- Once the tea has reached your desired strength and color, remove the tea bags immediately to prevent any over-extraction.
- Stir in your sweetener of choice while the tea is still slightly warm from the sun, then add fresh mint and lemon slices for an aromatic boost.
- Transfer the jar to the refrigerator to chill completely, then serve over plenty of ice in tall glasses for the most refreshing experience.
How to make strawberry pie?

Why we love this
A strawberry pie is a celebration of seasonal sweetness, featuring a flaky, buttery crust that shatters upon impact and a vibrant, ruby-red filling. We love the way the cooked berries break down into a jammy consistency while the fresh ones on top provide a bright, tart pop of flavor. The aroma of baking pastry and sugared fruit is intoxicating, creating a sense of homemade comfort that is hard to beat. It is the perfect sweet finale to a food board, offering a slice of summer that is both nostalgic and sophisticated.
Ingredients
- 1 Pre-baked Pie Crust
- 4 cups Fresh Strawberries, hulled
- 3/4 cup Sugar
- 3 tbsp Cornstarch
- 1 cup Water
- 1 small box Strawberry Gelatin
How to make it
- Mash 1 cup of the strawberries in a small saucepan and combine with the sugar, cornstarch, and water over medium heat.
- Cook the mixture, stirring constantly, until it reaches a boil and thickens into a clear, glossy glaze; this usually takes about 3-5 minutes.
- Remove from heat and stir in the strawberry gelatin powder until completely dissolved, then let the glaze cool to room temperature.
- Arrange the remaining 3 cups of whole or halved fresh strawberries into your pre-baked and cooled pie crust, packing them tightly.
- Pour the cooled gelatin glaze evenly over the fresh berries, ensuring every crevice is filled and the fruit is completely coated.
- Refrigerate the pie for at least 4 hours, or until the filling is firmly set, before slicing and serving with a dollop of fresh whipped cream.
How to make healthy snacks?
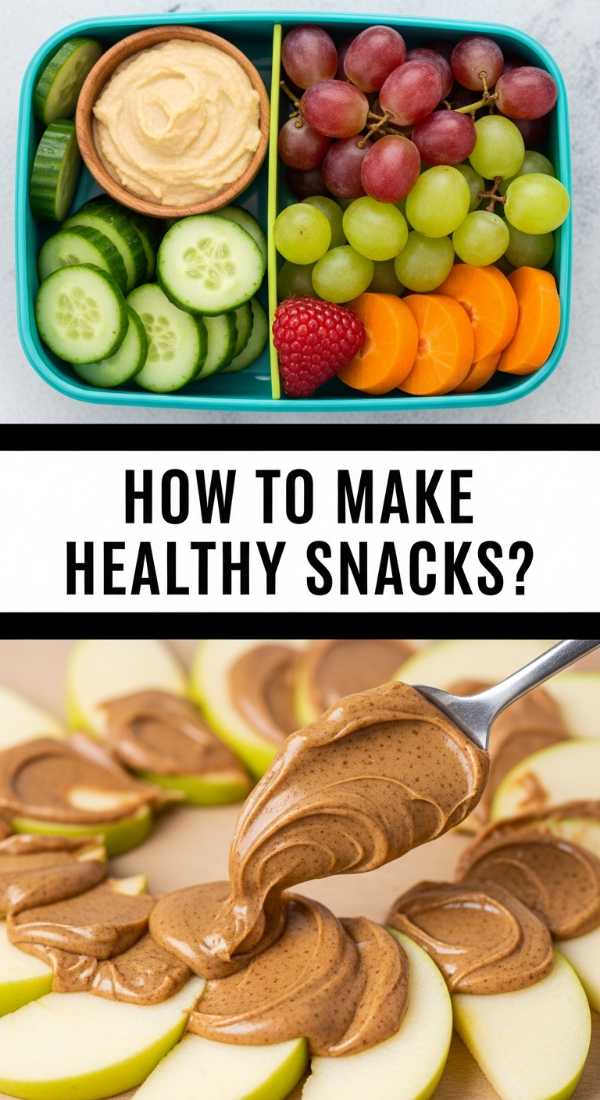
Why we love this
Healthy snacks add a vital element of crunch and guilt-free grazing to your viral board, ensuring there is something for everyone to enjoy. We love the snap of raw carrots, the earthy richness of roasted nuts, and the juicy sweetness of fresh grapes. These snacks provide a rainbow of nutrients and a variety of textures that keep the palate engaged without feeling heavy. They are the ‘fillers’ that make the board look abundant and lush, offering a natural beauty that only whole, unprocessed foods can provide.
Ingredients
- Baby Carrots and Celery Sticks
- Raw Almonds or Walnuts
- Red and Green Grapes
- Apple Slices (tossed in lemon)
- Roasted Chickpeas
- Dark Chocolate Squares
How to make it
- Prep your vegetables by slicing them into uniform sticks or batons, which makes them easier to dip and more visually appealing on the board.
- Toss apple slices in a mixture of water and lemon juice for 30 seconds to prevent oxidation and keep them looking bright and fresh for hours.
- Arrange the grapes in small clusters rather than individual berries to add height and a sense of ‘vine-ripened’ abundance to the display.
- Place small bowls filled with nuts and roasted chickpeas in various spots on the board to act as anchors and provide easy-to-grab salty bites.
- Fill the remaining gaps with the vegetable sticks, tucking them into the dip or layering them in a fan shape.
- Add a few squares of high-quality dark chocolate near the fruit sections to offer a small, healthy indulgence that satisfies a sweet tooth.
Conclusion
Building a viral food board is less about following a strict set of rules and more about embracing the textures and flavors you love. Whether it’s the gooey pull of a cheese dip or the refreshing snap of sun tea, these elements come together to create a dining experience that is as beautiful as it is delicious. So, grab your largest platter, gather your favorite people, and start building your own masterpiece!