

Have you ever spent hours scrolling through those perfectly curated home tours, sighing at the effortless beauty of a wrap-around porch or a perfectly organized garden? I’ve been there, clutching my lukewarm coffee and looking at my own ‘fixer-upper’ wondering if I’d ever find the time or the budget to make it feel like me. We often think that a dream home requires a massive renovation and a celebrity-sized bank account, but I’ve learned that the most viral-worthy transformations actually happen in the small, intentional details we create with our own two hands.
Today, I’m pulling back the curtain on some of my favorite home and garden projects that have taken the internet by storm—and for good reason! These aren’t just for show; they are practical, soul-filling DIYs that turn the mundane into the magical. Whether you’re looking to boost your curb appeal or create a playful corner for the kids, these projects are designed to be accessible, rewarding, and undeniably dreamy. Let’s roll up our sleeves and start turning that ‘someday’ list into a ‘today’ reality!
How to Maintain a Clean Chicken Coop for Happy Healthy Hens
Why we love this
There is nothing quite like the crisp, earthy scent of fresh pine shavings mingled with the soft, rhythmic clucking of content hens on a sunny morning. A clean coop isn’t just about aesthetics; it’s the heart of a healthy backyard homestead where the texture of clean straw and the absence of dust create a sanctuary for your feathered friends. Stepping into a well-maintained coop feels organized and purposeful, providing a peaceful ritual that connects you to the cycle of nature while ensuring your morning eggs are as pristine as they are delicious.
Essential Elements:
- High-quality pine shavings or hemp bedding
- Stiff-bristled scrubbing brush
- Natural coop cleaner (vinegar and citrus based)
- Diatomaceous earth (food grade)
- Properly fitted scrapers or hoes
- Ventilation window mesh
How to make it
- Begin by removing all old bedding with a wide hoe or scraper, ensuring you reach the deep corners where moisture tends to collect. You want to see the bare floor of the coop before proceeding.
- Use a stiff brush to scrub the nesting boxes and roosting bars. Apply a mixture of water and white vinegar to break down any stubborn debris. Professional tip: Add dried lavender or mint to the cleaning spray for a natural antibacterial boost and a calming aroma.
- Inspect the coop for any signs of dampness or pests. Sprinkle a light layer of food-grade diatomaceous earth over the floor and in the nesting boxes to deter mites and lice naturally.
- Spread fresh bedding at least 3-4 inches deep. If using the ‘deep litter method,’ ensure you turn the bedding regularly to facilitate composting and prevent ammonia buildup.
- Clear any cobwebs from the ventilation vents to ensure maximum airflow, which is critical for respiratory health in chickens. Finish by refreshing the nesting box straw so it’s fluffy and inviting for egg-laying.
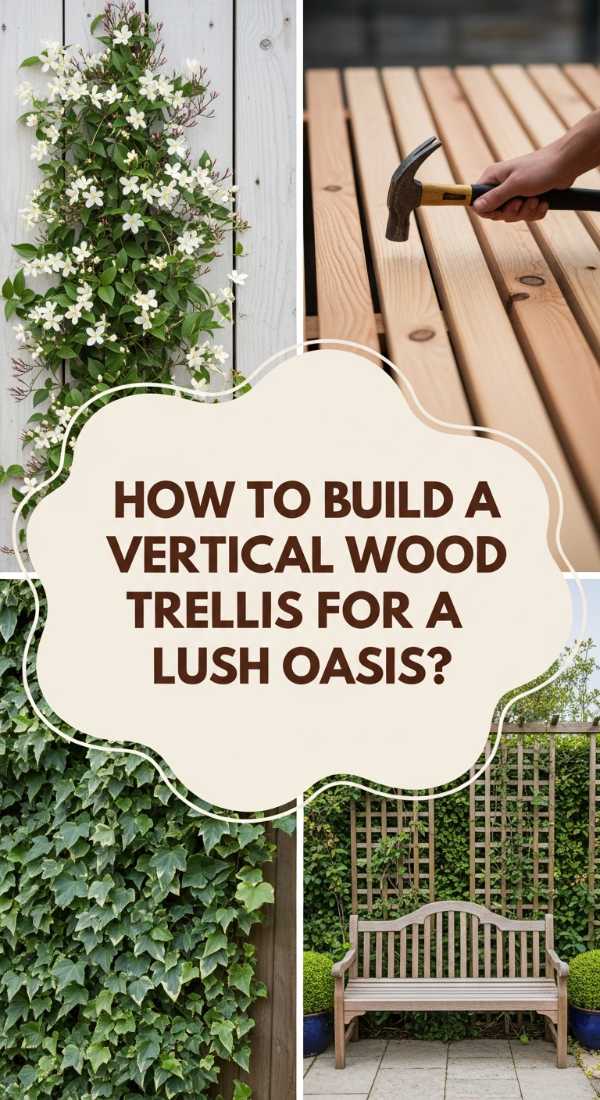
How to Build a Vertical Wood Trellis for a Lush Garden Oasis

Why we love this
Imagine a wall of living emerald green rising up against your patio, where the delicate tendrils of jasmine or clematis weave through warm, honey-toned cedar slats. This project transforms a flat, boring wall into a three-dimensional masterpiece that captures the light and filters the breeze, bringing a sense of privacy and enchantment to your outdoor space. The rough-hewn texture of the wood paired with the soft, velvet leaves of climbing vines creates a sensory contrast that makes your garden feel like a hidden Mediterranean retreat.
Essential Elements:
- Rot-resistant cedar or pressure-treated 1×2 boards
- Outdoor-rated wood glue
- Galvanized finish nails or screws
- Exterior wood stain or sealant
- Drill and miter saw
- Measuring tape and level
How to make it
- Measure your vertical space and decide on the dimensions of your trellis. A classic 2×6 foot frame works well for most garden walls. Cut your outer frame boards at 45-degree angles for a professional, mitered look.
- Assemble the outer frame using wood glue and galvanized screws. Ensure the frame is perfectly square by measuring diagonally from corner to corner; the numbers should be identical.
- Lay out your horizontal and vertical slats to create a grid or chevron pattern. Space them consistently—usually 4 to 6 inches apart—to allow plenty of room for plant stems to wrap around the wood.
- Secure each slat with a drop of glue and two finish nails at every intersection. This cross-bracing makes the structure incredibly sturdy against wind and the weight of heavy vines.
- Sand any rough edges and apply a high-quality exterior stain. When mounting to a wall, use spacers (like small blocks of wood) behind the trellis to leave a 1-inch gap; this allows air to circulate and prevents the plants from trapping moisture against your siding.
How to Update a Retro Ranch Exterior for Modern Curb Appeal

Why we love this
The transformation of a dated exterior is like watching a house finally wake up and smile at the neighborhood. There is a profound satisfaction in seeing tired brick or faded siding come to life with a fresh, modern palette of charcoals, creams, or sage greens that highlight the architectural lines of a classic ranch. When you touch the smooth, matte finish of a newly painted door or see the sharp contrast of modern black hardware, the home feels reborn, radiating a welcoming energy that says ‘well-loved’ from the very first glance.
Essential Elements:
- High-quality exterior masonry or siding paint
- Modern house numbers (floating style)
- Updated outdoor light fixtures
- Sanding block and tack cloth
- Painter’s tape and heavy-duty drop cloths
- High-grade paint sprayer or professional rollers
How to make it
- Start with a thorough power wash of the entire exterior to remove decades of dust, chalking paint, and grime. This is the most critical step for ensuring paint adhesion and a professional finish.
- Scrape away any peeling paint and sand the surfaces smooth. Fill any cracks in brick or siding with appropriate exterior-grade caulk to create a seamless canvas for your new color.
- Mask off windows, soffits, and walkways with precision. Using a paint sprayer will provide the most ‘viral’ look—a smooth, factory-like finish that rollers simply can’t replicate. Apply a high-quality primer if you are making a dramatic color shift.
- Apply two coats of your chosen exterior paint, allowing ample drying time between layers. Opt for a satin finish on the main body and a semi-gloss on the trim to create subtle depth and dimension.
- Swap out dated ‘builder-grade’ hardware for modern pieces. Install oversized matte black house numbers and a contemporary light fixture to instantly elevate the home’s aesthetic. The contrast of the new hardware against the fresh paint is the ultimate ‘wow’ factor.
How to Create Radiant Glass Yard Art for a Sparkling Garden
Why we love this
When the afternoon sun hits these handcrafted glass totems, your garden transforms into a shimmering gallery of light and color that dances across the lawn. There is a whimsical, vintage charm in repurposing forgotten glass plates and bowls, stacking them into towers that catch the light like giant jewels. The smooth, cool touch of the glass and the way it refracts the spectrum of a sunset brings a playful, artistic energy to your flower beds, making every stroll through the yard feel like a visit to a magical, sun-drenched wonderland.
Essential Elements:
- Assorted glass plates, bowls, and vases (thrifted or vintage)
- E6000 industrial-strength clear adhesive
- Threaded metal rods (for the base)
- Glass drill bit (if nesting on a rod)
- Rubbing alcohol for cleaning
- Level surface for curing
How to make it
- Spend an afternoon at local thrift stores hunting for glass pieces with interesting textures and colors. Look for sun-catchers, heavy glass bowls, and uniquely shaped vases that will stack securely.
- Thoroughly clean every piece of glass with rubbing alcohol to remove oils and price tag residue. This ensures the strongest possible bond for the adhesive, which is vital for outdoor durability.
- Experiment with stacking your pieces on a flat table before gluing. Place larger, heavier items at the bottom for stability and use delicate, colorful pieces toward the top to catch the most sunlight.
- Apply a generous bead of E6000 adhesive to the contact points between the glass layers. Press firmly and use a level to ensure the stack isn’t leaning. Tip: If you live in a windy area, drill a hole through the center of the pieces using a diamond-tipped glass bit and thread them onto a metal rod.
- Allow the art to cure for a full 48 to 72 hours in a dry, room-temperature environment before moving it outside. Once cured, the bond is waterproof and ready to withstand the elements, glowing beautifully in your garden.
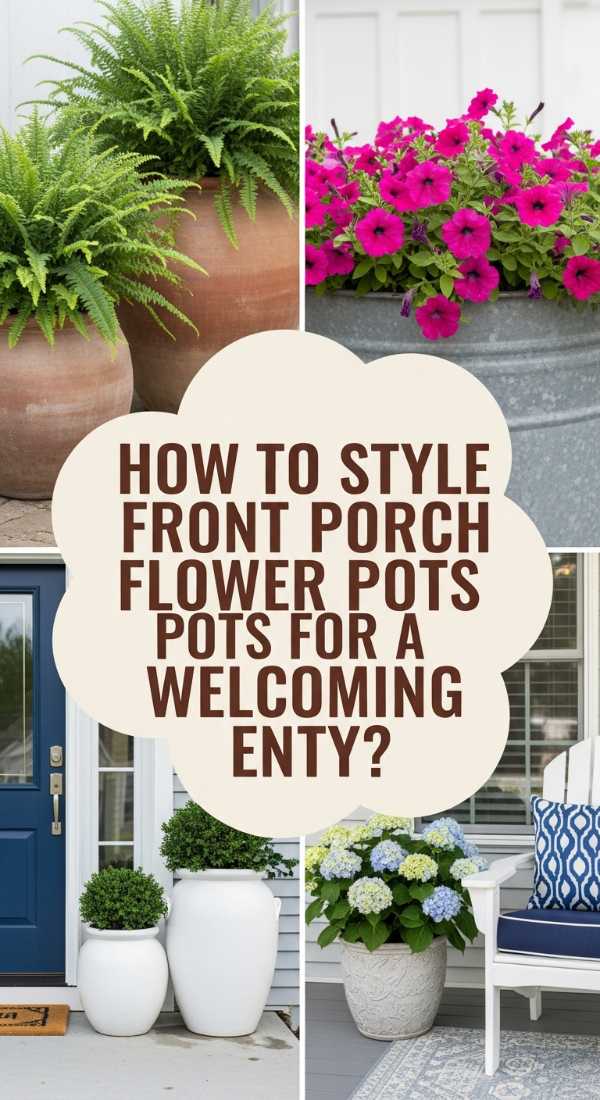
How to Style Front Porch Flower Pots for a Welcoming Entryway

Why we love this
A well-styled porch pot is more than just a plant; it’s a living greeting that sets the tone for your entire home. The vibrant explosion of color from seasonal blooms, the soft trail of ivy spilling over the rim, and the height of a dramatic spike or fern create a balanced, professional look that feels lush and intentional. Brushing past the fragrant leaves of rosemary or the sweet scent of petunias as you walk through the front door provides an instant sensory reset, grounding you in the beauty of the present moment.
Essential Elements:
- Large, weather-resistant planters
- High-quality potting mix with perlite
- ‘Thriller’ plants (Dracaena, Canna Lily, or Grasses)
- ‘Filler’ plants (Geraniums, Petunias, or Lantana)
- ‘Spiller’ plants (Sweet Potato Vine or Creeping Jenny)
- Slow-release fertilizer granules
How to make it
- Select a planter that is proportionate to your front door; oversized pots generally look more ‘viral’ and expensive. Ensure there are adequate drainage holes at the bottom to prevent root rot.
- Fill the pot with high-quality potting soil, leaving about 3 inches of space from the top. Mix in slow-release fertilizer to keep your plants vibrant throughout the entire growing season.
- Place your ‘Thriller’—the tallest, most dramatic plant—in the center or the back of the pot. This provides the vertical focal point that draws the eye upward.
- Surround the thriller with ‘Fillers.’ These are mid-height plants that add volume and color. Plant them closely enough that the soil is covered, creating a full, mounded appearance.
- Incorporate ‘Spillers’ around the edges of the pot. These trailing plants will grow downward, softening the hard lines of the container and adding a sense of movement. Water immediately and deeply until water runs out the bottom of the pot.
How to Build a Custom Grill Station for Affordable Outdoor Cooking

Why we love this
There is a primal joy in cooking outdoors, and a custom grill station turns a simple barbecue into a high-end culinary experience. The aroma of searing steaks and charred vegetables becomes even more delightful when you have a dedicated space featuring smooth stone countertops and the warm, rustic texture of stained wood. Having all your tools organized and at your fingertips makes the process feel effortless, allowing you to focus on the sizzle of the fire and the laughter of friends gathered around the patio, creating a professional-grade kitchen vibe without the luxury price tag.
Essential Elements:
- Pressure-treated 4x4s for the frame
- Cedar or composite decking boards for siding
- Heat-resistant countertop (Concrete, Granite, or Tile)
- Stainless steel hooks and magnetic tool strips
- Heavy-duty locking casters (optional for mobility)
- Outdoor-rated wood sealant
How to make it
- Design your frame based on the height and width of your specific grill. Build the skeleton using 4×4 pressure-treated posts and 2×4 cross-beams, ensuring everything is level and sturdy enough to support a heavy countertop.
- Sheath the sides of the station with cedar planks or composite boards for a clean, modern look. Use exterior-grade pocket hole screws for hidden joinery, which gives the piece a professional, high-end furniture feel.
- Install a heat-resistant top. If using concrete, you can pour it into a custom mold for a sleek, industrial look. Ensure there is a 1-2 inch clearance around the grill itself to allow for heat dissipation and expansion.
- Add functional details like a built-in bottle opener, stainless steel hooks for your tongs and spatulas, and a shelf for charcoal or wood chips. A magnetic strip is a viral-favorite for keeping knives and metal tools within reach.
- Sand the wood thoroughly and apply a weather-resistant stain or sealer. If you want the station to be moveable, attach heavy-duty locking casters to the bottom of the legs, allowing you to reposition your cooking hub as the sun moves.
How to Design Stunning Flower Beds for an Enchanting Home Front

Why we love this
A perfectly designed flower bed is like a living tapestry that changes its colors and textures with every passing month. The soft, pillowy mounds of hydrangeas contrasting against the sharp architectural spikes of salvia create a visual rhythm that is deeply satisfying to the soul. Walking past a garden that has been thoughtfully layered feels like stepping into a storybook, where the scent of damp earth and blooming jasmine fills the air, and the vibrant hues of the petals seem to glow against the dark, rich backdrop of fresh mulch.
Essential Elements:
- Garden spade and edging tool
- Landscape fabric (optional) or heavy cardboard for weed barrier
- Soil amendments (compost, peat moss, or aged manure)
- High-quality hardwood mulch
- Variety of perennials and annuals (staggered heights)
- Soaker hoses for efficient watering
How to make it
- Define the shape of your flower bed using a garden hose to create soft, organic curves. Use a sharp edging tool to cut a clean line into the grass, removing the turf to expose the bare soil beneath.
- Amend the soil by tilling in several inches of organic compost and aged manure. Professional landscapers know that the secret to viral-worthy blooms isn’t the plant itself, but the nutrient-rich ‘black gold’ soil it grows in.
- Plan your layout before digging. Place taller plants in the back, medium-height plants in the middle, and low-growing groundcovers at the front. This ‘theatrical’ staggering creates depth and ensures every plant is visible.
- Space the plants according to their mature size, not their current size in the nursery pot. While it might look sparse initially, proper spacing prevents disease and allows the garden to fill out beautifully over one or two seasons.
- Install a soaker hose system at the base of the plants for deep, root-level watering. Finish by applying a 3-inch layer of dark mulch. This suppresses weeds, retains moisture, and provides that crisp, professional ‘finished’ look that makes garden photos pop.
How to Curate the Perfect Mud Kitchen for Imaginative Outdoor Play
Why we love this
There is a beautiful, messy magic in a mud kitchen, where the grainy texture of wet sand and the smooth surface of river stones become the ingredients for a world of imagination. Watching a child ‘cook’ with twigs, flower petals, and water is a reminder of the simple joys of childhood, and the rustic charm of a mini-kitchen made from natural wood fits perfectly into any backyard. The sound of water splashing into a stainless steel sink and the sight of little hands covered in earth is a sensory celebration of play that fosters creativity and a deep love for the outdoors.
Essential Elements:
- Wooden pallets or scrap cedar boards
- Standard-size stainless steel mixing bowl (for the sink)
- Outdoor faucet or pump (optional)
- Assorted old pots, pans, and wooden spoons
- Chalkboard paint for ‘menus’
- Weatherproof wood glue and screws
How to make it
- Build a sturdy base using repurposed pallets or cedar 2x4s. The counter height should be roughly 20-24 inches, depending on the age of the children using it. Ensure all wood is sanded excessively smooth to prevent splinters.
- Cut a circular hole in the countertop that is slightly smaller than the lip of your stainless steel bowl. Drop the bowl in to create a removable ‘sink’ that can be easily cleaned and refilled with fresh ‘cooking’ water.
- Install a backboard and attach small hooks for hanging utensils. Using chalkboard paint on a section of the backboard allows kids to write daily menus or specials, adding an extra layer of interactive play.
- Incorporate ‘burners’ by painting black circles on the countertop or using round wood slices glued to the surface. Old stove knobs attached with screws that allow them to turn add a satisfying tactile element for little chefs.
- Finish the wood with a non-toxic, water-based sealant. Set up the kitchen in a shaded area of the yard and provide a nearby ‘pantry’ of natural items like pinecones, acorns, and pebbles to kickstart the imaginative culinary adventures.
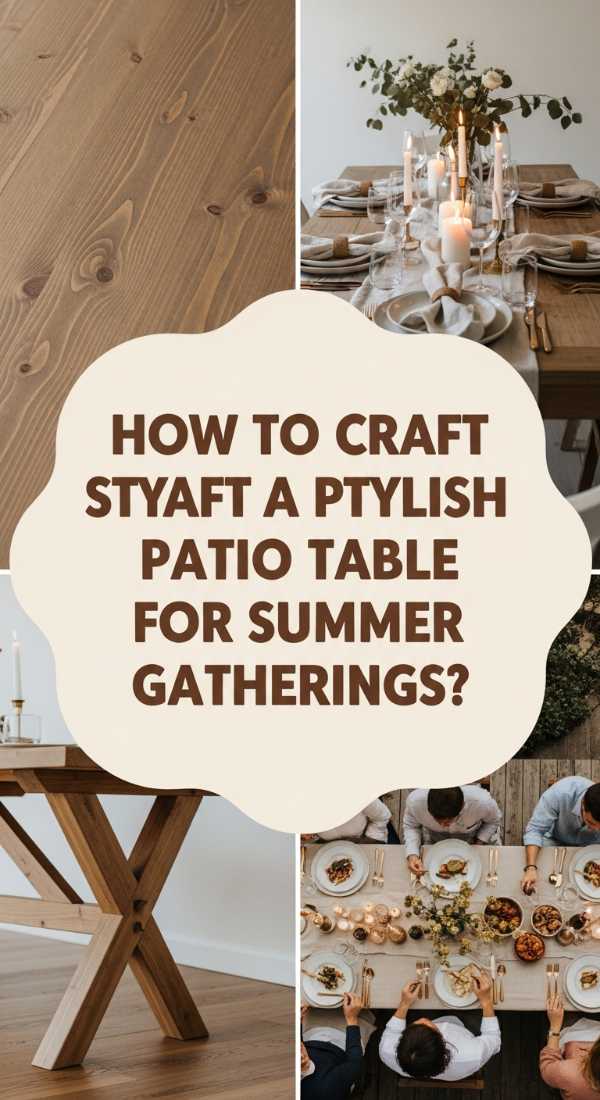
How to Craft a Stylish Patio Table for Summer Evening Gatherings

Why we love this
The centerpiece of any outdoor gathering is the table where stories are shared over chilled drinks and the soft glow of candlelight. Building your own patio table allows you to create a piece that feels substantial and artisanal, with the smooth, cool grain of the wood providing a perfect surface for summer feasts. There is an incredible sense of pride when you run your hand across a tabletop you’ve sanded to perfection, knowing that the laughter and memories created around it are supported by your own craftsmanship and vision.
Essential Elements:
- Thick cedar or teak planks (standard 2x6s work well)
- Pocket hole jig and screws
- Exterior wood glue
- Heavy-duty table legs (wooden or industrial metal)
- Sander with multiple grit papers (80 to 220)
- UV-resistant polyurethane or outdoor oil
How to make it
- Select the straightest boards available, as any warping will be amplified in a large tabletop. Cut your planks to your desired length—usually 6 to 8 feet for a standard dining table.
- Use a pocket hole jig to drill holes every 8-10 inches along the sides of the boards. Apply a bead of exterior wood glue along the edges and clamp the boards together tightly before driving in your pocket screws.
- For the base, you can build a matching wooden trestle or purchase industrial metal X-frame legs for a modern, viral-worthy aesthetic. Ensure the base is wide enough to prevent the table from tipping when someone leans on the edge.
- The secret to a high-end finish is the sanding process. Start with a coarse 80-grit sandpaper and move progressively to 220-grit. Wipe away all dust with a tack cloth between every single grit change to ensure a glass-smooth surface.
- Apply at least three coats of a UV-resistant outdoor finish. If you want a natural look, use a high-quality outdoor oil that penetrates the grain. If you prefer a glossy, protected surface, opt for a ‘spar urethane’ which flexes with the temperature changes to prevent cracking.
How to Make a Decorative Vent Cover for a Seamless Interior Look
[IMAGE_10]
Why we love this
Sometimes the most impactful projects are the ones that make a jarring detail disappear into the background. Replacing a cold, industrial metal vent with a custom wood or patterned cover adds a layer of sophistication and warmth that elevates an entire room. The intricate geometric patterns of a laser-cut screen or the clean lines of a custom-stained slat cover provide a tactile, high-end feel that makes your home look like it was designed by a professional, turning a functional necessity into a subtle work of art.
Essential Elements:
- Decorative metal or laser-cut wood screen
- Thin wood molding or trim (matching your baseboards)
- Miter box and hand saw
- Rare-earth magnets or finish nails
- Wood stain or paint to match existing trim
- Measuring tape and pencil
How to make it
- Measure the interior dimensions of your vent opening. You want the decorative screen to be slightly larger than the hole, while the outer frame should align with your baseboards or wall trim for a built-in look.
- Cut your decorative screen to size. If using a metal sheet, use tin snips; if using wood, a fine-tooth saw works best. Ensure the pattern is centered so it looks intentional and balanced.
- Construct a simple ‘picture frame’ using thin molding. Miter the corners at 45 degrees for a clean, professional joint. Glue and nail the frame together, then secure the decorative screen to the back of the frame.
- Match the finish of your new cover to the surrounding area. If it’s on a baseboard, use the exact same paint color and sheen. If it’s on a wood floor, use a matching stain to make the vent ‘disappear’ into the architecture.
- For easy access to change air filters, use rare-earth magnets to attach the cover to the vent ducting. This allows you to pop the cover off effortlessly without the need for tools or visible screws, keeping the aesthetic perfectly seamless.
Conclusion
Creating a home that feels like a sanctuary doesn’t happen all at once; it’s a collection of small victories, dusty hands, and the satisfaction of seeing a vision come to life. These viral projects are more than just trends—they are opportunities to pour your personality into your surroundings and create spaces that truly serve your lifestyle. I hope these guides inspire you to pick up a brush or a drill this weekend and start crafting the dreamy home you’ve always wanted. Remember, the most beautiful homes aren’t just built; they’re curated with love, one DIY at a time.