

There is something undeniably magical about the moment you set a beautifully curated food board in the center of the table. It’s more than just a meal; it’s an invitation to linger, to share stories, and to celebrate the art of slow living. In a world that moves so fast, these boards represent a pause button—a vibrant tapestry of textures and flavors that spark conversation before the first bite is even taken. Whether it’s the golden glow of a freshly baked scone or the intricate pleats of a handmade dumpling, every element tells a story of care and creativity.
I remember the first time I hosted a brunch with a massive, overflowing board. The room was filled with the scent of browned butter and fresh citrus, and the look on my friends’ faces was pure joy. That’s the power of the ‘Viral Food Board.’ It’s about taking simple, soulful recipes and presenting them with an aesthetic flair that is as pleasing to the eye as it is to the palate. Today, I’m sharing my secrets for crafting the ultimate board that will not only feed your loved ones but also become the star of your social media feed.
How to Bake Buttery Golden Scones for a Perfect Morning Tea

Why we love this
There is nothing quite like the aroma of cold butter meeting a hot oven, filling your kitchen with a scent that feels like a warm hug. These scones boast a remarkably crisp, golden-brown exterior that shatters slightly when you bite into it, revealing an interior so soft and tender it practically melts away. The subtle sweetness is perfectly balanced by the rich, savory depth of high-quality butter, making them the ultimate vessel for a dollop of thick clotted cream and a spoonful of tart raspberry jam. Every bite is a luxurious journey through texture, from the crunchy sugar-sprinkled tops to the pillowy, layered crumb within.
Essential Elements:
- All-purpose flour
- Cold unsalted butter, cubed
- Granulated sugar
- Baking powder and salt
- Heavy cream
- One large egg
- Coarse sanding sugar for the topping
How to make it
- Begin by whisking your dry ingredients—flour, sugar, baking powder, and salt—in a large chilled bowl to ensure even distribution and aeration.
- Take your ice-cold, cubed butter and work it into the flour mixture using a pastry cutter or your fingertips; you want to achieve a texture where the butter pieces are the size of peas, which creates those sought-after flaky layers.
- In a separate measuring cup, whisk together the heavy cream and egg, then pour it into the center of the flour well, stirring gently with a fork just until the dough begins to come together.
- Turn the shaggy dough onto a lightly floured surface and fold it over itself 3 or 4 times—this ‘lamination’ technique builds height without overworking the gluten, which would make the scones tough.
- Pat the dough into a 1-inch thick circle, cut into 8 wedges, and brush the tops with extra cream and a heavy sprinkle of sanding sugar for that professional bakery crunch.
- Bake at 400°F (200°C) for 18-22 minutes, or until the edges are deeply golden and the scones have risen significantly; let them cool slightly on the pan to set the structure before serving warm.
How to Make Safe Edible Cookie Dough for a Sweet Late Night Snack

Why we love this
We all share that nostalgic craving for the raw dough at the bottom of the mixing bowl, and this version lets you indulge without a single worry. The texture is a dream—gritty with organic sugar crystals yet incredibly smooth and fudge-like thanks to the whipped butter and splash of milk. As you fold in the chocolate chips, the aroma of pure Madagascar vanilla extract wafts up, promising a decadent experience that is both comforting and sophisticated. It is the ultimate late-night companion, whether enjoyed by the spoonful under a cozy blanket or served in elegant mini-ramkins for a sophisticated dessert board.
Essential Elements:
- All-purpose flour (must be heat-treated)
- Unsalted butter, softened
- Light brown sugar and granulated sugar
- Milk or heavy cream
- Vanilla extract
- Mini semi-sweet chocolate chips
- A pinch of sea salt
How to make it
- The most critical safety step is heat-treating the flour: spread it on a baking sheet and bake at 350°F for about 5-7 minutes until it reaches 160°F, then let it cool completely and sift it to remove any clumps.
- In a stand mixer or with a hand mixer, cream together the softened butter with both sugars for at least 3 minutes on medium-high speed until the mixture is pale, light, and doubled in volume.
- Add the vanilla extract, sea salt, and 2 tablespoons of milk, mixing until fully incorporated and the texture feels like a spreadable frosting.
- Reduce the mixer speed to low and gradually add the heat-treated flour, mixing just until no white streaks remain to avoid a gummy consistency.
- Fold in the mini chocolate chips by hand using a rubber spatula, ensuring they are evenly distributed throughout the dense, sweet dough.
- If the dough is too stiff, add milk one teaspoon at a time until you reach your desired ‘spoonable’ consistency; serve immediately or chill for 30 minutes for a firmer, scoopable texture.
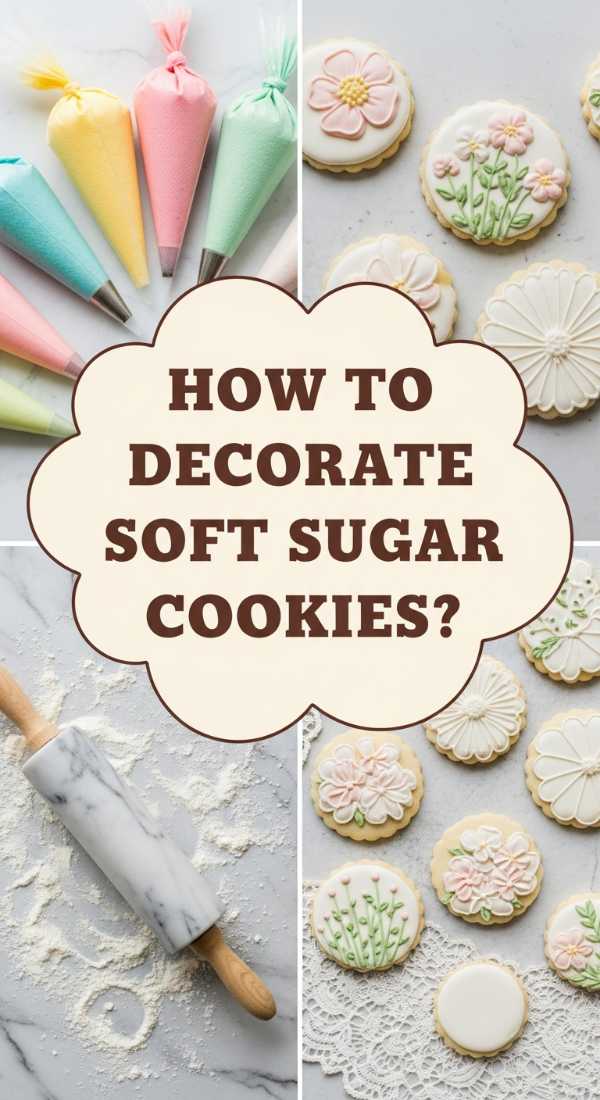
How to Decorate Soft Sugar Cookies for an Elegant Garden Party
Why we love this
Sugar cookies are the ultimate canvas for edible art, offering a buttery, soft bite that provides a gentle snap before giving way to a tender center. When decorated with royal icing, they transform into miniature masterpieces that capture the whimsical essence of a blooming garden. The smooth, matte finish of the icing contrasted with delicate floral piping creates a visual depth that is almost too beautiful to eat. There is a profound sensory satisfaction in the way the crisp icing layer breaks to reveal the sweet, vanilla-scented cookie underneath, making these the perfect centerpiece for a high-tea inspired food board.
Essential Elements:
- Baked and cooled sugar cookies
- Royal icing (meringue powder, powdered sugar, water)
- Gel food coloring (pastel tones)
- Piping bags and small round tips
- Toothpicks or a scribe tool
- Edible gold leaf (optional)
How to make it
- Prepare your royal icing to two consistencies: a thick ‘outline’ consistency that holds a peak, and a thinner ‘flood’ consistency that disappears into itself after 10 seconds of stirring.
- Outline the edge of your cooled cookie using the thick icing and a #2 piping tip, creating a dam that will prevent the thinner icing from spilling over the sides.
- Immediately fill the center with the flood icing, using a scribe tool or toothpick to pop any tiny air bubbles and push the icing into every corner for a perfectly flat surface.
- Allow the base layer to dry completely (this usually takes 6-12 hours in a dry environment) before you begin the decorative floral work to prevent the colors from bleeding.
- Using the thick consistency icing tinted in various shades, pipe small rosettes or leaf patterns onto the hardened base, varying the pressure on the bag to create realistic petal shapes.
- Finish with a tiny touch of edible gold leaf or a dusting of luster dust to give the cookies a sophisticated, ethereal glow that catches the light beautifully.
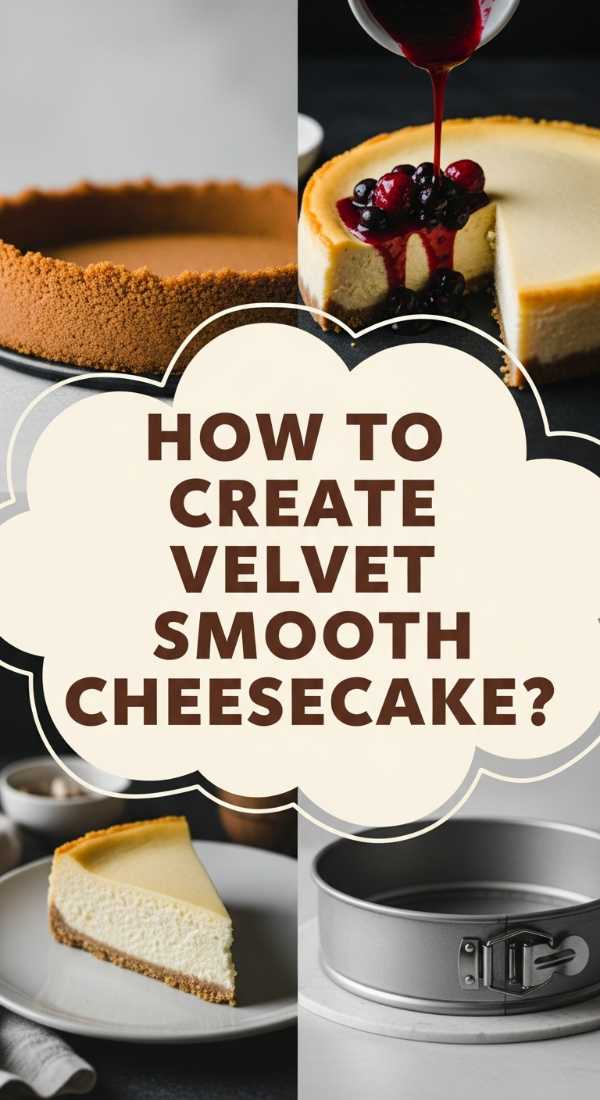
How to Create Velvet Smooth Cheesecake for an Impressive Dinner Finale
Why we love this
A perfect cheesecake is a masterclass in balance—rich yet light, tangy yet sweet, with a crust that provides the perfect earthy crunch against a cloud-like filling. This velvet-smooth version is defined by its incredibly dense, creamy texture that coats the palate in a wave of vanilla and cultured cream. It lacks the graininess of lesser cakes, instead offering a silken mouthfeel that feels undeniably expensive and indulgent. Served on a board with fresh berries and a drizzle of coulis, it becomes a show-stopping finale that leaves guests marveling at its flawless, crack-free surface and sophisticated flavor profile.
Essential Elements:
- Full-fat cream cheese, room temperature
- Granulated sugar
- Sour cream and heavy cream
- Large eggs, room temperature
- Graham cracker crumbs
- Melted butter
- Pure vanilla bean paste
How to make it
- Prepare your crust by mixing graham cracker crumbs with melted butter and a pinch of salt; press firmly into a springform pan and bake for 10 minutes at 325°F to set the structure.
- In a large bowl, beat the room-temperature cream cheese and sugar on low speed—using low speed is vital because high speed incorporates air, which causes the cake to rise and then crack.
- Add the sour cream, heavy cream, and vanilla bean paste, scraping down the sides and bottom of the bowl frequently to ensure no lumps of cheese remain.
- Add the eggs one at a time, mixing only until the yellow disappears; overbeating the eggs is the primary cause of cheesecake failure, so be gentle and patient.
- Wrap the outside of the pan in several layers of heavy-duty aluminum foil and place it in a large roasting pan filled with 1 inch of hot water—this water bath provides even, moist heat.
- Bake at 300°F for 60-70 minutes until the edges are set but the center still has a slight ‘jiggle’ like Jell-O; turn off the oven and let it cool inside with the door cracked for one hour to prevent thermal shock.
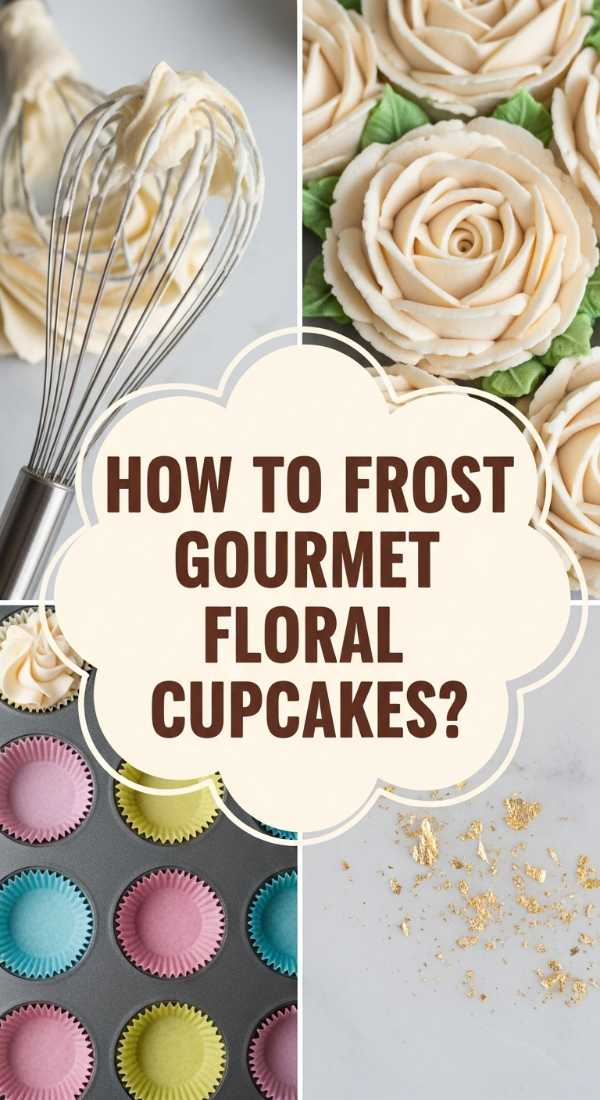
How to Frost Gourmet Floral Cupcakes for a Beautiful Celebration Treat
Why we love this
There is a unique joy in holding a cupcake that looks like a freshly picked dahlia or a soft, romantic rose. The buttercream is whipped until it is as light as air, yet stable enough to hold intricate, sharp edges that mimic the delicate anatomy of real flowers. As you take a bite, the buttery sweetness of the frosting melds with the moist, tender cake, creating a harmonious blend of flavors that feels both nostalgic and elevated. These cupcakes are more than just dessert; they are edible decor that adds a touch of botanical elegance to any social media-ready food board.
Essential Elements:
- Vanilla or lemon cupcakes, cooled
- Swiss Meringue Buttercream (or stiff American buttercream)
- Gel food colors (pinks, greens, purples)
- Piping tips: 1M (rose), 104 (petals), and 352 (leaves)
- Piping bags
How to make it
- Ensure your buttercream is at the perfect temperature—if it’s too cold, it will break; if it’s too warm, the petals will wilt; it should feel like soft clay that holds its shape.
- To pipe a classic rose using a 1M tip, start in the center of the cupcake and spiral outward in one continuous motion, maintaining steady pressure to create a lush, layered look.
- For a hydrangea effect, use a small star tip to pipe tiny ‘drops’ all over the surface, varying the shades of purple and blue in the bag for a natural, variegated appearance.
- Use the 352 leaf tip to tuck small green accents between the flowers, which hides any gaps and provides a realistic botanical contrast.
- Hold the piping bag at a 45-degree angle for leaves and a 90-degree angle for flowers to ensure the petals stand upright and have clear definition.
- Place the finished cupcakes in the refrigerator for 15 minutes to ‘lock’ the designs in place before arranging them on your serving board to prevent any accidental smudging.
How to Discover New Recipe Ideas for a Cozy Family Sunday

Why we love this
Sunday afternoons are made for the slow ritual of discovery, where the kitchen becomes a laboratory of comfort and creativity. Exploring new recipe ideas for a family gathering is about finding dishes that encourage grazing and long, leisurely conversation over a shared board. Think of rustic flatbreads, warm dips, and roasted seasonal vegetables that fill the home with earthy, savory aromas. This process is about building a menu that feels cohesive yet surprising, providing a sensory experience that grounds the family in the present moment while creating lasting memories around the table.
Essential Elements:
- Seasonal produce (roots in winter, stone fruit in summer)
- A variety of proteins (cured meats, roasted nuts)
- High-quality cheeses (soft brie, sharp cheddar)
- Fresh herbs for garnishing
- Artisan breads or crackers
How to make it
- Start by choosing a ‘hero’ flavor profile—such as Mediterranean, Nordic, or Farmhouse—to ensure all your new recipe experiments will complement each other on the final board.
- Utilize social media and high-end food blogs to find ‘trending’ techniques, like whipped feta or hasselback vegetables, which add visual interest and modern flair to traditional ingredients.
- Prepare a ‘test’ component of one new recipe each week; for example, try a new honey-glazing technique for carrots or a specific herb-infusion for your dipping oil.
- Focus on color theory when selecting ingredients—aim for a mix of deep greens, bright oranges, and neutral bakes to make the board visually stimulating and ‘viral’ worthy.
- Assemble your ideas on a physical or digital mood board to visualize how the textures will interact—crispy crackers next to creamy dips, and juicy fruits next to salty cheeses.
- On Sunday, involve the whole family in the assembly process, turning the preparation into a communal activity that makes the eventual meal even more satisfying.
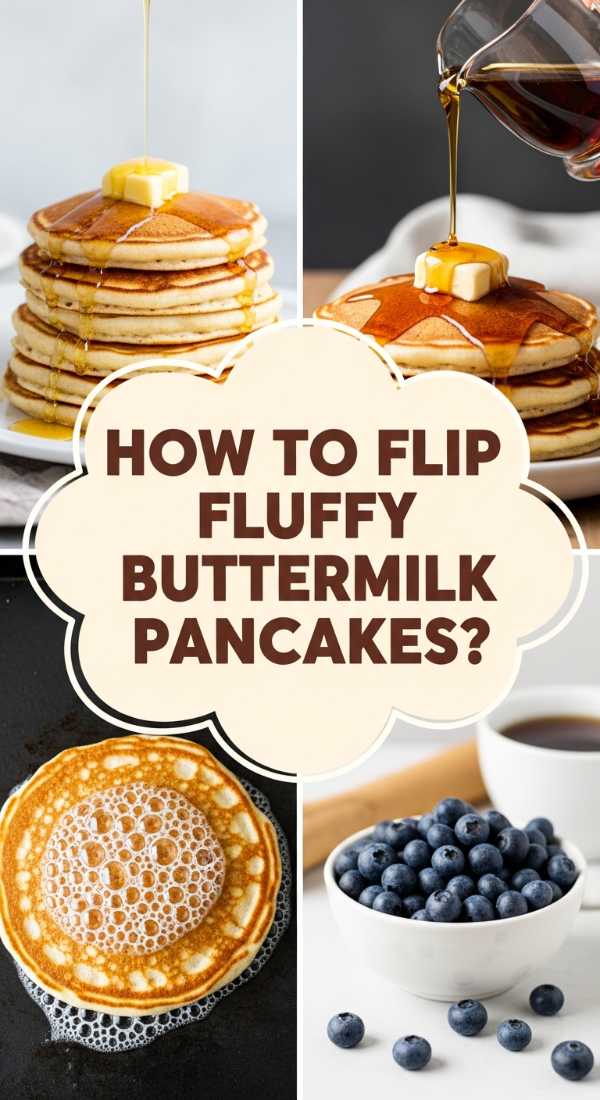
How to Flip Fluffy Buttermilk Pancakes for a Dreamy Weekend Brunch
Why we love this
The sound of a pancake batter hitting a hot, buttered griddle is the ultimate weekend soundtrack, signaling a morning of relaxation and indulgence. These pancakes are the definition of ‘fluffy’—thick, airy, and riddled with tiny pockets that act as sponges for pools of golden maple syrup. There’s a beautiful tang from the buttermilk that cuts through the richness, while the faint scent of malt and vanilla fills the air. Watching them rise on the griddle, seeing the bubbles form and pop, is a meditative experience that culminates in a stack of golden circles that are as soft as clouds.
Essential Elements:
- Buttermilk (room temperature)
- All-purpose flour
- Baking powder and baking soda
- Melted butter (slightly cooled)
- One large egg
- A pinch of cinnamon and vanilla
How to make it
- Whisk your dry ingredients together, then create a well in the center for the wet ingredients; mixing the two separately before combining prevents over-mixing, which is the enemy of fluffiness.
- Stir the buttermilk, egg, and melted butter into the dry mix just until combined—lumps are your friends here; if the batter is perfectly smooth, your pancakes will be tough.
- Preheat a non-stick griddle or cast-iron skillet over medium-low heat; the key to that even, ‘social media’ gold color is a consistent, moderate temperature rather than a searing high heat.
- Lightly grease the pan with a paper towel dipped in neutral oil or a tiny bit of butter, then pour 1/4 cup of batter for each pancake, leaving enough space between them for easy flipping.
- Wait for the visual cue: when the bubbles on the surface stay open and the edges look matte and set (usually after 2-3 minutes), it is time to flip.
- Use a thin spatula and a quick flick of the wrist to flip them over; cook for only another 60-90 seconds on the second side until they are puffed and golden, then serve immediately in a cascading stack.
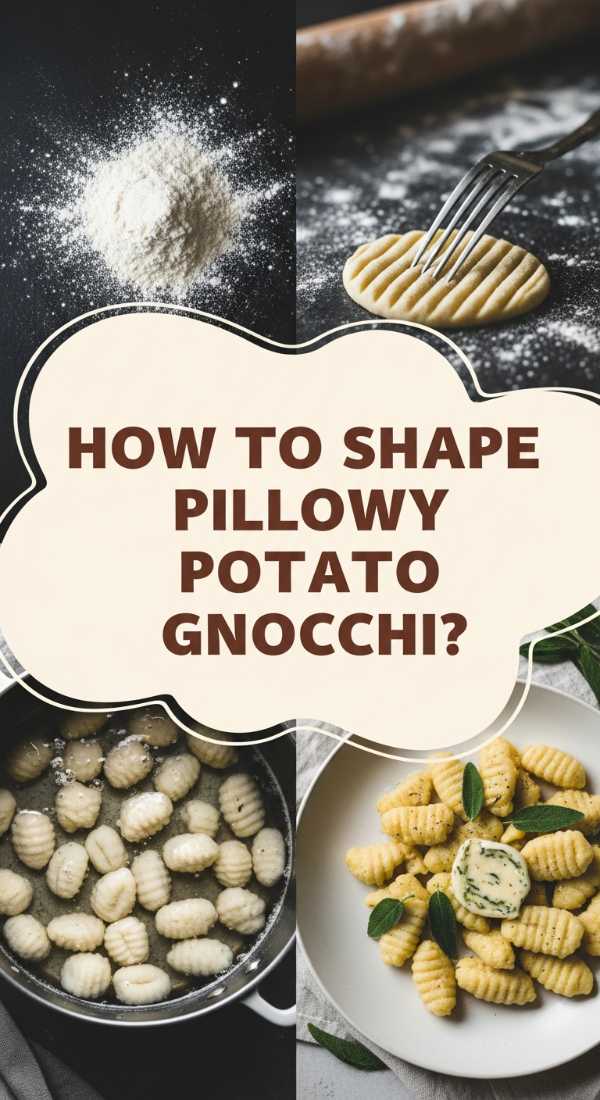
How to Shape Pillowy Potato Gnocchi for an Authentic Italian Dinner
Why we love this
Making gnocchi by hand is a tactile, grounding experience that connects you to generations of Italian tradition. These little ‘dumplings’ of potato and flour are incredibly light, earning their reputation as ‘pillows’ that hold onto sauces with grace. The aroma of roasted potatoes and nutty flour creates a rustic atmosphere in the kitchen, and there is an immense satisfaction in rolling each piece over a wooden board to create those iconic ridges. When tossed in a simple sage butter sauce, they offer a delicate, melt-in-your-mouth texture that is far superior to any store-bought alternative, making them a sophisticated addition to a dinner board.
Essential Elements:
- Russet potatoes (starchy is key)
- ’00’ flour or all-purpose flour
- One egg yolk
- Fine sea salt
- Gnocchi board or a fork
How to make it
- Bake the potatoes on a bed of salt rather than boiling them; this removes excess moisture, which is the secret to ensuring your gnocchi aren’t gummy or heavy.
- While still warm, peel the potatoes and pass them through a ricer onto a clean work surface—riced potatoes are much fluffier than mashed, creating a lighter final product.
- Lightly dust the potato mound with flour and add the egg yolk and salt; gently fold the dough together with a bench scraper until a soft, non-stick dough forms.
- Do not knead the dough like bread! Over-handling develops gluten, which will turn your pillows into rubber balls; use a light touch just to bring the ingredients into a cohesive mass.
- Roll the dough into long ropes about 3/4 inch thick, then cut into small 1-inch nuggets using a sharp knife or your bench scraper.
- To create the ridges, roll each nugget over a gnocchi board or the tines of a fork with a gentle thumb press; this creates a ‘pocket’ on the back to hold your sauce and gives them a professional, artisanal look.
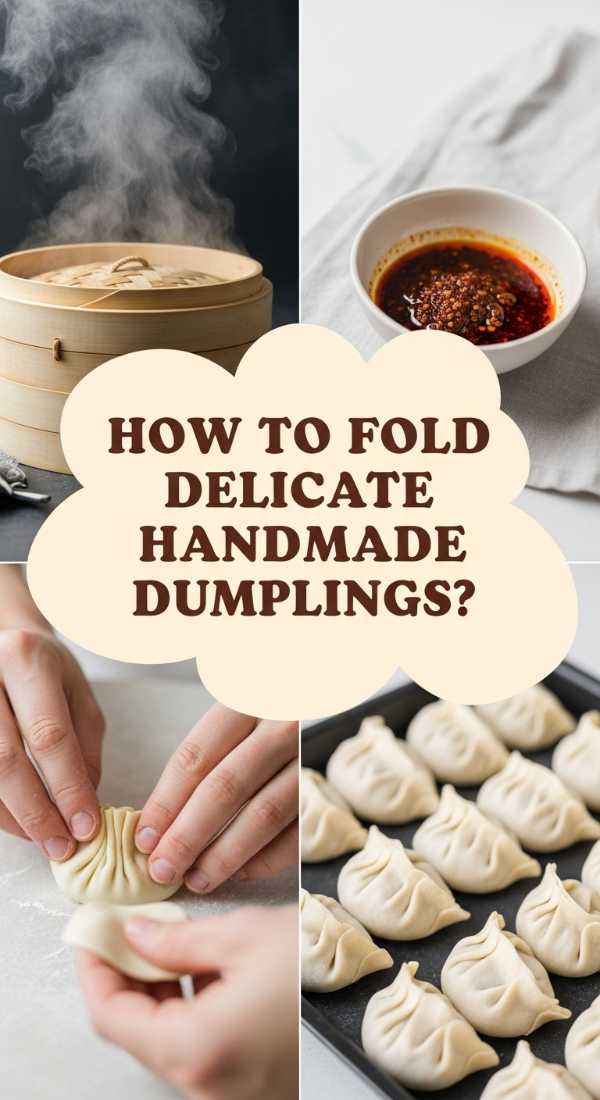
How to Fold Delicate Handmade Dumplings for a Savory Dim Sum Feast
Why we love this
There is a meditative rhythm to folding dumplings—the stretching of the dough, the careful placement of the filling, and the intricate pleating that seals in the savory juices. As they steam or fry, the aroma of ginger, garlic, and toasted sesame oil fills the room, teasing the palate with the promise of a flavor explosion. The contrast between the thin, translucent wrapper and the succulent, seasoned interior is a masterclass in culinary balance. Arranged in a circle on a board with vibrant dipping sauces, these handmade treasures are a testament to the beauty of manual craft and the joy of shared, bite-sized feasts.
Essential Elements:
- Dumpling wrappers (homemade or high-quality store-bought)
- Ground protein (pork, shrimp, or tofu)
- Napa cabbage, finely shredded and drained
- Fresh ginger and garlic
- Soy sauce and sesame oil
- Cornstarch (to bind)
How to make it
- Prepare your filling by mixing the protein with aromatics and seasonings; it is vital to squeeze all the water out of the cabbage first to prevent the wrappers from getting soggy.
- Place a small tablespoon of filling in the center of the wrapper—overfilling is the most common mistake and will cause the dumplings to burst during cooking.
- Moisten the edge of the wrapper with a tiny bit of water, then fold it in half to create a taco shape, pinching it only at the very top center point.
- To create the classic pleats, work from the center outward, folding the front layer of the dough over itself toward the center pinch while keeping the back layer flat.
- Ensure the seal is airtight by pressing firmly along the entire edge; any gaps will allow the precious juices to leak out during the steaming or frying process.
- For a ‘potsticker’ finish, sear the bottoms in a hot oiled pan until golden brown, then add 1/4 cup of water, cover immediately, and steam for 5 minutes until the wrappers are translucent and the filling is fully cooked.
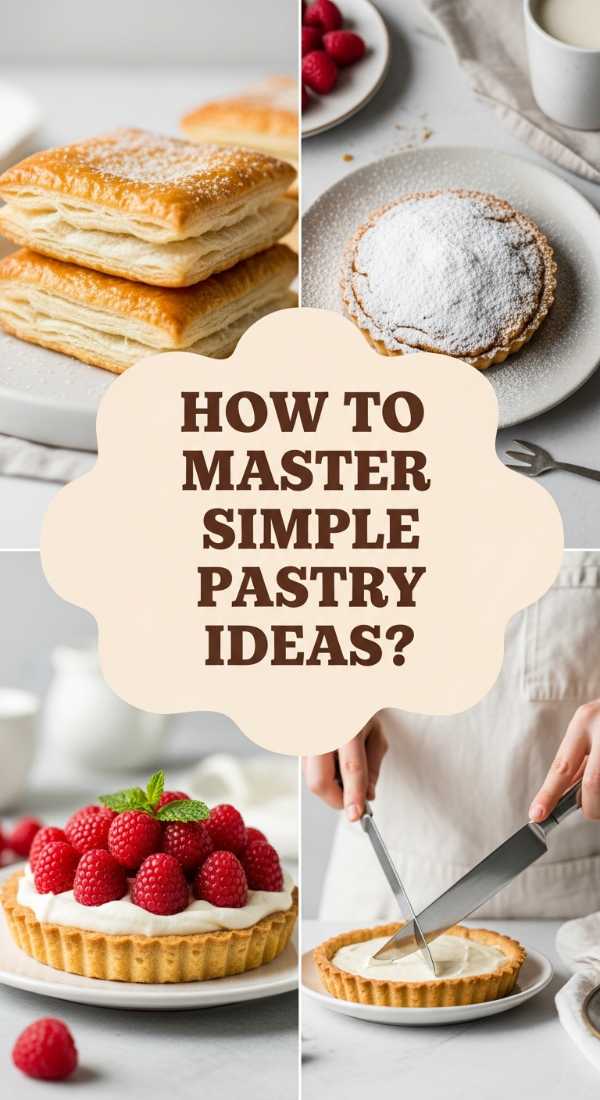
How to Master Simple Pastry Recipe Ideas for a Sophisticated Dessert Spread
Why we love this
Pastry is the height of culinary elegance, offering a delicate, buttery shatter that feels like pure luxury with every bite. The smell of high-quality butter caramelizing in the oven is intoxicating, creating a golden-brown crust that is both flaky and substantial. Mastering simple pastry techniques allows you to create an array of treats—from fruit galettes to savory tartlets—that provide a sophisticated variety to any food board. The way the light catches the glazed fruit and the shimmering sugar crystals on a well-executed pastry makes it an irresistible subject for photography and a delightful experience for the senses.
Essential Elements:
- High-fat European-style butter
- Chilled all-purpose flour
- Ice water
- A pinch of salt and sugar
- Egg wash (egg + splash of milk)
- Seasonal fruit or savory fillings
How to make it
- Keep everything cold: freeze your butter for 10 minutes before starting and use ice-cold water to keep the fat from melting into the flour before it hits the oven.
- Pulse the butter and flour in a food processor or cut by hand until you have large, visible chunks of butter—these chunks create the steam pockets that result in a flaky, layered crust.
- Add ice water one tablespoon at a time just until the dough barely holds together; a crumbly dough is better than a wet one, as extra water leads to a tough, leathery pastry.
- Wrap the dough and chill it for at least 30 minutes; this relaxes the gluten and ensures the dough doesn’t shrink when it hits the heat of the oven.
- Roll the dough out on a floured surface to 1/8 inch thickness and apply a generous egg wash to the edges—this acts as the ‘glue’ for decorations and provides that signature professional shine.
- Bake at a high initial temperature (400°F) to ‘shock’ the butter into creating layers, then reduce the heat to 375°F to cook the pastry through until it is a deep, burnished gold across the entire surface.
Conclusion
Creating a viral food board is about more than just the food; it’s about the intention behind it. By mastering these individual elements—from the fluffiest pancakes to the most delicate sugar cookies—you are building a toolkit for connection. These boards invite people to lean in, to explore different flavors, and to appreciate the beauty in the small details. So, the next time you find yourself in the kitchen, remember that every stir of the batter and every pleat of the dough is an opportunity to create something extraordinary. Happy hosting!