

There is something undeniably magical about the way a shared meal can turn a regular Tuesday into a cherished memory. We live in an era where food isn’t just sustenance; it’s an art form, a conversation starter, and a way to tell our loved ones we care without saying a word. I’ve found that the most viral food board trends aren’t about perfection—they’re about that lived-in, cozy feeling of grabbing a fork and diving into something delicious together.
Lately, my kitchen has become a laboratory for these viral ‘simple food boards.’ Whether it’s a spread of perfectly crisped vegetables or a sweet array of homemade treats, there’s a tactile joy in assembling a board that looks as good as it tastes. Today, I’m sharing my favorite ways to elevate your hosting game with ten classic recipes that are designed to be the stars of your next gathering.
How to Bake Moist Carrot Cake?
Why we love this
This carrot cake is the epitome of comfort, offering a symphony of warm spices like cinnamon and nutmeg that fill your kitchen with an irresistible aroma. Each bite is a luxurious experience, featuring a tight yet incredibly moist crumb that contrasts perfectly with the tangy, velvet-smooth cream cheese frosting. It’s the kind of cake that feels like a hug, balanced by the crunch of toasted walnuts and the natural sweetness of freshly grated carrots that melt into the batter during the bake.
Ingredients
- 2 cups all-purpose flour
- 2 cups granulated sugar
- 1 tsp baking powder
- 1 tsp baking soda
- 1 tsp ground cinnamon
- 3 cups finely grated raw carrots
- 1 cup vegetable oil
- 4 large eggs
- 1/2 cup chopped walnuts or pecans
- 8 oz cream cheese, softened
- 1/2 cup butter, softened
- 2 cups powdered sugar
- 1 tsp vanilla extract
How to make it
- Preheat your oven to 350°F (175°C) and grease a 9×13 inch pan or two 9-inch rounds. Ensure your ingredients, especially eggs and oil, are at room temperature to create a seamless emulsion.
- In a large bowl, whisk together the flour, sugar, baking powder, baking soda, and cinnamon until no clumps remain. This dry-mix phase ensures even distribution of leavening agents.
- In a separate bowl, beat the eggs and oil together until slightly pale. Slowly fold in the grated carrots. Pro tip: use the fine side of your grater for a texture that integrates better into the crumb.
- Gradually add the dry ingredients to the wet, stirring just until combined. Over-mixing at this stage develops too much gluten, which can make the cake tough.
- Fold in the nuts gently and pour the batter into the prepared pan. Bake for 35-40 minutes. Test for doneness by inserting a wooden skewer into the center; it should come out clean or with just a few moist crumbs.
- Allow the cake to cool completely in the pan. While cooling, whip the cream cheese and butter together until fluffy, then sift in the powdered sugar and vanilla. Spread generously over the cooled cake.
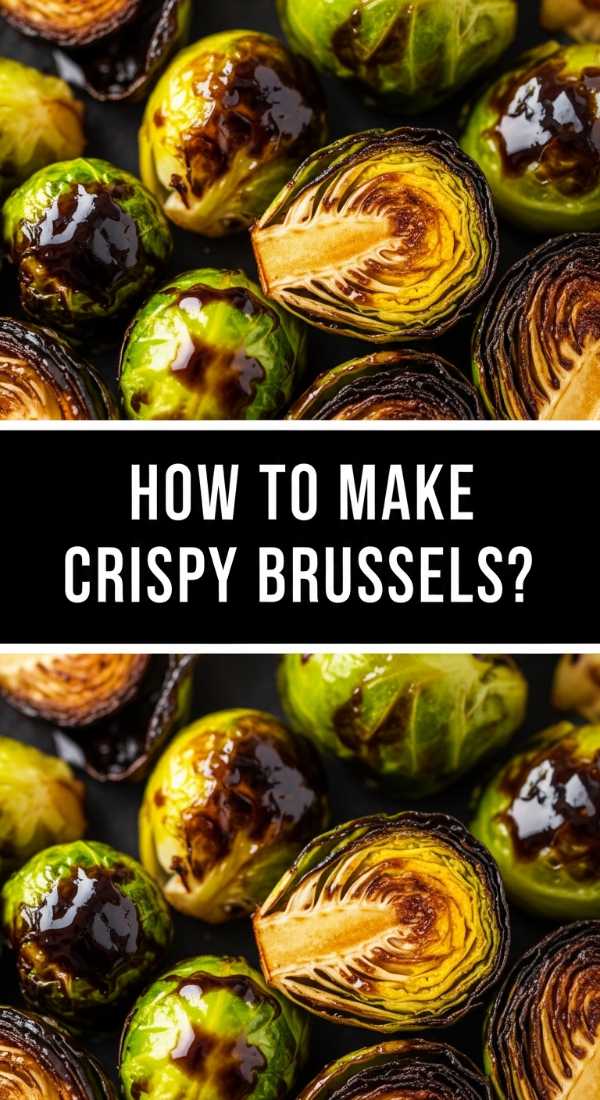
How to Cook Crispy Brussels Sprouts?
Why we love this
Forget the soggy sprouts of the past; these are a masterclass in texture and bold flavor. When roasted at a high heat, the outer leaves transform into delicate, salty chips that shatter upon impact, while the centers remain tender and buttery. The addition of a balsamic glaze adds a sticky, sweet-and-sour complexity that cuts through the earthy richness, making these small greens the most addictive part of any food board spread.
Ingredients
- 1 lb Brussels sprouts, halved
- 3 tbsp extra virgin olive oil
- 1/2 tsp sea salt
- 1/4 tsp cracked black pepper
- 2 tbsp balsamic glaze
- 1/4 cup shaved parmesan cheese
- Optional: red pepper flakes for heat
How to make it
- Preheat your oven to 425°F (220°C). High heat is the absolute secret to achieving that deep, mahogany char without overcooking the insides.
- Trim the ends of the sprouts and slice them in half lengthwise. Place them in a large bowl and toss thoroughly with olive oil, salt, and pepper. Ensure every leaf is lightly coated.
- Arrange the sprouts on a large rimmed baking sheet, flat-side down. This contact with the hot metal is what creates the crispy, caramelized surface. Do not overcrowd the pan; if they are too close, they will steam rather than roast.
- Roast for 20-25 minutes. At the 15-minute mark, check them—the outer leaves should be turning dark brown. Flip them gently if you want even browning, though the flat-side-down method is usually best for maximum crunch.
- Remove from the oven and immediately drizzle with the balsamic glaze while they are still sizzling. This allows the glaze to thicken and adhere to the sprouts.
- Finish with a flourish of shaved parmesan and red pepper flakes before serving warm.
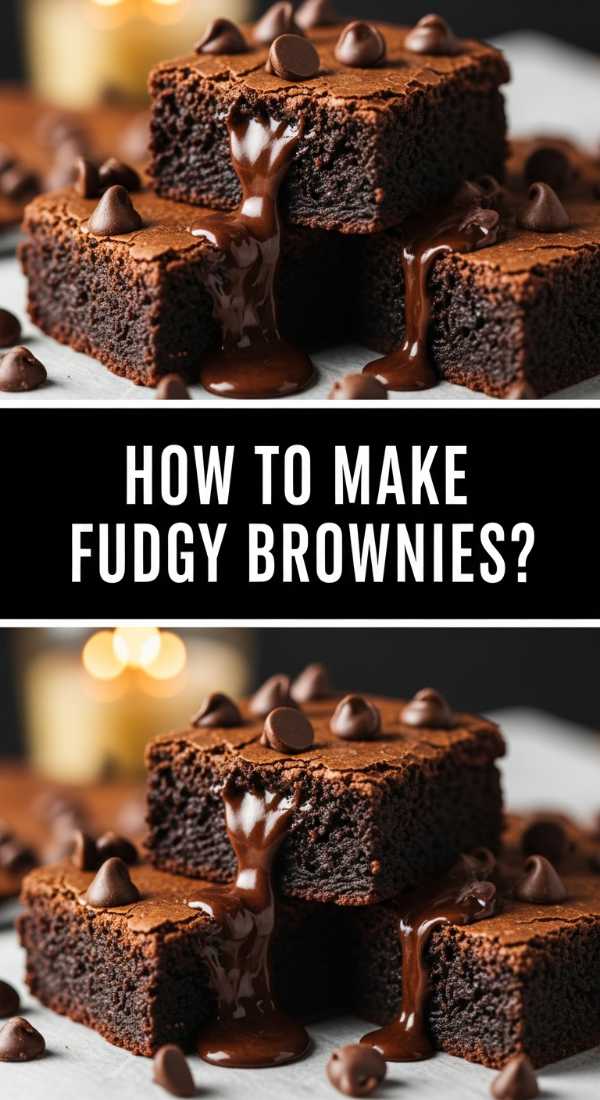
How to Bake Fudgy Chocolate Brownies?
Why we love this
There is nothing quite like a brownie that blurs the line between cake and truffle. These brownies boast a tissue-thin, crackly top that gives way to a dense, fudgy interior so rich it almost sticks to the roof of your mouth. The intense aroma of high-quality dark cocoa and melted butter creates a sensory experience that is pure indulgence, especially when finished with a tiny pinch of flaky sea salt to brighten the deep chocolate notes.
Ingredients
- 1 cup unsalted butter, melted and hot
- 2 cups granulated sugar
- 2 large eggs
- 2 tsp vanilla extract
- 3/4 cup unsweetened cocoa powder
- 1 cup all-purpose flour
- 1/2 tsp salt
- 1 cup dark chocolate chips
How to make it
- Preheat your oven to 350°F (175°C) and line an 8×8 inch square baking pan with parchment paper, leaving an overhang on the sides for easy removal.
- In a large bowl, whisk the hot melted butter and sugar together vigorously for about 2 minutes. The heat of the butter helps dissolve the sugar, which is the secret to that coveted shiny, crackly top.
- Add the eggs and vanilla, beating again until the mixture is light and well-incorporated.
- Sift in the cocoa powder, flour, and salt. Sifting is crucial here to avoid cocoa lumps. Fold the dry ingredients into the wet using a spatula just until the last streak of flour disappears.
- Gently fold in the chocolate chips. Pour the thick batter into the pan and smooth the top with your spatula.
- Bake for 25-30 minutes. The edges should be set, but the center should still have a slight jiggle. Do not overbake! They will continue to set as they cool. Let them cool completely before slicing for the cleanest edges.
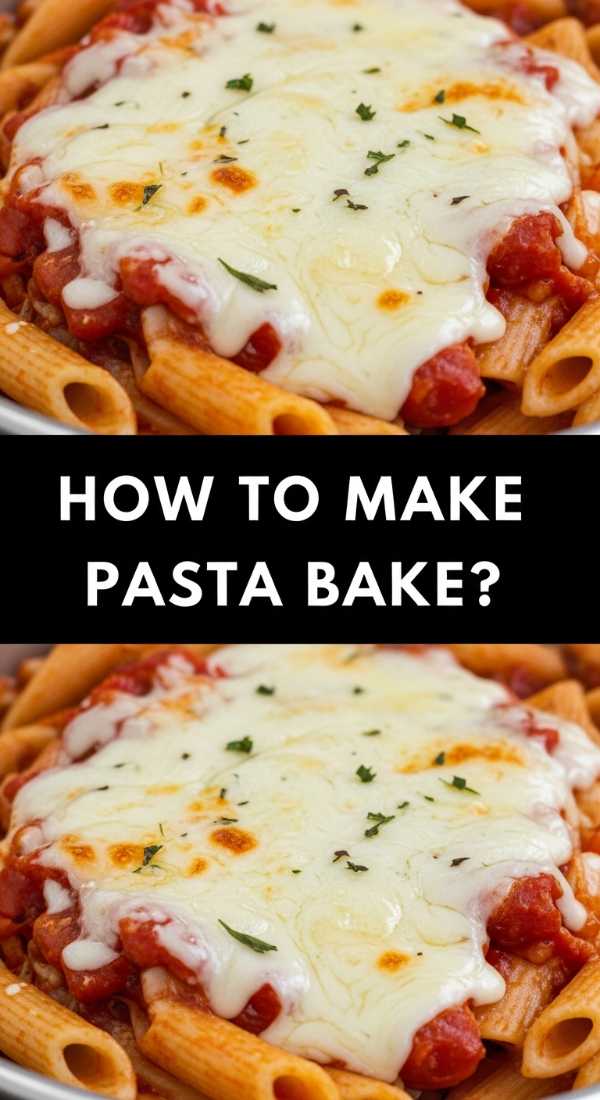
How to Bake the Ultimate Pasta Bake?

Why we love this
A pasta bake is the ultimate crowd-pleaser, bringing together the rustic charm of a slow-simmered marinara with the gooey, stringy satisfaction of melted mozzarella. As it bakes, the top layer of noodles becomes slightly toasted and crunchy, providing a wonderful textural contrast to the soft, sauce-drenched pasta underneath. It’s a warm, bubbly dish that invites everyone to dig in, releasing the scents of dried oregano, garlic, and toasted cheese throughout the house.
Ingredients
- 1 lb ziti or penne pasta
- 24 oz marinara sauce
- 15 oz ricotta cheese
- 1 egg, lightly beaten
- 3 cups shredded mozzarella cheese
- 1/2 cup grated parmesan
- 2 tsp dried Italian seasoning
- Fresh basil for garnish
How to make it
- Preheat your oven to 375°F (190°C). Bring a large pot of salted water to a boil.
- Cook the pasta for 2 minutes less than the package instructions suggest for ‘al dente.’ The pasta will finish cooking in the oven, and starting with firm noodles prevents them from becoming mushy.
- In a medium bowl, mix the ricotta cheese, beaten egg, 1 cup of mozzarella, and the Italian seasoning. The egg acts as a binder, giving the ricotta a creamy, custard-like texture.
- Drain the pasta and return it to the pot. Stir in the marinara sauce until every noodle is coated.
- In a 9×13 baking dish, layer half of the pasta, followed by dollops of the ricotta mixture. Top with the remaining pasta and the rest of the mozzarella and parmesan.
- Cover with foil and bake for 20 minutes. Remove the foil and bake for another 10-15 minutes until the cheese is bubbling and golden brown. For an extra crispy top, turn on the broiler for the last 2 minutes, watching closely to prevent burning.
How to Make Authentic Street Tacos?
Why we love this
Street tacos are all about the vibrant explosion of fresh flavors and high-heat techniques. The smell of corn tortillas lightly charring over an open flame combined with the savory, citrus-marinated meat is enough to transport you to a bustling night market. Each bite is a perfect balance of tender protein, the sharp bite of white onion, the coolness of cilantro, and a necessary hit of lime juice that makes all the spices sing.
Ingredients
- 1 lb flank steak or chicken thighs, finely diced
- 2 tbsp soy sauce
- 1 tbsp lime juice
- 1 tsp cumin
- Small corn tortillas
- 1/2 cup diced white onion
- 1/2 cup fresh cilantro, chopped
- Lime wedges and salsa for serving
How to make it
- Marinate your diced meat in soy sauce, lime juice, and cumin for at least 30 minutes. This breaks down the fibers and infuses the protein with a deep, savory base.
- Heat a heavy cast-iron skillet or griddle over medium-high heat until it is nearly smoking. Add a small amount of oil with a high smoke point (like avocado oil).
- Sear the meat in batches to avoid crowding. You want a dark, crispy crust on the edges of the meat while keeping the inside juicy. This usually takes about 5-7 minutes.
- While the meat rests, warm the corn tortillas directly over a low gas flame for 10-15 seconds per side using tongs. Look for slight char marks and a softened texture.
- Assemble the tacos by placing a generous spoonful of meat on two stacked tortillas (the double layer prevents tearing).
- Top with a sprinkle of raw onion and cilantro. Serve immediately with a squeeze of fresh lime and your favorite spicy salsa.
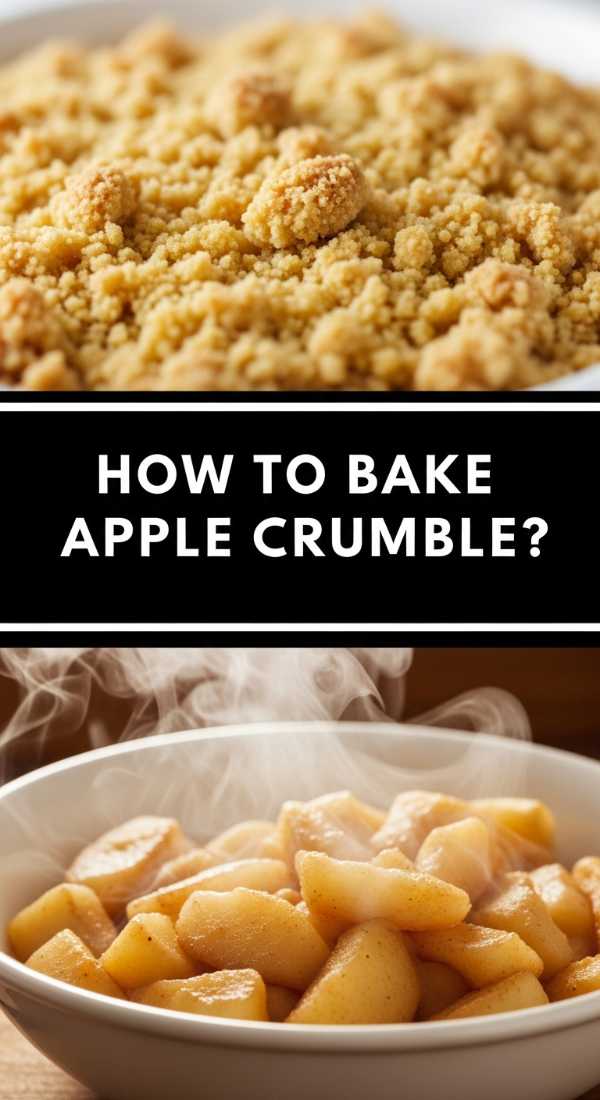
How to Bake Classic Apple Crumble?

Why we love this
The beauty of an apple crumble lies in the contrast between the molten, cinnamon-spiced fruit and the buttery, oat-filled topping. As it bakes, the apples release their juices to form a thick syrup, while the topping turns a deep golden brown, offering a satisfying crunch that mimics a toasted cookie. It’s a sensory delight of bubbling fruit and sweet, toasted grains that feels like the very essence of autumn in a bowl.
Ingredients
- 6 large Granny Smith apples, peeled and sliced
- 1/2 cup granulated sugar
- 1 tbsp ground cinnamon
- 1 cup rolled oats
- 1 cup all-purpose flour
- 1 cup packed brown sugar
- 1/2 cup cold unsalted butter, cubed
How to make it
- Preheat your oven to 375°F (190°C). Grease a medium-sized baking dish.
- Toss the sliced apples with the granulated sugar and cinnamon in a large bowl. Ensure every slice is coated. Granny Smith apples are ideal because their tartness balances the sugar and they hold their shape during baking.
- Transfer the apples to the baking dish, spreading them out evenly.
- In another bowl, combine the oats, flour, and brown sugar. Use your fingertips or a pastry cutter to work the cold butter into the mixture. Work it until you have pea-sized crumbles. The cold butter is essential for a light, flaky texture.
- Sprinkle the crumble mixture evenly over the apples, pressing down very lightly.
- Bake for 40-45 minutes. You’ll know it’s ready when the topping is a deep golden brown and the apple juices are bubbling up around the edges. Let it stand for 10 minutes before serving to let the juices thicken.
How to Make Healing Chicken Soup?
Why we love this
This isn’t just a recipe; it’s a restorative experience. The clear, golden broth is rich with the essence of slow-cooked chicken and aromatic vegetables, offering a gentle warmth that soothes from the inside out. With tender chunks of meat and perfectly soft carrots, every spoonful carries the nostalgic aroma of dill and garlic, making it the ultimate remedy for a cold day or a tired soul.
Ingredients
- 1 whole chicken (3-4 lbs) or 2 lbs bone-in thighs
- 3 large carrots, sliced
- 3 stalks celery, sliced
- 1 large onion, quartered
- 4 cloves garlic, smashed
- 2 bay leaves
- Fresh dill and parsley
- Salt and black pepper to taste
How to make it
- Place the chicken, onion, garlic, and bay leaves in a large stockpot. Cover with cold water (about 12 cups). Starting with cold water allows the proteins to release slowly, resulting in a clearer broth.
- Bring to a gentle simmer over medium-high heat. Once it reaches a boil, immediately reduce the heat to low. Use a slotted spoon to skim off any foam or impurities that rise to the surface.
- Simmer partially covered for about 1 to 1.5 hours. You want the chicken to be falling off the bone.
- Remove the chicken from the pot and set aside to cool. Strain the broth through a fine-mesh sieve into a clean pot, discarding the boiled aromatics.
- Add the fresh carrots and celery to the strained broth and simmer for 15-20 minutes until tender. While they cook, shred the chicken meat, discarding the skin and bones.
- Return the shredded meat to the pot, season generously with salt and pepper, and stir in plenty of fresh chopped dill and parsley just before serving.
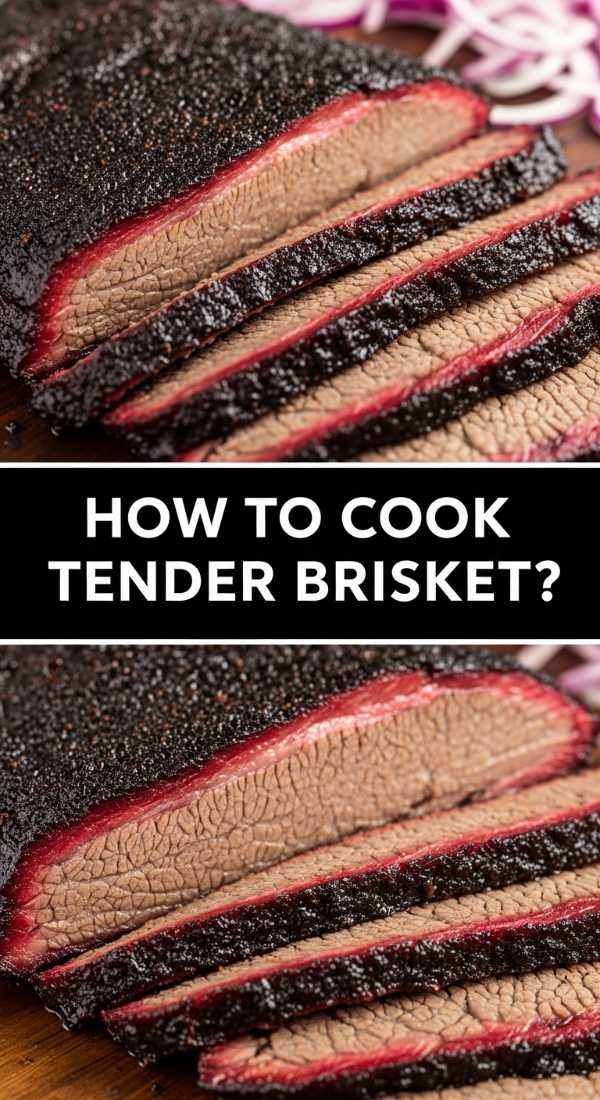
How to Cook Melt-In-Your-Mouth Brisket?

Why we love this
A well-cooked brisket is a labor of love that rewards you with meat so tender it practically dissolves on the tongue. The long, slow cooking process transforms the tough connective tissue into succulent gelatin, while the exterior develops a savory, dark ‘bark’ seasoned with salt and smoke. The aroma of beef drippings and black pepper fills the air, promising a rich, hearty meal that defines the art of slow-cooking.
Ingredients
- 4-5 lb beef brisket (flat cut)
- 2 tbsp kosher salt
- 2 tbsp coarse black pepper
- 1 tbsp garlic powder
- 1 cup beef broth
- 1 onion, sliced
How to make it
- Trim the fat cap of the brisket to about 1/4 inch thickness. This allows enough fat to baste the meat as it cooks without being overly greasy.
- Mix the salt, pepper, and garlic powder to create a dry rub. Coat the brisket generously on all sides, pressing the spices into the meat.
- Preheat your oven to 275°F (135°C). The low temperature is non-negotiable for breaking down the tough fibers.
- Place the sliced onions in the bottom of a heavy roasting pan or Dutch oven. Place the brisket on top, fat side up. Pour the beef broth into the bottom of the pan (not over the meat).
- Cover the pan tightly with a lid or double layer of foil to trap all moisture. Bake for about 1 hour per pound of meat.
- Check the internal temperature with a probe; it should reach 200-205°F (93-96°C) for maximum tenderness. Let the meat rest for at least 30 minutes before slicing against the grain to ensure the juices stay locked inside.
How to Bake Perfect Chocolate Chip Cookies?

Why we love this
The perfect chocolate chip cookie is a study in contrasts: crispy, buttery edges and a soft, slightly underbaked center that melts away. Using brown butter adds a toasted, nutty depth that elevates the sugar profile to a caramel-like richness. When the warm chocolate pools meet a sprinkle of flaky sea salt, the result is a sophisticated yet childhood-favorite snack that fills your home with the scent of vanilla and toasted sugar.
Ingredients
- 1 cup unsalted butter
- 3/4 cup granulated sugar
- 3/4 cup packed brown sugar
- 2 large eggs
- 1 tsp vanilla extract
- 2 1/4 cups all-purpose flour
- 1 tsp baking soda
- 1/2 tsp salt
- 2 cups semi-sweet chocolate chips
- Flaky sea salt for topping
How to make it
- Brown the butter: Melt the butter in a saucepan over medium heat, whisking constantly until it foams and brown bits form at the bottom. It should smell nutty. Remove from heat and let it cool slightly.
- In a large bowl, whisk the browned butter with the granulated and brown sugars until smooth. Add the eggs and vanilla, beating until the mixture looks slightly pale and thickened.
- Whisk the flour, baking soda, and salt together in a small bowl, then fold into the wet ingredients. Stop as soon as you see no more dry flour.
- Fold in the chocolate chips. For the best flavor and texture, chill the dough in the fridge for at least 2 hours (or up to 24). This prevents the cookies from spreading too thin.
- Preheat oven to 350°F (175°C). Scoop rounded tablespoons of dough onto a parchment-lined sheet, spacing them 2 inches apart.
- Bake for 9-11 minutes until the edges are golden but the centers still look soft. Remove from the oven and immediately sprinkle with flaky sea salt.
How to Make Fluffy Homemade Scones?
[IMAGE_10]
Why we love this
Scones are the crown jewel of a brunch board, offering a light, flaky texture that pulls apart in buttery layers. Unlike a heavy biscuit, a good scone has a delicate crumb and a slightly sweet finish that pairs beautifully with clotted cream and tart jam. The scent of cold butter hitting a hot oven creates a pastry-shop atmosphere in your kitchen, promising a treat that is both elegant and deeply satisfying.
Ingredients
- 2 cups all-purpose flour
- 1/3 cup granulated sugar
- 1 tbsp baking powder
- 1/2 tsp salt
- 1/2 cup cold unsalted butter, grated
- 1/2 cup heavy cream (plus more for brushing)
- 1 large egg
- 1 tsp vanilla extract
How to make it
- Whisk the flour, sugar, baking powder, and salt in a large bowl. Ensure your baking powder is fresh for maximum lift.
- Grate the cold butter using a box grater and toss it into the flour mixture. Use your fingers to quickly work the butter in until the mixture resembles coarse meal. The butter must remain cold to create steam pockets, which result in flakes.
- In a small bowl, whisk the heavy cream, egg, and vanilla. Pour this into the flour mixture.
- Stir with a fork until the dough just starts to come together. Turn it out onto a lightly floured surface and gently fold it over itself 3-4 times. Do not overwork or the scones will be tough.
- Pat the dough into a 1-inch thick circle and cut into 8 wedges. Place them on a baking sheet and freeze for 15 minutes while you preheat the oven to 400°F (200°C).
- Brush the tops with a little extra cream and bake for 18-22 minutes until the tops and bottoms are golden brown. Serve warm for the best experience.
The Art of the Board: Bringing It All Together
Creating a viral food board isn’t just about the individual recipes; it’s about the harmony of flavors and the visual joy of abundance. By combining these classic, well-loved dishes, you create a canvas for connection. Whether you’re piling high the crispy Brussels sprouts or layering the moist carrot cake, remember that the best boards are the ones that disappear the fastest because everyone felt comfortable enough to dig in. Happy hosting!