

Transform Your Hosting with This Viral Simple Food Board Trend
There is something undeniably magical about gathering around a table, isn’t there? But lately, the formal sit-down dinner feels a bit too stiff for the way we want to connect. Enter the viral ‘Simple Food Board’ trend—a way of serving that strips away the pretension and puts the focus back on comfort, conversation, and, most importantly, incredible food. It’s not just about cheese and crackers anymore; it’s about taking hearty, soul-warming mains and presenting them in a way that feels abundant and approachable.
I remember the first time I swapped individual plates for a massive wooden board piled high with perfectly seared steaks and roasted vegetables. The energy in the room shifted instantly. Instead of quiet clinking of silverware, there was laughter, sharing, and a sense of communal joy as everyone reached for their favorite cuts. This trend isn’t just a Pinterest aesthetic; it’s a lifestyle shift that makes hosting feel less like a chore and more like a celebration of the flavors we love most. Let’s dive into the ultimate components that will make your board the talk of the season.
How to cook juicy steak?

Why we love this
There is nothing quite like the sensory experience of a perfectly cooked steak resting on a board, its surface glistening with a rich, mahogany crust while the scent of rendered fat and fresh rosemary fills the air. When you slice into it, the contrast between the deeply seared exterior and the tender, ruby-pink center is a visual masterpiece that promises a melt-in-your-mouth texture. It’s the ultimate anchor for any food board, providing a savory depth that pairs beautifully with crunchy salts and vibrant chimichurris, making every guest feel like they’re indulging in a five-star steakhouse experience right in your living room.
Ingredients
- 2 thick-cut Ribeye or New York Strip steaks (at least 1.5 inches thick)
- 2 tablespoons high-smoke point oil (like grapeseed or avocado oil)
- 3 tablespoons unsalted butter
- 4 cloves garlic, smashed
- 3 sprigs fresh rosemary or thyme
- Coarse kosher salt and freshly cracked black pepper
How to make it
- Remove the steaks from the refrigerator at least 45 minutes before cooking to allow them to reach room temperature, which ensures even cooking throughout the meat.
- Pat the steaks extremely dry with paper towels; moisture is the enemy of a good sear, and a dry surface is essential for the Maillard reaction to occur.
- Generously season all sides, including the edges, with kosher salt and black pepper just before cooking.
- Heat a heavy cast-iron skillet over high heat until it is wispy with smoke, then add the oil, swirling to coat the bottom.
- Carefully lay the steaks into the pan, pressing down slightly to ensure maximum contact, and sear for 3-4 minutes without moving them until a deep golden-brown crust forms.
- Flip the steaks and immediately add the butter, garlic cloves, and herbs to the pan.
- As the butter melts and foams, tilt the pan and use a large spoon to continuously baste the steaks with the flavored butter for another 3-4 minutes.
- Use an instant-read thermometer to check for your desired doneness: 130-135°F for medium-rare.
- Transfer the steaks to a cutting board and let them rest for at least 10 minutes; this allows the juices to redistribute so they don’t run out when you slice into them for your board.
How to grill perfect burgers?

Why we love this
A grilled burger is the quintessential sound of summer, the sizzle on the grates providing a rhythmic backdrop to backyard gatherings. The aroma of char and woodsmoke clinging to the meat is intoxicating, evoking memories of sunny afternoons and cold drinks. A perfect burger should have a slightly charred, crisp edge that gives way to a juicy, loosely packed interior that drips with flavor. Serving these on a board allows guests to customize their toppings, creating a colorful, interactive feast where the smoky, savory scent of the beef is the undisputed star of the show.
Ingredients
- 2 lbs ground chuck (80/20 fat ratio is crucial for juiciness)
- 4 brioche buns, split
- 4 slices sharp cheddar or American cheese
- Kosher salt and black pepper
- 1 tablespoon melted butter (for the buns)
- Toppings: Lettuce, tomato, red onion, pickles
How to make it
- Divide the cold ground beef into four equal portions, handling the meat as little as possible to avoid a dense, tough texture.
- Shape the portions into patties about 1 inch thick and slightly wider than your buns, as they will shrink during the grilling process.
- Use your thumb to create a shallow indentation (a dimple) in the center of each patty; this prevents the burger from puffing up into a football shape while cooking.
- Preheat your grill to high heat (450-500°F) and clean the grates thoroughly with a wire brush, then lightly oil them.
- Season the patties liberally with salt and pepper only once they are ready to hit the grill to prevent the salt from breaking down the meat proteins too early.
- Place the patties on the grill and cook for about 4 minutes on the first side with the lid closed until a distinct char develops.
- Flip the burgers only once—do not press down on them with a spatula, or you will squeeze out all the delicious juices.
- Add the cheese slices during the last minute of cooking and close the lid to melt them perfectly.
- Toast the buttered buns on the edge of the grill for 30 seconds until golden, then let the burgers rest for 2 minutes before serving on your board.
How to bake chicken pot pie?

Why we love this
There is a profound sense of comfort that comes from breaking through the flaky, golden crust of a homemade chicken pot pie. As the steam rises, it carries the scent of buttery pastry, earthy thyme, and a rich, velvety cream sauce that wraps around tender vegetables like a warm hug. The texture is a delightful play between the shatteringly crisp top and the luscious, molten filling beneath. When served in individual ramekins on a large board, it adds a rustic, cozy charm that feels deeply personal and incredibly indulgent, making it the perfect centerpiece for a chilly evening gathering.
Ingredients
- 1 box refrigerated pie crusts or homemade shortcrust
- 2 cups shredded cooked chicken (rotisserie works great)
- 1 cup frozen peas and carrots
- 1/2 cup diced celery and 1/2 cup diced onion
- 1/3 cup unsalted butter
- 1/3 cup all-purpose flour
- 2 cups chicken broth
- 1/2 cup heavy cream
- 1 teaspoon dried thyme
- 1 egg (for egg wash)
How to make it
- Preheat your oven to 425°F (218°C) and prepare your baking dish or individual ramekins.
- In a large saucepan, melt the butter over medium heat and sauté the onions and celery until they are translucent and soft, about 5-7 minutes.
- Whisk in the flour and cook for 1-2 minutes to remove the raw flour taste, creating a pale roux that will thicken your sauce.
- Slowly whisk in the chicken broth and heavy cream, ensuring there are no lumps, and simmer until the mixture is thick enough to coat the back of a spoon.
- Stir in the shredded chicken, peas, carrots, thyme, salt, and pepper, then remove from heat.
- Pour the filling into your dish and drape the pie crust over the top, trimming any excess and crimping the edges to seal.
- Cut small slits in the top of the crust to allow steam to escape during the baking process.
- Whisk the egg with a tablespoon of water and brush the entire top crust generously for a shiny, golden finish.
- Bake for 30-35 minutes until the crust is a deep golden brown and the filling is bubbling vigorously around the edges.
How to make homemade gnocchi?

Why we love this
Homemade gnocchi are often described as ‘pillows of heaven,’ and for good reason. When prepared correctly, they possess a delicate, airy lightness that practically melts on the tongue, a far cry from the dense, rubbery store-bought versions. There is a tactile joy in the process—the feeling of the warm potato flour dough under your palms and the rhythmic roll across a fork to create those iconic ridges. Served on a board with a simple brown butter and sage sauce, the aroma of toasted nuts and herbs elevates the humble potato into something truly sophisticated and deeply satisfying.
Ingredients
- 2 lbs Russet potatoes (about 3-4 large)
- 1.5 to 2 cups all-purpose flour
- 1 large egg, lightly beaten
- 1 teaspoon kosher salt
- 1/2 cup freshly grated Parmesan cheese (optional)
How to make it
- Boil the whole, unpeeled potatoes in salted water until they are tender all the way through when pierced with a knife; keeping the skin on prevents them from absorbing too much water.
- Peel the potatoes while they are still hot (hold them with a towel) and pass them through a potato ricer onto a clean work surface to ensure a light, lump-free texture.
- Spread the riced potatoes out to allow the steam to evaporate for a few minutes; excess moisture is what makes gnocchi heavy.
- Drizzle the beaten egg over the potatoes, then sprinkle with 1 cup of flour and the salt.
- Gently fold the mixture together using a bench scraper or your hands, adding more flour a little at a time until a soft, slightly tacky dough forms—do not overwork it or the gnocchi will be tough.
- Roll a piece of dough into a long rope about 1/2 inch thick and cut into 1-inch pieces.
- Optional: Roll each piece over the tines of a fork or a gnocchi board to create ridges that will hold your sauce.
- Drop the gnocchi into a large pot of boiling salted water; they are done the moment they float to the surface (usually 2-3 minutes).
- Remove them with a slotted spoon and toss immediately into a pan with warm sauce to coat.
How to roast garlic chicken?

Why we love this
There is no aroma more inviting than a chicken roasting in an oven with forty cloves of garlic. As the heat works its magic, the garlic transforms from sharp and pungent to sweet, spreadable gold, while the chicken skin renders into a thin, crackling sheet of salty perfection. The meat remains incredibly succulent, infused with the subtle perfume of lemon and herbs. Placing a whole roasted chicken in the center of a board, surrounded by those soft garlic cloves, invites guests to roll up their sleeves and dig in, creating a rustic, communal vibe that is both elegant and effortless.
Ingredients
- 1 whole roasting chicken (4-5 lbs)
- 2 whole heads of garlic, cloves separated and peeled
- 1 lemon, halved
- 4 tablespoons softened unsalted butter
- 3 sprigs each of fresh rosemary and thyme
- Kosher salt and cracked black pepper
- 2 tablespoons olive oil
How to make it
- Preheat your oven to 425°F (218°C) and pat the chicken completely dry inside and out with paper towels.
- Season the cavity of the chicken generously with salt and pepper, then stuff it with the lemon halves and a few sprigs of herbs.
- Tie the legs together with kitchen twine (trussing) to ensure the bird cooks evenly and maintains a beautiful shape on the board.
- Rub the softened butter all over the skin, ensuring every nook and cranny is covered, then season heavily with salt and pepper.
- Place the chicken in a roasting pan or large cast-iron skillet and scatter the peeled garlic cloves around the base, tossing them in a bit of olive oil.
- Roast for 1 to 1.5 hours, or until a meat thermometer inserted into the thickest part of the thigh (without hitting bone) reads 165°F.
- Every 30 minutes, use a spoon to baste the chicken with the juices and fat accumulating in the pan; this helps achieve that ultra-crispy skin.
- If the garlic cloves get too dark before the chicken is done, simply move them underneath the bird or remove them temporarily.
- Let the chicken rest for 15-20 minutes before carving; this is the secret to keeping the meat juicy.
How to sear filet mignon?

Why we love this
Filet mignon is the crown jewel of beef, prized for its extraordinary tenderness and lean, buttery profile. When seared to perfection, it develops a thin, savory crust that provides a sophisticated snap before yielding to an interior that is almost soft enough to cut with a fork. The experience is purely decadent, especially when finished with a gloss of herb-infused butter. On a hosting board, small medallions of filet mignon offer a touch of luxury, providing a high-end contrast to more rustic elements and ensuring that your gathering feels truly special and curated.
Ingredients
- 2-4 Filet Mignon steaks (6-8 oz each)
- 2 tablespoons neutral oil with a high smoke point
- 3 tablespoons high-quality unsalted butter
- 4 cloves garlic, smashed
- Fresh thyme sprigs
- Flaky sea salt and black pepper
How to make it
- Take the steaks out of the fridge 30-60 minutes before cooking to bring them to room temperature, which is vital for a thick cut like filet.
- Season the steaks very generously with salt and pepper on all sides, pressing the seasoning into the meat.
- Heat a heavy stainless steel or cast-iron pan over medium-high heat until it is extremely hot; you should see a faint wisp of smoke.
- Add the oil and once it shimmers, place the steaks in the pan—you should hear a loud, aggressive sizzle.
- Sear for about 3-4 minutes per side, turning only once, until a dark brown crust has formed.
- Lower the heat slightly and add the butter, garlic, and thyme to the pan.
- As the butter melts, use a large spoon to baste the steaks repeatedly with the hot, aromatic fat; this cooks the sides and adds incredible flavor.
- Check for a core temperature of 130°F for medium-rare; remember the temperature will rise about 5 degrees while resting.
- Remove the steaks from the pan and let them rest on a warm plate for 10 minutes before placing them on your food board to serve.
How to slow cook stew?
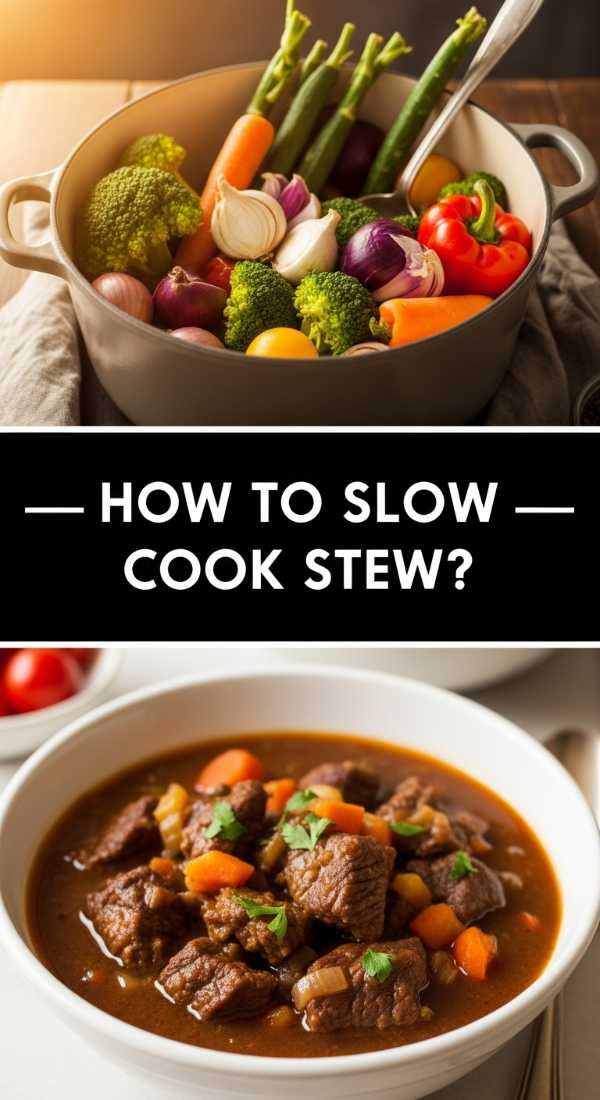
Why we love this
There is a deep, soulful satisfaction in a slow-cooked stew that has spent hours developing a complex, velvety broth and fork-tender meat. The aroma that fills the house while it simmers is the definition of ‘home,’ a rich blend of red wine, mirepoix, and slow-rendered beef. The textures are soft and unified, with carrots and potatoes absorbing the essence of the braising liquid. Serving a bowl of this rich stew on a board alongside crusty bread and salted butter turns a simple meal into an evocative, sensory journey that encourages guests to linger and savor every drop.
Ingredients
- 2 lbs beef chuck roast, cut into 1.5-inch cubes
- 3 large carrots, sliced into rounds
- 3 Russet potatoes, cubed
- 1 large onion, chopped
- 3 cloves garlic, minced
- 2 cups beef stock
- 1 cup dry red wine (like Cabernet or Merlot)
- 2 tablespoons tomato paste
- 2 sprigs fresh rosemary and 2 bay leaves
- Flour for dredging
How to make it
- Season the beef cubes with salt and pepper, then dredge them lightly in flour, shaking off the excess.
- In a large Dutch oven or heavy pot, heat olive oil over medium-high heat and sear the beef in batches until browned on all sides; do not crowd the pan, or the meat will steam instead of sear.
- Remove the meat and add the onions and carrots to the same pot, cooking until the onions are softened and picking up the browned bits (fond) from the bottom.
- Stir in the tomato paste and garlic, cooking for 1 minute until fragrant.
- Pour in the red wine to deglaze the pan, using a wooden spoon to scrape up all the flavor from the bottom.
- Add the beef back into the pot along with the beef stock, potatoes, rosemary, and bay leaves.
- Bring to a boil, then reduce the heat to very low, cover tightly, and simmer for 2.5 to 3 hours.
- Check the meat periodically; it should be ‘fork-tender,’ meaning it falls apart with very little pressure.
- If the sauce is too thin, simmer uncovered for the last 20 minutes to reduce and thicken into a glossy gravy.
How to smoke pork ribs?
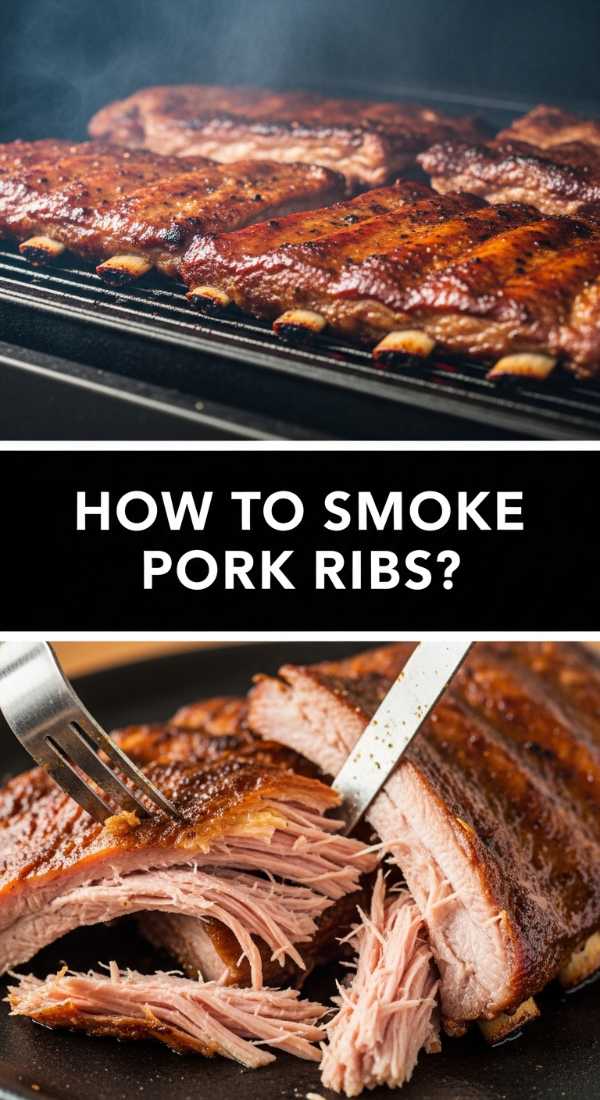
Why we love this
Smoked pork ribs are a labor of love, and the payoff is a sensory explosion of sweet, spicy, and smoky notes. A perfectly smoked rib features a ‘smoke ring’—a beautiful pink hue just beneath the surface—and a ‘bark’ that is tacky, dark, and intensely flavorful. The meat should pull away from the bone with ease but still maintain enough structure to provide a satisfying bite. Adding a rack of ribs to your food board introduces a rustic, finger-food element that is inherently social, messy in the best way possible, and guaranteed to be the highlight of the meal.
Ingredients
- 2 racks of St. Louis-style or Baby Back pork ribs
- Dry Rub: Brown sugar, paprika, garlic powder, onion powder, salt, pepper, and cayenne
- Apple juice or cider vinegar in a spray bottle (for spritzing)
- Your favorite BBQ sauce
- Hickory or Applewood chips/chunks
How to make it
- Remove the thin, papery membrane (the silverskin) from the back of the ribs by prying it up with a knife and pulling it off with a paper towel for better grip.
- Apply your dry rub generously to all sides of the ribs, pressing it in so it adheres to the meat; let them sit for 30 minutes at room temp.
- Preheat your smoker to a steady 225°F (107°C) using indirect heat.
- Place the ribs on the smoker, bone-side down, and close the lid; smoke for 3 hours, spritzing with apple juice every 45 minutes to keep them moist.
- After 3 hours, remove the ribs and wrap them tightly in heavy-duty aluminum foil with a splash of apple juice or a few pats of butter inside the foil.
- Return the wrapped ribs to the smoker for 2 more hours; this ‘Texas Crutch’ method tenderizes the meat through steaming.
- Unwrap the ribs carefully (watch the steam!) and brush them with BBQ sauce.
- Place them back on the smoker, unwrapped, for a final 30-60 minutes to allow the sauce to tack up and caramelize.
- Let the ribs rest for 15 minutes before slicing between the bones and arranging them on your board.
How to prepare lemon salmon?

Why we love this
Lemon salmon brings a bright, refreshing elegance to a food board, acting as a lighter counterpart to heavier meats. The vibrant pink of the fish, topped with charred lemon wheels and flecks of green herbs, is visually stunning. When prepared correctly, the skin becomes incredibly crisp—almost like a cracker—while the flesh remains moist, buttery, and flaky. The zesty aroma of citrus and the clean, oceanic flavor of the salmon create a sophisticated palate cleanser that makes the entire board feel balanced and thoughtfully composed.
Ingredients
- 4 salmon fillets (6 oz each), skin-on
- 1 large lemon, thinly sliced
- 2 tablespoons olive oil
- 2 tablespoons melted butter
- 1 tablespoon fresh dill or parsley, chopped
- Kosher salt and cracked black pepper
How to make it
- Take the salmon out of the fridge 15 minutes before cooking and pat the skin side very dry with paper towels; moisture prevents crispiness.
- Season the flesh side with salt and pepper, then lightly brush the skin side with olive oil.
- Heat a non-stick or well-seasoned cast-iron skillet over medium-high heat.
- Place the fillets in the pan, skin-side down, and immediately press down on them with a spatula for 10 seconds to prevent the skin from curling.
- Cook undisturbed for about 5-6 minutes until the skin is golden and crispy and the color of the fish has changed about three-quarters of the way up the side.
- Flip the fillets gently and add the lemon slices to the pan.
- Cook for another 1-2 minutes for a perfect medium-well; the salmon should still be slightly translucent in the very center.
- Off the heat, drizzle the melted butter and fresh herbs over the salmon, allowing the residual heat to release the herbal aromas.
- Serve immediately on the board with the charred lemon slices for extra acidity.
How to fry crispy chicken?

Why we love this
There is nothing quite as universally beloved as the audible ‘crunch’ of a perfectly fried piece of chicken. The golden-brown, craggy crust is a landscape of texture, holding onto just the right amount of salt and spice, while the meat inside remains steaming and incredibly juicy. The scent of hot oil and seasoned flour is nostalgic and comforting, promising a meal that is both indulgent and deeply satisfying. Piled high on a board with honey or hot sauce on the side, crispy fried chicken turns any gathering into a festive, high-energy event that guests will be talking about for weeks.
Ingredients
- 3 lbs chicken pieces (thighs and drumsticks work best)
- 2 cups buttermilk
- 1 tablespoon hot sauce
- 3 cups all-purpose flour
- 1/2 cup cornstarch (the secret to extra crunch)
- Seasoning: Salt, pepper, garlic powder, onion powder, and smoked paprika
- 1 quart neutral oil (vegetable or peanut) for frying
How to make it
- Whisk together the buttermilk and hot sauce in a large bowl, add the chicken pieces, and refrigerate for at least 4 hours (or overnight) to tenderize the meat.
- In a separate large bowl or shallow dish, whisk together the flour, cornstarch, and all your seasonings.
- Dredge each piece of chicken in the flour mixture, pressing firmly so the flour sticks, then dip it back into the buttermilk and back into the flour for a ‘double-dredge’—this creates those signature craggy bits.
- Place the coated chicken on a wire rack for 15 minutes before frying; this helps the coating set and prevents it from falling off in the oil.
- Heat the oil in a large Dutch oven to exactly 350°F (175°C); use a candy thermometer to monitor the temperature constantly.
- Carefully lower 3-4 pieces of chicken into the oil; do not overcrowd the pan, as the temperature will drop and the chicken will become greasy.
- Fry for 12-15 minutes, turning occasionally, until the crust is a deep golden brown and the internal temperature reaches 165°F.
- Drain the chicken on a clean wire rack over a baking sheet (not paper towels, which cause sogginess) and sprinkle with a final pinch of salt while still hot.
Conclusion
The viral simple food board trend is more than just a way to serve food; it’s an invitation to slow down and enjoy the company of those you love in a relaxed, beautiful setting. By mastering these foundational dishes—from the perfect sear on a steak to the delicate fluffiness of homemade gnocchi—you can create an interactive dining experience that is as delicious as it is memorable. Remember, the best boards are those filled with love, variety, and the confidence that comes from knowing you’ve cooked each element to perfection. So, grab your largest wooden board, pick a few of these recipes, and get ready to host an evening your guests will never forget.