
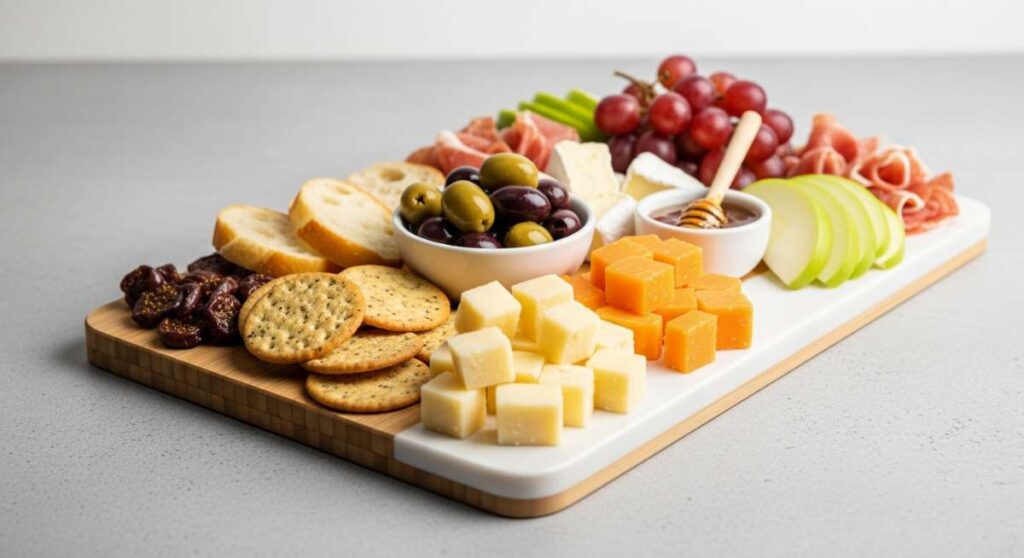
There is something truly magical about the way food acts as a bridge between hearts, especially when the sun begins to linger a little longer in the evening sky. We have all felt that flutter of panic when guests are on their way and the kitchen feels like a chaotic puzzle, but the secret to a viral, memorable gathering isn’t a five-course meal—it’s the art of the ‘Simple Food Board.’ It’s about taking those humble pantry staples and garden-fresh finds and arranging them into a tapestry of flavors that invites everyone to dig in, laugh louder, and stay a while.
My journey into the world of effortless hosting started when I realized that my favorite memories weren’t made at a formal dining table, but huddled around a coffee table filled with colorful snacks and shared stories. This approach to eating is more than just a trend; it’s a lifestyle shift toward intentionality and ease. By focusing on high-quality ingredients and beautiful presentation, you can transform a Tuesday night into a celebration. Let’s dive into the ultimate components that will make your next food board the talk of the town.
How to make strawberry pie?

Why we love this
Nothing captures the essence of a sun-drenched afternoon quite like a slice of strawberry pie. The contrast between the buttery, flaky crust and the burst of sweet, ruby-red berries is a sensory delight that evokes childhood nostalgia. As the pie bakes, the kitchen fills with the intoxicating aroma of caramelizing sugars and warm pastry, making your home feel instantly inviting. Every bite offers a harmony of textures, from the slight crunch of the golden crust to the silky, jam-like consistency of the fruit filling, finished with a cooling dollop of whipped cream.
Ingredients
- 2 pints fresh strawberries, hulled and sliced
- 1 cup granulated sugar
- 3 tablespoons cornstarch
- 1/4 teaspoon salt
- 1 tablespoon lemon juice
- 1 double pie crust (homemade or store-bought)
- 1 egg (for egg wash)
- 1 tablespoon coarse sugar
How to make it
- Begin by preheating your oven to 400°F (200°C). Roll out your bottom pie crust on a lightly floured surface until it is about 12 inches in diameter, then gently press it into a 9-inch pie plate, trimming any excess while leaving a 1-inch overhang.
- In a large mixing bowl, toss the sliced strawberries with the granulated sugar, cornstarch, salt, and lemon juice. Ensure the berries are evenly coated; the cornstarch is vital here as it will react with the fruit juices during baking to create a thick, glossy filling rather than a watery mess.
- Pour the strawberry mixture into the prepared bottom crust. Roll out the second crust and place it over the top, or cut it into strips to create a lattice pattern for a more professional, airy look. Crimp the edges tightly to seal in the juices.
- Whisk the egg with a splash of water and brush the entire top crust generously. Sprinkle with coarse sugar for an extra crunch. Bake for 45-50 minutes. You are looking for the crust to be a deep golden brown and for the fruit filling to be bubbling vigorously through the vents, which indicates the cornstarch has fully activated.
- Allow the pie to cool completely on a wire rack for at least 3 hours. This patience is critical; the filling needs time to set so you get clean, beautiful slices rather than a collapsed heap of berries.
How to cook rotel dip?

Why we love this
Rotel dip is the ultimate social glue of any party, offering a warm, gooey embrace that is impossible to resist. The velvety smoothness of the melted cheese acts as the perfect canvas for the zesty, fire-roasted kick of the tomatoes and green chilies. There is a specific, comforting sound of chips crunching against the backdrop of lively conversation that this dip always seems to inspire. It is savory, slightly spicy, and deeply satisfying, providing a rich mouthfeel that keeps guests hovering around the board until the very last scrape is gone.
Ingredients
- 1 lb Velveeta cheese, cubed
- 1 can (10 oz) Ro-Tel Diced Tomatoes and Green Chilies
- 1/2 lb ground sausage or lean ground beef
- 1/2 teaspoon garlic powder
- Fresh cilantro for garnish
- Tortilla chips for serving
How to make it
- In a large skillet over medium-high heat, brown your ground meat (beef or sausage). Use a spatula to break it into very small crumbles to ensure even distribution throughout the dip. Cook until no pink remains and the meat has developed a slight sear for extra flavor.
- Drain the excess grease thoroughly from the skillet. Leaving too much oil will cause the cheese dip to separate and become greasy rather than smooth and creamy.
- Turn the heat down to low and add the cubed Velveeta cheese to the skillet. It is important to use low heat here; high heat can scorch the cheese and ruin the texture. Stir frequently as the cheese begins to soften and melt into a golden pool.
- Pour in the can of Ro-Tel tomatoes, including the liquid. The acidity from the tomato juice helps balance the richness of the cheese. Add the garlic powder and stir continuously until the mixture is completely homogenous and silky.
- Transfer the dip to a small slow cooker on the ‘warm’ setting if you are serving it over a long period. This keeps the dip at the perfect dipping consistency. Garnish with fresh cilantro right before the guests arrive for a pop of color and freshness.
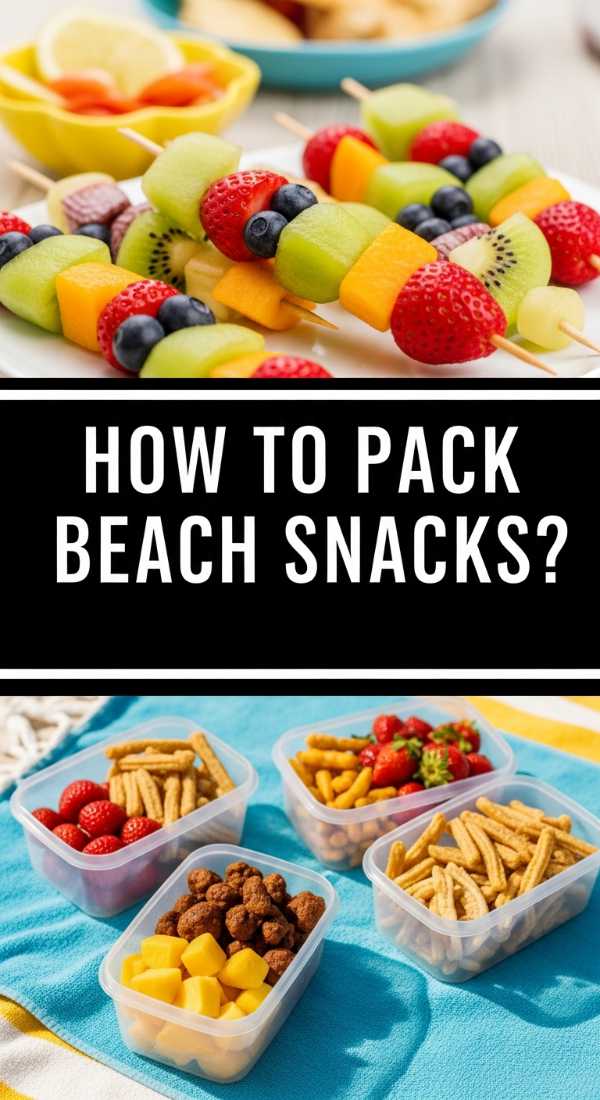
How to pack beach snacks?
Why we love this
The perfect beach snack is a curated balance of hydration and energy, designed to withstand the heat while providing a refreshing break from the salt and sand. There is a unique joy in opening a cooler to find crisp, chilled fruits and salty treats that taste better under the open sky. We love this approach because it prevents ‘hanger’ during a long day of swimming and sunbathing, ensuring everyone stays fueled and happy. The sensory experience of a cold, crunchy grape or a piece of savory jerky while listening to the rhythmic crashing of waves is the pinnacle of summer relaxation.
Ingredients
- Frozen grapes
- Pre-cut watermelon wedges
- Individual bags of beef jerky or turkey sticks
- Pita bread and hummus (in sealed containers)
- Mixed nuts with sea salt
- Insulated cooler bags and ice packs
How to make it
- Start your preparation the night before by washing and drying your grapes. Remove them from the stems and place them in a single layer in a freezer-safe bag. Freezing them turns the grapes into miniature, healthy sorbet bites that double as edible ice packs in your cooler.
- Slice your watermelon into wedges but keep the rind on; this provides a natural ‘handle’ so you aren’t touching the fruit with sandy fingers. Store these in a rigid, airtight container to prevent them from getting crushed.
- Portion out your hummus into small, individual-sized containers rather than one large tub. This prevents cross-contamination and ensures that if one container gets sand in it, the rest of the batch is still safe to eat.
- When packing the cooler, use a ‘last in, first out’ logic. Place heavier items and drinks at the bottom directly against the ice packs. Place the delicate snacks, like pita and fruit, at the very top.
- Wrap your dry snacks, like nuts or jerky, in waterproof silicone bags. Even if the ice melts and creates a pool at the bottom of the cooler, your crackers and nuts will stay perfectly dry and crunchy.
How to make soft butter?

Why we love this
Soft, spreadable butter is a small luxury that elevates a simple meal into something truly special. The sight of a knife gliding through a golden block of butter without resistance is incredibly satisfying, promising a perfectly even coating on warm bread or corn on the cob. When butter is at the correct room temperature, its aromatic fats are more volatile, meaning you can actually taste the richness and the subtle grassy notes much more clearly than when it is cold. It feels indulgent and thoughtful, showing your guests that you’ve considered even the smallest details of their dining experience.
Ingredients
- 1 stick high-quality salted butter (European-style preferred)
- A pinch of flaky sea salt (for topping)
- Warm water (for the ‘glass method’)
How to make it
- The most reliable method for perfect soft butter is the ‘countertop method.’ Take your butter out of the refrigerator at least 1 to 2 hours before you plan to serve. The goal is a temperature of about 65-70°F (18-21°C). At this point, the butter should yield to gentle pressure but still hold its shape.
- If you are in a rush, use the ‘warm glass hack.’ Fill a tall glass with boiling water and let it sit for 2 minutes until the glass is very hot to the touch. Empty the water and quickly wipe the inside dry.
- Stand your stick of butter upright on a small plate and place the inverted hot glass over it, creating a warm mini-sauna. Let it sit for 5-7 minutes. The residual heat from the glass will soften the butter from the outside in without melting it into a liquid state.
- Check the consistency by pressing the side of the glass. Once the butter feels pliable, remove the glass.
- Transfer the butter to a small ramekin and use a spoon to whip it slightly for a lighter texture. Top with a sprinkle of flaky sea salt for a beautiful visual finish and a burst of flavor that cuts through the richness.
How to prep camping meals?

Why we love this
Camping meals bring a rugged, smoky charm to the table that you just can’t replicate in a traditional kitchen. Preparing these meals ahead of time allows you to focus on the crackle of the fire and the stars above, rather than chopping onions in the dark. We love the efficiency of foil packs—they are self-contained little gifts of flavor that steam vegetables and sear meats simultaneously. The smell of woodsmoke mingling with seasoned potatoes and sausage is the ultimate outdoor perfume, creating a hearty, soul-warming experience that tastes like pure adventure.
Ingredients
- Smoked sausage, sliced into rounds
- Baby potatoes, quartered
- Bell peppers and onions, sliced
- Olive oil and Montreal steak seasoning
- Heavy-duty aluminum foil
How to make it
- Do all your knife work at home in your kitchen. Slice the sausages, peppers, and onions, and quarter the potatoes. Having everything pre-cut saves time and prevents a mess at the campsite.
- In a large bowl, toss all the ingredients with a generous amount of olive oil and your seasoning of choice. Ensure the potatoes are well-coated, as they take the longest to cook and need the oil to conduct heat and prevent sticking.
- Tear off large squares of heavy-duty aluminum foil. Distribute the mixture into the center of each square. It is vital to use heavy-duty foil to prevent tears from tongs or the heat of the coals.
- Fold the foil over the food and crimp the edges tightly to create a sealed pouch. Leave a little bit of headspace inside the pouch for steam to circulate, which is what cooks the potatoes through to a fluffy finish.
- When at the campsite, place the packs on a grate over hot coals (not direct flames). Cook for 20-25 minutes, flipping the packs halfway through using long-handled tongs. You will know they are done when the potatoes feel soft through the foil and the aroma of roasted garlic and meat is undeniable.
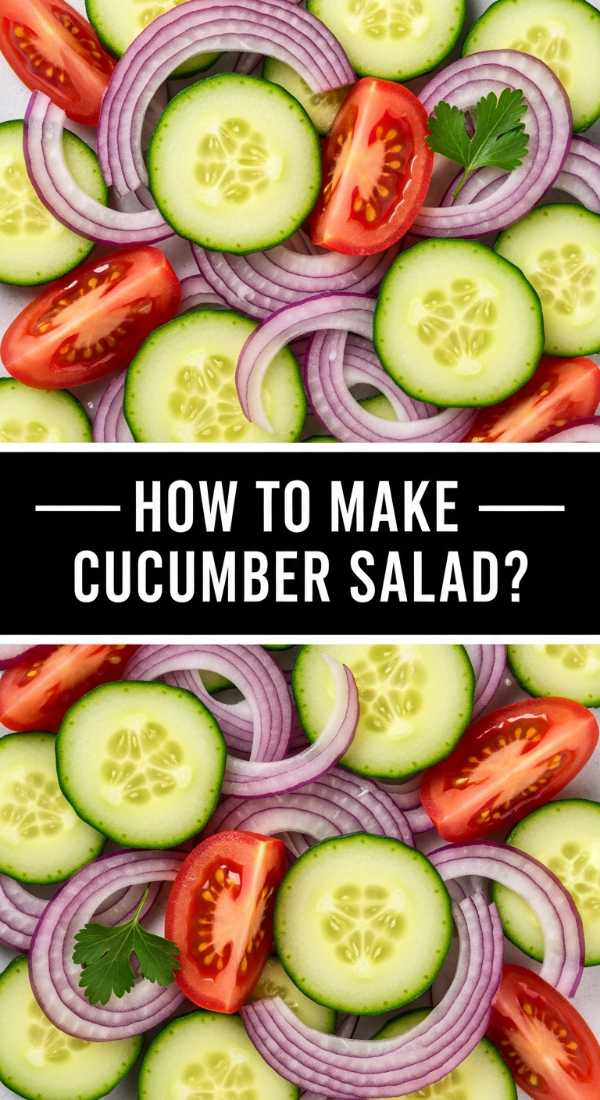
How to make cucumber salad?
Why we love this
A cucumber salad is the quintessential palate cleanser, offering a bright, acidic snap that cuts through the heaviness of grilled meats or creamy dips. The translucent, pale green slices look stunning on a food board, especially when tossed with vibrant red onions and flecks of fresh dill. We love the cooling sensation of the chilled cucumber, which provides a refreshing contrast to the summer heat. The dressing, a simple balance of vinegar and sugar, soaks into the vegetables to create a tangy, juicy bite that is both light and deeply hydrating.
Ingredients
- 3 large English cucumbers, thinly sliced
- 1/2 red onion, shaved into half-moons
- 1/2 cup white vinegar
- 2 tablespoons granulated sugar
- 1 teaspoon salt
- 2 tablespoons fresh dill, chopped
How to make it
- Slice your cucumbers as thinly as possible. Using a mandoline on the thinnest setting is the best way to achieve those paper-thin, professional-looking slices that absorb the dressing perfectly.
- Place the sliced cucumbers in a colander and sprinkle with the salt. Let them sit for about 15 minutes. This step is crucial; it draws out the excess water which would otherwise dilute your dressing and make the salad soggy.
- While the cucumbers drain, whisk together the white vinegar and sugar in a large bowl until the sugar is completely dissolved. The ratio should be sharp but with a hint of sweetness to round out the vinegar’s bite.
- Pat the cucumbers dry with a paper towel and add them to the bowl along with the shaved red onions and fresh dill. Toss thoroughly to ensure every slice is submerged or coated in the liquid.
- Cover and refrigerate for at least 30 minutes before serving. The flavors develop and the cucumbers become slightly pickled and translucent, creating a much more complex taste than if served immediately.
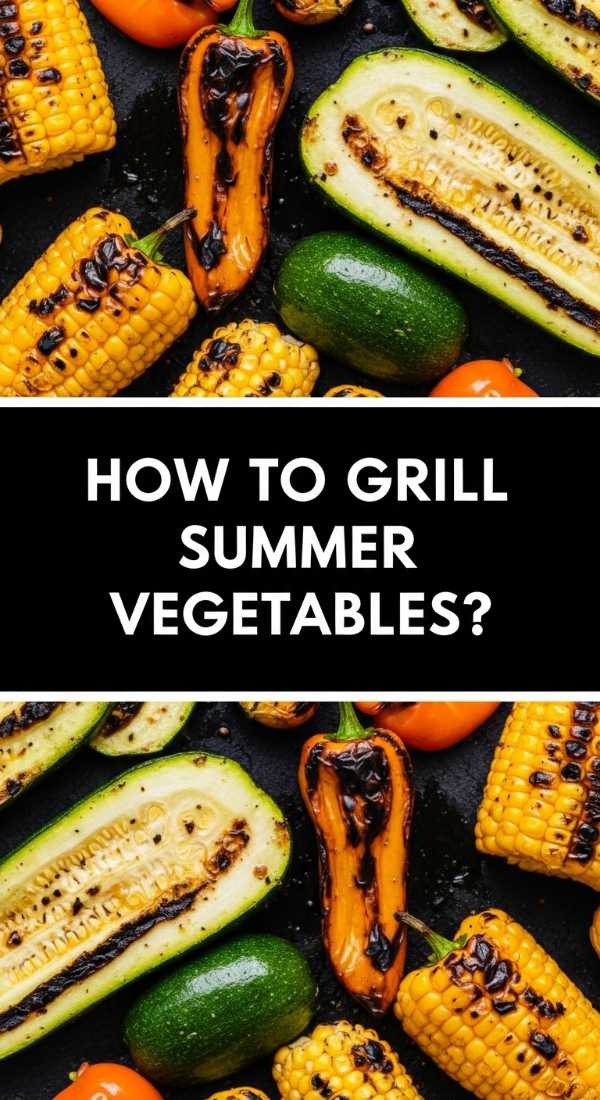
How to grill summer vegetables?
Why we love this
Grilling vegetables transforms them from simple side dishes into the stars of the show, intensifying their natural sugars through the magic of caramelization. The sight of those charred, dark grill marks against the bright oranges, greens, and yellows of garden produce is visually arresting. We love the smoky depth of flavor that only a live fire can provide, turning a standard zucchini or bell pepper into a tender, savory treat. The aroma of roasting vegetables wafting through the backyard is the true scent of summer hosting, promising a meal that is healthy, vibrant, and full of life.
Ingredients
- Zucchini and yellow squash, sliced lengthwise
- Bell peppers, seeded and quartered
- Asparagus spears, woody ends trimmed
- Olive oil, balsamic vinegar, and dried oregano
- Salt and cracked black pepper
How to make it
- Preheat your grill to medium-high heat (about 400°F). A hot grate is essential for getting those iconic sear marks without overcooking the interior of the vegetables until they become mushy.
- In a large tray, lay out your prepared vegetables and drizzle them generously with olive oil and a splash of balsamic vinegar. Season heavily with salt, pepper, and oregano. Use your hands to ensure every nook and cranny of the vegetables is oiled; this prevents them from sticking to the grill.
- Place the vegetables on the grill. Start with the denser items like peppers and squash. Place them perpendicular to the grill grates to prevent them from falling through.
- Grill each side for about 3-5 minutes. You are looking for clear grill marks and a slight softening of the texture. Use tongs to flip them carefully; the vegetables should release easily from the grate when they are ready.
- Move the vegetables to a cooler part of the grill if they are browning too fast but still feel raw in the center. Once removed, drizzle with a little more fresh olive oil and a squeeze of lemon juice to brighten the charred flavors before serving.
How to cook summer dinner?
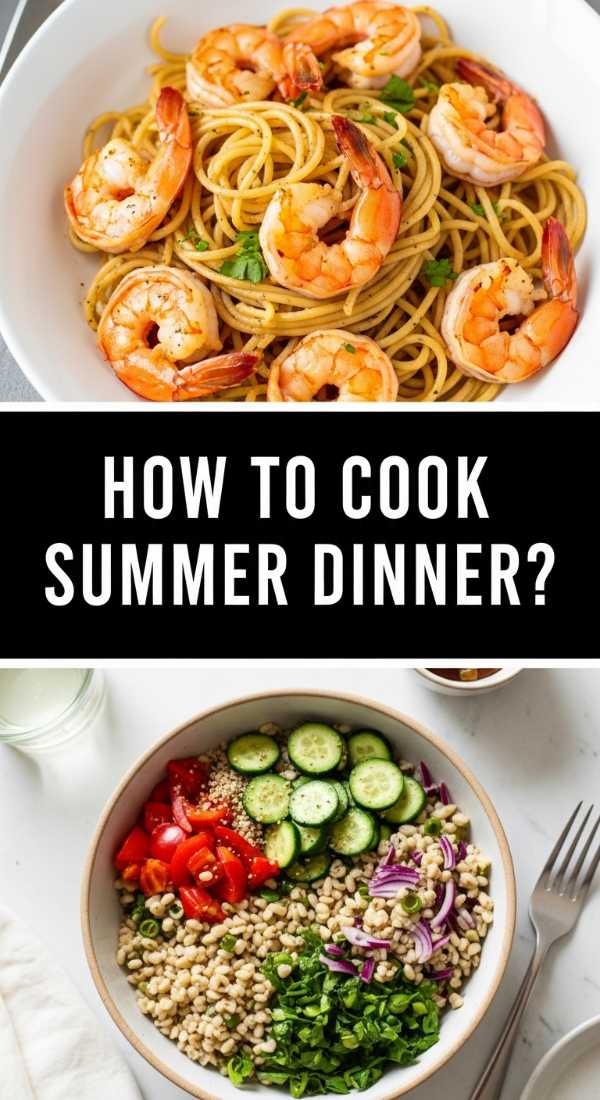
Why we love this
The ideal summer dinner is a celebration of minimalism, focusing on assembly rather than intense labor over a hot stove. It’s about creating a meal that feels light and airy, leaving you energized rather than weighed down for an evening stroll or a backyard fire. We love this style of cooking because it prioritizes fresh, raw ingredients paired with quick-seared proteins, highlighting the peak produce of the season. The sensory experience is a mosaic of temperatures—the warmth of a grilled chicken breast against the crisp, cold crunch of a garden salad, all tied together with a zesty vinaigrette.
Ingredients
- 1 lb chicken breast or shrimp
- Large bowl of mixed power greens (spinach, arugula, kale)
- 1 cup cherry tomatoes, halved
- 1/4 cup feta cheese crumbles
- Lemon-tahini or balsamic dressing
How to make it
- Season your protein (chicken or shrimp) simply with salt, pepper, and lemon zest. Summer flavors should be clean and bright.
- Sear the protein in a hot pan or on the grill. If using chicken, cook until the internal temperature reaches 165°F (74°C). For shrimp, cook only until they turn opaque and form a ‘C’ shape. Overcooking will result in a rubbery texture that ruins the lightness of the meal.
- While the protein rests (resting is key to keep the juices inside!), prepare a large bed of greens in a shallow bowl. A shallow bowl is better than a deep one as it allows for a better distribution of toppings.
- Scatter the halved cherry tomatoes and feta cheese over the greens. The tomatoes provide bursts of acidity, while the feta adds a creamy, salty punch that acts as a flavor bridge.
- Slice the protein into thin strips and lay it over the greens. Drizzle the dressing just before serving to keep the leaves from wilting. Serve with a side of crusty bread to soak up the juices and dressing.
How to make tomato salad?
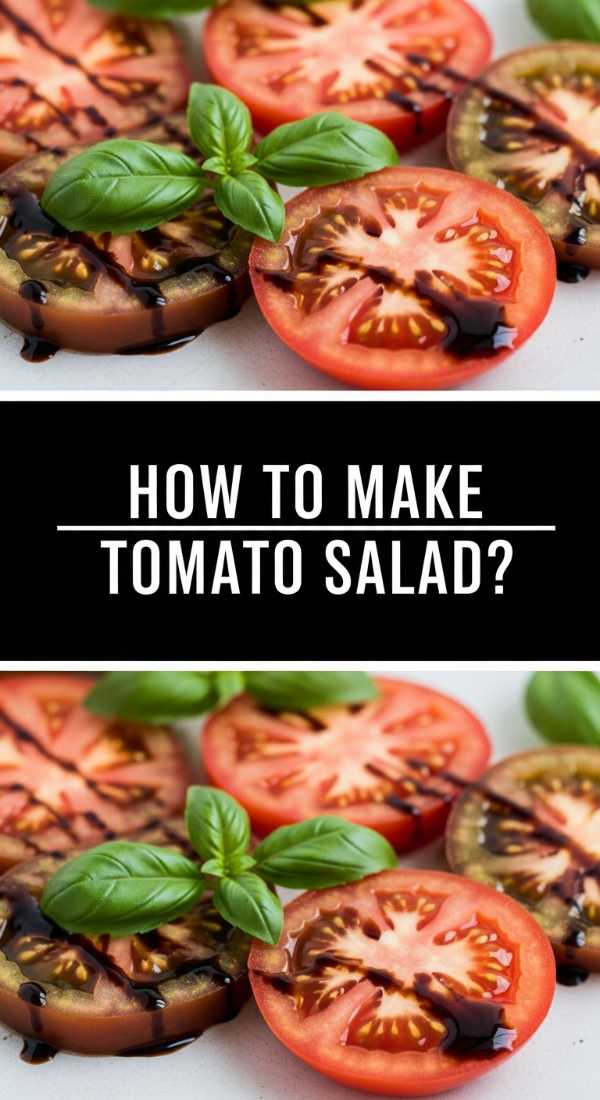
Why we love this
A true tomato salad is an homage to the garden, celebrating the fruit at its most ripe and flavorful state. When you slice into a sun-ripened heirloom tomato, the aroma is earthy and sweet, a far cry from the bland versions found in winter. We love the simplicity of this dish; it doesn’t hide behind heavy sauces but instead uses high-quality olive oil and balsamic glaze to amplify the tomato’s natural juices. The combination of creamy mozzarella, fragrant basil, and the slight acidity of the tomatoes creates a timeless flavor profile that feels sophisticated yet incredibly easy to prepare.
Ingredients
- 3-4 large heirloom tomatoes, various colors
- 1 ball fresh mozzarella cheese (Burrata also works beautifully)
- A handful of fresh basil leaves, torn
- Extra virgin olive oil and thick balsamic glaze
- Flaky sea salt
How to make it
- Never store your tomatoes in the fridge before making this salad; cold temperatures destroy the cellular structure and dull the flavor. Ensure they are at room temperature for the best experience.
- Slice the tomatoes into thick rounds or irregular wedges. Using a variety of shapes and colors makes the salad look like a piece of art on your food board.
- Tear the mozzarella into bite-sized chunks rather than slicing it perfectly. The jagged edges of torn cheese catch the oil and balsamic much better than smooth surfaces.
- Layer the tomatoes and cheese on a flat platter. Tuck fresh basil leaves in between the layers. Tearing the basil rather than cutting it with a knife prevents the edges from bruising and turning black.
- Drizzle generously with your highest quality olive oil and the balsamic glaze. Finish with a heavy pinch of flaky sea salt. The salt will draw out a small amount of tomato juice, which mixes with the oil to create a natural, delicious ‘sauce’ at the bottom of the plate.
How to prep easy meals?

Why we love this
Easy meal prep is the ultimate gift to your future self, stripping away the stress of ‘what’s for dinner’ and replacing it with the confidence of a plan. We love the rhythmic, meditative process of washing, chopping, and organizing ingredients for the week ahead. It turns the kitchen into a streamlined workshop where health and flavor are prioritized without sacrificing time. The feeling of opening a fridge stocked with colorful, prepped containers is incredibly satisfying, ensuring that even on your busiest days, you can assemble a viral-worthy meal in under ten minutes.
Ingredients
- Bulk grains (quinoa or brown rice)
- Roasted sweet potatoes
- Blanched broccoli or green beans
- Marinated protein (tofu, steak, or salmon)
- A ‘signature’ sauce (peanut, pesto, or ranch)
How to make it
- Start by cooking a large batch of grains. Use broth instead of water to infuse the grains with flavor from the inside out. Once cooked, spread them on a baking sheet to cool quickly before refrigerating to prevent them from becoming gummy.
- Roast your hearty vegetables like sweet potatoes or carrots at 400°F (200°C) with olive oil and salt. These keep their texture well over several days.
- Prepare your proteins. If you are prepping for the whole week, consider undercooking your vegetables slightly so they stay crisp when you reheat them later in the week.
- Divide the ingredients into clear, airtight glass containers. Glass is superior to plastic as it doesn’t retain odors and can go straight from the fridge to the microwave or oven safely.
- Store your sauces in separate small jars. Never dress your prepped meals ahead of time, as the acid in the dressing will break down the fibers of the vegetables and proteins, leading to a mushy texture by day three.
Wrapping Up Your Viral Food Board
Creating a viral food board is less about following a strict recipe and more about embracing the joy of variety and the beauty of fresh ingredients. Whether you’re layering a tomato salad or packing snacks for the beach, the goal is to create a shared experience that feels both indulgent and effortless. By mastering these simple components, you transform your pantry into a party-ready toolkit, ensuring that you’re always ready to welcome friends and family with open arms and a delicious spread. So, grab a board, pick your favorite sections, and start building your own masterpiece tonight!
Frequently Asked Questions
How do I keep my food board looking fresh for hours?
To keep a food board fresh, always place your ‘wet’ items like cucumber salad or tomato salad in small bowls rather than directly on the board. This prevents the juices from soaking into crackers or bread. Additionally, keep your fruit and cheese boards away from direct sunlight, and consider placing a small marble slab (chilled in the freezer beforehand) under your cheeses to keep them firm.
What are the best crackers to use for a simple food board?
The best crackers are those that offer a neutral flavor profile but a sturdy texture. Water crackers are excellent for soft cheeses, while multi-grain or seeded crackers provide a nice crunch and earthy flavor for dips like Rotel. Always include a gluten-free option, like rice crackers, to ensure all your guests can enjoy the spread.
Can I make these components ahead of time?
Absolutely! In fact, many of these dishes benefit from being made in advance. The cucumber salad and tomato salad develop better flavors after 30 minutes, and the camping meal packs can be assembled up to 24 hours before you head out. Just wait to slice any apples or avocados until the very last second to prevent browning.