
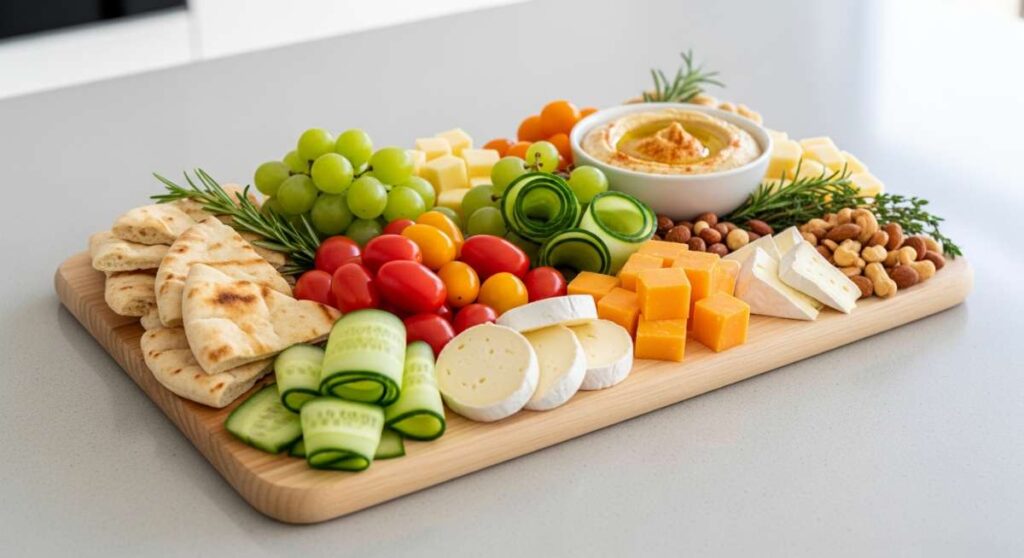
We have all been there—scrolling through TikTok at midnight, mesmerized by those perfectly curated food boards that look almost too good to eat. There is a certain magic in the way simple ingredients are transformed into a communal masterpiece, turning an ordinary weeknight dinner into a shared experience that feels both intimate and grand. These boards aren’t just about the food; they are about the laughter shared over a communal platter and the ease of a lifestyle that prioritizes connection over complicated cooking techniques.
As a blogger who has spent years chasing the perfect balance between ‘aesthetic’ and ‘actually edible,’ I can tell you that the secret to the viral food board trend isn’t a culinary degree. It’s about celebrating the seasons, focusing on high-quality textures, and letting the natural colors of fresh produce do the heavy lifting. Whether you are hosting a backyard sunset dinner or packing a cooler for the coast, these simple food board elements will help you master the art of the viral spread with effortless grace.
In this guide, we are diving deep into the components that make a board truly ‘Pinterest-perfect.’ From the sizzle of roasted veggies to the silky smooth finish of whipped butter, we will explore how to prep, cook, and present these TikTok-famous favorites. So, grab your favorite wooden board, and let’s get into the kitchen to create something beautiful.
How to make strawberry pie?

Why we love this
There is something inherently nostalgic about a fresh strawberry pie sitting on a sun-drenched countertop. As you slice into it, the vibrant red glaze glistens like rubies, releasing a sweet, floral aroma that instantly transports you to a summer afternoon. The contrast between the flaky, buttery crust that crumbles at the touch of a fork and the soft, jammy center creates a symphony of textures that dance on your palate. It’s a messy, beautiful labor of love that tastes like pure sunshine and memories of roadside berry stands, making it the perfect centerpiece for a dessert board.
Ingredients
- 2 pints fresh strawberries, hulled and sliced
- 1 cup granulated sugar
- 3 tablespoons cornstarch
- 1/4 teaspoon salt
- 1 tablespoon lemon juice
- 1 pre-baked 9-inch pie crust
- Whipped cream for topping
How to make it
- Begin by preparing your berries; wash them thoroughly and hull them, slicing half of the berries into quarters while leaving the smaller ones whole for varied texture.
- In a medium saucepan, combine one cup of the crushed strawberries with the sugar, cornstarch, and salt. Cook this over medium heat, stirring constantly with a whisk to prevent burning.
- As the mixture heats up, the berries will release their juices; continue to stir for about 5 to 7 minutes until the liquid transitions from a cloudy pink to a translucent, thick, deep red glaze.
- Remove the saucepan from the heat and stir in the lemon juice to add a bright acidity that balances the sugar, then fold in the remaining fresh sliced strawberries until they are evenly coated.
- Pour the warm strawberry filling into your pre-baked and completely cooled pie crust, smoothing the top with a spatula to ensure an even distribution.
- Place the pie in the refrigerator for at least 3 to 4 hours to allow the cornstarch to fully set, ensuring clean slices that hold their shape when served.
How to cook rotel dip?

Why we love this
Rotel dip is the ultimate comfort food that brings people together, offering a savory, cheesy indulgence that is impossible to resist. The aroma of seasoned beef mingling with melted cheese and zesty green chilies fills the room, signaling that the party has officially started. Its texture is velvety and thick, perfect for clinging to a salty tortilla chip, while the subtle heat from the peppers provides a gentle kick that keeps you reaching for more. It’s a nostalgic staple that feels both rustic and satisfying, grounding any fancy food board with a touch of approachable warmth.
Ingredients
- 1 lb ground beef or sausage
- 1 block (16 oz) Velveeta or processed cheese, cubed
- 1 can (10 oz) Ro-Tel Diced Tomatoes and Green Chilies
- 1/2 teaspoon garlic powder
- Optional: Chopped cilantro and jalapeños for garnish
How to make it
- Place a large skillet over medium-high heat and add your ground meat, breaking it apart with a wooden spoon as it browns to ensure small, even crumbles.
- Once the meat is fully cooked and no longer pink, drain the excess fat carefully to ensure the dip stays smooth and doesn’t become oily or separated.
- Reduce the heat to low and add the cubed cheese to the skillet; it is essential to cut the cheese into uniform cubes so they melt at the same rate without scorching.
- Pour in the entire can of Ro-Tel tomatoes, including the liquid, which provides the necessary moisture to create a silky, dippable consistency.
- Stir the mixture gently but constantly using a rubber spatula, scraping the bottom of the pan to ensure the cheese doesn’t stick as it transforms into a liquid gold sauce.
- Once the dip is completely smooth and bubbly, transfer it immediately to a pre-warmed serving bowl or a small slow cooker to maintain its gooey texture throughout the gathering.
How to pack beach snacks?
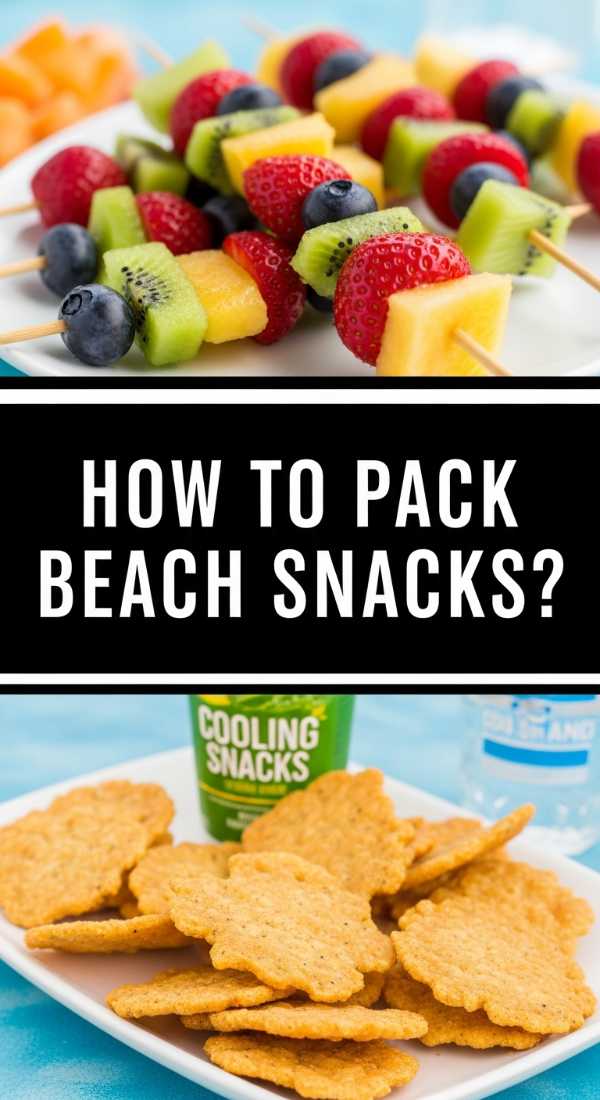
Why we love this
Packing the perfect beach snacks is an art form that balances refreshment with rugged portability, ensuring that your seaside aesthetic isn’t ruined by rogue sand. There is a specific joy in opening a cooler to find crisp, chilled fruits and salty treats that provide a burst of energy between dips in the ocean. The crunch of a cold cucumber or the burst of a frozen grape offers a sensory relief from the midday heat, while the organization of individual containers makes the whole experience feel like a curated picnic. It’s about creating a stress-free moment where the food is as breezy and light as the salty air around you.
Ingredients
- Pre-cut watermelon cubes
- Frozen grapes
- Individual hummus cups
- Pre-washed snap peas and baby carrots
- Beef jerky or turkey sticks
- Sturdy crackers or pita chips
- Insulated cooler bags and ice packs
How to make it
- Start by prepping all your produce the night before; wash and thoroughly dry fruits and vegetables to prevent them from becoming soggy in their containers.
- Utilize rigid, airtight plastic or glass containers to protect delicate items like crackers from being crushed by heavier drinks or ice packs in the bag.
- Freeze half of your water bottles and a container of grapes; these act as secondary ice packs to keep the bag cold and provide a slushy, refreshing treat as they melt.
- Layer your cooler strategically: place the heaviest items and ice packs at the very bottom, followed by proteins and dips, and keep the lightest items like chips at the very top.
- Package snacks in individual portions or “snack jars” to minimize the time the cooler stays open, preserving the internal temperature and preventing sand from entering large bags.
- Include a separate small bag for trash and plenty of wet wipes to ensure hands are clean before diving into the food spread.
How to whip creamy butter?
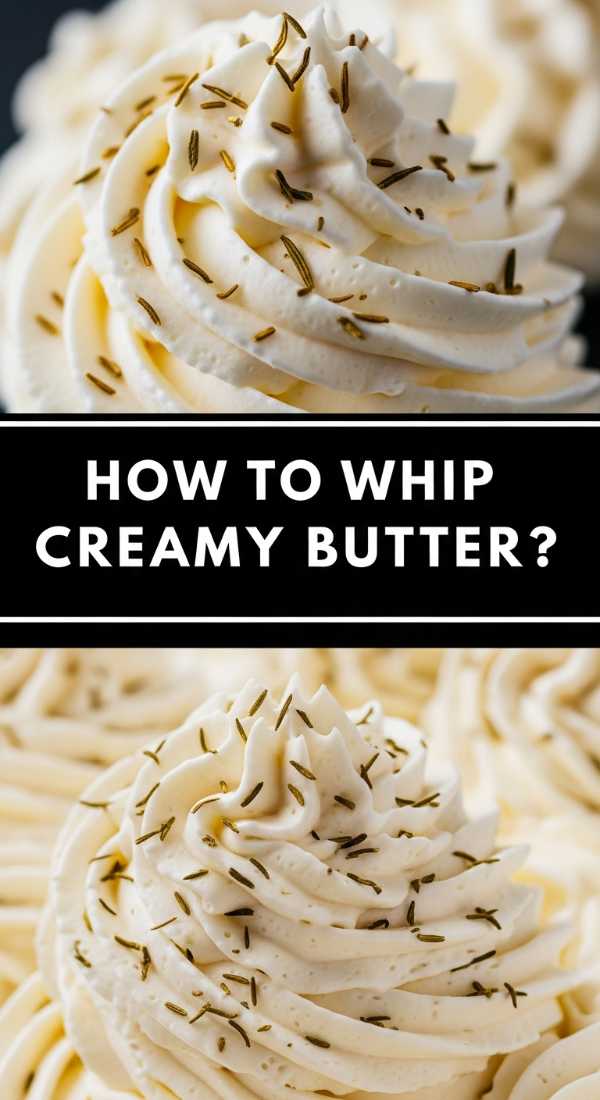
Why we love this
Whipped butter is the secret weapon of the viral butter board, turning a humble pantry staple into an ethereal, cloud-like spread that feels incredibly luxurious. As the beaters incorporate air, the butter transforms from a dense yellow block into a pale, voluminous silk that glides effortlessly across warm bread. The aroma is purely dairy-rich and comforting, especially when finished with a sprinkle of flaky sea salt that catches the light like tiny crystals. It is a tactile delight to spread, offering a soft, melt-in-your-mouth experience that elevates even the simplest baguette to gourmet status.
Ingredients
- 2 sticks (1 cup) high-quality unsalted butter, softened
- 1/2 teaspoon flaky sea salt
- 1 tablespoon heavy cream (optional for extra fluff)
- Honey or herbs for garnish
How to make it
- Ensure your butter is perfectly softened to room temperature; it should give easily when pressed but not be oily or melting, as temperature is critical for aeration.
- Place the softened butter in a stand mixer fitted with the whisk attachment or use a hand mixer in a deep glass bowl to contain the splatter.
- Start whipping at a low speed to break up the blocks, then gradually increase to high speed, beating for about 5 to 7 minutes until the volume has nearly doubled.
- If you want an even lighter, creamier consistency, drizzle in a tablespoon of heavy cream midway through the whipping process to emulsify the fats.
- Stop the mixer once the butter is pale ivory and holds soft peaks; over-whipping can cause it to break or become too soft to hold its shape on a board.
- Fold in your salt or flavorings by hand, then use an offset spatula to swirl the butter onto your board, creating peaks and valleys that look beautiful under soft lighting.
How to prep camping meals?
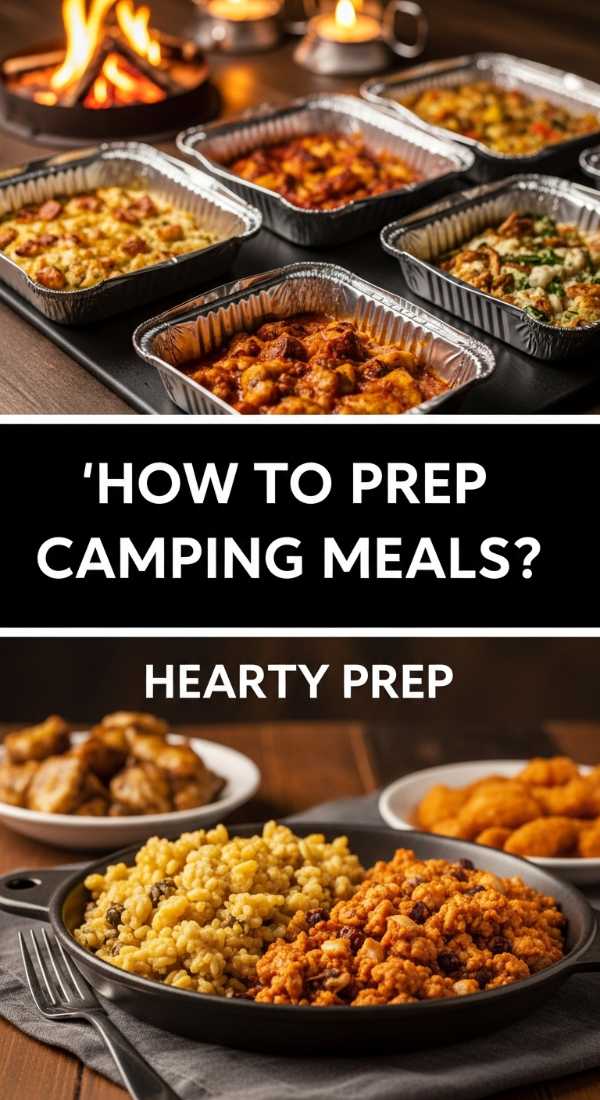
Why we love this
Camping meals are all about the primal satisfaction of cooking over an open flame, where the smoky scent of burning wood infuses every bite with a rustic, outdoorsy charm. There is a unique thrill in prepping everything at home so that once you’re in the wilderness, the cooking process is as seamless as the surrounding nature. The contrast of charred edges on a foil packet meal against a backdrop of pine trees makes the food taste twice as good as it would in a kitchen. It’s about simplicity, efficiency, and the rugged beauty of a meal shared under the stars with minimal cleanup required.
Ingredients
- Pre-marinated chicken or steak tips
- Chopped potatoes, bell peppers, and onions
- Aluminum foil (heavy-duty)
- Olive oil or butter pats
- Seasoning blends (garlic herb, cajun, etc.)
- Pre-cracked eggs in a sealed jar
How to make it
- Do all your heavy chopping and marinating at home; place proteins and vegetables in separate leak-proof silicone bags to maximize space in the camp cooler.
- For foil packet meals, tear off large squares of heavy-duty aluminum foil and lightly coat the center with oil or a pat of butter to prevent sticking.
- Layer your ingredients by placing the longest-cooking items, like sliced potatoes, at the bottom, followed by the protein and quicker-cooking vegetables on top.
- Fold the foil tightly to create a sealed pouch, leaving a small amount of space inside for steam to circulate and cook the ingredients evenly.
- When at the campsite, wait for your fire to burn down to white-hot coals rather than active flames, which provides a steady, even heat for roasting.
- Place the packets directly on a grate or the edge of the coals for 15-20 minutes, flipping halfway through using tongs to ensure the bottom doesn’t scorch while the top steams.
How to make tomato salad?
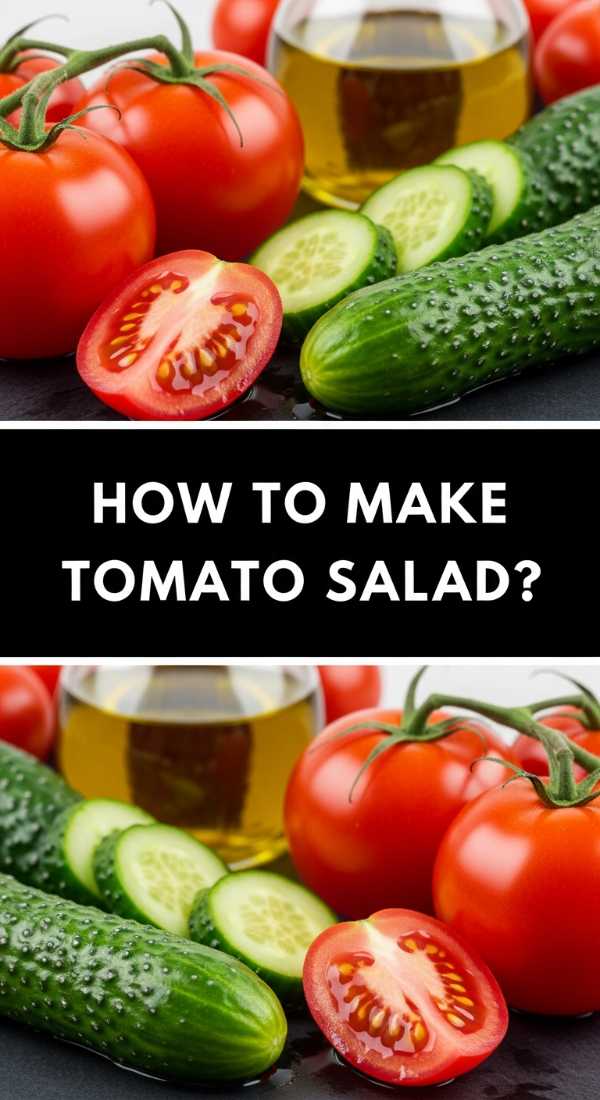
Why we love this
A fresh tomato salad is a celebration of peak summer, offering a vibrant explosion of color and juicy, acidic flavor that refreshes the soul. The sight of heirloom tomatoes in shades of purple, yellow, and deep red, glistening with a coating of olive oil, is enough to make any food lover swoon. Each bite is a balance of textures: the snap of the tomato skin, the creamy give of fresh mozzarella, and the aromatic crunch of basil. It is a dish that smells like a garden after a rainstorm—earthy, sweet, and incredibly clean—making it a vital, cooling addition to a heavy food board.
Ingredients
- 3-4 large heirloom tomatoes, sliced thick
- 1 pint cherry tomatoes, halved
- Fresh basil leaves, torn
- Extra virgin olive oil
- Balsamic glaze
- Flaky sea salt and cracked black pepper
How to make it
- Select tomatoes that are heavy for their size and fragrant at the stem; slice the larger ones into thick, rustic rounds and halve the smaller ones to create visual variety.
- Arrange the tomatoes on a flat platter or the corner of your food board, slightly overlapping the slices to create a shingled, professional look.
- Sprinkle the tomatoes generously with flaky sea salt and let them sit for about 10 minutes; this crucial step draws out the juices and intensifies the natural sweetness.
- Tear fresh basil leaves by hand rather than chopping them with a knife, which prevents the edges from bruising and darkening, preserving their bright green color.
- Drizzle a high-quality, peppery extra virgin olive oil over the top, followed by a zig-zag motion of thick balsamic glaze for a hit of concentrated sweetness.
- Finish with a final crack of black pepper just before serving to keep the spice fresh and aromatic on the palate.
How to roast grilled veggies?

Why we love this
Roasted grilled veggies bring an earthy, charred complexity to a food board that balances out richer cheeses and breads. The smell of caramelizing bell peppers and blackened zucchini is intoxicating, evoking images of midsummer cookouts and garden harvests. The texture is a delightful journey: a slightly crisp, smoky exterior that gives way to a tender, sweet, and concentrated interior. They are a feast for the eyes as much as the mouth, with deep char marks providing a rustic, professional contrast to the bright, raw elements on the table.
Ingredients
- Zucchini, yellow squash, and bell peppers
- Asparagus spears, trimmed
- Red onion wedges
- 3 tablespoons olive oil
- Dried oregano and garlic powder
- Lemon wedges for finishing
How to make it
- Preheat your grill to a steady medium-high heat (around 400°F) and ensure the grates are cleaned and lightly oiled to prevent the vegetables from tearing.
- Cut your vegetables into large, uniform pieces; for example, slice zucchini lengthwise into planks and peppers into wide strips so they don’t fall through the grates.
- In a large bowl, toss all the vegetables with olive oil, salt, pepper, and dried herbs until every surface is lightly glistening, which facilitates even browning.
- Place the sturdier vegetables like onions and peppers on the hottest part of the grill first, as they require more time to soften and caramelize.
- Add the delicate items like asparagus and squash later, grilling each side for about 3 to 5 minutes until distinct grill marks appear and the edges begin to curl.
- Remove the veggies to a tray and immediately squeeze fresh lemon juice over them while they are still hot; the steam will carry the citrus flavor deep into the fibers of the vegetables.
How to cook summer meals?

Why we love this
Cooking summer meals is all about embracing a slower, more intentional pace of life where the ingredients are allowed to speak for themselves with minimal interference. There is a lightness to this style of eating—dishes are bright, vibrant, and designed to be enjoyed outdoors as the sun dips below the horizon. The focus is on assembly rather than intense labor, using the heat of the day to justify no-cook options or quick-fire grilling. It’s a sensory experience of cold glasses of wine, the sound of crickets, and the refreshing taste of produce plucked straight from the vine, creating a communal vibe that feels like a permanent vacation.
Ingredients
- Seasonal proteins (shrimp, thin-sliced chicken, or halloumi)
- Fresh greens and herbs
- Quick-cooking grains (couscous or quinoa)
- Stone fruits (peaches or plums)
- Light vinaigrettes
How to make it
- Plan your menu around the “30-minute rule” to keep the kitchen from overheating; prioritize proteins that cook in under 10 minutes on a grill or stovetop.
- Utilize seasonal stone fruits by slicing them and giving them a quick sear on the grill to concentrate their sugars, adding a sophisticated sweetness to savory salads.
- Prepare a large batch of a neutral grain like quinoa early in the morning when the air is cool, then fluff and chill it to use as a base for various bowls throughout the week.
- Master the “assembly board” technique by placing raw ingredients, grilled proteins, and small bowls of dressing directly on a large wooden plank for self-service.
- Incorporate plenty of raw elements—shaved radishes, cold cucumber ribbons, and fresh sprouts—to provide a temperature contrast to cooked items.
- Keep the seasonings simple and bright: think Maldon salt, fresh citrus zest, and handfuls of soft herbs like mint and cilantro to keep the palate feeling refreshed.
How to serve cheesy dip?

Why we love this
A warm, bubbling cheesy dip is the undisputed king of any food board, providing a gooey, indulgent focal point that everyone gravitates toward. The sight of cheese pulling apart in long, stretchy ribbons as a piece of crusty bread is dipped in is pure culinary theater. The aroma is rich and savory, often spiked with garlic or herbs that hit you before you even take a bite. It feels like a hug in a bowl—unapologetically decadent and perfect for cozying up during a movie night or a casual get-together with best friends. It’s the ultimate “viral” food because it looks just as good in motion as it does in a still photo.
Ingredients
- 8 oz cream cheese, softened
- 1 cup shredded mozzarella
- 1/2 cup grated parmesan
- 1/2 cup sour cream
- 1 teaspoon garlic mince
- Optional: Spinach, artichokes, or bacon bits
How to make it
- In a medium mixing bowl, combine the softened cream cheese with sour cream and garlic, beating them together until no lumps remain for a perfectly smooth base.
- Fold in the shredded cheeses and any optional mix-ins like sautéed spinach or crispy bacon, ensuring they are distributed evenly throughout the mixture.
- Transfer the mixture to a small, oven-safe ceramic dish or a cast-iron skillet, which holds heat longer than glass and helps keep the dip melty on the board.
- Bake at 375°F for 20 to 25 minutes, or until the edges are vigorously bubbling and the cheese on top has developed golden-brown, toasted spots.
- For a professional touch, finish the dip under the broiler for the final 60 seconds to achieve a deeply caramelized crust that provides a satisfying snap.
- Place the hot dish directly onto your wooden board, surrounding it with sturdy dippers like toasted baguette slices or bagel chips that can handle the weight of the cheese.
How to prepare fresh dinners?
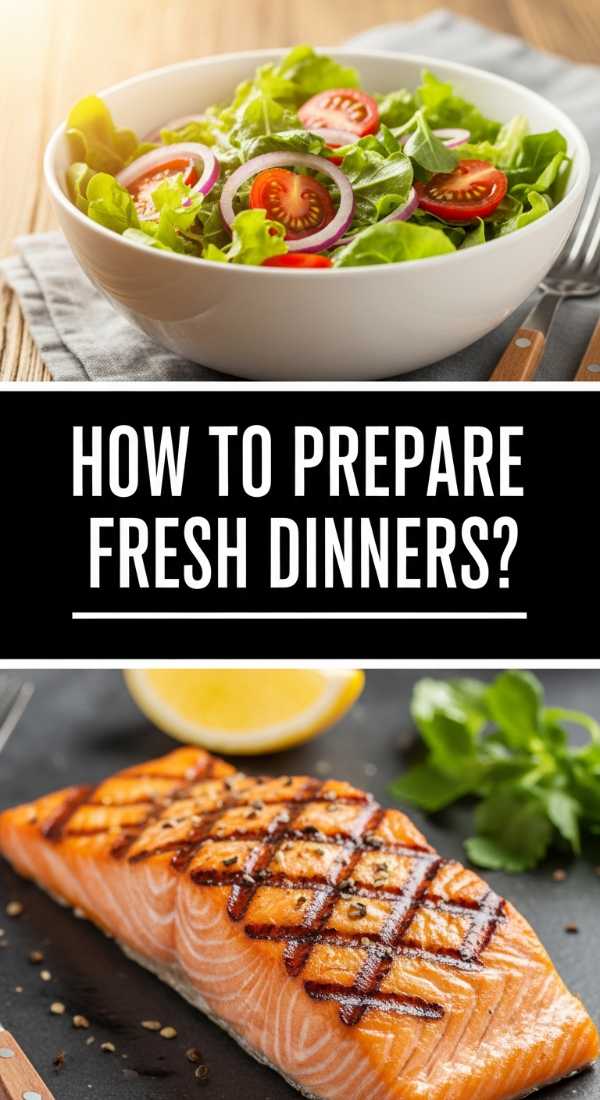
Why we love this
Fresh dinners are the cornerstone of a vibrant lifestyle, offering a way to nourish the body while delighting the senses with clean, bold flavors. The experience of preparing a fresh dinner is tactile and grounding—the snap of green beans, the zesty spray of a lemon peel, and the vibrant colors of a farm-to-table spread. There is a profound satisfaction in knowing that the food on your plate was grown, not manufactured, resulting in a meal that leaves you feeling energized rather than weighed down. It is an aesthetic of wellness and abundance, where the dinner table becomes a garden of possibilities.
Ingredients
- Lean proteins (wild-caught salmon, organic chicken, or chickpeas)
- A variety of cruciferous and leafy vegetables
- Freshly squeezed citrus and high-quality oils
- Toasted nuts or seeds for crunch
- Microgreens for garnish
How to make it
- Start with a high-quality protein and treat it simply; sear salmon skin-side down in a hot pan with just salt and pepper to achieve a crispy texture and moist interior.
- Focus on “component cooking” by preparing three separate elements: a roasted vegetable, a fresh raw salad, and a clean protein, then arranging them thoughtfully.
- Create a quick “green sauce” by blending parsley, olive oil, lemon juice, and a clove of garlic to drizzle over everything, tying the different components together with a fresh, herbal note.
- Pay attention to the architecture of the plate; place your greens at the base, nestle the protein on top, and scatter your nuts and seeds for a final layer of texture.
- Use the “color wheel” technique—if your plate looks too monochromatic (all green or all brown), add a pop of color with pickled red onions or shaved carrots.
- Serve the meal immediately while temperatures are at their peak contrast, ensuring the hot items are steaming and the cold items are crisp.
Conclusion: Your Board, Your Rules
Mastering the viral food board trend is less about following a rigid recipe and more about embracing a philosophy of abundance and ease. By focusing on these simple, high-impact dishes, you can create a dining experience that feels both luxurious and approachable. Remember, the best boards are the ones that reflect your personality—so don’t be afraid to mix the sweet with the savory, the charred with the fresh. Now it’s your turn to take these TikTok inspirations and bring them to your own table. Happy hosting!