

There is something undeniably magical about the way a simple wooden board can transform a scattered array of ingredients into a communal masterpiece. We’ve all seen it scrolling through our feeds—the effortlessly chic ‘Simple Food Board’ that looks like it stepped out of a high-end editorial but feels like a warm hug from an old friend. It’s not just about the food; it’s about the permission it gives us to slow down, put our phones aside, and actually connect over the shared experience of picking, dipping, and savoring.
I remember the first time I hosted a gathering where I ditched the formal three-course meal for one of these viral boards. The tension in the room instantly evaporated. Instead of being stuck in the kitchen, I was right there with my loved ones, laughing as we reached for the last slice of heirloom tomato or the creamiest dollop of whipped butter. This lifestyle is all about celebrating the season’s bounty and finding beauty in the basics, making every guest feel like they’ve found a seat at the most welcoming table in town.
How to make strawberry pie

Why we love this
Nothing says peak summer quite like the scent of a freshly baked strawberry pie wafting through an open window. This dish is a celebration of texture, from the flaky, buttery shatter of the golden-brown crust to the jammy, ruby-red center that oozes with natural sweetness. The aroma is a nostalgic blend of toasted pastry and sun-ripened berries, creating a sensory experience that feels both indulgent and remarkably fresh. It is the perfect centerpiece for a food board, offering a vibrant pop of color and a sweet contrast to more savory elements.
Ingredients
- 2 cups all-purpose flour
- 1 cup cold unsalted butter, cubed
- 1/2 cup ice water
- 1 teaspoon salt
- 4 cups fresh strawberries, hulled and halved
- 3/4 cup granulated sugar
- 3 tablespoons cornstarch
- 1 tablespoon lemon juice
- 1 egg (for wash)
How to make it
- Begin by preparing your crust: Combine the flour and salt in a large bowl, then cut in the cold butter using a pastry cutter or your fingertips until the mixture resembles coarse crumbs. Gradually add ice water, one tablespoon at a time, until the dough just comes together; avoid overworking the dough to ensure a flaky texture.
- Divide the dough into two disks, wrap them in plastic, and chill in the refrigerator for at least one hour. This allows the gluten to relax and the fats to solidify, preventing shrinkage during baking.
- Preheat your oven to 400°F (200°C). Roll out one disk on a floured surface to fit a 9-inch pie plate, gently pressing it into the bottom and sides.
- In a separate bowl, toss the strawberries with sugar, cornstarch, and lemon juice. The cornstarch is vital here—it acts as a thickening agent to ensure your pie filling isn’t watery.
- Pour the strawberry mixture into the prepared crust. Roll out the second disk and place it over the top, either as a solid sheet with steam vents or a beautiful lattice pattern. Crimping the edges tightly is a professional tip to seal in those precious juices.
- Brush the top with a beaten egg wash for a glossy, professional finish. Bake for 45-50 minutes, or until the crust is deeply golden and the filling is bubbling thick and slow.
How to make rotel dip

Why we love this
Rotel dip is the ultimate nostalgic comfort food that never fails to draw a crowd. There’s something incredibly satisfying about the velvety, liquid gold of melted cheese swirled with the spicy, acidic kick of diced tomatoes and green chilies. It’s a sensory explosion—salty, creamy, and subtly piquant—that pairs perfectly with a crunchy, sea-salted tortilla chip. Serving this warm in a small cast-iron skillet on your board adds an element of rustic charm that invites everyone to dive in immediately.
Ingredients
- 1 lb Velveeta or high-quality melting cheese, cubed
- 1 can (10 oz) Ro-Tel Diced Tomatoes and Green Chilies
- 1/2 lb ground sausage or beef (optional)
- 1/2 teaspoon chili powder
- Fresh cilantro for garnish
How to make it
- If you are including meat, start by browning the ground sausage or beef in a skillet over medium-high heat until fully cooked. Drain the excess fat thoroughly; this ensures your dip remains smooth and not greasy.
- In a slow cooker or a heavy-bottomed saucepan over low heat, combine the cubed cheese and the undrained can of Ro-Tel. The juices from the tomatoes are essential for achieving the perfect dipping consistency.
- Stir the mixture constantly if using a saucepan to prevent the cheese from scorching on the bottom. You are looking for a completely smooth, homogeneous texture where the chilies are evenly suspended in the cheese.
- Add the chili powder for an extra layer of depth. Once the dip is bubbling slightly and silky, fold in the cooked meat if using.
- Keep the heat on the lowest setting to maintain a pourable consistency. If the dip becomes too thick, a splash of whole milk or heavy cream can be whisked in to restore its velvet-like flow.
How to prep beach snacks
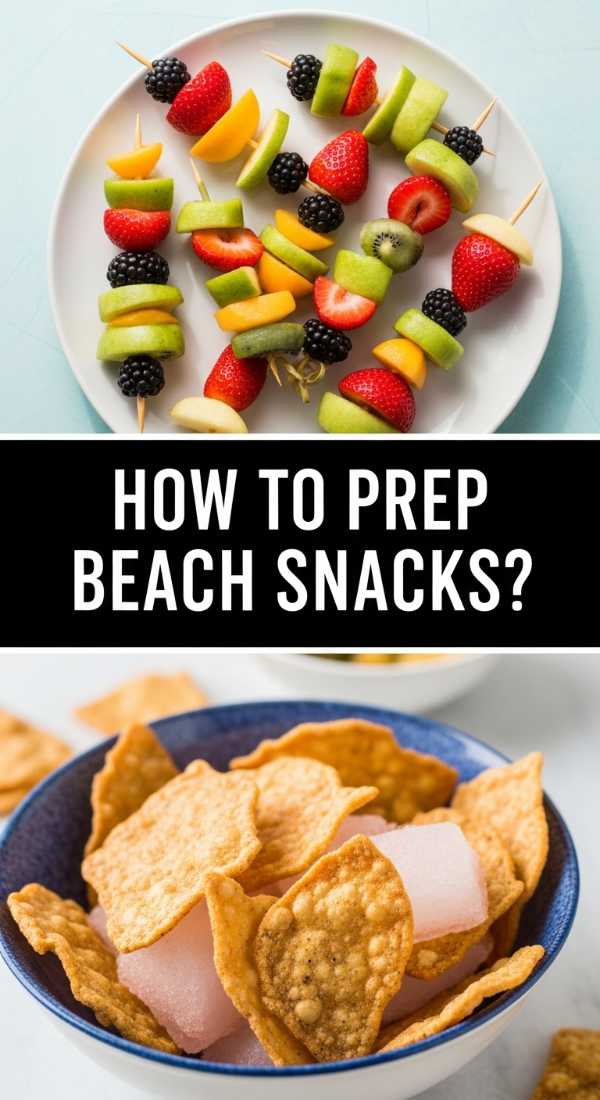
Why we love this
Prepping beach snacks is an art form that prioritizes freshness, hydration, and the ease of eating with sandy fingers. We love the vibrant crunch of chilled cucumbers and bell peppers, providing a refreshing burst of moisture against the heat of the sun. The combination of salty nuts, sweet grapes, and crisp crackers creates a balanced palette of flavors that keeps energy levels high for a day of waves and wind. It’s about creating a portable feast that feels like a luxury picnic rather than a messy afterthought.
Ingredients
- English cucumbers, sliced into thick rounds
- Mini sweet peppers, halved and deseeded
- Frozen grapes
- Salted almonds or cashews
- Pretzel crisps
- Individual hummus cups
How to make it
- Start with the fruit: Freeze your grapes overnight. This is a pro tip that turns them into little natural popsicles that double as ice packs in your cooler, keeping everything else chilled.
- Slice the English cucumbers into thick, sturdy rounds. English cucumbers are preferred because they have thinner skins and fewer seeds, staying crisper longer than standard varieties.
- Clean and halve the mini peppers, removing the ribs and seeds to create “boats” that are perfect for scooping. Store these in airtight containers with a damp paper towel to maintain their snap.
- Portion out nuts and pretzels into small, reusable silicone bags to prevent them from getting soggy or sandy.
- When assembling the board or container, keep the “wet” items like hummus and cucumbers separate from the “dry” items like pretzels until the moment of serving to ensure maximum crunch.
How to make butter squishy

Why we love this
Whipped, “squishy” butter is the luxurious secret to a high-end food board that feels incredibly indulgent yet costs almost nothing to make. The texture is ethereal—light, airy, and cloud-like—melting the moment it touches a warm piece of sourdough. By whipping it, you unlock a delicate creaminess and a pearlescent sheen that makes ordinary butter look like a gourmet spread. Topped with a sprinkle of flaky sea salt and fresh herbs, it becomes a focal point that guests can’t stop talking about.
Ingredients
- 2 sticks high-quality unsalted butter (room temperature)
- 1 tablespoon heavy cream
- 1/2 teaspoon flaky sea salt
- Fresh thyme or rosemary (finely chopped)
How to make it
- Ensure your butter is truly at room temperature; it should be soft enough that a finger leaves a deep indent with no resistance, but not so soft that it’s oily.
- Place the butter in the bowl of a stand mixer fitted with the whisk attachment. Begin whisking on medium speed for about 2 minutes to break the butter down.
- Add the tablespoon of heavy cream. This is the secret ingredient that adds a silky, “squishy” moisture and helps incorporate more air into the fat.
- Increase the speed to high and whip for another 3-5 minutes. Watch for the color to change from a yellow-gold to a pale, creamy white. The volume should nearly double.
- Once the butter forms soft, billowy peaks, stop the mixer and fold in the sea salt and herbs by hand to keep the texture fluffy.
- Transfer the butter to a shallow bowl or spread it directly onto your board in decorative swoops using the back of a spoon.
How to prepare camping meals

Why we love this
Camping meals bring a primal, smoky depth to the food board concept, utilizing the unpredictable magic of an open flame. There is something deeply satisfying about the charred edges of a foil-packet meal or the rustic look of fire-toasted bread. These meals are designed for ease and minimal cleanup, allowing the focus to remain on the crackling fire and the starlit sky. The aroma of woodsmoke mingled with garlic and herbs creates a ruggedly sophisticated dining experience that tastes better because it was cooked outdoors.
Ingredients
- Pre-marinated steak tips or chicken thighs
- Baby potatoes, parboiled
- Corn on the cob, cut into rounds
- Zucchini slices
- Heavy-duty aluminum foil
- Garlic butter
How to make it
- The key to successful camping meals is prep at home: Parboil your baby potatoes for 5 minutes in salted water before you leave. This ensures they cook at the same rate as the meat over the campfire.
- Lay out large squares of heavy-duty aluminum foil. You want double layers to prevent any tearing from the heat of the coals.
- Place a portion of meat, potatoes, corn, and zucchini in the center of each foil square. Generously dollop with garlic butter and a sprinkle of salt.
- Fold the foil tightly, creating a sealed packet that allows the ingredients to steam in their own juices while the exterior gets a light char.
- Place the packets on a grill grate over hot coals (not active flames). Cook for 15-20 minutes, flipping halfway through. Look for the packet to puff up with steam as a sign of doneness.
- Carefully open the packets—the steam will be intense—and serve them directly on the board for a rustic, communal feast.
How to make tomato salad
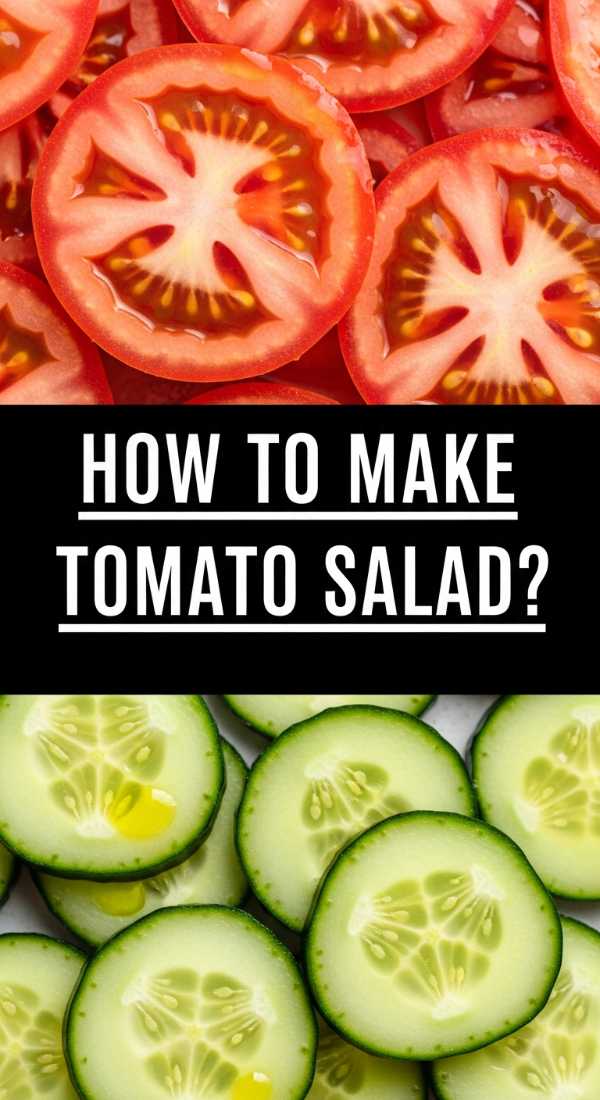
Why we love this
A fresh tomato salad is a masterclass in simplicity, relying on the vibrant, sun-soaked flavors of peak-season produce. We love the visual feast of colors—deep purples, bright yellows, and classic reds—all glistening under a drizzle of liquid-gold olive oil. Each bite is a balance of acidity and sweetness, accented by the peppery bite of fresh basil and the crystalline crunch of sea salt. It’s a light, refreshing addition to any board that cleanses the palate and celebrates the garden’s bounty.
Ingredients
- 3 lbs assorted heirloom tomatoes
- 1 bunch fresh Genovese basil
- 4 oz fresh mozzarella pearls or burrata
- 1/4 cup extra-virgin olive oil
- 2 tablespoons balsamic glaze
- Flaky sea salt and cracked black pepper
How to make it
- Slice your heirloom tomatoes into various shapes—some in thick rounds, some in wedges, and smaller cherry tomatoes halved. This variation in size creates a more interesting visual and textural experience.
- Arrange the tomatoes on a flat platter or directly on your board, overlapping them slightly to create depth.
- Tuck the fresh mozzarella pearls or a torn ball of burrata into the crevices between the tomatoes. If using burrata, break it open just before serving so the creamy center can spill out.
- Hand-tear the basil leaves rather than chopping them with a knife; this prevents the edges from bruising and browning, preserving the bright green color and aromatic oils.
- Just before serving, drizzle the entire arrangement with high-quality olive oil. Follow with a artistic zig-zag of balsamic glaze for a punch of concentrated sweetness.
- Finish with a generous sprinkle of flaky salt. The salt draws out the juices of the tomatoes, creating a natural “dressing” on the board.
How to grill garden vegetables

Why we love this
Grilling garden vegetables brings out a concentrated sweetness and a smoky complexity that raw veggies simply can’t match. We love the dramatic char marks that add a professional, rustic aesthetic to the food board, turning humble stalks of asparagus or slices of eggplant into stars. The texture remains tender-crisp, and the aroma of caramelized sugars and charred herbs is intoxicating. It’s a healthy, vibrant way to add warmth and substance to a spread without the heaviness of traditional sides.
Ingredients
- Asparagus spears, woody ends trimmed
- Bell peppers, sliced into wide planks
- Zucchini and yellow squash, sliced lengthwise
- Red onion, cut into thick rounds
- Olive oil, lemon juice, and dried oregano
How to make it
- Preheat your grill to medium-high heat (about 400°F). A hot grill is essential for getting those iconic char marks without overcooking the inside of the vegetables.
- Toss your prepared vegetables in a large bowl with olive oil, salt, pepper, and a teaspoon of dried oregano. Ensure every piece is lightly coated; the oil prevents sticking and aids in heat conduction.
- Place the vegetables across the grates. Professional tip: Lay them perpendicular to the grill lines to ensure they don’t fall through and to get the best markings.
- Grill the peppers and onions first as they take longer (4-5 minutes per side). Add the asparagus and squash last, as they only need 2-3 minutes per side to reach a tender-crisp state.
- Look for the vegetables to become slightly charred and vibrant in color. Use tongs to flip them only once to maintain the integrity of the char marks.
- Remove from the grill and immediately squeeze fresh lemon juice over them. The acidity brightens the smoky flavor and keeps the colors popping on your board.
How to cook summer dinners

Why we love this
Summer dinners should feel effortless and breezy, emphasizing speed and freshness over heavy techniques. We love the shift toward meals that can be assembled quickly and enjoyed outside, where the golden hour light makes everything look more appetizing. This approach to cooking is about minimal heat in the kitchen and maximum flavor on the plate, utilizing high-quality proteins and seasonal produce. It’s a lifestyle choice that values leisure time and the joy of a meal that feels as light as the summer breeze.
Ingredients
- Thin-cut chicken cutlets or shrimp
- Pre-washed arugula or baby kale
- Canned chickpeas or white beans
- Store-bought pesto or vinaigrette
- Crumbled feta or goat cheese
How to make it
- Opt for quick-cooking proteins. Thin chicken cutlets or shrimp cook in under 5 minutes per side in a hot skillet, minimizing the time you spend over a stove.
- While the protein cooks, prepare a base of greens in a large, shallow bowl. Adding a can of rinsed chickpeas provides a hit of protein and fiber with zero cooking required.
- Use a “one-pan” mindset. Once the chicken is done, toss the greens and beans directly into the warm pan for 30 seconds. The residual heat will slightly wilt the greens without making them soggy.
- Whisk together a simple dressing of pesto and a splash of vinegar, or use a high-quality store-bought version to save time.
- Plate the protein over the greens and finish with a sprinkle of salty feta. This creates a meal that is balanced, colorful, and ready in under 15 minutes, making it the perfect addition to a busy weeknight food board.
How to make fresh meals

Why we love this
Fresh meals are the backbone of a healthy, vibrant lifestyle, focusing on ingredients in their most natural state. We love the bright, clean flavors that come from using herbs right off the windowsill and produce that hasn’t spent days in transit. There’s a certain crispness to a fresh meal—a literal snap of a pea or the juiciness of a sliced peach—that feels revitalizing. It’s food that makes you feel good from the inside out, providing a literal glow that matches the sunny aesthetic of a viral food board.
Ingredients
- Fresh corn, cut off the cob
- Avocado, diced
- Radishes, thinly sliced
- Fresh cilantro and mint
- Lime juice and honey
- Quinoa or farro (cooked and cooled)
How to make it
- Start with a base of cooked grains like quinoa or farro. These can be made in large batches and kept in the fridge, acting as a blank canvas for fresh toppings.
- Combine the raw corn kernels, diced avocado, and radishes in a bowl. Using raw corn provides a sweet, milky crunch that is far superior to canned or frozen varieties.
- The dressing should be light: Whisk the juice of two limes with a teaspoon of honey and a pinch of salt. The honey balances the lime’s acidity and helps the dressing cling to the vegetables.
- Finely mince a large handful of fresh cilantro and mint. The double-herb punch is a professional secret for making a simple dish taste complex and high-end.
- Toss everything together gently to avoid mashing the avocado. The goal is a vibrant, multi-textured salad that can be served in small bowls on your food board, adding a “fresh” anchor to the spread.
How to make fruit pies

Why we love this
Fruit pies are the quintessential finale to any gathering, embodying the warmth of home-style baking. Whether it’s peach, blueberry, or cherry, a fruit pie captures the essence of a season in a flaky vessel. We love the way the fruit juices thicken into a glossy, translucent sauce that coats the tongue in pure sweetness. The contrast between the hot filling and a scoop of cold vanilla ice cream is a sensory delight that never goes out of style, making it the ultimate comfort food to share from the center of a board.
Ingredients
- 5 cups of seasonal fruit (peaches, berries, or apples)
- 1/2 cup brown sugar
- 1/4 cup all-purpose flour
- 1 teaspoon cinnamon
- Double pie crust (homemade or store-bought)
- Coarse sparkling sugar for topping
How to make it
- Prepare your fruit by washing and slicing it into uniform pieces. If using stone fruits like peaches, peeling is optional but recommended for a smoother texture.
- In a large bowl, mix the fruit with brown sugar, flour, and cinnamon. Let this sit for 15 minutes. This “macerating” process allows the fruit to release its juices, which the flour will then thicken as it bakes.
- Line a pie tin with the bottom crust. Fill it with the fruit mixture, piling it slightly higher in the center to account for shrinkage as the fruit softens.
- Apply the top crust. For a professional look, use a small cookie cutter to punch out shapes (like stars or leaves) from the dough and layer them over the fruit. This allows steam to escape while looking incredibly intricate.
- Brush the crust with water or milk and sprinkle generously with coarse sparkling sugar. This adds a delightful crunch and a beautiful shimmer to the finished pie.
- Bake at 375°F (190°C) for 50-60 minutes. You’ll know it’s done when the crust is a deep mahogany and the fruit juices are bubbling through the vents in the center.
The Art of the Simple Board
Recreating the viral simple food board isn’t about perfection; it’s about the joy of assembly and the beauty of shared flavors. By combining these different elements—from the savory warmth of Rotel dip to the fresh snap of a tomato salad—you create a tapestry of tastes that caters to every guest. Remember, the best boards are the ones that are quickly demolished amidst laughter and good conversation. So, grab a wooden plank, choose a few of these recipes, and start building your own edible masterpiece today.