
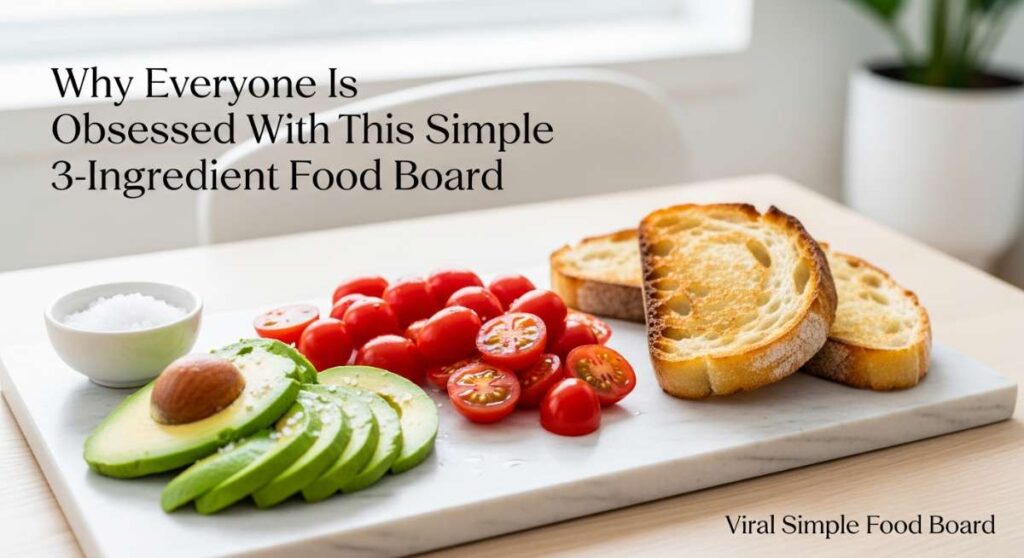
Why Everyone is Obsessed With This Simple 3-Ingredient Food Board
There is something almost magical about the way a simple spread of food can transform a regular Tuesday night into a core memory. We’ve all been there—exhausted after a long day, staring into the fridge, wanting something that feels like a treat without the three-hour cleanup. The rise of the ‘snack dinner’ or the curated food board isn’t just about the aesthetics we see on social media; it’s about reclaiming our time and focusing on the joy of grazing on high-quality flavors.
The obsession stems from the accessibility of it all. You don’t need a culinary degree to assemble a board that looks like a work of art. By focusing on just a few high-impact ingredients—something sweet, something savory, and something crunchy—you create a landscape of textures that invites everyone to lean in, share stories, and linger over the table. It’s a return to slow living in a fast-paced world, and honestly, it’s the most delicious trend I’ve ever hopped on.
How to make the perfect strawberry pie

Why we love this
The first bite of this strawberry pie is like a concentrated burst of July sunshine. The crust shatters into buttery, salt-flecked flakes against the tongue, providing the perfect stage for the jammy, ruby-red filling that smells of wild meadows and sweet nectar. As the warm juice pools on the plate, it mingles with the cold, melting cream, creating a textural symphony of hot and cold, crisp and soft that feels both nostalgic and utterly sophisticated. It is the ultimate centerpiece for any dessert board, offering a vibrant pop of color and a scent that fills the entire house with the aroma of caramelized sugar and fresh fruit.
Ingredients
- 2 lbs fresh strawberries, hulled and halved
- 1 cup granulated sugar
- Double pie crust (homemade or store-bought)
- 3 tablespoons cornstarch
- 1 tablespoon lemon juice
How to make it
- Preheat your oven to 425°F (220°C). This high initial heat is crucial for setting the pastry and ensuring a crisp bottom crust.
- In a large mixing bowl, toss the halved strawberries with sugar, cornstarch, and lemon juice. Let them sit for 15 minutes to macerate; this draws out the natural juices and allows the cornstarch to begin its thickening magic.
- Roll out your bottom crust on a lightly floured surface until it is roughly 12 inches in diameter. Carefully drape it over a 9-inch pie plate, pressing gently into the corners without stretching the dough.
- Pour the strawberry mixture into the crust. If there is an excess of liquid, leave the last tablespoon or two in the bowl to prevent the pie from becoming too watery.
- Top with the second crust, either as a solid sheet with steam vents or a beautiful lattice. Crimp the edges tightly to seal in the steam.
- Bake at 425°F for 15 minutes, then reduce the heat to 375°F (190°C) and bake for another 35-40 minutes. Look for a deep golden-brown crust and filling that is bubbling thick through the vents.
- Allow the pie to cool completely—at least 4 hours—before slicing. This is the hardest part, but it ensures the filling sets properly into a sliceable consistency.
How to make creamy rotel dip
Why we love this
There is a primitive, soulful satisfaction in a bowl of warm, gooey cheese dip that hits every single salty, spicy, and creamy note all at once. The aroma of browned sausage mixed with the sharp tang of green chilies creates an irresistible invitation to dive in with a salty tortilla chip. It’s the kind of food that disappears in minutes at a party because of its velvety texture and the way it coats the palate in a rich, savory blanket of spice. Whether it’s a game day or a casual board night, this dip is the anchor that keeps everyone coming back for ‘just one more bite’ until the bowl is scraped clean.
Ingredients
- 1 lb Velveeta cheese, cubed
- 1 can (10 oz) Ro-Tel Diced Tomatoes and Green Chilies
- 1 lb ground breakfast sausage or chorizo
- 1/4 cup heavy cream (optional for extra silkiness)
How to make it
- Place a large skillet over medium-high heat. Add the ground sausage and cook, breaking it into very small crumbles with a wooden spoon. Continue cooking until it is deeply browned and slightly crispy; this caramelization adds essential depth of flavor.
- Drain the excess fat from the skillet, leaving just a tiny bit for flavor.
- Lower the heat to low-medium. Add the cubed Velveeta cheese to the skillet. It is vital to keep the heat low here to prevent the cheese from scorching or becoming grainy.
- Pour in the entire can of Ro-Tel, including the liquid. The acidity in the tomato juice helps balance the richness of the cheese.
- Stir constantly with a heat-resistant spatula until the cheese is completely melted and the mixture is smooth. If you prefer a thinner consistency, stir in the heavy cream at this stage.
- Transfer the dip to a warm serving crock or a small slow cooker set to ‘warm’ to maintain that perfect, dippable viscosity throughout your event.
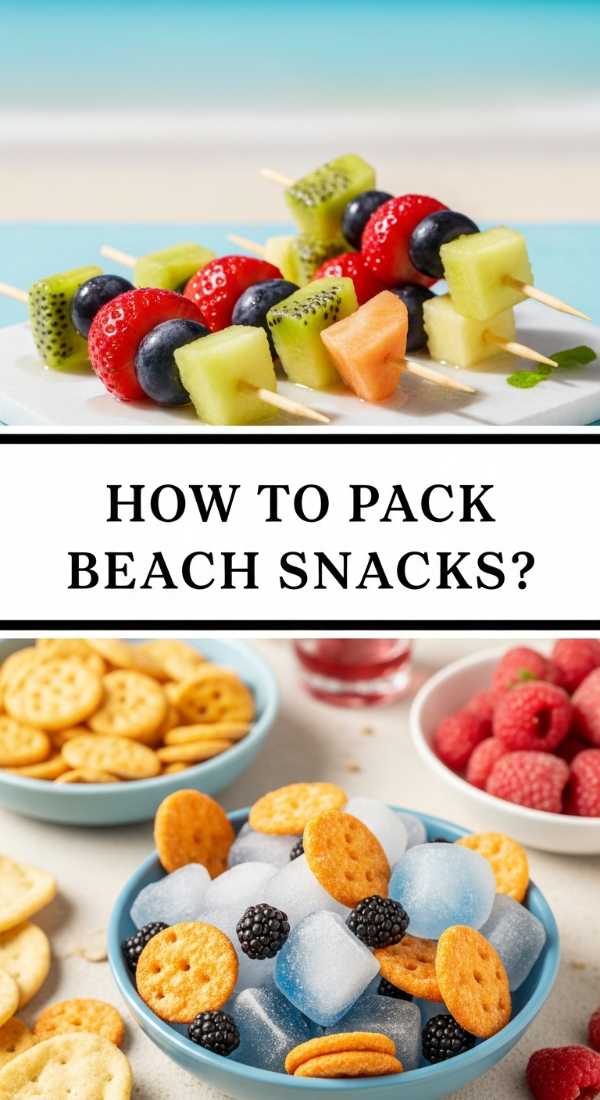
How to pack beach snacks
Why we love this
Beach snacking is an art form that requires a balance of refreshing hydration and satisfying saltiness to combat the heat and the sea air. Imagine the crisp snap of a chilled grape or the cooling crunch of a cucumber slice while the sun warms your skin—it is the ultimate sensory contrast. These snacks are designed to be eaten with sandy fingers (safely!), offering a burst of energy without the heaviness of a full meal. There is a specific joy in opening a cooler to find perfectly organized, vibrant bites that look as good as the ocean view in front of you.
Ingredients
- Frozen grapes
- Precut cheese cubes (cheddar or gouda)
- Individual hummus pods
- Sliced cucumbers and mini peppers
- Salted almonds
How to make it
- Start by freezing your grapes overnight. This turns them into natural mini-popsicles that help keep the rest of the cooler cold without making things soggy.
- Use rigid, airtight plastic containers rather than bags. Bags get crushed and allow sand to seep in; hard containers create a flat surface for assembly and keep delicate items like peppers from bruising.
- Layer your cooler strategically: Place ice packs or frozen water bottles at the very bottom, followed by the heavy containers (cheese and hummus), and then the lighter snacks (cucumbers and peppers) on top.
- Pre-portion everything. Use muffin liners inside a larger container to separate almonds from cheese; this prevents the nuts from losing their crunch due to moisture from the cheese.
- Pack a separate ‘clean’ bag with wet wipes and a small hand towel so guests can clean their hands thoroughly before touching the food board items.
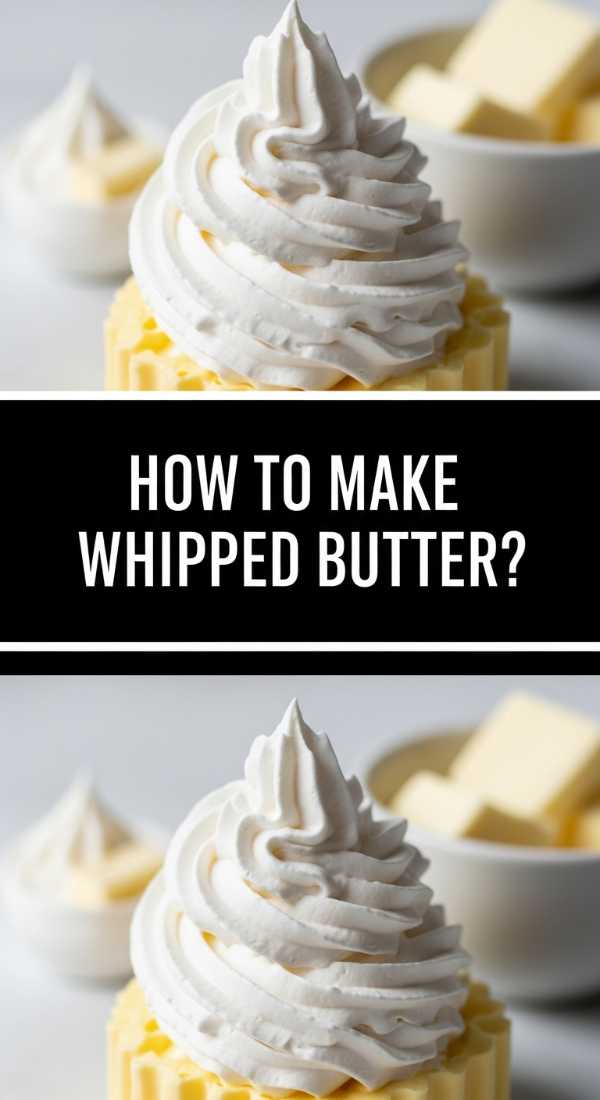
How to make whipped butter

Why we love this
Whipped butter is a revelation in texture, turning a standard condiment into a cloud-like experience that feels impossibly luxurious. When you whip air into high-quality butter, it becomes light, airy, and spreads like a dream over a warm baguette, melting instantly into every nook and cranny. The addition of flaky sea salt creates tiny explosions of flavor that cut through the richness, while a hint of honey or herbs can transform it into something truly gourmet. It’s a simple touch that elevates a basic bread board into a five-star dining experience, making the act of spreading butter feel like an indulgence.
Ingredients
- 1 cup (2 sticks) unsalted high-quality butter, softened to room temperature
- 1/2 teaspoon flaky sea salt
- 2 tablespoons heavy cream
- Optional: 1 tablespoon honey or chopped fresh herbs
How to make it
- Ensure your butter is truly at room temperature. It should be soft enough that a finger leaves an easy indent, but not so soft that it is melting or oily. This is the most critical step for achieving volume.
- Place the butter in the bowl of a stand mixer fitted with the whisk attachment (or use a hand mixer).
- Begin whisking on low speed to break up the butter, then gradually increase to high speed. Whip for 3 to 5 minutes. You will see the color change from a deep yellow to a pale, almost white cream.
- Slowly drizzle in the heavy cream while continuing to whip. The cream adds moisture and helps the butter hold even more air for that signature ‘mousse’ texture.
- Add the salt and any optional flavorings (like honey or thyme). Whisk for one more minute to ensure even distribution.
- Transfer to a small ramekin and serve immediately, or store in the fridge. If refrigerated, let it sit out for 20 minutes before serving to regain its fluffy texture.
How to prep camping meals
Why we love this
There is nothing quite like the primal satisfaction of a meal cooked over an open flame, surrounded by the rustle of leaves and the smell of pine. Camping meals should be rugged yet comforting, providing a warm, savory hug after a day of hiking or exploring. The sizzle of fat on a hot grate and the slightly charred, smoky edge of a potato wedge create a flavor profile that you simply cannot replicate in a modern kitchen. It’s about simplicity and the communal experience of huddling around the fire, waiting for the foil packets to reveal their steaming, perfectly seasoned treasures.
Ingredients
- Heavy-duty aluminum foil
- Pre-sliced smoked sausage
- Baby gold potatoes, quartered
- Bell peppers and onions, sliced
- Olive oil and ‘everything’ grill seasoning
How to make it
- The secret to successful camping meals is ‘prep at home.’ Slice all your vegetables and proteins before you leave. This minimizes waste and clean-up at the campsite.
- Toss the potatoes, sausage, and veggies in a large bowl with plenty of olive oil and your chosen spices. Ensure the potatoes are cut small (about 1/2 inch) so they cook at the same rate as the peppers.
- Cut large squares of heavy-duty foil. Place a portion of the mixture in the center. Fold the sides up and ‘double-fold’ the edges to create a completely airtight seal. This traps the steam inside to cook the potatoes.
- Build a fire and let it burn down until you have a bed of glowing red coals. Never cook directly in high flames; the intense heat will burn the foil and char the food before the inside is done.
- Place the packets on a grill grate over the coals or directly on the outer edge of the coal bed. Cook for 20-25 minutes, flipping once halfway through using tongs.
- Carefully open the steam-filled packet (watch your face!) and check the potatoes for tenderness with a fork. Serve directly from the foil to keep the food hot and save on dishes.
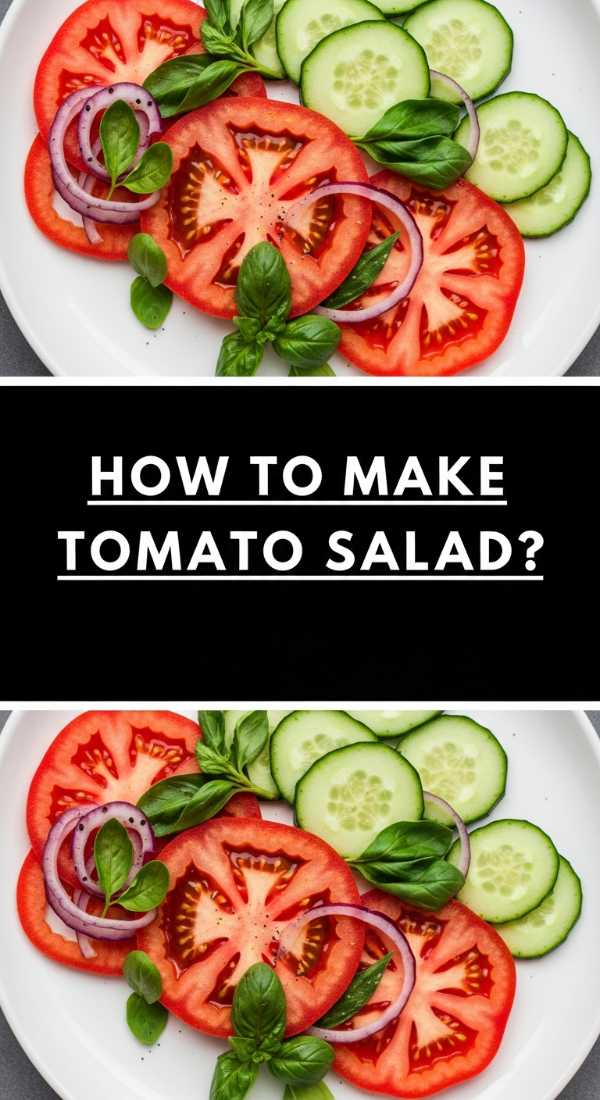
How to make tomato salad

Why we love this
A perfect tomato salad is a celebration of the harvest, focusing on the pure, unadulterated essence of fruit and herb. The tomatoes should be heavy and fragrant, releasing their sweet, acidic juices which mix with the olive oil to create a natural dressing that begs to be mopped up with crusty bread. The sharp, peppery bite of fresh basil and the creamy richness of mozzarella provide a beautiful balance to the brightness of the tomatoes. It’s a dish that looks like a mosaic on a board, vibrating with color and smelling like a sun-drenched Italian garden in mid-August.
Ingredients
- 3-4 large heirloom tomatoes, sliced into thick rounds
- 1 ball of fresh buffalo mozzarella or burrata
- Fresh basil leaves, torn
- Extra virgin olive oil and balsamic glaze
- Flaky sea salt and cracked black pepper
How to make it
- Select tomatoes that are at room temperature. Never refrigerate your tomatoes for this salad, as cold temperatures destroy the delicate cellular structure and dull the flavor.
- Slice the tomatoes into 1/2-inch thick rounds. If using smaller cherry tomatoes, simply halve them to expose the seeds and juices.
- Arrange the tomato slices on a flat board or platter, slightly overlapping them to create a shingled effect.
- Tear the mozzarella by hand into bite-sized chunks and nestle them between the tomato slices. Hand-tearing creates more surface area for the oil and salt to cling to compared to clean knife cuts.
- Scatter the torn basil leaves over the top. Tearing the basil rather than chopping it prevents the leaves from bruising and turning black.
- Drizzle generously with high-quality olive oil, followed by a light zig-zag of balsamic glaze for sweetness.
- Finish with a heavy pinch of flaky sea salt and freshly cracked pepper immediately before serving to ensure the tomatoes don’t release too much water before they hit the table.
How to grill vegetables

Why we love this
Grilling vegetables transforms them from simple side dishes into the stars of the show by coaxing out their natural sugars through caramelization. The high heat of the grill creates those beautiful, dark char marks that add a bitter-smokey complexity to the sweetness of a bell pepper or the earthiness of an asparagus spear. There is a wonderful tactile nature to eating grilled veggies from a board—picking up a charred zucchini spear or a smoky mushroom with your hands feels rustic and satisfying. The texture remains tender-crisp, offering a juicy snap that is far superior to any steamed or boiled alternative.
Ingredients
- Zucchini, sliced into planks
- Asparagus, woody ends trimmed
- Red onion, cut into thick wedges
- Balsamic vinaigrette (for marinating)
- Lemon wedges for serving
How to make it
- Preheat your grill to medium-high (about 400°F). Ensure the grates are scraped clean and lightly oiled to prevent sticking.
- Toss your prepared vegetables in a light coating of oil and a splash of balsamic vinaigrette. Do not over-saturate them, or the dripping oil will cause flare-ups that can soot the food.
- Place the vegetables across the grates. Asparagus should be placed perpendicular to the grates so they don’t fall through.
- Leave them undisturbed for 3-4 minutes. This ‘still time’ is what creates the defined grill marks and allows the sugars to caramelize without the vegetables becoming mushy.
- Flip using long tongs. The second side usually takes less time—about 2-3 minutes. You are looking for a vibrant color and a slight softening, but they should still have ‘bite.’
- Remove from the grill and squeeze fresh lemon juice over them while they are still steaming; the heat helps the lemon juice penetrate the vegetables for a bright finish.
How to cook summer meals

Why we love this
Summer meals are all about lightness and the ability to dine al fresco without feeling weighed down by heavy sauces or long cook times. The ideal summer dish feels like a breeze—refreshing, colorful, and highlighting ingredients at their peak ripeness. Think of a cold pasta salad tossed with zesty herbs or a chilled shrimp cocktail; these meals prioritize ease and temperature, keeping the kitchen cool while providing maximum flavor. It’s the season of ‘assembly cooking,’ where the quality of the raw ingredients does most of the work for you, allowing you more time to enjoy the golden hour with a glass of chilled rosé.
Ingredients
- 1 lb short pasta (fusilli or farfalle)
- Jarred basil pesto
- Cherry tomatoes, halved
- Mini mozzarella pearls
- Toasted pine nuts
How to make it
- Cook the pasta in a large pot of heavily salted water. Boil until it is ‘al dente’—just a bit firm to the bite. Overcooked pasta will become mushy when tossed with dressing later.
- Immediately drain the pasta and rinse it under cold running water. This stops the cooking process and washes away excess starch, which prevents the pasta from clumping together as it cools.
- In a large bowl, whisk together the pesto with a tablespoon of pasta water or olive oil to loosen it into a coating consistency.
- Add the cooled pasta to the bowl and toss thoroughly until every spiral is coated in green.
- Fold in the cherry tomatoes and mozzarella pearls. The contrast of the red and white against the green pesto makes this a stunning addition to any food board.
- Top with toasted pine nuts for a necessary crunch. Keep the bowl chilled until the very moment of serving to maintain that refreshing summer temperature.
How to make fruit pie

Why we love this
A mixed fruit pie is a rustic masterpiece, bubbling with the dark, concentrated juices of blackberries, raspberries, and blueberries. The aroma is intoxicating—a mix of warm cinnamon, buttery pastry, and tart fruit that evokes images of country kitchens and cooling racks on windowsills. There is a deep, purple-hued beauty to the filling that looks stunning when sliced, especially when paired with a scoop of melting vanilla bean ice cream that creates creamy rivers in the warm juice. It is the quintessential comfort dessert, providing a sweet-tart finish to a board of savory cheeses and salty meats.
Ingredients
- 5 cups mixed berries (fresh or frozen)
- 3/4 cup sugar
- 1/4 cup cornstarch
- 1 teaspoon cinnamon
- Prepared pie crust
How to make it
- If using frozen berries, do not thaw them first; using them frozen prevents the pie from becoming a purple soup. If using fresh, wash and dry them thoroughly.
- In a large bowl, whisk together the sugar, cornstarch, and cinnamon. Gently fold in the berries until they are evenly coated in the powder.
- Line your pie tin with the bottom crust. Fill with the berry mixture, mounding it slightly in the center as the fruit will shrink significantly during the baking process.
- For a fruit pie, a lattice top is recommended. Cut the second crust into 1-inch strips and weave them over the fruit. This allows maximum moisture evaporation, which thickens the sauce.
- Brush the crust with an egg wash (one egg beaten with a splash of water) and sprinkle with coarse sanding sugar for a professional, sparkly crunch.
- Bake at 400°F for 20 minutes to set the crust, then lower to 350°F and bake for another 40 minutes. The filling should be bubbling vigorously in the center.
- Wait. A fruit pie requires at least 6 hours to set. If you cut it too early, the delicious juice will run out, leaving the fruit dry.
How to make cheese dip
[IMAGE_10]
Why we love this
This isn’t just a snack; it’s a warm, stretchy embrace in a bowl. A true cheese dip, made with a proper base, has a silky, coat-your-tongue quality that processed versions simply can’t match. The scent of sharp cheddar melting into a nutty roux is enough to draw anyone into the kitchen from three rooms away. It’s savory, rich, and has a slight tang that pairs perfectly with everything from soft pretzels to crisp apple slices. Watching that long, indulgent cheese pull as you lift a cracker from the bowl is one of the simple, high-reward pleasures of food board entertaining.
Ingredients
- 2 cups sharp cheddar, freshly grated (avoid pre-shredded)
- 2 tablespoons butter
- 2 tablespoons all-purpose flour
- 1 cup whole milk or light beer
- 1/2 teaspoon mustard powder
How to make it
- Start by grating your cheese by hand. Pre-shredded cheese is coated in cellulose (wood pulp) to prevent clumping, which prevents it from melting into a smooth sauce.
- In a small saucepan over medium heat, melt the butter until it is foaming. Whisk in the flour to create a ‘roux.’ Cook this for about 1 minute—it should smell slightly nutty but stay pale.
- Very slowly, whisk in your liquid (milk or beer) about 1/4 cup at a time. Whisk vigorously after each addition to ensure there are no lumps. You are looking for a thick, smooth ‘bechamel’ base.
- Once all liquid is in and the sauce has thickened enough to coat the back of a spoon, turn the heat to the lowest setting possible.
- Add the cheese one handful at a time. Whisk gently until the first handful is completely melted before adding the next. If the sauce gets too hot, the cheese will ‘break’ and become oily.
- Whisk in the mustard powder at the very end—this doesn’t make it taste like mustard, but it amplifies the natural sharpness of the cheddar. Serve immediately while it is at its peak ‘stretch.’
Conclusion
Whether you are packing a cooler for a day at the shore or setting out a decadent cheese and pie board for a weekend gathering, the secret to the perfect spread is intentionality. By choosing a few of these detailed recipes to anchor your board, you create an experience that feels curated and thoughtful without the stress of a traditional multi-course meal. The 3-ingredient board philosophy is all about quality over quantity—letting the textures of whipped butter or the vibrant colors of a tomato salad speak for themselves. So, grab a board, pick your favorites, and start grazing!