

Viral Simple Food Boards: How to Wow Your Guests with Zero Effort
We’ve all been there—the doorbell rings in twenty minutes, your house is halfway clean, and you realized you forgot to plan the ‘wow’ factor for the table. In a world of over-the-top charcuterie, the secret to being the ultimate host isn’t spending hours in the kitchen; it’s about the art of the ‘Simple Food Board.’ These boards take the stress out of entertaining by focusing on vibrant colors, nostalgic flavors, and textures that practically jump off the plate. It’s about creating an inviting atmosphere where guests can graze and laugh without anyone feeling the pressure of a formal sit-down meal.
There is something deeply communal about sharing a platter of food that looks like a work of art but tastes like home. Whether it’s the glossy shine of a retro strawberry pie or the smoky char of perfectly grilled vegetables, these dishes are designed to be conversation starters. By the time you finish reading, you’ll have a toolkit of viral-worthy recipes that transform basic ingredients into effortless masterpieces. Let’s dive into the delicious world of simple boards that will make you the star of every summer gathering.
How to make Shoneys strawberry pie

Why we love this
This pie is pure, unadulterated nostalgia served on a plate, bringing back memories of sticky summer afternoons and diner booths. We love the contrast between the buttery, flaky crust and the jewel-toned, translucent strawberry glaze that shimmers under the light. As you slice into it, the aroma of fresh, sun-ripened berries fills the air, mingling with the sweet scent of strawberry gelatin. The texture is a delightful dance of firm, juicy whole berries suspended in a silky, cool gel that melts on your tongue, providing a refreshing finish to any meal.
Ingredients
- 1 pre-baked 9-inch pie crust
- 1 quart fresh strawberries, hulled
- 1 cup granulated sugar
- 3 tablespoons cornstarch
- 1 cup water
- 3 tablespoons strawberry gelatin powder (like Jell-O)
- Whipped cream for topping
How to make it
- Begin by preparing your fresh strawberries; wash them thoroughly and remove the green hulls. Pat them completely dry with paper towels to ensure the glaze sticks properly. Place the whole berries pointed-side up in your pre-baked and cooled pie crust, packing them tightly but gently.
- In a medium saucepan, whisk together the granulated sugar and cornstarch until no lumps remain. Slowly pour in the water, whisking constantly over medium heat.
- Bring the mixture to a boil. Once it reaches a bubbling state, continue to cook for about 2 to 3 minutes. You are looking for the liquid to transition from cloudy to a clear, thick consistency. It should be thick enough to coat the back of a spoon heavily.
- Remove the saucepan from the heat immediately and stir in the strawberry gelatin powder. Whisk vigorously until the powder is fully dissolved and the color is a vibrant, deep red.
- Allow the glaze to cool slightly for about 10 minutes so it doesn’t wilt the berries, then pour it evenly over the strawberries in the crust, ensuring every berry is encased in the red shimmer.
- Refrigerate the pie for at least 3 to 4 hours, or until the glaze is fully set and firm. Serve cold with a generous dollop of whipped cream.
How to make rotel dip

Why we love this
Rotel dip is the undisputed king of party appetizers because it delivers an explosion of creamy, spicy, and savory flavors with almost zero effort. There is something incredibly satisfying about the way the golden, melted cheese clings to a salty tortilla chip, carrying with it chunks of zesty tomatoes and fiery green chilies. The aroma is warm and inviting, immediately signaling to your guests that the party has officially started. It’s the ultimate comfort food—rich, velvety, and consistently the first dish to be scraped clean at any gathering.
Ingredients
- 1 lb Velveeta cheese, cubed
- 1 can (10 oz) Ro*Tel Original Diced Tomatoes & Green Chilies (do not drain)
- 1 lb ground breakfast sausage or lean ground beef
- 1/2 teaspoon garlic powder
- Tortilla chips for serving
How to make it
- In a large skillet over medium-high heat, brown the ground sausage or beef. Use a wooden spoon to crumble the meat into small, even pieces as it cooks. Sauté until no pink remains and the edges are slightly crispy and caramelized.
- Drain the excess grease from the skillet thoroughly; this prevents the dip from becoming oily. Sprinkle the garlic powder over the meat and stir for 30 seconds until fragrant.
- Lower the heat to medium-low and add the cubed Velveeta cheese. It is crucial to use low heat here to prevent the cheese from scorching or becoming grainy.
- Pour the entire can of Ro*Tel (including the liquid) over the cheese. The juices from the tomatoes help thin the cheese to the perfect dipping consistency.
- Stir constantly with a heat-resistant spatula. Watch for the cheese to lose its shape and transform into a smooth, glossy lava-like sauce. This should take about 5-8 minutes.
- Once fully melted and integrated, transfer the dip to a small slow cooker on the ‘warm’ setting to keep it silky and fluid throughout your event.
How to make beach snacks
Why we love this
Beach snacks need to be two things: refreshing and sand-proof, and this curated board hits both marks beautifully. We love the combination of hydrating fruits like frozen grapes that crunch like tiny sorbet bites and salty elements that replenish you after a swim in the ocean. The smell of salt air mixed with the scent of fresh lime and mint from the fruit is the essence of vacation. It’s a sensory experience that balances the heat of the sun with cool, crisp textures and bright, zesty pops of flavor that keep everyone energized and happy.
Ingredients
- 2 cups red and green grapes (frozen)
- 1 cup watermelon cubes
- Individual hummus cups
- Pretzel thins
- String cheese or babybel rounds
- Cucumber slices seasoned with Tajin
How to make it
- Start the night before by washing and drying your grapes. Remove them from the stems and place them in a single layer on a baking sheet. Freeze for at least 4 hours; this turns them into natural, healthy ice pops that won’t get soggy in the heat.
- Slice the watermelon into uniform cubes and place them in a leak-proof container. For an extra kick, squeeze fresh lime juice over them to enhance their sweetness.
- Prepare the cucumbers by slicing them into thick rounds. Dust them heavily with Tajin seasoning for a salty, limey, and slightly spicy crunch that stands up to humidity.
- Assemble the board using individual serving containers for the hummus and cheeses. This is a pro-tip for the beach: it prevents cross-contamination and keeps the bulk of the food protected from blowing sand.
- Pack everything into an insulated cooler bag with plenty of ice packs. Place the frozen grapes at the very bottom to act as extra cooling agents for the rest of the snacks.
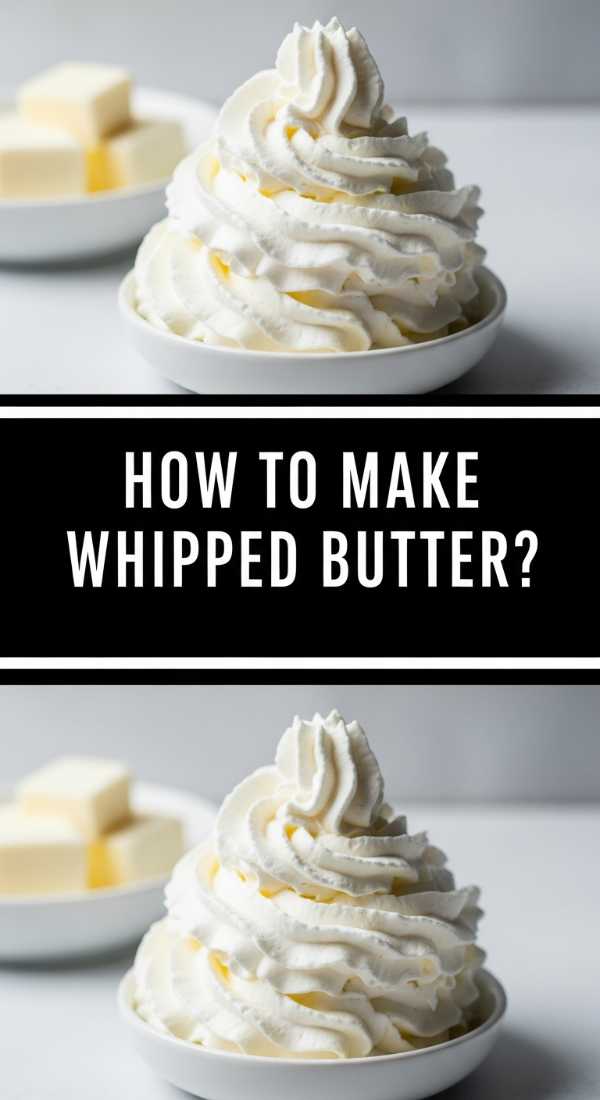
How to make whipped butter

Why we love this
Whipped butter is the glow-up your bread board deserves, turning a humble staple into a luxurious, cloud-like spread. We love the ethereal, airy texture that allows it to glide across a warm roll without tearing the bread, melting instantly into every nook and cranny. When infused with honey or sea salt, the aroma becomes intoxicating—a mix of sweet cream and earthy herbs. It feels incredibly decadent on the palate, offering a rich mouthfeel that is significantly lighter than standard butter, making every bite feel like a gourmet experience.
Ingredients
- 2 sticks (1 cup) high-quality unsalted butter, softened to room temperature
- 2 tablespoons heavy cream
- 1/2 teaspoon flaky sea salt
- Optional: 1 tablespoon honey or chopped fresh herbs
How to make it
- Ensure your butter is perfectly softened—it should give easily when pressed but not be oily or melting. This is the most critical step for achieving the right volume.
- Place the softened butter in the bowl of a stand mixer fitted with the whisk attachment (or use a hand mixer). Start on low speed to break the butter down.
- Gradually increase the speed to medium-high. Whip the butter for about 2 to 3 minutes. You will see it change from a dense yellow to a pale, almost white color as air is incorporated.
- Slowly drizzle in the heavy cream while the mixer is still running. This adds a silky moisture that makes the butter even fluffier.
- Add the flaky sea salt and any optional flavors like honey or herbs. Continue to whip on high for another 2 minutes. The final result should look like stiff whipped cream and have doubled in volume.
- Transfer to a shallow bowl or spread it directly onto a wooden board, swirling it with a spoon for a beautiful, viral-worthy aesthetic. Serve at room temperature.
How to make camping meals
Why we love this
There is nothing quite like the rugged, smoky charm of a meal cooked over an open flame under a canopy of stars. We love camping foil packets because they lock in all the juices and steam, resulting in meat that is incredibly tender and vegetables that are infused with the scent of woodsmoke and garlic. The sound of the packets sizzling on the grate and the anticipation as you peel back the foil to reveal a bubbling, hot meal is pure magic. It’s rustic, hearty, and provides that soul-warming satisfaction that only outdoor cooking can provide.
Ingredients
- 1 lb smoked sausage, sliced
- 2 large potatoes, diced small
- 2 ears of corn, cut into rounds
- 1 bell pepper, sliced
- 3 tablespoons olive oil
- 1 tablespoon Cajun seasoning
How to make it
- Prepare your campfire or grill until you have a bed of hot, glowing coals rather than high leaping flames. Indirect heat is best for foil packets to prevent burning.
- Tear off four large sheets of heavy-duty aluminum foil (about 12 inches each). If you only have thin foil, double it up to ensure it doesn’t tear.
- In a large bowl, toss the sliced sausage, diced potatoes, corn rounds, and peppers with the olive oil and Cajun seasoning. Ensure every piece is well-coated in oil and spices.
- Divide the mixture evenly onto the center of the foil sheets. Fold the sides of the foil up to meet in the middle, then fold the edges down tightly to create a sealed pouch. Leave a little room inside for steam to circulate.
- Place the packets on the grill grate over the coals. Cook for 20-25 minutes. About halfway through, use tongs to carefully flip the packets to ensure the potatoes on the bottom don’t char too much.
- Check for doneness by carefully opening one packet (watch for the steam!) to see if the potatoes are fork-tender. Serve directly in the foil for easy cleanup.
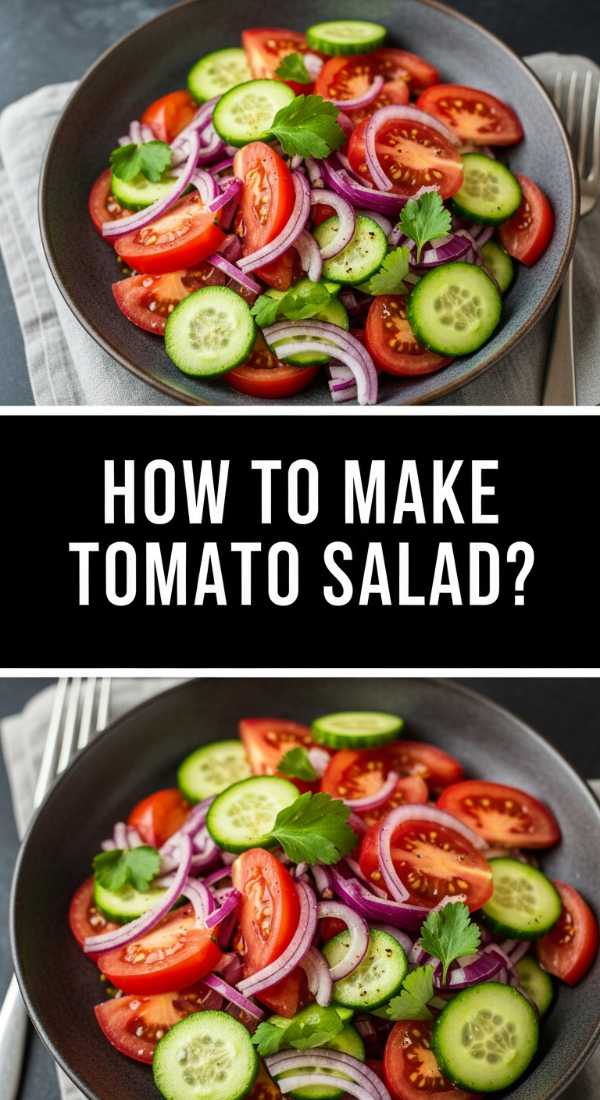
How to make tomato salad
Why we love this
This tomato salad is the epitome of summer in a bowl, celebrating the vibrant acidity and honey-like sweetness of peak-season produce. We love the visual appeal of heirloom tomatoes in shades of ruby, gold, and purple, glistening with a coating of high-quality olive oil. The aroma is a sharp, refreshing blend of torn basil leaves and tangy balsamic vinegar that awakens the senses immediately. Each bite offers a juicy explosion of flavor, contrasted by the crunch of red onion and the creamy richness of fresh mozzarella or a sprinkle of salty feta.
Ingredients
- 2 lbs assorted heirloom tomatoes
- 1/4 cup extra virgin olive oil
- 2 tablespoons balsamic glaze
- 1/2 red onion, thinly shaved
- 1/2 cup fresh basil leaves, torn
- Salt and cracked black pepper to taste
How to make it
- Choose tomatoes that are heavy for their size and fragrant at the stem. Slice larger tomatoes into thick wedges and halve smaller cherry tomatoes to create a variety of shapes and textures.
- Arrange the tomatoes on a large, shallow platter rather than a deep bowl. This prevents the weight of the tomatoes from crushing the ones at the bottom and allows the dressing to coat everything evenly.
- Scatter the thinly shaved red onions over the top. To mellow the bite of the onion, you can soak the slices in ice water for 10 minutes before adding them to the salad.
- Whisk together the olive oil with a pinch of salt and pepper. Drizzle this generously over the tomatoes.
- Just before serving, tear the fresh basil leaves by hand. Tearing rather than chopping prevents the edges from bruising and releasing a bitter flavor.
- Finish with a dramatic drizzle of thick balsamic glaze. The acidity will draw out the tomato juices, creating a delicious ‘liquid gold’ at the bottom of the plate that guests will want to soak up with bread.
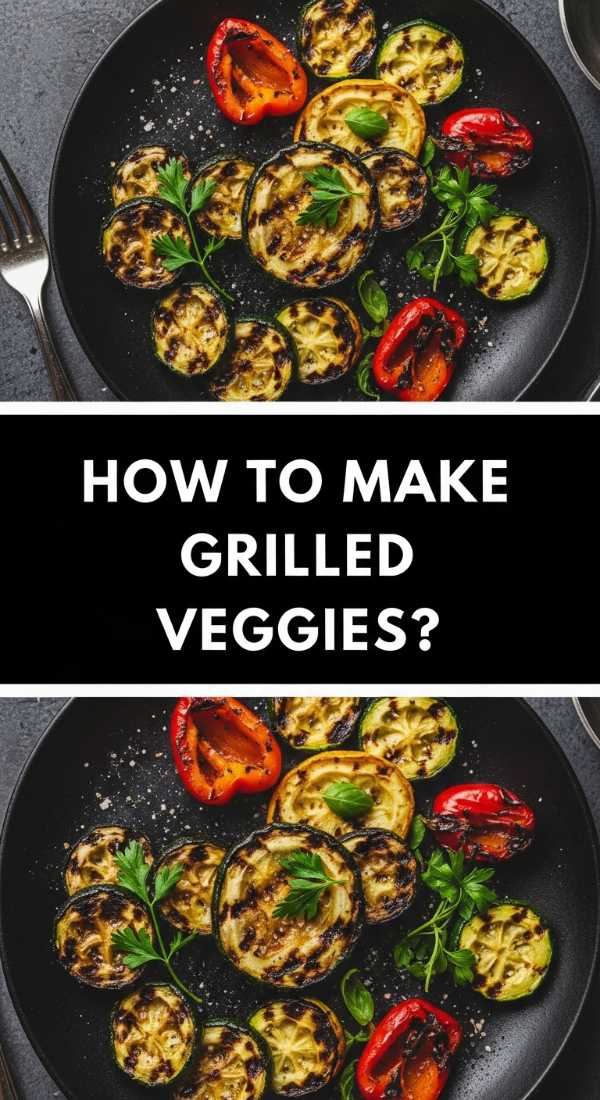
How to make grilled veggies

Why we love this
Grilled vegetables are a masterclass in flavor transformation, where the high heat of the grill coaxes out natural sugars and adds a sophisticated smoky depth. We love the ‘snap’ of a perfectly grilled asparagus spear and the tender, buttery interior of a charred zucchini slice. The smell of caramelizing onions and scorched peppers is quintessential summer, promising a side dish that is as healthy as it is indulgent. The charred edges provide a bitter contrast to the sweet vegetables, creating a complex flavor profile that elevates the entire board.
Ingredients
- 2 zucchinis, sliced lengthwise
- 1 bunch asparagus, woody ends trimmed
- 2 bell peppers, seeded and quartered
- 1 large red onion, cut into thick rounds
- 1/4 cup balsamic vinaigrette
- 2 cloves garlic, minced
How to make it
- Preheat your grill to medium-high (about 400°F). Ensure the grates are clean and lightly oiled to prevent the vegetables from sticking.
- In a large bowl, whisk together the balsamic vinaigrette and minced garlic. Toss all the prepared vegetables in this mixture, ensuring a thin, even coat. Don’t let them soak too long, or the acid will make them mushy.
- Place the vegetables on the grill. Start with the peppers and onions, as they take the longest (about 5-6 minutes per side). Place the zucchini and asparagus on next, as they only need 3-4 minutes per side.
- Lay the vegetables perpendicular to the grill grates to get those iconic, deep brown char marks. Resist the urge to move them too much; let them sit undisturbed for the first few minutes to develop color.
- Look for the visual cue of the vegetables becoming slightly translucent and flexible. They should have dark grill marks but still retain a slight ‘al dente’ bite.
- Remove from the heat and arrange them artistically on a board. Garnish with a final sprinkle of sea salt and a squeeze of lemon juice to brighten the char.
How to make summer meals
Why we love this
Summer meals should feel like a breeze, emphasizing lightness and ease without sacrificing an ounce of flavor. We love the concept of a ‘deconstructed’ meal board where grilled proteins meet fresh, cooling sides, allowing guests to build their own perfect plate. The aroma is a medley of citrus, grilled herbs, and fresh air, perfectly matching the relaxed vibe of the season. The textures vary from the flaky, moist tenderness of grilled fish or chicken to the crisp, hydrating crunch of raw greens, creating a balanced dining experience that leaves you feeling satisfied but never weighed down.
Ingredients
- 1 lb grilled protein (chicken breast or salmon fillets)
- 1 cup cooked quinoa or couscous
- Mixed baby greens
- Sliced avocado
- Lemon-tahini dressing
- Fresh dill and parsley
How to make it
- Season your protein of choice with lemon zest, dried oregano, salt, and pepper. Grill over medium heat until the internal temperature reaches 165°F for chicken or 145°F for salmon. Let the meat rest for 5 minutes before slicing into strips.
- Cook the quinoa or couscous in vegetable broth instead of water to infuse more flavor. Fluff with a fork and let it cool to room temperature.
- Prepare a large board by laying down a bed of mixed baby greens on one side. Use this as the fresh base for the other components.
- Arrange the sliced protein, grains, and avocado in separate sections on the board. This visual separation makes the meal look organized and abundant.
- Whisk together the lemon-tahini dressing: mix 2 tbsp tahini, the juice of half a lemon, 1 tsp honey, and enough water to reach a drizzling consistency.
- Drizzle the dressing over the entire board and finish with a heavy scattering of fresh dill and parsley. This adds a punch of herbaceous flavor that ties the cooked and raw elements together.
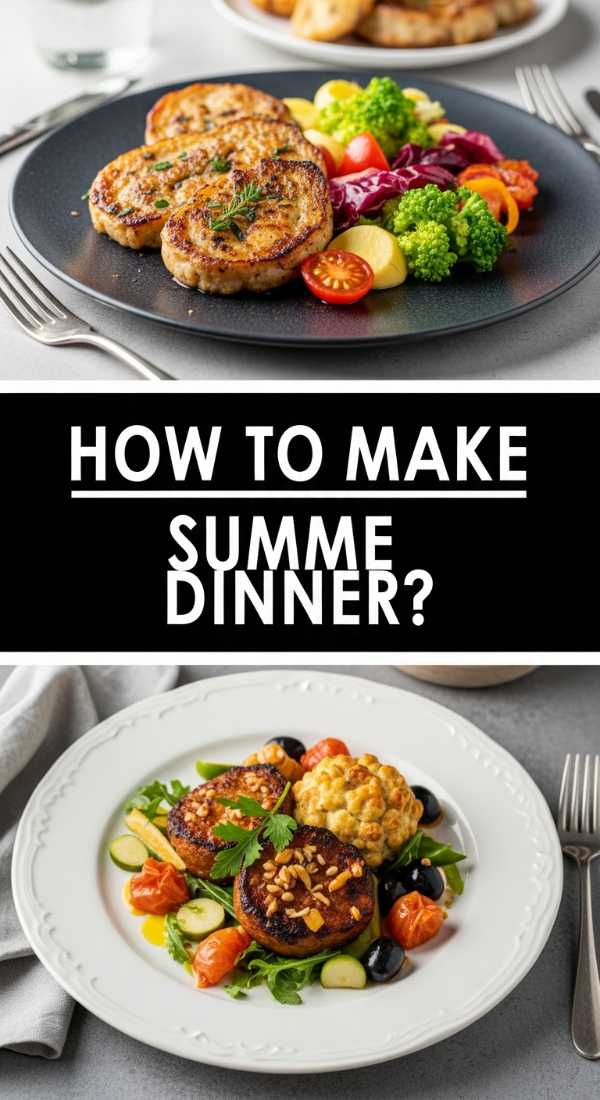
How to make summer dinner

Why we love this
A true summer dinner board is about lingering over the table as the sun sets, picking at small bites of savory pasta and fresh bread. We love the heartiness of a pasta salad combined with the elegance of a curated platter, offering a complete meal that doesn’t require slaving over a hot stove at the last minute. The scent of roasted garlic and parmesan cheese wafts from the board, inviting everyone to dig in. It’s a tactile experience—breaking bread, scooping up pasta, and enjoying the harmony of sun-dried tomatoes and creamy cheeses in every mouthful.
Ingredients
- 12 oz rotini or farfalle pasta, cooked and cooled
- 1/2 cup sun-dried tomatoes, chopped
- 1/2 cup kalamata olives
- 1/4 lb salami, cubed
- 1/2 cup parmesan cheese, shaved
- Italian herb vinaigrette
How to make it
- Cook the pasta in a large pot of salted water until it is just past al dente. Overcooking slightly helps the pasta absorb the dressing better once it cools. Drain and rinse with cold water immediately to stop the cooking process.
- In a massive mixing bowl, combine the cooled pasta with the sun-dried tomatoes, olives, and salami. The variety of salty and tangy ingredients creates a complex flavor profile.
- Toss the mixture with a generous amount of Italian herb vinaigrette. Be bold with the dressing, as the pasta will soak up a lot of the liquid as it sits.
- Transfer the pasta salad to the center of a large board. Surround it with extra components like toasted baguette slices, extra cheese shavings, and perhaps a few clusters of grapes.
- Let the board sit at room temperature for about 20 minutes before serving. This allows the flavors to meld and the fats in the salami and cheese to soften, enhancing the mouthfeel.
- Garnish with fresh cracked pepper and a few sprigs of rosemary for a professional, rustic finish that looks as good as it tastes.
How to make cucumber salad
[IMAGE_10]
Why we love this
This cucumber salad is the ultimate palate cleanser—crisp, icy, and incredibly sharp. We love the way the thin, translucent slices of cucumber absorb the sweet and sour vinegar brine, turning into a quick-pickle that is insanely addictive. The aroma of fresh dill is prominent and cooling, cutting through the heat of any summer day. Each bite provides a satisfying ‘crunch’ followed by a burst of cold, zesty juice. It is the perfect refreshing companion to heavier grilled meats, offering a bright acidity that balances the richness of a summer feast.
Ingredients
- 3 large English cucumbers, thinly sliced
- 1/2 red onion, very thinly sliced
- 1/2 cup white vinegar
- 2 tablespoons granulated sugar
- 1/4 cup fresh dill, chopped
- 1 teaspoon salt
How to make it
- Use a mandoline slicer to get paper-thin rounds of cucumber and red onion. The thinner they are, the more surface area there is to soak up the brine, resulting in a more flavorful salad.
- Place the sliced cucumbers in a colander and sprinkle with the salt. Let them sit for 15 minutes. This draws out excess water, ensuring your salad stays crunchy and doesn’t become a watery mess in the bowl.
- In a small bowl, whisk together the white vinegar and sugar until the sugar is completely dissolved. This creates a balanced sweet-and-sour base.
- Pat the cucumbers dry with a paper towel and transfer them to a large bowl along with the red onions.
- Pour the vinegar mixture over the vegetables and toss in the freshly chopped dill. The dill is the star flavor here, so don’t be afraid to be generous with it.
- Refrigerate the salad for at least 1 hour before serving. The colder it is, the more refreshing it becomes. Serve in a chilled bowl to keep it crisp throughout the meal.
The Art of Effortless Entertaining
Hosting shouldn’t feel like a chore, and with these simple food boards, it doesn’t have to. By focusing on high-quality ingredients and beautiful presentation, you can create a viral-worthy spread that keeps your guests coming back for seconds. Remember, the best part of any gathering is the time spent with loved ones, so take these recipes, set your table, and enjoy the ease of a perfectly curated board. Happy hosting!