

There is something almost magical about the way a beautifully arranged board brings people together. Whether it is a slow Saturday morning with the sun streaming through the kitchen window or a vibrant backyard brunch with your favorite souls, the concept of the ‘Food Board’ has evolved into a true lifestyle art form. Recently, I have been completely obsessed with the ‘Juice Flight Board’—a colorful, hydrating masterpiece that turns simple fruits and vegetables into a liquid rainbow that looks just as good as it tastes.
It is not just about the nutrients, though those are a wonderful bonus for your skin and energy levels. It is about the ritual of the process: the crisp snap of a fresh carrot, the zesty spray of citrus oils in the air, and the deep, rich hues of magenta, emerald, and gold sitting side-by-side in delicate glass carafes. It feels like capturing a bit of sunshine and pouring it straight into a glass to share with the people you love most.
Today, I am showing you exactly how to craft the viral board everyone is talking about. We are going to master ten different styles of fresh juice, from the ultra-hydrating to the deeply detoxifying, so you can build your own stunning beverage spread at home. Let’s dive into these liquid gems!
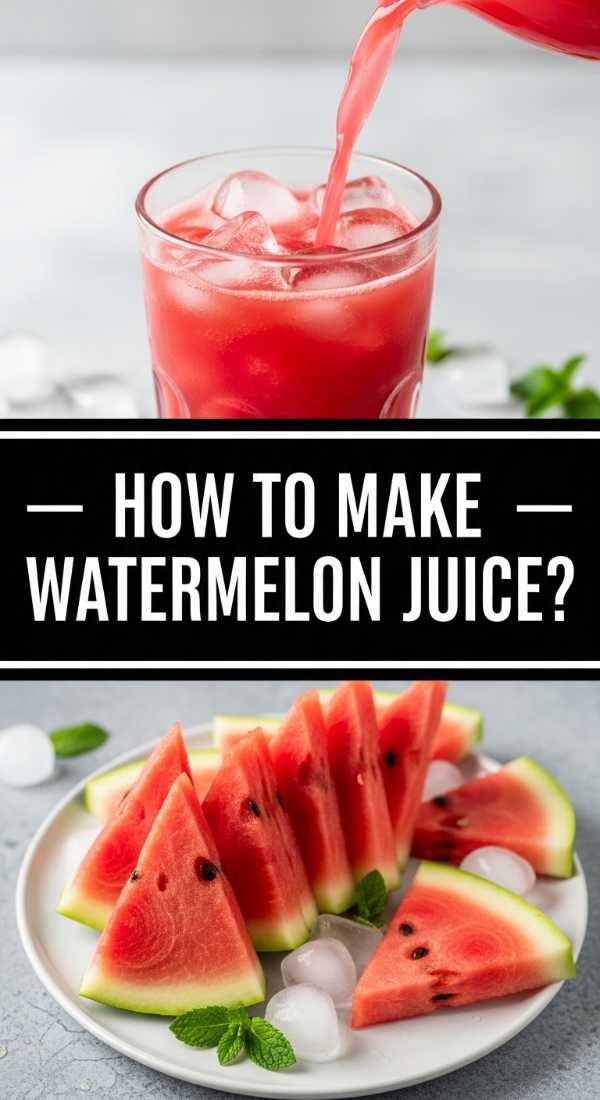
How to make watermelon juice?
Why we love this
Watermelon juice is the ultimate essence of summer captured in a glass, offering a hydrating experience that feels like a cool breeze on a humid afternoon. We love the way the naturally grainy, fibrous fruit transforms into a translucent, ruby-red nectar that is both incredibly sweet and delicately floral. It has a lightness that regular sodas or heavy smoothies simply cannot match, leaving your palate feeling refreshed and your body instantly cooled from the inside out.
Ingredients
- 1 medium seedless watermelon (chilled)
- 1 tablespoon fresh lime juice (optional)
- A handful of fresh mint leaves for garnish
How to make it
- Begin by placing your watermelon on a sturdy cutting board and slicing it in half. Use a large chef’s knife to remove the green rind and the white pith, leaving only the vibrant red flesh.
- Cut the red flesh into 1-inch to 2-inch cubes. You don’t need to be perfect here, as they are headed for the blender, but smaller chunks process more evenly.
- Transfer the cubes into a high-speed blender, filling it about three-quarters of the way. Do not add water, as watermelon is about 92% water on its own and adding more will dilute the flavor.
- Pulse the blender on low for 30 seconds, then increase to medium-high until the mixture is completely liquefied and looks frothy on top.
- For a professional, ‘clear’ juice appearance, pour the mixture through a fine-mesh sieve or a nut milk bag into a large pitcher. Use a spoon to gently press the pulp to extract every last drop of liquid.
- Stir in the lime juice to brighten the flavor and serve immediately over ice with a sprig of fresh mint.
How to juice celery properly?

Why we love this
Celery juice has become a cult favorite for a reason, offering a clean, salty-sweet profile that feels like a morning reset for your entire system. The aroma is incredibly earthy and green, reminiscent of a dew-covered garden at dawn, while the texture is thin and surprisingly smooth when strained correctly. It provides a crisp, alkaline punch that wakes up your digestive system and leaves you feeling light, vibrant, and ready to take on the world with a clear mind.
Ingredients
- 2 large bunches of organic celery
- Filtered water (only if using a blender)
- Optional: half a green apple to cut the bitterness
How to make it
- Thoroughly wash each celery stalk under cold running water, ensuring you remove all traces of dirt and debris from the crevices where the stalks meet.
- Trim off the very bottom base of the stalks and the leafy tops. While the leaves are edible, they can add a very bitter note to the juice, so removing them results in a smoother flavor.
- If using a juicer: Feed the individual stalks through the chute one by one. Use the plunger to apply even, steady pressure, allowing the machine to fully masticate the fibers and separate the dry pulp.
- If using a blender: Chop the stalks into 1-inch pieces and add them to the blender with 1/4 cup of filtered water to help the blades catch. Blend on high until a thick green slurry forms.
- If you used a blender, you must strain the mixture through a nut milk bag. Squeeze the bag firmly with clean hands to extract the juice, discarding the dry fiber left behind.
- Pour into a chilled glass and consume immediately on an empty stomach for the best experience.
How to squeeze orange juice?

Why we love this
There is a nostalgic, golden warmth to fresh-squeezed orange juice that simply cannot be replicated by anything bought in a carton. The scent of the citrus oils spraying from the peel as you press down is like an instant aromatherapy session, filling the kitchen with an uplifting, zesty fragrance. The taste is a complex balance of tangy acidity and natural sugars, with a velvet-like texture that coats the tongue in pure, liquid sunshine.
Ingredients
- 6-8 large juice oranges (like Valencias or Navels)
- Optional: 1 blood orange for a beautiful sunset hue
How to make it
- For maximum juice yield, roll your oranges firmly on the counter under the palm of your hand for 10 seconds before cutting. This breaks the internal membranes and releases the liquid.
- Slice each orange in half crosswise. If you see any visible seeds on the surface, pluck them out with a small fork.
- Using a manual citrus reamer or an electric juicer, press the cut side of the orange onto the cone. If using a manual press, use a firm twisting motion to ensure you scrape the sides of the fruit.
- Apply consistent downward pressure until the skin feels thin and only the white pith remains inside.
- If you prefer no pulp, pour the juice through a small strainer into your serving glass. If you love the texture, pour it directly from the juicer.
- Serve at room temperature or slightly chilled, but never over ice, as the melting water will dull the vibrant citrus profile.
How to craft carrot juice?

Why we love this
Carrot juice is deceptively sweet and incredibly rich, offering a deep orange color that adds a stunning visual anchor to any food board flight. It has a grounding, earthy undertone that feels nourishing and substantial, with a creamy mouthfeel that is unique among vegetable juices. We love the way it pairs with almost any other fruit, adding a beautiful density and a boost of beta-carotene that makes your skin glow from the inside out.
Ingredients
- 1 pound of fresh, firm carrots
- 1 inch of fresh ginger root (peeled)
- 1/2 lemon, peeled
How to make it
- Scrub your carrots vigorously with a vegetable brush under cold water. You don’t necessarily need to peel them if they are organic, as the skin contains many nutrients, but peeling will result in a slightly sweeter juice.
- Cut the carrots into pieces that fit your juicer’s feed chute. If the carrots are very thick, slice them lengthwise to avoid jamming the motor.
- Turn on your juicer to a high-speed setting. Carrots are hard vegetables and require significant centrifugal force to extract the liquid efficiently.
- Feed the ginger and lemon through first to ensure their flavors are fully washed through by the high-volume carrot juice that follows.
- Push the carrots through the chute steadily. You will notice the pulp coming out very dry; this is a sign you are getting a great yield.
- Once finished, stir the juice with a long spoon to incorporate the layers, as carrot juice tends to settle quickly. Serve in a tall glass.
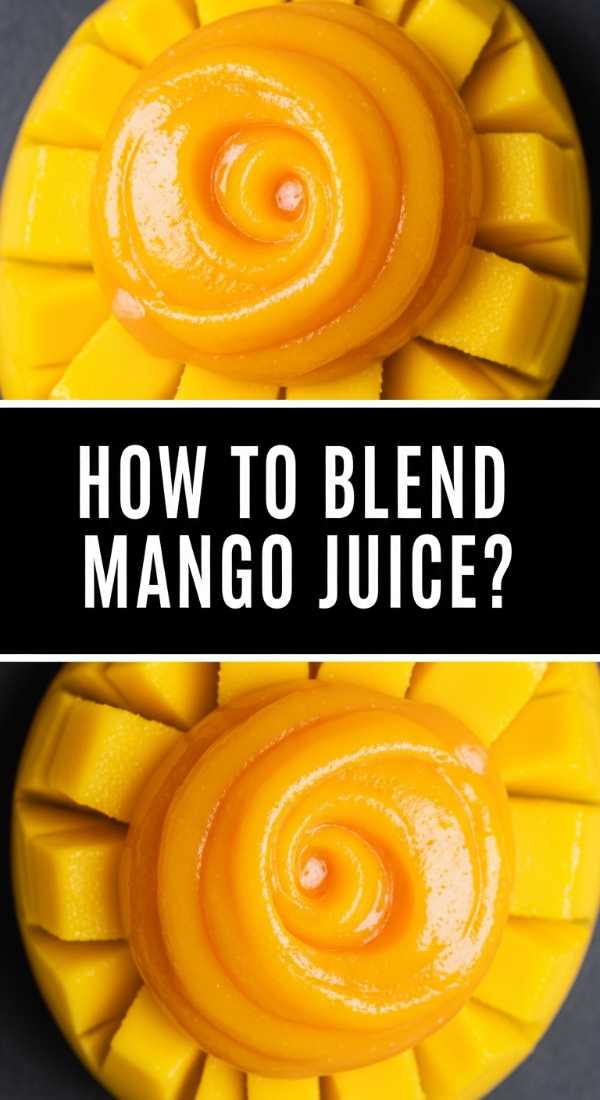
How to blend mango juice?
Why we love this
Mango juice is like a tropical vacation in a glass, boasting a thick, velvety consistency that feels more like a decadent treat than a simple juice. The aroma is intoxicatingly sweet and floral, bringing to mind white sandy beaches and palm trees swaying in the breeze. Each sip is smooth and buttery, coating the palate in a rich, honey-like sweetness that is balanced by a subtle, refreshing tartness that keeps you coming back for more.
Ingredients
- 2 large, ripe mangoes (Champagne or Kent varieties work best)
- 1/2 cup cold filtered water
- 1 teaspoon agave nectar (optional, if mangoes aren’t perfectly sweet)
- A squeeze of lime juice
How to make it
- Find the ‘cheek’ of the mango by slicing just to the side of the large, flat pit in the center. Repeat on the other side, then trim the remaining flesh from around the pit.
- Score the flesh of the mango cheeks in a cross-hatch pattern, being careful not to cut through the skin. Pop the cubes out and slice them off into a bowl.
- Place the mango cubes into a blender and add the half-cup of cold water. The water is essential here, as mangoes are too thick to juice on their own and would result in a purée.
- Add the lime juice and agave if using. Blend on the highest setting for 45-60 seconds until the mixture is completely homogenous and air-whipped.
- For a traditional juice texture, you can strain this through a medium-mesh sieve, but many prefer the ‘nectar’ style which keeps the thick body.
- Chill in the refrigerator for 30 minutes before serving to let the flavors meld and the texture thicken slightly.
How to extract pineapple juice?

Why we love this
Fresh pineapple juice is a revelation compared to the canned version, offering a bright, electric acidity and a frothy, foam-topped texture that is absolutely irresistible. It has a bold, tangy zing that dance on the tongue, followed by a deep, tropical sweetness that lingers long after the sip is gone. The smell is incredibly potent and sunny, instantly lifting the mood and adding a festive, vibrant energy to your juice board spread.
Ingredients
- 1 whole ripe pineapple
- A pinch of sea salt (to enhance the sweetness)
How to make it
- Prepare the pineapple by slicing off the crown and the base. Stand it upright and carefully slice away the tough, prickly skin, following the curve of the fruit.
- Cut the pineapple into long spears. Do not remove the core! The core contains the highest concentration of bromelain (a beneficial enzyme) and juices perfectly well in a high-quality machine.
- Turn your juicer to a medium-high setting. Pineapple is fibrous, so it needs a bit of power to process efficiently without clogging the filter.
- Feed the spears through one at a time. You will see a beautiful, thick golden foam forming on top of the liquid—this is normal and highly sought after for its flavor.
- Once all the fruit is processed, add a tiny pinch of sea salt to the pitcher and stir. This neutralizes any excessive ‘bite’ from the acidity and makes the juice taste even sweeter.
- Serve in a glass with a small wedge of pineapple on the rim for that classic tropical aesthetic.
How to mix jungle juice?

Why we love this
Jungle juice is the ultimate crowd-pleaser, a playful and complex blend that combines the best of every fruit into one harmonious, party-ready punch. It is vibrant, fruity, and incredibly fun, with a flavor profile that changes with every glass as the different juices mingle together. We love the way it looks in a large glass dispenser, filled with floating fruit slices and ice, acting as the social centerpiece of any gathering where the goal is shared joy and celebration.
Ingredients
- 2 cups orange juice
- 2 cups pineapple juice
- 1 cup cranberry juice
- 1 cup grape juice
- 1 liter of ginger ale or sparkling water
- Slices of lemon, lime, and orange for garnish
How to make it
- Select a large glass pitcher or a punch bowl. Ensure it is clean and chilled before you begin mixing to keep the ingredients cold.
- Start by pouring in the ‘heavy’ juices first: the orange and pineapple juice. Stir them together with a long-handled spoon to create a consistent base.
- Slowly pour in the cranberry and grape juices. You will see the color transform into a deep, beautiful magenta or purple-red hue.
- Just before serving, gently pour in the ginger ale or sparkling water. Pour it down the side of the container to preserve as much carbonation as possible.
- Give it one very gentle stir—too much stirring will kill the bubbles.
- Add a generous amount of ice and the sliced citrus fruits. The fruit will slowly infuse the juice with their zest over time, making it even better as the party goes on.
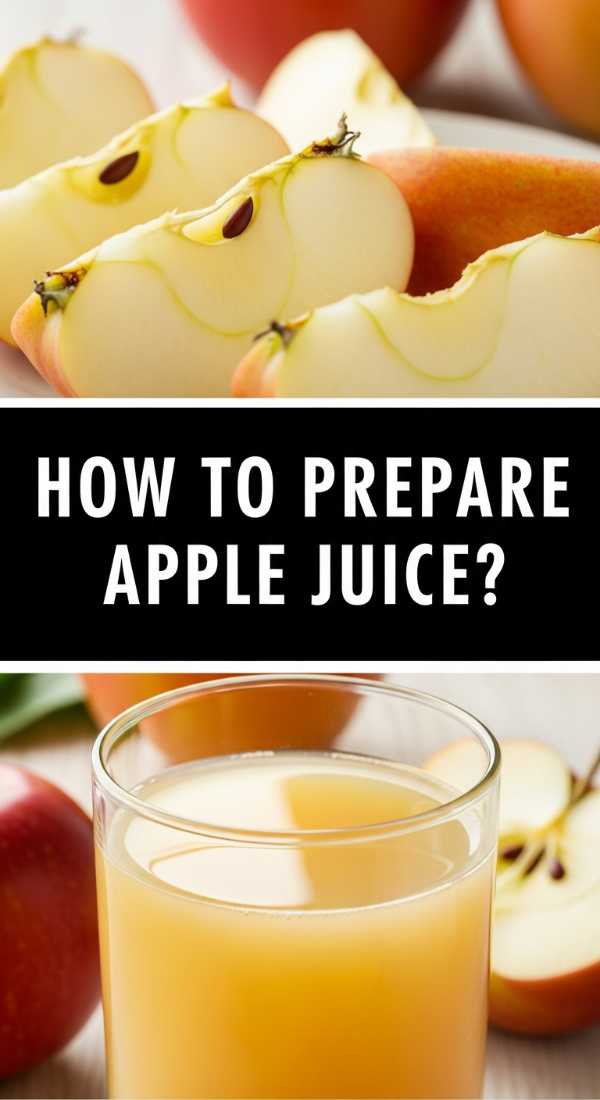
How to prepare apple juice?
Why we love this
Freshly pressed apple juice is a far cry from the store-bought variety, offering a crisp, clean, and sparkling flavor that tastes exactly like a bite of a cold, crunchy apple. The aroma is sweet and autumnal, while the liquid itself has a beautiful, natural cloudiness that proves its authenticity and freshness. It is comforting yet refreshing, providing a balanced sweetness that is neither too heavy nor too thin, making it the perfect palate cleanser for any food board.
Ingredients
- 6-8 large firm apples (Gala or Honeycrisp for sweetness, Granny Smith for tartness)
- 1/2 lemon (to prevent browning)
How to make it
- Wash the apples thoroughly to remove any wax or residue. Cut them into quarters, removing the stems, but you can leave the seeds and cores if using a high-quality juicer.
- Prepare a pitcher with the juice of half a lemon already inside. Apple juice oxidizes (turns brown) incredibly fast once it hits the air, and the citric acid will help maintain that bright, golden color.
- Set your juicer to a high speed. Apples are dense, and you want to extract the liquid quickly to minimize air exposure.
- Feed the apple quarters through the chute at a steady pace. If you are using a mix of apple varieties, alternate them to help the flavors blend during the extraction process.
- Once the juice is collected, you may see a layer of brownish foam on top. Use a wide spoon to skim this off if you want a clear, professional look.
- Serve immediately. If you must store it, fill the container to the very top to leave no room for oxygen and keep it tightly sealed in the fridge.
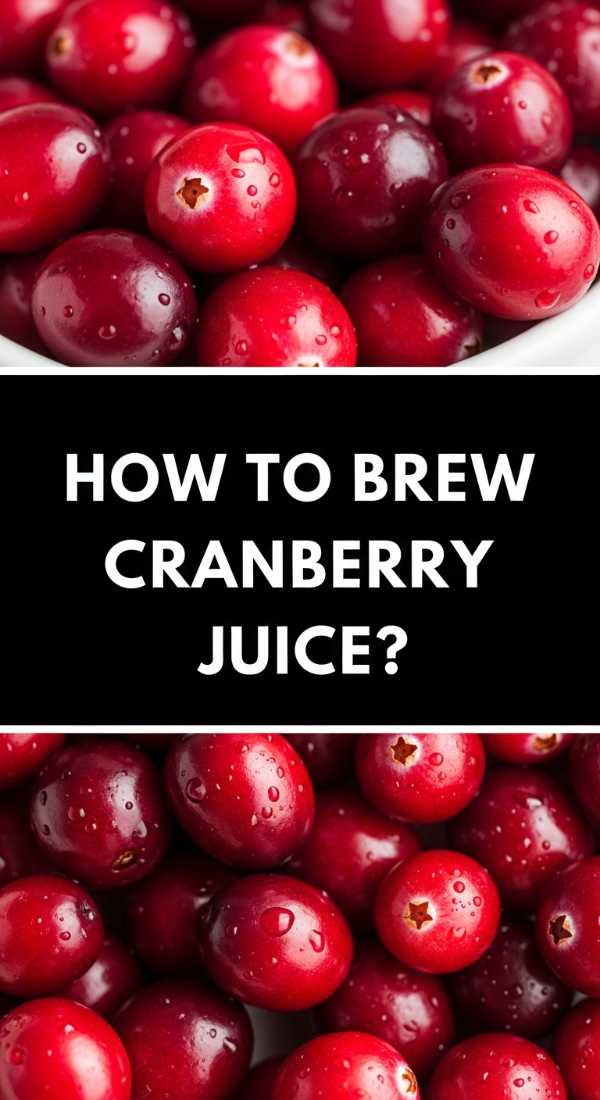
How to brew cranberry juice?
Why we love this
Cranberry juice is prized for its bold, sophisticated tartness and its stunning, deep-crimson color that adds a touch of elegance to any drink flight. Unlike the sugary ‘cocktail’ versions, home-brewed cranberry juice has a medicinal, cleansing quality that feels incredibly revitalizing. It has a sharp, tannic finish that cuts through richer foods, making it a brilliant companion for a cheese or charcuterie board where its acidity can shine.
Ingredients
- 1 pound fresh or frozen cranberries
- 4 cups filtered water
- 1/4 cup honey or maple syrup (adjust to taste)
- 1 cinnamon stick (optional)
How to make it
- Rinse the cranberries in a colander, discarding any that are soft, shriveled, or discolored.
- Place the cranberries and the 4 cups of water into a large stainless steel saucepan. Add the cinnamon stick if you want a warm, spiced undertone.
- Bring the mixture to a boil over high heat. Once boiling, reduce the heat to medium-low and let it simmer.
- As the berries cook, they will begin to ‘pop’—listen for this sound! Use a potato masher or the back of a large spoon to crush the berries against the side of the pot to release all their juice.
- Simmer for about 10-15 minutes until the liquid is deep red and the berries are completely broken down.
- Strain the mixture through a fine-mesh sieve into a heat-proof bowl. Stir in your sweetener while the liquid is still hot so it dissolves completely. Allow it to cool fully before chilling in the fridge.
How to start juice cleansing?

Why we love this
Starting a juice cleanse is more than just a diet change; it is a dedicated ritual of self-care and a total sensory reset for your body. We love the feeling of mental clarity and the surge of natural energy that comes when you flood your system with pure, liquid nutrients. It is a chance to slow down, listen to your body’s cues, and appreciate the vibrant, raw power of plants in their most bioavailable form, leaving you feeling lighter, brighter, and completely rejuvenated.
Ingredients
- A variety of green, root, and fruit juices (as prepared above)
- Plenty of room-temperature filtered water
- Herbal teas (caffeine-free)
How to make it
- Preparation is key: Two days before you start, begin weaning yourself off caffeine, processed sugars, and heavy dairy to avoid ‘detox headaches.’
- Plan for 5-6 juices per day, spaced about 2 to 3 hours apart. Start with a green juice in the morning for alkalinity, and move toward heartier root juices (like carrot or beet) in the afternoon.
- For each ‘meal,’ choose a juice from your board. Sip it slowly, ‘chewing’ the liquid to mix it with saliva, which contains important digestive enzymes.
- Hydrate aggressively between juices. For every glass of juice, drink at least one full glass of filtered water to help your kidneys flush out the toxins being released.
- Listen to your body’s energy levels. If you feel lightheaded, add a pinch of sea salt to your water or have a small bowl of clear vegetable broth.
- To ‘break’ the cleanse, do not jump straight into a heavy meal. Start with watery fruits (like the watermelon juice) and slowly reintroduce solid vegetables over the course of 24 hours.
Conclusion
Building a viral-worthy juice board is about so much more than just a pretty photo; it is about bringing vitality and joy into your kitchen. Whether you are hosting a festive brunch or simply looking to elevate your morning routine, these ten recipes offer a foundation for endless creativity. So, grab your finest glassware, find the freshest produce at your local market, and start pouring. Your body and your guests will thank you for this vibrant, liquid feast!