
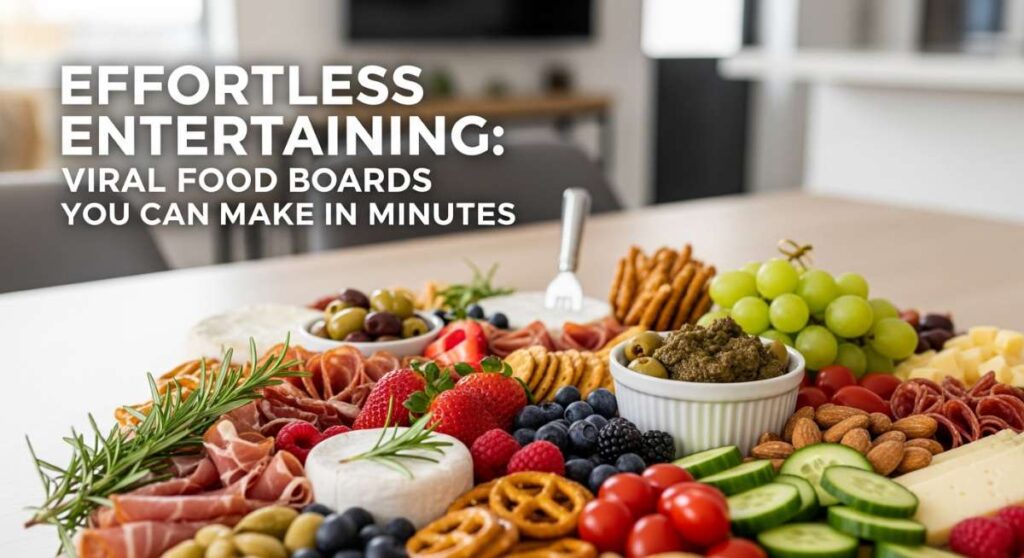
Effortless Entertaining: Viral Food Boards You Can Make in Minutes
There is something truly magical about the way a gathering transforms when a beautiful food board is placed in the center of the table. It’s more than just a meal; it’s a shared experience, a conversation starter, and an invitation for everyone to dive in and linger a while. I used to spend hours stressing over complicated multi-course dinners, but lately, I’ve embraced the viral trend of simple, high-impact food boards that celebrate the season’s best flavors without keeping me trapped in the kitchen for hours.
The secret to these boards isn’t culinary perfection—it’s the abundance of textures, the pop of vibrant colors, and that relaxed, effortless vibe that makes guests feel instantly at home. Whether you’re hosting a breezy backyard hang, a cozy spring dinner, or just want to elevate a Tuesday night with the family, these recipes are designed to be visually stunning and deeply satisfying. Let’s get into the snacks and sips that will make your next gathering go viral among your friends!
How to make the best summer pasta salad?

Why we love this
This summer pasta salad is the ultimate sunshine in a bowl, offering a perfect harmony of tangy acidity and garden-fresh sweetness. We love how the rotini pasta captures every drop of the zesty herb vinaigrette, while the crisp cucumbers and juicy cherry tomatoes provide a satisfying crunch that feels incredibly refreshing on a hot afternoon. The aroma of fresh basil and salty feta cheese wafting from the board creates an instant picnic atmosphere, making it a crowd favorite that disappears faster than you can set the table.
Ingredients
- 1 lb Rotini or Fusilli pasta
- 1 pint cherry tomatoes, halved
- 1 English cucumber, diced
- 1/2 red onion, thinly sliced
- 1 jar kalamata olives, pitted
- 8 oz feta cheese, crumbled
- 1/2 cup extra virgin olive oil
- 1/4 cup red wine vinegar
- 2 cloves garlic, minced
- 1 tbsp dried oregano
- Fresh basil leaves for garnish
How to make it
- Fill a large stockpot with water and add a generous amount of sea salt—it should taste like the ocean—then bring it to a rolling boil over high heat.
- Add the pasta and cook for exactly 8-10 minutes until it reaches ‘al dente’ texture; the pasta should have a slight bite to ensure it doesn’t get mushy once the dressing is added.
- Drain the pasta and immediately rinse it under cold running water for 60 seconds to stop the cooking process and remove excess starch, then drizzle with a teaspoon of olive oil to prevent sticking.
- In a small glass jar or bowl, whisk together the olive oil, red wine vinegar, minced garlic, and oregano until the mixture is fully emulsified and slightly thickened.
- In a massive mixing bowl, combine the cooled pasta, halved tomatoes, diced cucumbers, onions, and olives, then pour the dressing over the top and toss gently with large spoons.
- Fold in the crumbled feta cheese last to keep the pieces intact, then cover and refrigerate for at least 30 minutes to allow the flavors to marry before serving with a flourish of fresh basil.
How to make creamy rotel dip?

Why we love this
Nothing says ‘party’ quite like a molten bowl of creamy Rotel dip surrounded by a sea of salty, golden tortilla chips. It’s the ultimate comfort food—rich, velvety, and packed with just enough heat from the green chilies to keep you coming back for more. The way the cheese stretches and coats every chip, combined with the savory, spiced ground meat, creates a sensory experience that is nostalgic, indulgent, and undeniably addictive for guests of all ages.
Ingredients
- 16 oz Velveeta or processed melting cheese, cubed
- 1 can (10 oz) Rotel diced tomatoes and green chilies
- 1 lb ground breakfast sausage or lean ground beef
- 1/2 tsp chili powder
- 1/4 tsp cumin
- Fresh cilantro and sliced jalapeños for garnish
How to make it
- Place a large skillet over medium-high heat and add the ground sausage or beef, breaking it up with a wooden spoon into very small, uniform crumbles.
- Sauté the meat for 7-9 minutes until it is thoroughly browned and no pink remains, then carefully drain all excess grease into a heat-safe container to ensure the dip isn’t oily.
- Lower the heat to medium-low and add the cubed cheese to the skillet; it is vital to keep the heat low here so the cheese melts smoothly without scorching or becoming grainy.
- Pour in the entire can of Rotel (including the liquid, which provides the necessary acidity and moisture) and stir continuously in a circular motion until the cheese is completely liquid and glossy.
- Stir in the chili powder and cumin, allowing the dip to simmer for just 2-3 minutes until tiny bubbles appear around the edges, indicating it is heated through.
- Transfer the mixture to a pre-warmed serving bowl or a small slow cooker on the ‘warm’ setting to maintain that perfect silkiness throughout the entire party.
How to grill perfect chicken kabobs?

Why we love this
Grilled chicken kabobs are a visual masterpiece, showcasing a rainbow of charred vegetables and succulent, golden-brown meat that smells like a summer dream. There is something so satisfying about the smoky aroma that rises from the grill as the honey-garlic marinade caramelizes against the high heat. Each bite offers a contrast between the tender, juice-filled chicken and the slightly crisp, blackened edges of the bell peppers and onions, making it a healthy yet hearty centerpiece for any viral food board.
Ingredients
- 1.5 lbs boneless skinless chicken breasts, cut into 1-inch cubes
- 2 large bell peppers (red and green), cut into chunks
- 1 large red onion, cut into wedges
- 1/4 cup olive oil
- 3 tbsp soy sauce
- 2 tbsp honey
- 1 tsp smoked paprika
- Wooden or metal skewers
How to make it
- If using wooden skewers, submerge them in a tray of water for at least 30 minutes prior to grilling to prevent them from catching fire over the open flame.
- In a large bowl, whisk together the olive oil, soy sauce, honey, and smoked paprika, then toss the chicken cubes in the marinade, covering and chilling in the fridge for at least 1 hour to tenderize the meat.
- Thread the chicken and vegetables onto the skewers, alternating between meat, pepper, and onion, making sure not to pack them too tightly so the heat can circulate around each piece.
- Preheat your grill to medium-high heat (about 400°F) and lightly oil the grates using a pair of tongs and a folded paper towel dipped in vegetable oil.
- Place the kabobs on the grill and cook for 12-15 minutes, turning them a quarter-turn every 3-4 minutes to achieve those beautiful, even char marks on all sides.
- Use an instant-read thermometer to ensure the chicken has reached an internal temperature of 165°F, then remove from the heat and let them rest for 5 minutes before serving to lock in the juices.
How to make creamy iced coffee?

Why we love this
This creamy iced coffee is the ultimate afternoon pick-me-up, looking like a professional coffee shop creation with its beautiful swirling marble of dark espresso and white cream. We love the velvety mouthfeel that comes from the perfect fat-to-coffee ratio, offering a cooling sensation that cuts through the humidity of a summer day. The aroma of toasted beans mixed with a hint of vanilla is intoxicating, providing a caffeinated luxury that feels like a treat but is incredibly simple to assemble.
Ingredients
- 1 cup strong cold brew coffee or chilled espresso
- 2 tbsp heavy cream or half-and-half
- 1 tbsp sweetened condensed milk (optional for sweetness)
- 1/2 tsp vanilla extract
- Large ice cubes
How to make it
- Start by filling a tall, sturdy glass all the way to the brim with large ice cubes; using larger cubes is a professional secret as they melt slower and won’t water down your coffee.
- Pour your chilled cold brew or espresso over the ice, leaving about two inches of space at the top of the glass for your creamy additions.
- In a separate small frothing pitcher or jar, combine the heavy cream, sweetened condensed milk, and vanilla extract.
- If you have a handheld milk frother, pulse it for 10-15 seconds until the cream is thickened and slightly foamy, which creates that viral ‘cold foam’ look.
- Slowly pour the cream mixture over the back of a spoon into the coffee to create a stunning layered effect, allowing the cream to slowly cascade down through the ice.
- Give it a very gentle stir with a long straw just before the first sip to ensure the sweetness is distributed while maintaining the beautiful aesthetic.
How to make strawberry lemonade?

Why we love this
Nothing beats the vibrant pink hue and the sweet-tart explosion of a freshly made strawberry lemonade served in a frosted pitcher. It’s the quintessential summer refresher, balancing the sharp, bright zing of freshly squeezed lemons with the mellow, floral sweetness of sun-ripened strawberries. The scent of citrus zest mixed with crushed berries is enough to lift anyone’s mood, and the sight of floating fruit slices makes it a gorgeous addition to any outdoor gathering.
Ingredients
- 1 cup freshly squeezed lemon juice (about 5-6 lemons)
- 1 cup granulated sugar
- 1 cup water (for simple syrup)
- 1 lb fresh strawberries, hulled
- 4 cups cold filtered water
- Ice and lemon slices for garnish
How to make it
- Create a simple syrup by combining the sugar and 1 cup of water in a small saucepan over medium heat; stir constantly until the sugar is completely dissolved and the liquid is clear, then set aside to cool.
- Place the strawberries in a high-speed blender and pulse until they are a completely smooth purée; for an extra-elegant look, pour the purée through a fine-mesh sieve to remove the seeds.
- In a large glass pitcher, combine the freshly squeezed lemon juice, the strawberry purée, and the cooled simple syrup, stirring vigorously with a long wooden spoon.
- Add the 4 cups of cold filtered water and stir again, tasting for balance; if it’s too tart, add a splash more syrup, or if it’s too sweet, add a squeeze more lemon.
- Chill the pitcher in the refrigerator for at least two hours to allow the strawberry and lemon flavors to fully integrate and become more complex.
- Serve over plenty of ice in glasses rimmed with sugar, garnishing with fresh mint sprigs and thin lemon wheels for a truly viral, photo-ready presentation.
How to make easy summer desserts?
Why we love this
Easy summer desserts are all about celebrating nature’s candy with minimal effort and maximum flavor, focusing on light, airy textures that don’t weigh you down. We love the combination of buttery, crumbly shortbread paired with billowing clouds of whipped cream and the macerated juices of ripe summer berries. It feels sophisticated yet rustic, providing a cool and refreshing end to a warm-weather meal that emphasizes fresh ingredients over heavy baking techniques.
Ingredients
- 1 pint fresh strawberries or blueberries
- 2 tbsp granulated sugar
- 1 tsp lemon zest
- 1 cup heavy whipping cream, cold
- 2 tbsp powdered sugar
- Store-bought shortbread cookies or pound cake
How to make it
- Wash and hull your berries, then slice the strawberries into thin pieces and place them in a glass bowl with the granulated sugar and lemon zest.
- Toss the berries gently and let them sit at room temperature for at least 20 minutes; this process, called maceration, draws out the natural juices to create a delicious, syrupy sauce.
- Place a metal mixing bowl and whisk in the freezer for 10 minutes before starting—this ensures the cream stays cold and whips into a more stable, voluminous foam.
- Pour the cold heavy cream into the chilled bowl and whisk on medium-high speed until soft peaks begin to form, then add the powdered sugar and continue whisking until the peaks are firm.
- To assemble, place two shortbread cookies on a plate or a slice of pound cake, then top with a massive dollop of the fresh whipped cream.
- Spoon the macerated berries and their accumulated syrup over the top, allowing the red juices to soak slightly into the base for a perfect, easy-to-eat summer treat.
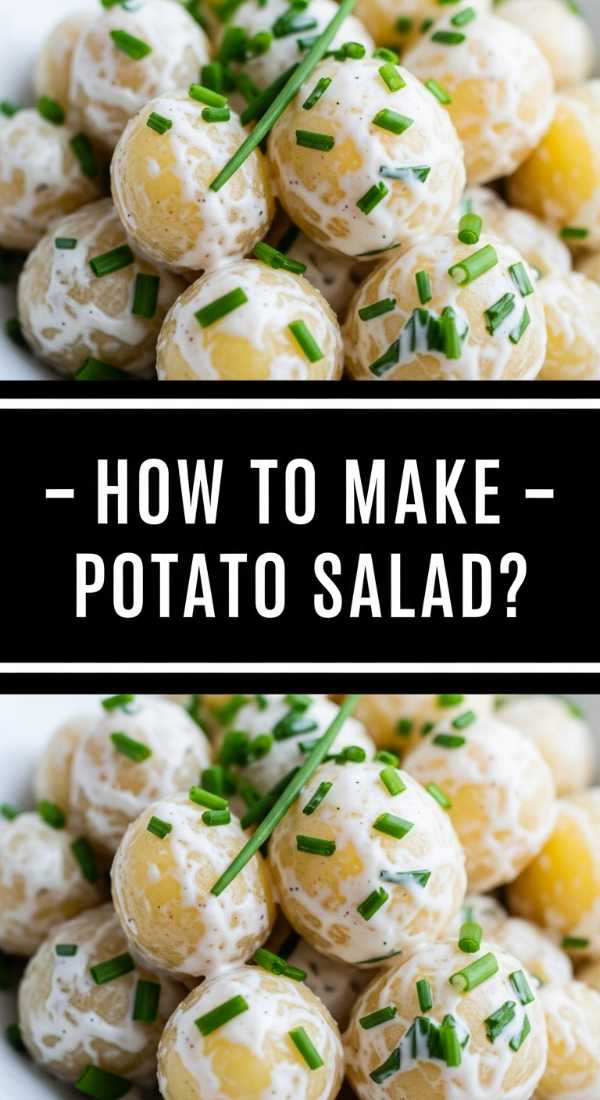
How to make classic potato salad?

Why we love this
Classic potato salad is the ultimate nostalgic side dish, offering a creamy, tangy, and hearty bite that pairs perfectly with anything off the grill. We love the contrast between the tender, buttery Yukon Gold potatoes and the sharp, crunchy bite of diced celery and red onion. The aroma of mustard and fresh dill creates a savory profile that feels like home, while the rich, egg-based dressing provides a smooth texture that makes it a staple for any viral food board.
Ingredients
- 3 lbs Yukon Gold potatoes, peeled and cubed
- 1 cup mayonnaise
- 2 tbsp yellow mustard
- 1 tbsp apple cider vinegar
- 3 hard-boiled eggs, chopped
- 1/2 cup celery, finely diced
- 1/4 cup red onion, minced
- 2 tbsp fresh dill, chopped
- Salt and black pepper to taste
How to make it
- Place the cubed potatoes in a large pot and cover with cold water by at least an inch; starting with cold water ensures the potatoes cook evenly from the center to the outside.
- Bring the water to a boil, then reduce to a simmer and cook for 10-12 minutes until the potatoes are fork-tender but not falling apart or ‘mashy’.
- Drain the potatoes and, while they are still steaming, drizzle them with the apple cider vinegar; the warmth allows the potatoes to absorb the vinegar deep into their centers for better flavor.
- In a medium bowl, whisk together the mayonnaise, mustard, salt, and pepper until the dressing is completely smooth and uniform in color.
- In a large mixing bowl, combine the cooled potatoes, chopped hard-boiled eggs, celery, and red onion, then pour the dressing over the top.
- Fold the ingredients together gently with a rubber spatula to avoid breaking the potatoes, stir in the fresh dill, and chill for at least 4 hours—or overnight—to let the starches set and the flavors deepen.
How to make easy spring dinner?
Why we love this
An easy spring dinner is like a breath of fresh air on a plate, featuring vibrant greens and light proteins that celebrate the end of winter. We love the simplicity of a sheet-pan meal where the bright, citrusy notes of lemon and the earthy snap of fresh asparagus take center stage. The sight of a perfectly roasted piece of salmon flaking under a fork, surrounded by tender baby potatoes, creates a wholesome and elegant dining experience that requires very little cleanup.
Ingredients
- 2 large salmon fillets
- 1 bunch thin asparagus, trimmed
- 1 lb baby potatoes, halved
- 3 tbsp olive oil
- 1 lemon, thinly sliced
- 3 cloves garlic, smashed
- 1 tsp dried thyme
- Salt and pepper
How to make it
- Preheat your oven to 400°F (200°C) and line a large, rimmed baking sheet with parchment paper to prevent sticking and make cleanup a breeze.
- Toss the halved baby potatoes with 1 tablespoon of olive oil, salt, pepper, and thyme, then spread them out on the sheet pan and roast alone for 15 minutes to give them a head start.
- Remove the pan from the oven and move the potatoes to one side, then place the salmon fillets and the asparagus on the remaining space.
- Drizzle the salmon and asparagus with the remaining olive oil and scatter the smashed garlic and lemon slices over the top of the fish and vegetables.
- Return the pan to the oven and roast for another 12-15 minutes; the salmon should be opaque and flake easily with a fork, and the asparagus should be bright green and tender-crisp.
- Garnish with an extra squeeze of fresh lemon juice and a sprinkle of sea salt before serving directly from the pan for a rustic, effortless presentation.
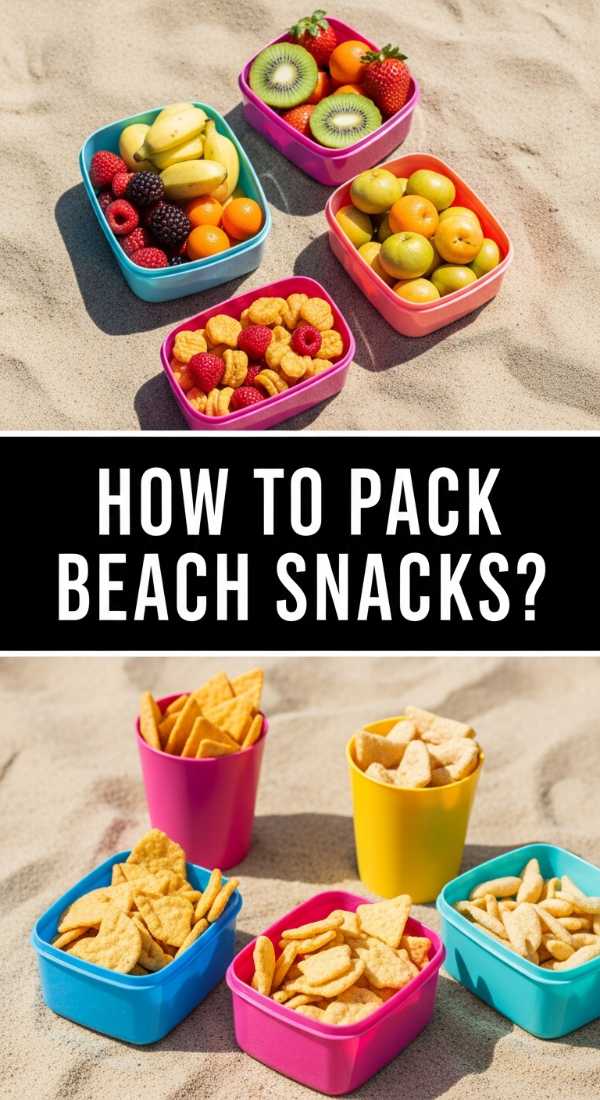
How to pack beach snacks?

Why we love this
Packing the perfect beach snacks is an art form that ensures your seaside day is fueled by fresh, hydrating, and mess-free treats. We love the combination of salty crackers and creamy hummus paired with pre-cut, chilled fruit that provides a burst of natural energy under the hot sun. There’s a specific joy in opening a sand-free container to find crisp grapes and savory energy balls, making the experience of eating by the ocean feel organized, refreshing, and entirely stress-free.
Ingredients
- Firm fruits (grapes, apple slices with lemon, melon chunks)
- Pre-cut vegetables (carrots, bell pepper strips)
- Individual hummus cups
- Whole grain crackers
- Homemade or store-bought protein energy balls
- Frozen water bottles (to act as ice packs)
How to make it
- Select firm fruits and vegetables that won’t bruise easily or become mushy in the heat; wash, dry, and cut them into bite-sized pieces for easy ‘hand-to-mouth’ snacking.
- Toss apple slices in a small amount of lemon juice to prevent browning, then pack them into airtight silicone bags or hard-shell containers to protect them from being crushed.
- Portion out hummus into small, individual-sized containers with tight-fitting lids so you don’t have to worry about sand getting into a large communal tub.
- Wrap crackers in a reusable beeswax wrap or a small container to keep them crisp and prevent them from absorbing moisture from the cooler environment.
- Place your frozen water bottles at the very bottom of an insulated cooler bag; this creates a cold base that will keep your snacks chilled for hours without the mess of melting ice cubes.
- Layer your snacks on top of the bottles with the heaviest items at the bottom and the most delicate fruits on top, ensuring everything is sealed tight to keep the salty sea air and sand out.
How to brew refreshing sun tea?
[IMAGE_10]
Why we love this
Sun tea is the ultimate slow-living summer ritual, using the gentle power of the sun to extract a mellow, smooth flavor that you just can’t get from boiling water. We love the beautiful sight of a glass gallon jar sitting on a sun-drenched porch, with the tea slowly infusing the water with a deep amber glow. The result is a crisp, clean beverage that lacks the bitterness of over-steeped hot tea, making it the perfect canvas for fresh mint and slices of citrus.
Ingredients
- 1 gallon cold filtered water
- 8-10 black or green tea bags (tags removed)
- 1 large glass jar with a tight-fitting lid
- Fresh mint sprigs
- Optional: Honey or agave for sweetening
How to make it
- Thoroughly clean and sanitize a one-gallon glass jar—using glass is essential as plastic can leach chemicals when sitting in the direct heat of the sun.
- Fill the jar with cold, filtered water and gently submerge the tea bags, allowing the strings to hang over the side or simply dropping the bags in entirely.
- Seal the lid tightly and place the jar in a spot that receives direct, uninterrupted sunlight for at least 3 to 5 hours; the longer it sits, the stronger the infusion will be.
- Keep an eye on the color; once it reaches a rich, translucent amber hue, bring the jar inside—do not leave it out for more than 4-5 hours to ensure the highest quality and safety.
- Remove and discard the tea bags, then stir in your sweetener of choice while the tea is still slightly warm from the sun so it dissolves completely.
- Add a handful of fresh mint sprigs and move the jar to the refrigerator immediately; serve over tall glasses of ice for the most refreshing, natural tea experience imaginable.
The Joy of Effortless Hosting
At the end of the day, viral food boards and simple recipes aren’t just about the aesthetic—they are about reclaiming your time so you can actually enjoy the people you’ve invited over. By focusing on fresh ingredients, smart prep, and beautiful presentation, you can create a spread that feels luxurious without the burnout. So, grab your biggest wooden board, whip up a pitcher of sun tea, and let the flavors of the season do the heavy lifting for you. Happy hosting!