
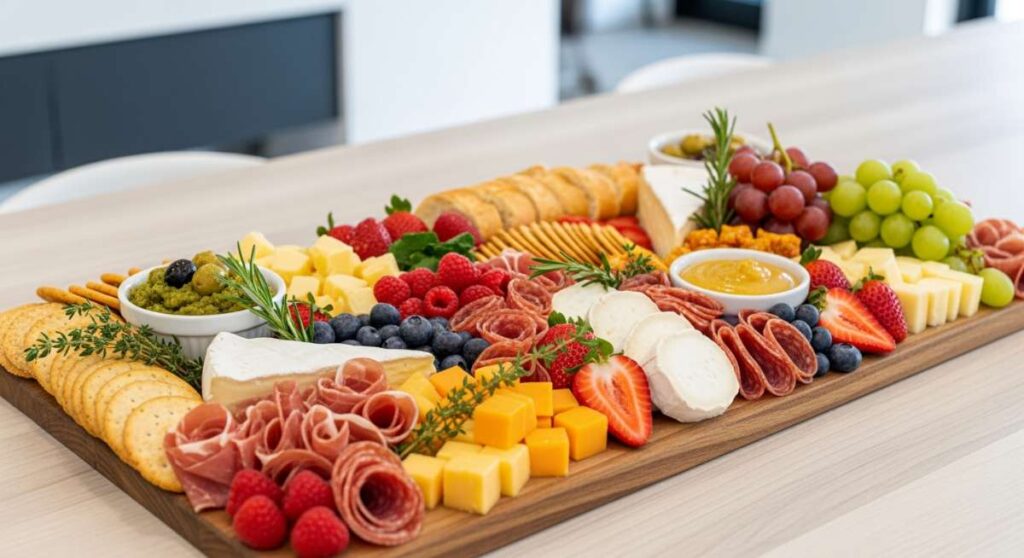
Why This Simple Food Board is the Only Appetizer You Need This Year
There is something inherently magical about a gathering that centers around shared food, where the barriers between host and guest dissolve over a beautifully curated spread. I remember the first time I set out a massive, rustic board filled with a kaleidoscope of flavors; the room immediately filled with laughter and the sound of crusty bread tearing, replacing the formal stiffness of traditional dinner parties. This food board isn’t just about eating; it’s about the permission to linger, to graze, and to savor the simple joys of seasonal ingredients transformed into something extraordinary.
We live in a world that often feels rushed and fragmented, which is why the ‘Simple Food Board’ has become my ultimate hosting secret. By combining these ten versatile elements—ranging from floral jellies to crisp summer salads—you create a landscape of textures and aromas that cater to every palate. It takes the stress out of the kitchen and puts the focus back on the connection, allowing you to actually enjoy the party you worked so hard to put together.
How to make dandelion jelly

Why we love this
This golden, honey-like jelly is essentially liquid sunshine captured in a jar, offering a delicate floral aroma that transports you straight to a blooming meadow in late spring. The texture is silky and translucent, shimmering against a piece of warm sourdough or a sharp wedge of cheddar on your board. There is a profound sense of satisfaction in foraging these bright yellow blossoms and turning a backyard ‘weed’ into a sophisticated, sweet-and-earthy preserve that sparks endless conversation among guests who can’t believe the flavor profile.
Ingredients
- 2 cups dandelion petals (yellow parts only)
- 4 cups boiling water
- 1/4 cup lemon juice
- 1 package powdered pectin
- 4 cups granulated sugar
How to make it
- Begin by meticulously separating the yellow petals from the green base of the dandelion; the green parts are incredibly bitter and will ruin the delicate floral flavor if included.
- Place the cleaned petals in a heat-proof glass bowl and pour 4 cups of boiling water over them, stirring gently to ensure all petals are submerged.
- Cover the bowl and allow the petals to steep for at least 8 to 12 hours (overnight is best) in the refrigerator to create a potent ‘dandelion tea.’
- Strain the liquid through a fine-mesh sieve lined with cheesecloth, squeezing the petals firmly to extract every drop of essence, then measure out exactly 3 3/4 cups of the liquid into a large heavy-bottomed pot.
- Stir in the lemon juice and the powdered pectin, then bring the mixture to a full rolling boil over high heat, stirring constantly so it doesn’t scorch.
- Add the sugar all at once, stirring vigorously until dissolved, and return to a full rolling boil that cannot be stirred down for exactly one minute.
- Remove from heat, skim off any foam with a metal spoon, and ladle the hot jelly into sterilized jars, leaving a quarter-inch headspace before processing in a water bath for 10 minutes.
How to cook quick chicken

Why we love this
When you need a high-protein anchor for your food board that doesn’t take hours to prepare, this quick chicken technique is an absolute lifesaver. The chicken emerges from the pan with a gorgeous, caramelized golden crust that seals in an incredible amount of moisture, ensuring every bite is succulent rather than dry. The aroma of searing garlic and fresh herbs creates an immediate ‘home-cooked’ atmosphere, providing a savory, warm contrast to the cooler fruits and cheeses on your spread.
Ingredients
- 2 large chicken breasts, sliced into thin medallions
- 2 tablespoons olive oil
- 1 teaspoon smoked paprika
- 2 cloves garlic, minced
- Salt and cracked black pepper to taste
- Fresh parsley for garnish
How to make it
- Pat the chicken medallions completely dry with paper towels; moisture is the enemy of a good sear, and dry surface area ensures you get that vital golden-brown crust.
- Season both sides of the chicken generously with the smoked paprika, salt, and pepper, pressing the spices into the meat so they adhere during the high-heat cooking process.
- Heat the olive oil in a large stainless steel or cast-iron skillet over medium-high heat until the oil is shimmering and just starting to show a faint wisp of smoke.
- Place the chicken medallions in the pan in a single layer, ensuring they aren’t touching; work in batches if necessary to avoid crowding the pan, which would cause the meat to steam instead of sear.
- Cook undisturbed for 3 to 4 minutes until a deep golden crust forms on the bottom, then flip each piece and immediately add the minced garlic to the spaces between the meat.
- Lower the heat to medium and cook for another 3 minutes, or until the internal temperature reaches exactly 165°F (74°C) and the juices run clear.
- Remove the chicken from the pan immediately and let it rest on a cutting board for 5 minutes to allow the juices to redistribute before slicing or serving on your board.
How to prep summer meals

Why we love this
Prepping summer meals is all about embracing the abundance of the season while keeping the kitchen cool and the chef relaxed. There is a tactile joy in washing vibrant, sun-ripened produce and organizing it into prepped containers that promise ease for the week ahead. By spending a little time on a Sunday afternoon slicing, dicing, and marinating, you ensure that every dinner feels like a breezy, al fresco celebration rather than a chore, allowing the natural sweetness of summer corn and tomatoes to take center stage.
Ingredients
- Bulk fresh corn on the cob
- Heritage tomatoes
- Large bunches of fresh basil and mint
- Pre-washed arugula or spinach
- Citrus fruits (lemons, limes, oranges)
- High-quality extra virgin olive oil
How to make it
- Start by washing all your firm produce in cold water and drying it thoroughly; wet greens will wilt much faster in the fridge, so use a salad spinner for maximum crispness.
- Blanch your corn on the cob by dropping it into boiling water for 3 minutes, then immediately plunging it into an ice bath; this locks in the milkiness and sweetness, allowing you to cut the kernels off the cob for salads later.
- Create a ‘master vinaigrette’ by whisking together 3 parts olive oil to 1 part lemon juice with a spoonful of Dijon mustard and honey; store this in a mason jar to use as a marinade or dressing throughout the week.
- Pick the leaves off your herbs and store them in a damp paper towel inside a sealed bag; this keeps them vibrant and prevents the blackening that occurs when they sit in a pool of water.
- Pre-slice hardy vegetables like bell peppers and cucumbers, but keep watery items like tomatoes whole until the moment of serving to maintain their structural integrity and flavor.
- Organize your fridge by ‘meal kits,’ placing all the ingredients for a specific salad or board in one bin so you can grab-and-go when the evening heat makes you want to spend as little time as possible in the kitchen.
How to make pasta salad

Why we love this
A well-made pasta salad is the ultimate versatile side dish, offering a satisfying al dente bite and a refreshing tang that cuts through the richness of meats and cheeses. We love how the nooks and crannies of fusilli or farfalle trap the zesty dressing, ensuring that every mouthful is an explosion of Mediterranean flavors like salty olives and creamy feta. It’s a dish that actually tastes better the next day as the flavors meld, making it an essential, stress-free addition to any large food board or picnic spread.
Ingredients
- 1 lb rotini or fusilli pasta
- 1 cup cherry tomatoes, halved
- 1 English cucumber, diced
- 1/2 cup Kalamata olives, pitted and sliced
- 1/2 cup red onion, finely minced
- 4 oz crumbled feta cheese
- Homemade Greek dressing (olive oil, red wine vinegar, dried oregano, garlic)
How to make it
- Boil a large pot of heavily salted water; the water should taste like the sea to properly season the pasta from the inside out.
- Cook the pasta for one minute less than the package instructions for ‘al dente’; the pasta will continue to absorb liquid from the dressing, so starting with a firm texture prevents it from becoming mushy.
- Drain the pasta and rinse it immediately under cold running water to stop the cooking process and wash away excess starch, which ensures the pieces don’t stick together.
- In a large mixing bowl, whisk together 1/2 cup olive oil, 1/4 cup red wine vinegar, a tablespoon of dried oregano, and two cloves of pressed garlic until emulsified.
- Add the cooled pasta to the bowl along with the tomatoes, cucumbers, onions, and olives, tossing vigorously to ensure every surface is coated in the dressing.
- Gently fold in the feta cheese at the very end to keep the crumbles distinct and prevent the dressing from becoming cloudy.
- Cover and refrigerate for at least two hours before serving, giving the pasta time to soak up the aromatics; toss one more time just before plating to redistribute the dressing that may have settled at the bottom.
How to prep camping meals

Why we love this
There is nothing quite like the smoky, charred aroma of a meal cooked over an open flame, and prepping these meals in advance turns a rustic campsite into a five-star outdoor bistro. We love the cleverness of foil packs and pre-marinated proteins that eliminate the need for heavy kitchen gear while delivering maximum flavor. Eating under the stars with a warm, hearty meal in hand creates a sense of primal satisfaction and deep connection to nature that you just can’t get from a standard kitchen-cooked dinner.
Ingredients
- Heavy-duty aluminum foil
- Pre-sliced smoked sausage or kielbasa
- Baby potatoes, quartered
- Bell peppers and onions, sliced
- Butter pats or olive oil
- Cajun seasoning or garlic salt
How to make it
- Chop all your vegetables and proteins into uniform sizes at home; this ensures that everything in your foil pack cooks at the same rate, preventing raw potatoes and overcooked meat.
- Lay out a large square of heavy-duty foil (or a double layer of standard foil) and place a portion of sausage, potatoes, and veggies in the center.
- Add a generous pat of butter or a tablespoon of olive oil on top, then sprinkle heavily with your chosen seasonings to create a steam-infused sauce inside the packet.
- Fold the foil edges together tightly, crimping the seams multiple times to create an airtight seal; this prevents the juices from leaking out and causing flare-ups on the fire.
- Label each packet with a permanent marker if you have different dietary options, and store them in a chilled cooler in a waterproof bag.
- To cook, place the packets on a grate over hot coals (avoid direct leaping flames) and cook for 20-25 minutes, flipping once halfway through using long-handled tongs.
- Carefully vent the steam by slicing the top of the foil with a knife before opening fully; the steam will be incredibly hot, so use caution while checking that the potatoes are fork-tender.
How to make strawberry salad
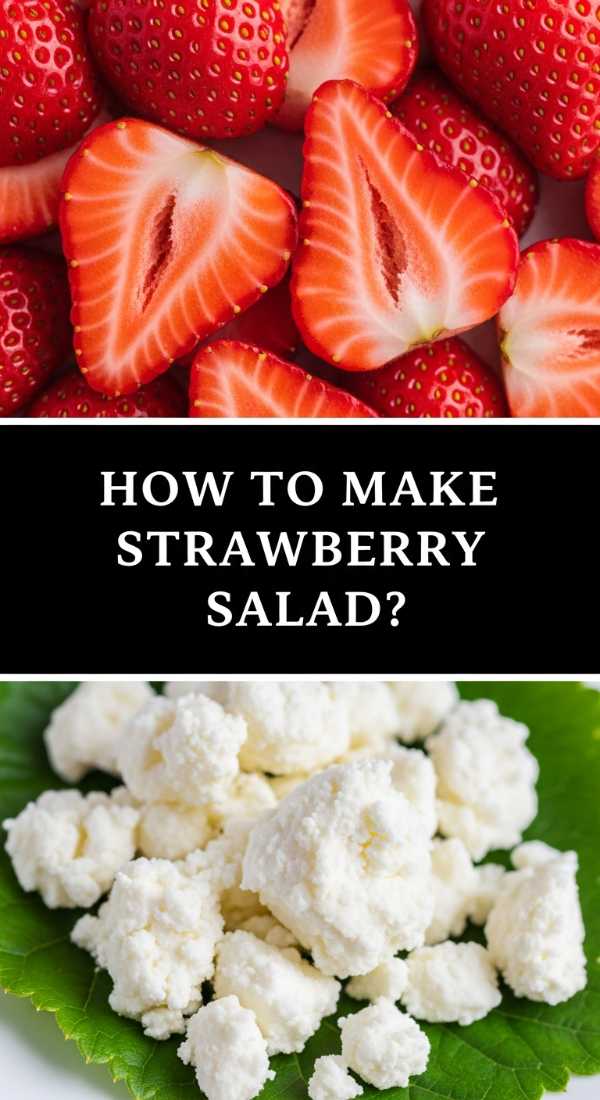
Why we love this
This salad is a masterclass in balance, pairing the juicy, sun-drenched sweetness of fresh strawberries with the peppery bite of baby spinach and the creamy tang of goat cheese. It is visually stunning, with the vibrant reds and deep greens providing an instant pop of color that makes any food board look professionally styled. The crunch of toasted walnuts combined with a silky balsamic glaze creates a multi-sensory experience that feels light, sophisticated, and perfectly emblematic of a summer afternoon.
Ingredients
- 4 cups fresh baby spinach
- 2 cups strawberries, hulled and sliced
- 1/4 cup goat cheese, crumbled
- 1/4 cup toasted walnuts or pecans
- 1/2 small red onion, thinly shaved
- Balsamic glaze for drizzling
How to make it
- Start with the freshest spinach possible, removing any long stems and ensuring the leaves are bone-dry so the glaze adheres properly rather than sliding off.
- Slice the strawberries vertically into 1/4 inch thick pieces; this creates a beautiful heart shape that looks elegant when scattered across the greens.
- If your walnuts aren’t toasted, toss them in a dry pan over medium heat for 3-5 minutes until they become fragrant and slightly darkened; this step is crucial for depth of flavor.
- To assemble, lay the spinach as a base in a shallow wide bowl or directly on your wooden food board for a rustic look.
- Scatter the strawberries and shaved red onions evenly, then sprinkle the goat cheese crumbles, trying to keep them on top of the fruit so they don’t get lost in the greens.
- Just before the guests arrive, drizzle the balsamic glaze in a zig-zag pattern over the entire salad; avoid tossing it, as the dark glaze will turn the cheese and fruit a muddy color.
- Finish with a final crack of fresh black pepper, which surprisingly enhances the sweetness of the berries and the creaminess of the cheese.
How to cook healthy veggies
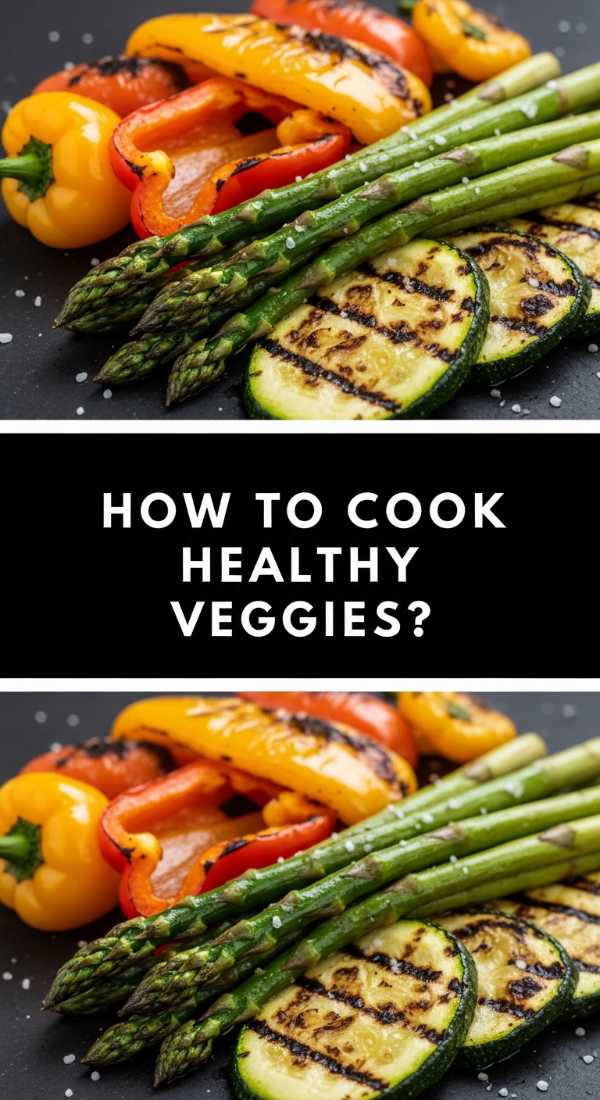
Why we love this
Vegetables don’t have to be a side thought; when cooked with the right technique, they become the star of the board with their charred edges and tender, nutrient-dense centers. We love the way high-heat roasting coaxes out the natural sugars in carrots and asparagus, creating a caramelized sweetness that is far superior to steaming. These veggies provide a healthy, fiber-rich crunch that balances out the heavier elements of a food board, offering a vibrant and guilt-free way to indulge in the season’s harvest.
Ingredients
- 1 bunch thin asparagus, trimmed
- 1 lb heirloom carrots, scrubbed and halved lengthwise
- 2 tablespoons avocado oil (high smoke point)
- 1 teaspoon sea salt
- 1/2 teaspoon lemon zest
- Fresh thyme sprigs
How to make it
- Preheat your oven to 425°F (220°C); a very hot oven is the secret to achieving that coveted exterior char without overcooking the inside into mush.
- Place your prepared vegetables on a large rimmed baking sheet, ensuring they are spread out in a single layer with plenty of space between them to allow for air circulation and browning.
- Drizzle the avocado oil over the veggies and use your hands to toss them, ensuring every inch is lightly and evenly coated in oil.
- Sprinkle the sea salt and fresh thyme sprigs over the top, then roast in the center rack of the oven.
- Roast the carrots for about 15-20 minutes, adding the thinner asparagus only in the last 8-10 minutes since they cook much faster.
- Look for visual cues: the tips of the asparagus should be slightly crispy and the carrots should show dark brown ‘caramelization’ spots where they touched the pan.
- Remove from the oven and immediately sprinkle with fresh lemon zest while the veggies are hot; the heat will release the lemon oils for a bright, aromatic finish.
How to make stuffed shells
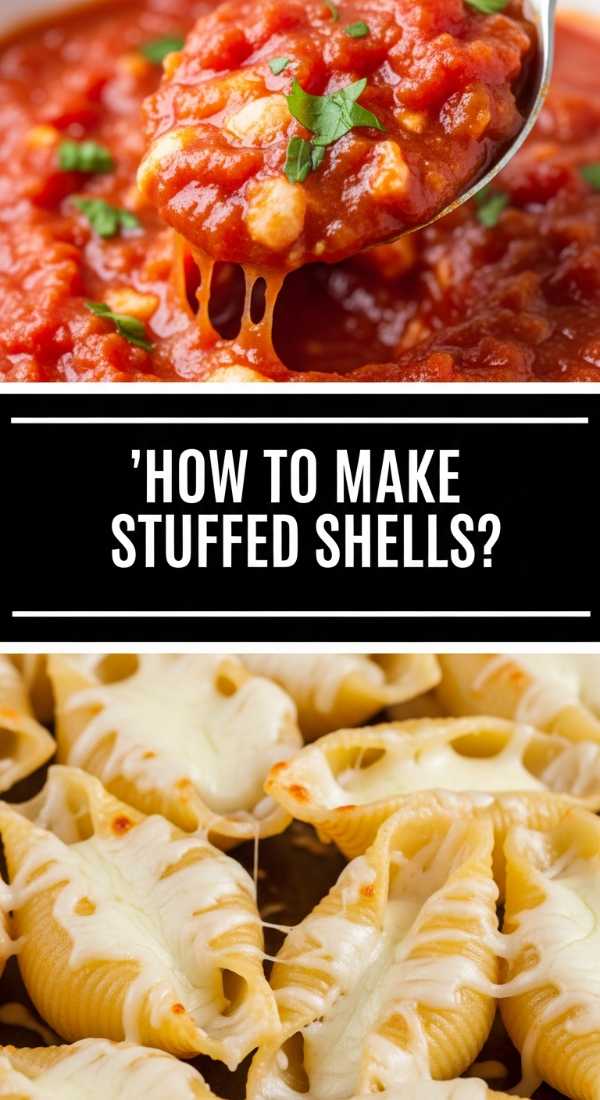
Why we love this
Stuffed shells are the ultimate ‘crowd-pleaser’ comfort food, offering individual portions that are easy for guests to scoop onto their plates from a larger spread. We love the contrast between the tender pasta shell and the rich, velvety ricotta filling that bursts with the flavor of fresh herbs and melted mozzarella. Basting in a vibrant, slow-simmered marinara sauce, these shells emerge from the oven bubbling and fragrant, providing a warm, heart-warming center-piece that feels like a hug in edible form.
Ingredients
- 1 box jumbo pasta shells
- 15 oz whole milk ricotta cheese
- 1 cup shredded mozzarella
- 1/2 cup grated Parmesan
- 1 egg, lightly beaten
- 2 cups marinara sauce
- 1 teaspoon dried Italian seasoning
How to make it
- Boil the jumbo shells in a large pot of salted water for about 2 minutes less than the ‘al dente’ time; they need to be pliable enough to stuff but firm enough not to tear during the process.
- Drain and lay the shells out individually on a baking sheet lined with parchment paper to prevent them from sticking together as they cool.
- In a medium bowl, combine the ricotta, half of the mozzarella, the Parmesan, the egg, and the Italian seasoning, mixing until the filling is smooth and well-incorporated.
- Spread 1 cup of marinara sauce across the bottom of a 9×13 inch baking dish to create a non-stick, flavorful base for the shells.
- Using a small spoon or a piping bag, generously fill each shell with the ricotta mixture and nestle them into the sauce in the baking dish.
- Top with the remaining marinara and the rest of the mozzarella cheese, then cover the dish tightly with foil.
- Bake at 375°F (190°C) for 20 minutes, then remove the foil and bake for another 10-15 minutes until the cheese is browned and the sauce is bubbling vigorously around the edges.
How to make summer dinner

Why we love this
A summer dinner should feel like a vacation on a plate, focusing on minimal heat and maximum freshness. We love this approach because it transitions the concept of a snack board into a full, satisfying meal that encourages slow eating and deep conversation. By layering cold meats, warm roasted veggies, and zesty salads, you create a dynamic dining experience that celebrates the heat of the day with cooling flavors and the ease of a meal that requires no formal plating.
Ingredients
- Assorted charcuterie (prosciutto, salami)
- Sliced artisan breads or crostini
- The prepared Quick Chicken (from section 1)
- The prepared Healthy Veggies (from section 6)
- A bowl of fresh peaches or melon
- Small bowls of nuts and olives
How to make it
- Select a large wooden board or a clean marble slab as your ‘plate’; the larger the surface, the more dramatic and inviting the dinner will look.
- Place your ‘anchors’ first: these are the bowls containing small items like olives, nuts, or the dandelion jelly, spaced out across the board to create balance.
- Add the larger proteins, like the sliced Quick Chicken and the rolled charcuterie, creating a ‘river’ of meat that flows through the center of the board.
- Arrange the warm roasted veggies in clusters next to the proteins, allowing their juices to slightly mingle with the bread for extra flavor.
- Fill the remaining gaps with fresh, sliced summer fruits and the prepared Strawberry Salad to add height and vibrant color to the arrangement.
- Place the artisan breads and crostini at the edges of the board where they are easily accessible for guests to use as vessels for the various dips and meats.
- Serve immediately while the warm components are still at their peak temperature, providing small side plates for guests but encouraging them to pick directly from the board.
How to make refreshing salad
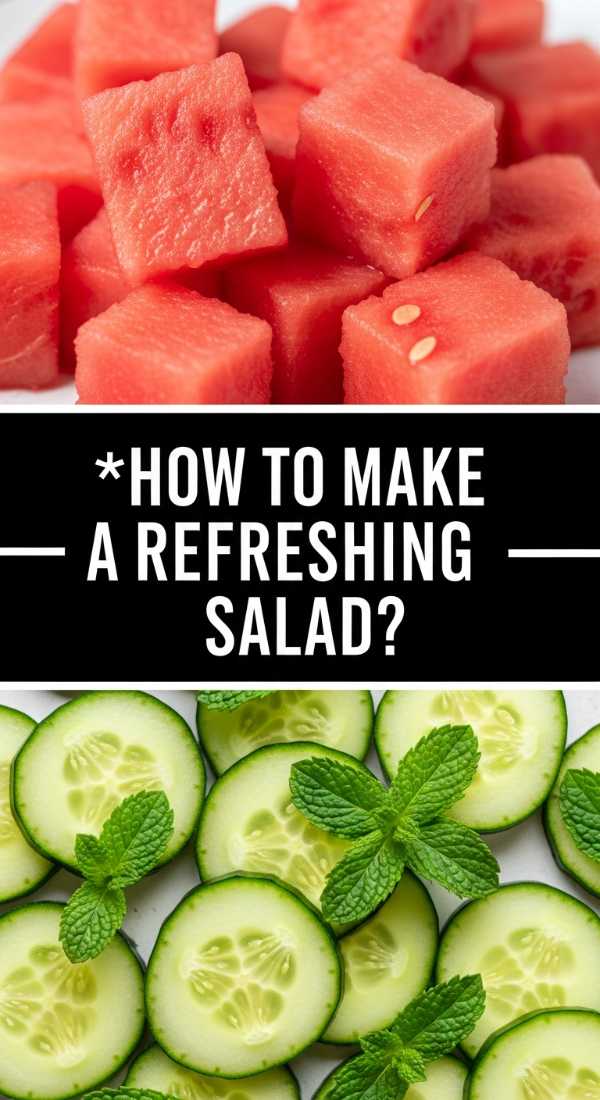
Why we love this
When the sun is at its peak, this refreshing watermelon and mint salad acts as a literal coolant for the palate, offering an explosion of hydrating sweetness and citrus zing. The texture is incredibly crisp, with the juiciness of the fruit perfectly complemented by the crunch of cucumber and the herbaceous finish of fresh mint. It’s a clean, bright, and invigorating addition to any food board that cleanses the palate between savory bites and keeps everyone feeling energized and refreshed.
Ingredients
- 4 cups cubed seedless watermelon
- 1 English cucumber, sliced into half-moons
- 1/4 cup fresh mint leaves, torn
- Juice of 2 limes
- 1 tablespoon honey or agave nectar
- A pinch of flakey sea salt
How to make it
- Cube the watermelon into uniform 1-inch squares, ensuring you remove any stray seeds; for the best texture, use a watermelon that has been chilled in the refrigerator for at least 4 hours.
- Slice the cucumber thinly; keeping the skin on adds a beautiful green border and extra nutritional crunch to the dish.
- In a small jar, whisk together the lime juice and honey until the honey is completely dissolved, creating a bright and sticky dressing.
- Combine the watermelon and cucumber in a large chilled glass bowl, tossing gently so as not to bruise the delicate fruit.
- Drizzle the lime dressing over the mixture and toss again to ensure every piece is glistening.
- Scatter the torn mint leaves over the top just before serving; tearing the mint by hand instead of chopping it prevents the edges from turning black and releases more aromatic oils.
- Finish with a light sprinkle of flakey sea salt; the salt acts as a flavor enhancer that makes the watermelon taste even sweeter and more ‘watermelon-y.’
Conclusion: The Art of the Simple Board
Creating the perfect food board is less about culinary perfection and more about the curation of textures, temperatures, and colors. By integrating these ten diverse recipes—from the sweet, floral notes of dandelion jelly to the savory comfort of stuffed shells—you provide a journey for the senses that no single-plate appetizer could ever match. This year, let your table be a place of abundance and ease, where the food is the bridge that brings everyone closer together.
Frequently Asked Questions
Below are some common questions about building the ultimate food board to help you host like a pro.